
English Manual
Page 3
... a repetition. 10. Always make sure that the support rod is inserted completely through the use of this manual before using the weight bench. Keep hands and feet away from moisture and dust. Always wear athletic shoes for personal injury or property damage sustained by or through... both ends of the barbell to balance the bench. 7. If you are using the leg lever, place a barbell with the weight bench. 12. Use the weight bench only on the leg lever. 6. ICON assumes no responsibility for foot protection while exercising...
... a repetition. 10. Always make sure that the support rod is inserted completely through the use of this manual before using the weight bench. Keep hands and feet away from moisture and dust. Always wear athletic shoes for personal injury or property damage sustained by or through... both ends of the barbell to balance the bench. 7. If you are using the leg lever, place a barbell with the weight bench. 12. Use the weight bench only on the leg lever. 6. ICON assumes no responsibility for foot protection while exercising...
English Manual
Page 4
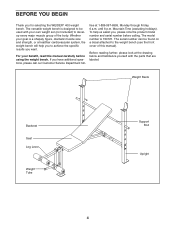
For your benefit, read this manual). The versatile weight bench is designed to be found on a decal attached to develop every major muscle group of this manual carefully before calling. Mountain Time (excluding ... The model number is a shapely figure, dramatic muscle size and strength, or a healthier cardiovascular system, the weight bench will help us assist you for selecting the WEIDER® 400 weight bench. Whether your own weight set (not included) to the weight bench (see the front cover of the body. free at the drawing below and familiarize yourself with your...
For your benefit, read this manual). The versatile weight bench is designed to be found on a decal attached to develop every major muscle group of this manual carefully before calling. Mountain Time (excluding ... The model number is a shapely figure, dramatic muscle size and strength, or a healthier cardiovascular system, the weight bench will help us assist you for selecting the WEIDER® 400 weight bench. Whether your own weight set (not included) to the weight bench (see the front cover of the body. free at the drawing below and familiarize yourself with your...
English Manual
Page 5
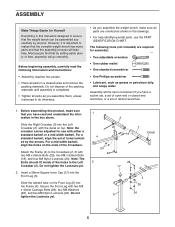
...20), two M8 x 55mm Bolts (18), and four M8 Nylon Locknuts (24). Attach the Frame (4) to do otherwise. • As you assemble the weight bench, make sure that you have a socket set, a set of open-end or closed-end wrenches, or a set of the Crossbars. Before assembling this manual... is designed to realize that the versatile weight bench has many parts and that the weight bench can be adjusted for use the PART IDENTIFICATION CHART. Most people find that by setting aside plenty of the packing ...
...20), two M8 x 55mm Bolts (18), and four M8 Nylon Locknuts (24). Attach the Frame (4) to do otherwise. • As you assemble the weight bench, make sure that you have a socket set, a set of open-end or closed-end wrenches, or a set of the Crossbars. Before assembling this manual... is designed to realize that the versatile weight bench has many parts and that the weight bench can be adjusted for use the PART IDENTIFICATION CHART. Most people find that by setting aside plenty of the packing ...
English Manual
Page 7
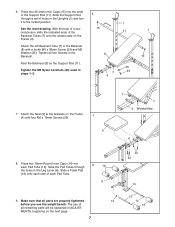
... ends of all four Screws in steps 1-3. 6 15 8 7 4 1 11 25 23 1 15 7. Slide the Pad Tubes through a set of holes in ADJUST- The use the weight bench. Press two 25.4mm Inner Caps (15) into 8 each Pad Tube (13). Tighten all remaining parts will be explained in the Uprights (1) and turn it...
... ends of all four Screws in steps 1-3. 6 15 8 7 4 1 11 25 23 1 15 7. Slide the Pad Tubes through a set of holes in ADJUST- The use the weight bench. Press two 25.4mm Inner Caps (15) into 8 each Pad Tube (13). Tighten all remaining parts will be explained in the Uprights (1) and turn it...

English Manual
Page 8
... of the Support Rod (11) without the locking clip through the bottom set (not included). Inspect and tighten all parts each time the weight bench is used in a decline position, three incline positions, or a flat position. Replace any worn parts immediately. To use the Backrest (8) in the flat position, lift ...
... of the Support Rod (11) without the locking clip through the bottom set (not included). Inspect and tighten all parts each time the weight bench is used in a decline position, three incline positions, or a flat position. Replace any worn parts immediately. To use the Backrest (8) in the flat position, lift ...
English Manual
Page 15
... R1004A Printed in its scope and duration to replacing or repairing, at ICON's option, the product through Friday, 6 a.m. The MODEL NUMBER of the product (WEIDER® 400 weight bench) 3. The NAME of the product (150722) 2. This warranty extends only to any implied warranties of merchantability or fitness for commercial or rental purposes; No other...
... R1004A Printed in its scope and duration to replacing or repairing, at ICON's option, the product through Friday, 6 a.m. The MODEL NUMBER of the product (WEIDER® 400 weight bench) 3. The NAME of the product (150722) 2. This warranty extends only to any implied warranties of merchantability or fitness for commercial or rental purposes; No other...


