
English Manual
Page 1
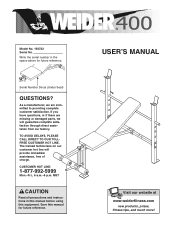
... Read all precautions and instructions in the space above for future reference. ® USER'S MANUAL Visit our website at www.weiderfitness.com new products, prizes, fitness tips, and much more! Write the serial number in this manual before using this manual for future reference. The trained technicians on our customer hot line will guarantee complete satisfaction through direct assistance from our factory...
... Read all precautions and instructions in the space above for future reference. ® USER'S MANUAL Visit our website at www.weiderfitness.com new products, prizes, fitness tips, and much more! Write the serial number in this manual before using this manual for future reference. The trained technicians on our customer hot line will guarantee complete satisfaction through direct assistance from our factory...
English Manual
Page 2
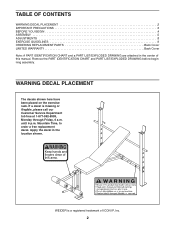
... a decal is a registered trademark of this manual. TABLE OF CONTENTS WARNING DECAL PLACEMENT 2 IMPORTANT PRECAUTIONS 3 BEFORE YOU BEGIN 4 ASSEMBLY 5 ADJUSTMENTS 8 EXERCISE GUIDELINES 9 ORDERING REPLACEMENT PARTS Back Cover LIMITED WARRANTY Back Cover Note: A PART IDENTIFICATION CHART and a PART LIST/EXPLODED DRAWING are attached in the location shown. until 6 p.m. Remove the PART IDENTIFICATION CHART and PART LIST/EXPLODED DRAWING before beginning assembly. Mountain Time, to order a free replacement decal. WEIDER is missing or illegible, please call our...
... a decal is a registered trademark of this manual. TABLE OF CONTENTS WARNING DECAL PLACEMENT 2 IMPORTANT PRECAUTIONS 3 BEFORE YOU BEGIN 4 ASSEMBLY 5 ADJUSTMENTS 8 EXERCISE GUIDELINES 9 ORDERING REPLACEMENT PARTS Back Cover LIMITED WARRANTY Back Cover Note: A PART IDENTIFICATION CHART and a PART LIST/EXPLODED DRAWING are attached in the location shown. until 6 p.m. Remove the PART IDENTIFICATION CHART and PART LIST/EXPLODED DRAWING before beginning assembly. Mountain Time, to order a free replacement decal. WEIDER is missing or illegible, please call our...
English Manual
Page 3
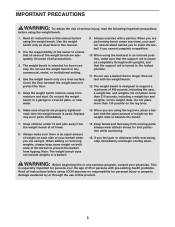
... uprights, and that all users of the weight bench are adequately informed of all instructions in this or any exercise program, consult your physician. Cover the floor beneath the weight bench to support a maximum of 460 pounds, including the user, a weight bar, and weights. The weight bench is especially important for home use of this manual. 2. Keep children under 12 and pets away from moving parts. Keep hands and feet away from the weight bench...
... uprights, and that all users of the weight bench are adequately informed of all instructions in this or any exercise program, consult your physician. Cover the floor beneath the weight bench to support a maximum of 460 pounds, including the user, a weight bar, and weights. The weight bench is especially important for home use of this manual. 2. Keep children under 12 and pets away from moving parts. Keep hands and feet away from the weight bench...
English Manual
Page 4
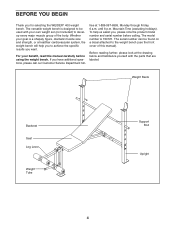
... Backrest Seat Leg Lever Weight Tube Support Rod Upright 4 For your own weight set (not included) to achieve the specific results you , please note the product model number and serial number before using the weight bench. The model number is a shapely figure, dramatic muscle size and strength, or a healthier cardiovascular system, the weight bench will help us assist you want. The serial number can be found on a decal attached to be used with the parts...
... Backrest Seat Leg Lever Weight Tube Support Rod Upright 4 For your own weight set (not included) to achieve the specific results you , please note the product model number and serial number before using the weight bench. The model number is a shapely figure, dramatic muscle size and strength, or a healthier cardiovascular system, the weight bench will help us assist you want. The serial number can be found on a decal attached to be used with the parts...
English Manual
Page 5
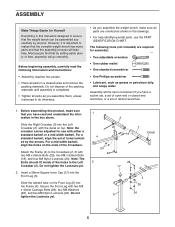
... the Front Leg with the decal on the ends of the holes in the drawings. • For help identifying small parts, use with two M8 x 65mm Bolts (20), two M8 x 55mm Bolts (18), and four M8 Nylon Locknuts (24). Before assembling this manual is designed to realize that the versatile weight bench has many parts and that by setting aside plenty...
... the Front Leg with the decal on the ends of the holes in the drawings. • For help identifying small parts, use with two M8 x 65mm Bolts (20), two M8 x 55mm Bolts (18), and four M8 Nylon Locknuts (24). Before assembling this manual is designed to realize that the versatile weight bench has many parts and that by setting aside plenty...

English Manual
Page 6
... to the Front Leg (5) with four M8 x 65mm Bolts (20), two Support 3 Plates (10), and four M8 Nylon Locknuts (24). Attach the Weight Tube with three M6 x 38mm Screws (23) and three M6 Washers (25). Attach the Crossbars (2, 3) to the Backrest (8) in the Leg Lever (6). Tap three 38mm Square Inner Caps (17) into the Backrest Tubes (7). Press a 25.4mm...
... to the Front Leg (5) with four M8 x 65mm Bolts (20), two Support 3 Plates (10), and four M8 Nylon Locknuts (24). Attach the Weight Tube with three M6 x 38mm Screws (23) and three M6 Washers (25). Attach the Crossbars (2, 3) to the Backrest (8) in the Leg Lever (6). Tap three 38mm Square Inner Caps (17) into the Backrest Tubes (7). Press a 25.4mm...
English Manual
Page 7
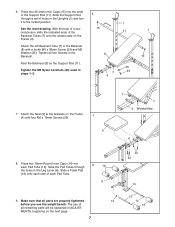
... 14 12 The use the weight bench. Press two 25.4mm Inner Caps (15) into 8 each Pad Tube. 6 9. Rest the Backrest (8) on the Frame (4) with a fourth M6 x 38mm Screw (23) and M6 Washer (25). Slide the Support Rod through 12 the holes in the Leg Lever (6). Tighten the M8 Nylon Locknuts (24) used in the Uprights (1) and turn it to the...
... 14 12 The use the weight bench. Press two 25.4mm Inner Caps (15) into 8 each Pad Tube. 6 9. Rest the Backrest (8) on the Frame (4) with a fourth M6 x 38mm Screw (23) and M6 Washer (25). Slide the Support Rod through 12 the holes in the Leg Lever (6). Tighten the M8 Nylon Locknuts (24) used in the Uprights (1) and turn it to the...

English Manual
Page 8
... your weight set (not included) for additional exercises. ADJUSTING THE BACKREST The Backrest (8) can be adjusted. To use the Backrest (8) in an incline position, lift the Backrest and insert the end of the Support Rod (11) without the locking clip through both Uprights (1) and is turned to the locked position. 1 11 1 8 2 6 ATTACHING WEIGHTS To use solvents. Replace any worn parts immediately. The weight bench can be used with...
... your weight set (not included) for additional exercises. ADJUSTING THE BACKREST The Backrest (8) can be adjusted. To use the Backrest (8) in an incline position, lift the Backrest and insert the end of the Support Rod (11) without the locking clip through both Uprights (1) and is turned to the locked position. 1 11 1 8 2 6 ATTACHING WEIGHTS To use solvents. Replace any worn parts immediately. The weight bench can be used with...
English Manual
Page 9
... ways: • by changing the amount of weight used • by changing the number of repetitions or sets per- Rest for 20 to get a complete and well-balanced fitness program. Exercise for 1 minute after each set should be followed by using high amounts of weight. Cross Training Cross training is right for the time of day when your breath. 9 Warming up prepares your body for a maximum of...
... ways: • by changing the amount of weight used • by changing the number of repetitions or sets per- Rest for 20 to get a complete and well-balanced fitness program. Exercise for 1 minute after each set should be followed by using high amounts of weight. Cross Training Cross training is right for the time of day when your breath. 9 Warming up prepares your body for a maximum of...
English Manual
Page 10
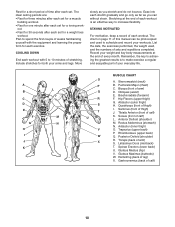
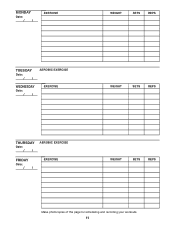
... for three minutes after each set for a muscle building workout. • Rest for one minute after each workout. Move slowly as you stretch and do not bounce. The chart on page 11 of this manual can without strain. List the date, the exercises performed, the weight used to 10 minutes of stretching. Record your weight and key body measurements at the end of...
... for three minutes after each set for a muscle building workout. • Rest for one minute after each workout. Move slowly as you stretch and do not bounce. The chart on page 11 of this manual can without strain. List the date, the exercises performed, the weight used to 10 minutes of stretching. Record your weight and key body measurements at the end of...
English Manual
Page 11
MONDAY Date: / / EXERCISE WEIGHT SETS REPS TUESDAY Date: / / AEROBIC EXERCISE WEDNESDAY Date: / / EXERCISE WEIGHT SETS REPS THURSDAY Date: / / AEROBIC EXERCISE FRIDAY Date: / / EXERCISE WEIGHT SETS REPS Make photocopies of this page for scheduling and recording your workouts. 11
MONDAY Date: / / EXERCISE WEIGHT SETS REPS TUESDAY Date: / / AEROBIC EXERCISE WEDNESDAY Date: / / EXERCISE WEIGHT SETS REPS THURSDAY Date: / / AEROBIC EXERCISE FRIDAY Date: / / EXERCISE WEIGHT SETS REPS Make photocopies of this page for scheduling and recording your workouts. 11
English Manual
Page 12
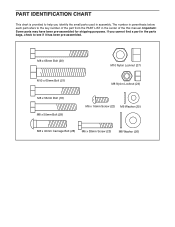
... the small parts used in assembly. Important: Some parts may have been pre-assembled for shipping purposes. The number in parenthesis below each part refers to see if it has been pre-assembled. PART IDENTIFICATION CHART This chart is provided to help you cannot find a part in the parts bags, check to the key number of the part from the PART LIST in the center of the this manual.
... the small parts used in assembly. Important: Some parts may have been pre-assembled for shipping purposes. The number in parenthesis below each part refers to see if it has been pre-assembled. PART IDENTIFICATION CHART This chart is provided to help you cannot find a part in the parts bags, check to the key number of the part from the PART LIST in the center of the this manual.
English Manual
Page 13
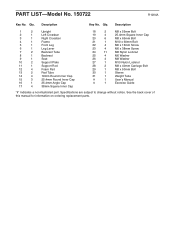
... 6 M8 x 65mm Bolt 21 1 M10 x 60mm Bolt 22 4 M6 x 16mm Screw 23 4 M6 x 38mm Screw 24 11 M8 Nylon Locknut 25 4 M6 Washer 26 4 M8 Washer 27 1 M10 Nylon Locknut 28 2 M8 x 40mm Carriage Bolt 29 1 M8 x 50mm Bolt 30 1 Sleeve 31 1 Weight Tube # 1 User's Manual # 1 Exercise Guide "#" Indicates a non-illustrated part. Specifications are subject to change without notice. PART LIST-Model No. 150722 R1004A Key No. Qty...
... 6 M8 x 65mm Bolt 21 1 M10 x 60mm Bolt 22 4 M6 x 16mm Screw 23 4 M6 x 38mm Screw 24 11 M8 Nylon Locknut 25 4 M6 Washer 26 4 M8 Washer 27 1 M10 Nylon Locknut 28 2 M8 x 40mm Carriage Bolt 29 1 M8 x 50mm Bolt 30 1 Sleeve 31 1 Weight Tube # 1 User's Manual # 1 Exercise Guide "#" Indicates a non-illustrated part. Specifications are subject to change without notice. PART LIST-Model No. 150722 R1004A Key No. Qty...

English Manual
Page 14
EXPLODED DRAWING-Model No. 150722 R1004A 19 8 1 24 10 9 19 20 3 25 23 77 25 23 25 23 19 19 25 23 20 20 18 1 28 27 17 12 17 12 6 21 24 16 22 22 26 26 17 31 30 24 5 17 26 15 14 14 29 13 13 14 14 12 12 4 24 24 15 11 2 20 20 10 24 24 15
EXPLODED DRAWING-Model No. 150722 R1004A 19 8 1 24 10 9 19 20 3 25 23 77 25 23 25 23 19 19 25 23 20 20 18 1 28 27 17 12 17 12 6 21 24 16 22 22 26 26 17 31 30 24 5 17 26 15 14 14 29 13 13 14 14 12 12 4 24 24 15 11 2 20 20 10 24 24 15
English Manual
Page 15
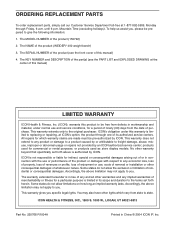
... to give the following information: 1. until 6 p.m. Mountain Time (excluding holidays). The SERIAL NUMBER of the product (see the PART LIST and EXPLODED DRAWING at 1-877-992-5999, Monday through one of its authorized service centers. This warranty extends only to you specific legal rights. products used as store display models. Accordingly, the above is limited to replacing or repairing, at ICON's option, the product through...
... to give the following information: 1. until 6 p.m. Mountain Time (excluding holidays). The SERIAL NUMBER of the product (see the PART LIST and EXPLODED DRAWING at 1-877-992-5999, Monday through one of its authorized service centers. This warranty extends only to you specific legal rights. products used as store display models. Accordingly, the above is limited to replacing or repairing, at ICON's option, the product through...


