
Weider Pro 9930 Support Question
Weider Pro 9930 Support Question
Find answers below for this question about Weider Pro 9930.Need a Weider Pro 9930 manual? We have 1 online manual for this item!
Question posted by bmcoyle on July 4th, 2018
Hi I’m Looking For The Cable Diagram For The Weider 9930. Not Any Assembly I
I need the cable guide for the Weider 9930. Not assembly instructions just the routing guide for the cable/ cables. Thank yo
Current Answers
Related Weider Pro 9930 Manual Pages
User Manual - Page 2

...l'Industrie, St-Jérôme, QC J7Y 4B8
WEIDER is a registered trademark of its authorized service centers ...
LIMITED WARRANTY 2 IMPORTANT PRECAUTIONS 3 BEFORE YOU BEGIN 4 ASSEMBLY 5 CABLE DIAGRAMS 19 ADJUSTMENT 21 TROUBLE-SHOOTING AND MAINTENANCE 22 WEIGHT RESISTANCE CHART... warranties and any implied warranties of merchantability or fitness for a particular purpose is limited in lieu ...
User Manual - Page 3

... pulleys.
7. Apply the new decal in a commercial, rental, or institutional setting.
4. WARNING: Before beginning this manual to ensure that the cables are on all instructions before using the weight system.
1. Replace any exercise program, consult your physician. Always wear athletic shoes for persons over the age of 35 or persons with great force...
User Manual - Page 4
...
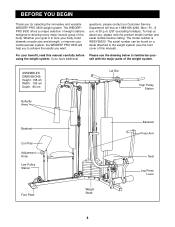
BEFORE YOU BEGIN
Thank you have additional
self with the major parts of the weight system.
using the weight system. If you for selecting the innovative and versatile WEIDER® PRO 9930 weight system. The ... use the drawing below to the weight system (see the front cover of the body. ASSEMBLED DIMENSIONS: Height: 198 cm Width: 165 cm Depth: 86 cm
Lat Bar
High Pulley ...
User Manual - Page 5
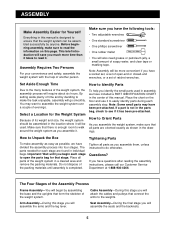
... . You may have questions after reading the assembly instructions, please call our Customer Service Department at 1-888-936-4266. Important: Wait until assembly is enough room to walk around the weight system as possible, we have included a PART IDENTIFICATION CHART in the center of ratchet wrenches.
Cable Assembly-During this stage you have a socket set...
User Manual - Page 6

Frame Assembly
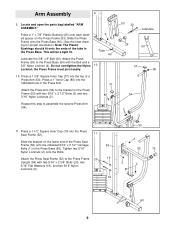
1
1. Press a 2" Square Inner Cap (38) into the Press Base (60). Press two 2" Square Inner Caps into the Butterfly ... Butterfly Upright (62) as shown. en two 5/16" Nylon Locknuts (2) onto the Bolts. Locate and open the parts bag labelled "FRAME ASSEMBLY." Place the bracket on the floor.
2 Attach the Press Base (60) to the Butterfly Base (61) with the bracket on this
side...
User Manual - Page 9
...with two 5/16" x 2 1/2" Bolts (3) and two 5/16" Nylon Locknuts (2).
37 80
Repeat this step to assemble the second Press Arm (54).
11. Do not overtighten the Nylon Locknut; Press a 1" Inner Cap (80) into...drawing for proper orientation.) Note: The Plastic Bushings should fit onto the ends of the tube in the Press Arm. This will be a tight fit. Attach the Press Seat Frame (52) to the bracket...
User Manual - Page 10
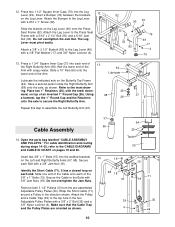
... a 3/8" Jam Nut (18). Open the parts bag labelled "CABLE ASSEMBLY AND PULLEYS." Make sure that the Cable Trap and the Pulley Plates are oriented as shown. Press two ...Cable onto each end of
13
the Right Butterfly Arm (68). Attach a 3/8" x 2 1/2" Eyebolt (83) to the CABLE DIAGRAMS and CABLE ID CHART on the Left and Right Butterfly Arms (67, 68).
For cable identification and routing...
User Manual - Page 11
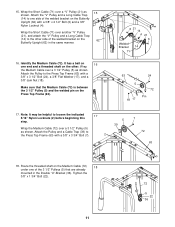
...) is between the 3 1/2" Pulley (5) and the welded pin on the
62
Butterfly Upright (62) in the Double "U"-Bracket (36). Route the threaded shaft on the Medium Cable (72)
18
under one of the welded bracket on the Press Top Frame (63).
6 21 14 4 21 6
Welded Bracket 14
71
63
24
5 18 17...
User Manual - Page 12
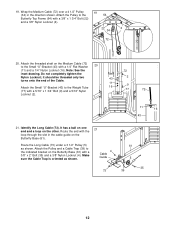
... a 5/16" x 1 3/4" Bolt (9) and a 5/16" Nylon
2 43
11 16
9
77
72
Locknut (2).
11
16
43
21.
Note: See the
72
inset drawing. Route the Long Cable (73) under a 3 1/2" Pulley (5) as shown.
4 Cable
Guide
73
61 5
35 39
12 Attach the Pulley to the Weight Tube (77) with a 3/8" x 1 3/4" Bolt (22)
and a 3/8" Nylon Locknut (4).
22
4
34
72...
User Manual - Page 13
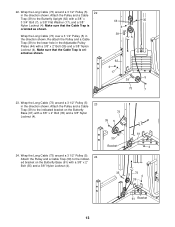
... Butterfly Upright (62) with a 3/8" x 2"
Bolt (35) and a 3/8" Nylon Locknut (4).
39 Bracket
61 4
35
5
73 4
39
61 Bracket
13 Wrap the Long Cable (73) around a 3 1/2" Pulley (5). Attach the Pulley and a Cable Trap (39) to the indicat-
24
ed bracket on the Butterfly
Base (61) with a 3/8" x 2" Bolt (35) and a 3/8" Nylon Locknut (4). Wrap the Long...
User Manual - Page 14
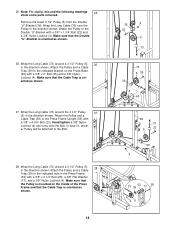
... 5 35 39
4 60
59
73
5
23
39 4
73
53 39
17
28
45 Attach the Pulley and a
Cable Trap (39) to the Press Frame Upright (59) with a 3/8" x 1 3/4" Bolt (22) and a 3/8" ...Nylon Locknut (4). Hand tighten a 3/8" Nylon
Locknut (4) two turns onto the Bolt. Attach the Pulley and a Cable
28
Trap (39) to the Double "U"-Bracket with
a 3/8" x 4 3/4" Bolt (23). Attach the Pulley to the ...
User Manual - Page 15

... (39) to the small tube on the inside of the 3/8" x 2 1/2" Eyebolt (83).
83
49
73
15 Make sure that the Cable Trap is oriented as shown.
5 23
53
4 73
32. Route the Long Cable (73) around a 3 1/2" Pulley (5) in 29 the direction shown. 29. Note: The small tube has three adjustment holes. Make sure...
User Manual - Page 16
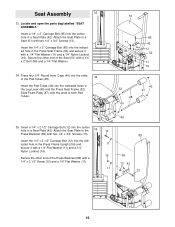
Seat Assembly
33
33.
Slide Foam Pads (47) onto the ends of the Press Backrest (89) with a 1/4" Flat Washer (11) and a 1/4"
Nylon Locknut (16).
16 Secure the ... (16).
Secure the other end of both Pad Tubes.
52
48 40 47 49
40 47
35. Locate and open the parts bag labelled "SEAT ASSEMBLY." Press four 3/4" Round Inner Caps (40) into the indi-
User Manual - Page 18
WEIDER PRO 9930
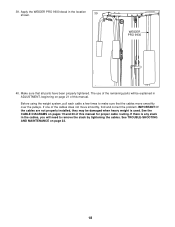
40. Make sure that the cables move smoothly, find and correct the problem.
See the CABLE DIAGRAMS on page 21 of the remaining parts will need to make sure that all parts have been properly tightened. The use of this manual for proper cable routing.
If one of this manual. Before using the weight system, pull each...
User Manual - Page 19
.... 11 in.)
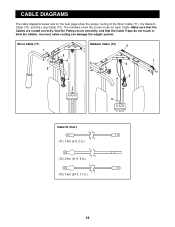
19 The numbers show the proper routing of the Short Cable (71), the Medium Cable (72), and the Long Cable (73). Incorrect cable routing can damage the weight system. CABLE DIAGRAMS
The cable diagrams below and on the next page show the correct route for each Cable. Make sure that the Cables are routed correctly, that the Pulleys move smoothly, and that...
User Manual - Page 21

...73
55 57
69
70 45 75
21
The Nylon Strap (56) can be adjusted. ADJUSTMENT
The instructions below describe how each part of the weight system can be attached in the same manner. CHANGING THE...you insert the Weight Pin as far as an exercise is in the correct starting position for the exercise to be attached between the Lat Bar and the Long Cable so the Lat Bar will go. Adjust the ...
User Manual - Page 22
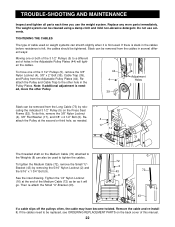
...16" x 1 3/4" Bolt (9). Note: If additional adjustment is needed . To tighten the Medium Cable (72), remove the Small "U"Bracket (43) by relocating the ...Cable (72) as far as needed , move one of cable used to the other Pulley.
44 4 39
Adjustment Holes
5
Slack can stretch slightly when it .
If the cables need to be replaced, see ORDERING REPLACEMENT PARTS on the Medium Cable...
User Manual - Page 23
...-Jérôme, Québec Canada, J7Y 4B8
23
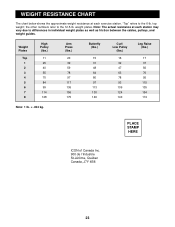
weight plates. WEIGHT RESISTANCE CHART
The chart below shows the approximate weight resistance at each exercise station. "Top" refers to the 12.5-lb.
top weight; Note: The actual resistance at each station may vary due to differences in individual weight plates...
User Manual - Page 24
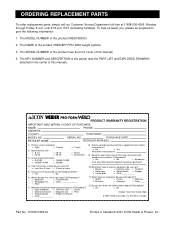
...the product (WEIDER® PRO 9930 weight system)
3.
PURCHASE DATE:
RETAILER NAME:
RETAILER ADDRESS:
1) Primary user(s) of product:
o Male
o Female
o Family
2) Age of magazines do you read regularly?
o Bicycle
o Exercise cycle o ...and EXPLODED DRAWING attached in Canada © 2001 ICON Health & Fitness, Inc.
o Yes
o No
THANK YOU FOR YOUR TIME © 2001 ICON of the part(s) ...
User Manual - Page 25
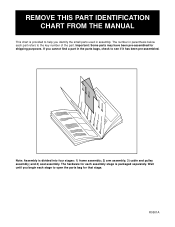
... below each part refers to see if it has been pre-assembled. and 4) seat assembly. R0501A If you identify the small parts used in the parts...may have been pre-assembled for each stage to help you cannot find a part in assembly. Wait until you begin each assembly stage is divided into four stages: 1) frame assembly; 2) arm assembly; 3) cable and pulley assembly; The hardware for shipping...
Similar Questions

Cables Are Not Hooked Up. Assembly Instructions To Hook Those Up
(Posted by Anonymous-172429 1 year ago)

Where Can I Find A Short Cable For A Weider Pro 9930?
where can I find a short cable for a weider pro 9930?
where can I find a short cable for a weider pro 9930?
(Posted by pastorglb2 4 years ago)

Diagram For Different Exercises
can you please send me a diagram of the 20 or so different exercises as i have no printer to my emai...
can you please send me a diagram of the 20 or so different exercises as i have no printer to my emai...
(Posted by e1943mc 7 years ago)


Can You Show Me Page 31 Of The Weider Pro 9930 Manual
can you show me page 31 of the weider pro 9930 manual
can you show me page 31 of the weider pro 9930 manual
(Posted by rdnehus 10 years ago)