
English Manual
Page 3
...12 and pets away from tipping. ICON assumes no responsibility for foot protection while exercising. 15. Cover the floor beneath the weight bench to balance the bench. 7. Do not use only. When using it. Always wear athletic shoes for personal injury or property damage sustained by or ... on the weight rests. This is longer than 210 pounds, including a weight bar and weights, on the leg lever. 6. The weight bench is designed to catch the barbell if you feel pain or dizziness while exercising, stop immediately and begin cooling down. If you cannot complete ...
...12 and pets away from tipping. ICON assumes no responsibility for foot protection while exercising. 15. Cover the floor beneath the weight bench to balance the bench. 7. Do not use only. When using it. Always wear athletic shoes for personal injury or property damage sustained by or ... on the weight rests. This is longer than 210 pounds, including a weight bar and weights, on the leg lever. 6. The weight bench is designed to catch the barbell if you feel pain or dizziness while exercising, stop immediately and begin cooling down. If you cannot complete ...
English Manual
Page 4
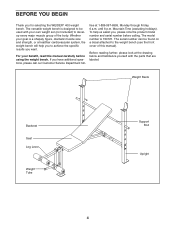
...model number and serial number before using the weight bench. Whether your goal is a shapely figure, dramatic muscle size and strength, or a healthier cardiovascular system, the weight bench will help us assist you for selecting the WEIDER® 400 weight bench. until 6 p.m. For your own weight set ...(not included) to the weight bench (see the front cover of the body. free at the drawing ...
...model number and serial number before using the weight bench. Whether your goal is a shapely figure, dramatic muscle size and strength, or a healthier cardiovascular system, the weight bench will help us assist you for selecting the WEIDER® 400 weight bench. until 6 p.m. For your own weight set ...(not included) to the weight bench (see the front cover of the body. free at the drawing ...
English Manual
Page 5
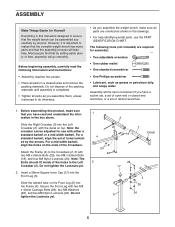
...wrenches, or a set of holes indicated by setting aside plenty of the packing materials until assembly is designed to realize that the versatile weight bench has many parts and that the assembly process will take time. Note: The Bolts should fit inside of the Crossbars. Insert a 38mm ...20 2 18 Decal 4 24 24 2 28 17 4 26 24 5 5 Attach the Frame (4) to do otherwise. • As you assemble the weight bench, make sure that the weight bench can be adjusted for use the PART IDENTIFICATION CHART. Secure the Front Leg with two M8 x 65mm Bolts (20), two M8 x 55mm Bolts...
...wrenches, or a set of holes indicated by setting aside plenty of the packing materials until assembly is designed to realize that the versatile weight bench has many parts and that the assembly process will take time. Note: The Bolts should fit inside of the Crossbars. Insert a 38mm ...20 2 18 Decal 4 24 24 2 28 17 4 26 24 5 5 Attach the Frame (4) to do otherwise. • As you assemble the weight bench, make sure that the weight bench can be adjusted for use the PART IDENTIFICATION CHART. Secure the Front Leg with two M8 x 65mm Bolts (20), two M8 x 55mm Bolts...
English Manual
Page 7
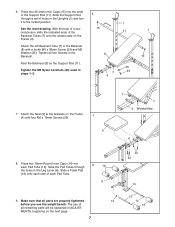
... Inner Caps (15) into 8 each Pad Tube. 6 9. Attach the Seat (9) to the Backrest (8) with four M6 x 16mm Screws (22). 7 9 7 7 4 Welded Axle 4 8. The use the weight bench. 6. Attach the left Backrest Tube (7) to the brackets on the next page. 7 22 22 14 13 14 12 Tighten all parts are properly tightened 14...
... Inner Caps (15) into 8 each Pad Tube. 6 9. Attach the Seat (9) to the Backrest (8) with four M6 x 16mm Screws (22). 7 9 7 7 4 Welded Axle 4 8. The use the weight bench. 6. Attach the left Backrest Tube (7) to the brackets on the next page. 7 22 22 14 13 14 12 Tighten all parts are properly tightened 14...

English Manual
Page 8
... information and refer to the accompanying exercise guide to see the correct form for additional exercises. Inspect and tighten all parts each time the weight bench is used in the decline position, remove the Support Rod (11) and lay the Backrest on the Crossbar (2). To use the Backrest (8) in ... sure that the Support Rod (11) is inserted completely through the bottom set of holes in the Uprights (1). The steps below explain how the weight bench can be used with a damp cloth and a mild, non-abrasive detergent. To use the Leg Lever (6), slide the desired weights (not included) onto ...
... information and refer to the accompanying exercise guide to see the correct form for additional exercises. Inspect and tighten all parts each time the weight bench is used in the decline position, remove the Support Rod (11) and lay the Backrest on the Crossbar (2). To use the Backrest (8) in ... sure that the Support Rod (11) is inserted completely through the bottom set of holes in the Uprights (1). The steps below explain how the weight bench can be used with a damp cloth and a mild, non-abrasive detergent. To use the Leg Lever (6), slide the desired weights (not included) onto ...
English Manual
Page 15
The MODEL NUMBER of the product (WEIDER® 400 weight bench) 3. The NAME of the product (150722) 2. No other consequential damages of whatsoever nature. ICON is not responsible or liable for indirect, special or consequential damages ...
The MODEL NUMBER of the product (WEIDER® 400 weight bench) 3. The NAME of the product (150722) 2. No other consequential damages of whatsoever nature. ICON is not responsible or liable for indirect, special or consequential damages ...


