User Manual
Page 8
... mouse 10 Special keyboard buttons (front view 10 Overview of the wired mouse (front view 12 Indicator lights 12 Setting up the PC 13 Preparing to setup your PC 13 Connecting the power 14 Connecting the wired keyboard and mouse 15 Customizing the mouse settings 15 Turning on the PC 16 Turning off the PC 16 Configuring the display 17 Brightness control 17 Using the PC ...18 Connecting to the Internet 18 Connecting to a wired network 18 ViewSonic VPC101...
... mouse 10 Special keyboard buttons (front view 10 Overview of the wired mouse (front view 12 Indicator lights 12 Setting up the PC 13 Preparing to setup your PC 13 Connecting the power 14 Connecting the wired keyboard and mouse 15 Customizing the mouse settings 15 Turning on the PC 16 Turning off the PC 16 Configuring the display 17 Brightness control 17 Using the PC ...18 Connecting to the Internet 18 Connecting to a wired network 18 ViewSonic VPC101...

User Manual
Page 9
... Devices 27 Connecting USB devices 27 Removing USB devices 28 Cleaning and care 29 Screen and computer 29 Cleaning the screen and computer 29 Storing your computer 30 CDs and DVDs (ViewSonic Wizard CD and System Recovery and Driver Disk 30 Cleaning the discs 30 Keyboard and mouse 31 Cleaning your keyboard and mouse 31 BIOS Setup Utility 32 When to Use the BIOS Setup Utility 32 Standard CMOS Features menu 34 Advanced BIOS Features menu 34 Load Optimized Defaults menu 35 Set Password menu...
... Devices 27 Connecting USB devices 27 Removing USB devices 28 Cleaning and care 29 Screen and computer 29 Cleaning the screen and computer 29 Storing your computer 30 CDs and DVDs (ViewSonic Wizard CD and System Recovery and Driver Disk 30 Cleaning the discs 30 Keyboard and mouse 31 Cleaning your keyboard and mouse 31 BIOS Setup Utility 32 When to Use the BIOS Setup Utility 32 Standard CMOS Features menu 34 Advanced BIOS Features menu 34 Load Optimized Defaults menu 35 Set Password menu...
User Manual
Page 11
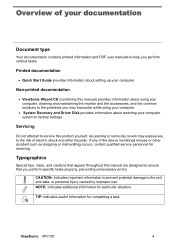
... documentation contains printed information and PDF user manuals to help you perform specific tasks properly, preventing unnecessary errors. ViewSonic VPC101 4 Typographics Special tips, notes, and cautions that appear throughout this manual) provides information about using your computer. • System Recovery and Driver Disk provides information about setting up your computer system to factory settings. Printed documentation • Quick Start Guide provides information about restoring your computer. Overview of...
... documentation contains printed information and PDF user manuals to help you perform specific tasks properly, preventing unnecessary errors. ViewSonic VPC101 4 Typographics Special tips, notes, and cautions that appear throughout this manual) provides information about using your computer. • System Recovery and Driver Disk provides information about setting up your computer system to factory settings. Printed documentation • Quick Start Guide provides information about restoring your computer. Overview of...

User Manual
Page 15
... slot to stand upright. 3 15-pin D-Sub input jack. ViewSonic VPC101 8 Use an Ethernet (RJ45) cable to connect your microphone to this port to an audio in jack on external audio equipment for audio sound. 6 Microphone input jack. Insert the USB plugs into the USB ports to connect your PC when watching videos and DVDs, listening to connect other devices with a network or broadband device. 8 USB ports. Getting to know the PC Keep the vents clean and free...
... slot to stand upright. 3 15-pin D-Sub input jack. ViewSonic VPC101 8 Use an Ethernet (RJ45) cable to connect your microphone to this port to an audio in jack on external audio equipment for audio sound. 6 Microphone input jack. Insert the USB plugs into the USB ports to connect your PC when watching videos and DVDs, listening to connect other devices with a network or broadband device. 8 USB ports. Getting to know the PC Keep the vents clean and free...
User Manual
Page 21
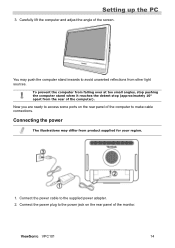
... to make cable connections. Connect the power cable to the power jack on the rear panel of the monitor. ViewSonic VPC101 14 You may differ from other light sources. Connect the power plug to the supplied power adapter. 2. To prevent the computer from falling over at too small angles, stop pushing the computer stand when it reaches the detent stop (approximately 10° apart from the rear of the screen. Setting up...
... to make cable connections. Connect the power cable to the power jack on the rear panel of the monitor. ViewSonic VPC101 14 You may differ from other light sources. Connect the power plug to the supplied power adapter. 2. To prevent the computer from falling over at too small angles, stop pushing the computer stand when it reaches the detent stop (approximately 10° apart from the rear of the screen. Setting up...
User Manual
Page 22
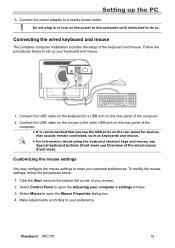
...'s settings window. 3. Make adjustments according to do so. Customizing the mouse settings You may configure the mouse settings to open the Mouse Properties dialog box. 4. ViewSonic VPC101 15 Setting up your screen. 2. Connect the power adapter to the other USB port on the rear panel of the computer. • It is recommended that you use the USB ports on the rear panel for devices that usually remain connected, such as keyboards and mouse. • For information about using the keyboard shortcut keys and mouse...
...'s settings window. 3. Make adjustments according to do so. Customizing the mouse settings You may configure the mouse settings to open the Mouse Properties dialog box. 4. ViewSonic VPC101 15 Setting up your screen. 2. Connect the power adapter to the other USB port on the rear panel of the computer. • It is recommended that you use the USB ports on the rear panel for devices that usually remain connected, such as keyboards and mouse. • For information about using the keyboard shortcut keys and mouse...
User Manual
Page 23
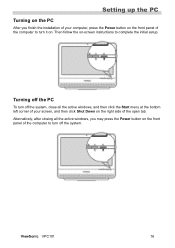
... closing all the active windows, and then click the Start menu at the bottom left corner of your computer, press the Power button on the front panel of the open tab. Then follow the on-screen instructions to complete the initial setup. Setting up the PC Turning on the PC After you may press the Power button on the front panel of the computer to...
... closing all the active windows, and then click the Start menu at the bottom left corner of your computer, press the Power button on the front panel of the open tab. Then follow the on-screen instructions to complete the initial setup. Setting up the PC Turning on the PC After you may press the Power button on the front panel of the computer to...
User Manual
Page 25
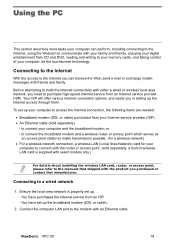
... to make transmission possible. (for a wireless network) • For a wireless network connection, a wireless LAN (Local Area Network) card for your computer to your memory cards, and taking control of your computer and the broadband modem, or - Connecting to purchase high-speed Internet service from your Internet service provider (ISP). • An Ethernet cable (sold separately; Before attempting to build the Internet connectivity with either a wired or wireless local area network, you can perform, including connecting to the Internet, using...
... to make transmission possible. (for a wireless network) • For a wireless network connection, a wireless LAN (Local Area Network) card for your computer to your memory cards, and taking control of your computer and the broadband modem, or - Connecting to purchase high-speed Internet service from your Internet service provider (ISP). • An Ethernet cable (sold separately; Before attempting to build the Internet connectivity with either a wired or wireless local area network, you can perform, including connecting to the Internet, using...

User Manual
Page 30
... files to create your disc. ViewSonic VPC101 23 Follow the steps in the "Inserting a disc" section. 2. For more instructions about the selected software, please see its manual or online help . 3. Removing a disc 1. Ensure the optical disc driver indicator is off. 2. Using the PC Reading a disc 1. When prompted, choose the desired program to play the inserted disc. Press the Eject button on the desktop, click "Start", select "All Programs...
... files to create your disc. ViewSonic VPC101 23 Follow the steps in the "Inserting a disc" section. 2. For more instructions about the selected software, please see its manual or online help . 3. Removing a disc 1. Ensure the optical disc driver indicator is off. 2. Using the PC Reading a disc 1. When prompted, choose the desired program to play the inserted disc. Press the Eject button on the desktop, click "Start", select "All Programs...
User Manual
Page 41
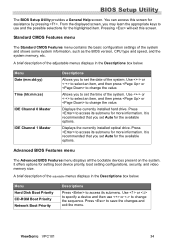
... the available options. Use or to select an item, and then press or to access its submenu for setting boot device priority, boot setting configurations, security, and video memory size. It offers options for more information. Menu Hard Disk Boot Priority CD-ROM Boot Priority Network Boot Priority Descriptions Press to change the value. BIOS Setup Utility The BIOS Setup Utility provides a General Help screen. Displays the currently installed optical drive. Press to save the changes and exit the menu. Press to access its submenu...
... the available options. Use or to select an item, and then press or to access its submenu for setting boot device priority, boot setting configurations, security, and video memory size. It offers options for more information. Menu Hard Disk Boot Priority CD-ROM Boot Priority Network Boot Priority Descriptions Press to change the value. BIOS Setup Utility The BIOS Setup Utility provides a General Help screen. Displays the currently installed optical drive. Press to save the changes and exit the menu. Press to access its submenu...
User Manual
Page 42
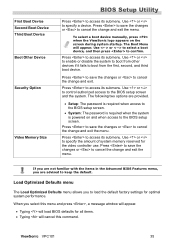
.... Use or to enable or disable the system to boot from other devices if it fails to the BIOS setup screen and the system. Press to save the changes or to cancel the change and exit the menu. When you to load the default factory settings for the video controller use. Use or to confirm. First Boot Device Second Boot Device Third Boot Device Boot Other Device Security Option Video Memory Size BIOS Setup Utility Press to access its submenu. Use or to select a boot device...
.... Use or to enable or disable the system to boot from other devices if it fails to the BIOS setup screen and the system. Press to save the changes or to cancel the change and exit the menu. When you to load the default factory settings for the video controller use. Use or to confirm. First Boot Device Second Boot Device Third Boot Device Boot Other Device Security Option Video Memory Size BIOS Setup Utility Press to access its submenu. Use or to select a boot device...

User Manual
Page 43
... menu allows you to exit BIOS setup without entering any changes and restart the system. • Typing will cancel this menu and press , the Enter Password window will be disabled. BIOS Setup Utility Set Password menu The Set Password menu allows you to set password, simply press . When the password is disabled, you access the BIOS setup main screen. • To disable or clear the set password in order to the BIOS setup main screen. You should further decide when the password is required both at boot...
... menu allows you to exit BIOS setup without entering any changes and restart the system. • Typing will cancel this menu and press , the Enter Password window will be disabled. BIOS Setup Utility Set Password menu The Set Password menu allows you to set password, simply press . When the password is disabled, you access the BIOS setup main screen. • To disable or clear the set password in order to the BIOS setup main screen. You should further decide when the password is required both at boot...

User Manual
Page 46
System Recovery 7. After restarting, Windows Setup Wizard appears to finish. 9. ViewSonic VPC101 39 Follow the on-screen instructions to restart your All-in -One PC. Click OK to complete setup and start using your All-in -One PC. Restarting may take several seconds to help you configure basic settings. After the system has been restored, the following window appears. 8.
System Recovery 7. After restarting, Windows Setup Wizard appears to finish. 9. ViewSonic VPC101 39 Follow the on-screen instructions to restart your All-in -One PC. Click OK to complete setup and start using your All-in -One PC. Restarting may take several seconds to help you configure basic settings. After the system has been restored, the following window appears. 8.

User Manual
Page 52
... computer is properly installed. - If the indicator lights up in amber, your monitor has entered Sleep mode. Press the Power button on the screen. • Certain operating system files may encounter while using the computer and provides troubleshooting steps. If so, you have to wake the system. - Check the connection between your computer, the power adapter, and the nearby outlet. - Check the supplied System Recovery and Driver Disk for details...
... computer is properly installed. - If the indicator lights up in amber, your monitor has entered Sleep mode. Press the Power button on the screen. • Certain operating system files may encounter while using the computer and provides troubleshooting steps. If so, you have to wake the system. - Check the connection between your computer, the power adapter, and the nearby outlet. - Check the supplied System Recovery and Driver Disk for details...
User Manual
Page 53
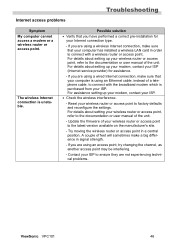
... latest version available on the manufacturer's site. - Internet access problems Troubleshooting Symptom My computer cannot access a modem or a wireless router or access point. For details about setting up your modem, contact your ISP (Internet service provider) for your wireless router or access point to factory defaults and reconfigure the settings. If you are not experiencing technical problems. ViewSonic VPC101 46 If you have performed a correct pre-installation for assistance. - Reset your Internet connection type. -
... latest version available on the manufacturer's site. - Internet access problems Troubleshooting Symptom My computer cannot access a modem or a wireless router or access point. For details about setting up your modem, contact your ISP (Internet service provider) for your wireless router or access point to factory defaults and reconfigure the settings. If you are not experiencing technical problems. ViewSonic VPC101 46 If you have performed a correct pre-installation for assistance. - Reset your Internet connection type. -
User Manual
Page 54
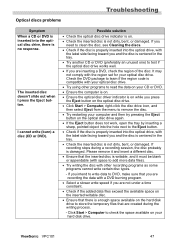
... Start > Computer, right-click the disc drive icon, and then select Eject from the menu to remove the disc. • Try restarting your optical disc drive. Optical discs problems Troubleshooting Symptom When a CD or DVD is inserted into the optical drive, with the label side facing toward you and the disc is centered in the tray. • Try another CD or DVD (preferably an unused one) to test if the optical disc drive works...
... Start > Computer, right-click the disc drive icon, and then select Eject from the menu to remove the disc. • Try restarting your optical disc drive. Optical discs problems Troubleshooting Symptom When a CD or DVD is inserted into the optical drive, with the label side facing toward you and the disc is centered in the tray. • Try another CD or DVD (preferably an unused one) to test if the optical disc drive works...
User Manual
Page 55
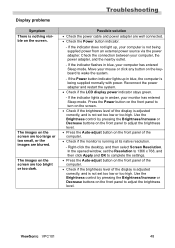
... being supplied normally with power. In the opened window, set too low or too high. Reconnect the power adapter and restart the system. • Check if the LCD display power indicator stays green. - ViewSonic VPC101 48 Possible solution • Check the power cable and power adapter are too bright or too dark. If the indicator does not light up, your mouse or click any button on the screen. •...
... being supplied normally with power. In the opened window, set too low or too high. Reconnect the power adapter and restart the system. • Check if the LCD display power indicator stays green. - ViewSonic VPC101 48 Possible solution • Check the power cable and power adapter are too bright or too dark. If the indicator does not light up, your mouse or click any button on the screen. •...
User Manual
Page 58
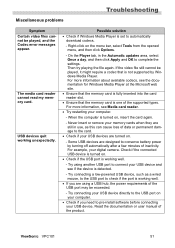
... set to the card. • Check if your computer. - ViewSonic VPC101 51 Possible solution • Check if Windows Media Player is detected. - If the video file still cannot be played, and the Codec error messages appear. Never insert or remove your digital camera. On the Player tab, in use, as a wired mouse, to the USB port to conserve battery power by Windows Media Player. Check if the connected USB device is working...
... set to the card. • Check if your computer. - ViewSonic VPC101 51 Possible solution • Check if Windows Media Player is detected. - If the video file still cannot be played, and the Codec error messages appear. Never insert or remove your digital camera. On the Player tab, in use, as a wired mouse, to the USB port to conserve battery power by Windows Media Player. Check if the connected USB device is working...

User Manual
Page 62
... of supplies or parts not meeting ViewSonic's specifications. g. For information about receiving service under warranty, contact ViewSonic Customer Support (Please refer to get service: 1. How long the warranty is displayed on the customer's original limited warranty. ViewSonic is responsible for the first consumer purchaser. Removal or installation of any data lost. d. Causes external to the product, such as "image burn-in" which the serial number has...
... of supplies or parts not meeting ViewSonic's specifications. g. For information about receiving service under warranty, contact ViewSonic Customer Support (Please refer to get service: 1. How long the warranty is displayed on the customer's original limited warranty. ViewSonic is responsible for the first consumer purchaser. Removal or installation of any data lost. d. Causes external to the product, such as "image burn-in" which the serial number has...
Brochure
Page 1
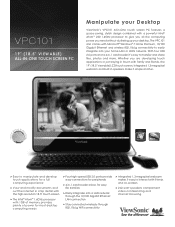
... memory provides plenty of power for most desktop computing needs > Four high-speed USB 2.0 ports provide easy connections for peripherals > 4-in-1 card reader allows for easy file transfers > Easily integrates into your desktop. With four USB 2.0 ports and a 4-in-1 card reader it easy to interact with a powerful Intel® Atom™ 230 1.6GHz processor to easily integrate into a LAN network through the 10/100 Gigabit Ethernet LAN connection > Stay connected wirelessly through 802.11b/g WiFi connectivity...
... memory provides plenty of power for most desktop computing needs > Four high-speed USB 2.0 ports provide easy connections for peripherals > 4-in-1 card reader allows for easy file transfers > Easily integrates into your desktop. With four USB 2.0 ports and a 4-in-1 card reader it easy to interact with a powerful Intel® Atom™ 230 1.6GHz processor to easily integrate into a LAN network through the 10/100 Gigabit Ethernet LAN connection > Stay connected wirelessly through 802.11b/g WiFi connectivity...


