
User Manual
Page 7
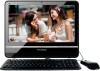
.../pdf/RecyclePlus.pdf 2. For Your Records Product Name: Model Number: Document Number: Serial Number: Purchase Date: VPC101 ViewSonic All-in-One PC VS12602 VPC101-1_UG_ENG Rev. 1B 09-21-09 Product disposal at : www.viewsonic.com. Product Registration To meet your future needs, and to receive any additional product information as it becomes available, please...
.../pdf/RecyclePlus.pdf 2. For Your Records Product Name: Model Number: Document Number: Serial Number: Purchase Date: VPC101 ViewSonic All-in-One PC VS12602 VPC101-1_UG_ENG Rev. 1B 09-21-09 Product disposal at : www.viewsonic.com. Product Registration To meet your future needs, and to receive any additional product information as it becomes available, please...
User Manual
Page 8
...Printed documentation 4 Non-printed documentation 4 Servicing...4 Typographics 4 Package contents 5 Standard items 5 Getting to know the PC 6 Touring the PC 6 Front view 6 Rear view 7 Right-side view 9 Left-side view 10 Wired keyboard and mouse 10 ...PC 13 Preparing to setup your PC 13 Connecting the power 14 Connecting the wired keyboard and mouse 15 Customizing the mouse settings 15 Turning on the PC 16 Turning off the PC 16 Configuring the display 17 Brightness control 17 Using the PC ...18 Connecting to the Internet 18 Connecting to a wired network 18 ViewSonic VPC101...
...Printed documentation 4 Non-printed documentation 4 Servicing...4 Typographics 4 Package contents 5 Standard items 5 Getting to know the PC 6 Touring the PC 6 Front view 6 Rear view 7 Right-side view 9 Left-side view 10 Wired keyboard and mouse 10 ...PC 13 Preparing to setup your PC 13 Connecting the power 14 Connecting the wired keyboard and mouse 15 Customizing the mouse settings 15 Turning on the PC 16 Turning off the PC 16 Configuring the display 17 Brightness control 17 Using the PC ...18 Connecting to the Internet 18 Connecting to a wired network 18 ViewSonic VPC101...
User Manual
Page 12
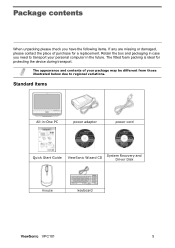
... items. If any are missing or damaged, please contact the place of your personal computer in -One PC power adapter power cord Quick Start Guide ViewSonic Wizard CD System Recovery and Driver Disk mouse keyboard ViewSonic VPC101 5 The appearance and contents of purchase for protecting the device during transport. The fitted foam packing is...
... items. If any are missing or damaged, please contact the place of your personal computer in -One PC power adapter power cord Quick Start Guide ViewSonic Wizard CD System Recovery and Driver Disk mouse keyboard ViewSonic VPC101 5 The appearance and contents of purchase for protecting the device during transport. The fitted foam packing is...
User Manual
Page 13
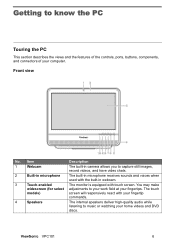
...your fingertip commands. 4 Speakers The internal speakers deliver high-quality audio while listening to your work field at your fingertips. Front view No. ViewSonic VPC101 6 Getting to capture still images, record videos, and have video chats. 2 Built-in microphone The built-in microphone receives sounds and ...voices when used with the built-in camera allows you to know the PC Touring the PC This section describes the views and the features of the controls, ports, buttons, components, and connectors of your computer.
...your fingertip commands. 4 Speakers The internal speakers deliver high-quality audio while listening to your work field at your fingertips. Front view No. ViewSonic VPC101 6 Getting to capture still images, record videos, and have video chats. 2 Built-in microphone The built-in microphone receives sounds and ...voices when used with the built-in camera allows you to know the PC Touring the PC This section describes the views and the features of the controls, ports, buttons, components, and connectors of your computer.

User Manual
Page 14
... switch. Hotkey for LCD Brightness control / Press to know the PC Power. 5 6 7 8 9 / 10 Rear view Getting to make decrease Brightness adjustment. Press to prevent the computer from overheating. Item 1 Vents Description The design of the vents is on your computer. ViewSonic VPC101 7 Press to select the input signal that may have connected to...
... switch. Hotkey for LCD Brightness control / Press to know the PC Power. 5 6 7 8 9 / 10 Rear view Getting to make decrease Brightness adjustment. Press to prevent the computer from overheating. Item 1 Vents Description The design of the vents is on your computer. ViewSonic VPC101 7 Press to select the input signal that may have connected to...

User Manual
Page 15
Getting to know the PC Keep the vents clean and free of dirt and dust, as blocking it may cause serious thermal problems. 2 Computer stand You... this jack to listen to music, and playing games. 5 Audio input jack. Insert the USB plugs into the USB ports to connect your PC when watching videos and DVDs, listening to the sound from your USB devices, such as notebooks, or game consoles, etc. 4 Audio/Headphone output.... 9 DC IN port. Connect the power cord to this jack to connect other devices with a network or broadband device. 8 USB ports. ViewSonic VPC101 8
Getting to know the PC Keep the vents clean and free of dirt and dust, as blocking it may cause serious thermal problems. 2 Computer stand You... this jack to listen to music, and playing games. 5 Audio input jack. Insert the USB plugs into the USB ports to connect your PC when watching videos and DVDs, listening to the sound from your USB devices, such as notebooks, or game consoles, etc. 4 Audio/Headphone output.... 9 DC IN port. Connect the power cord to this jack to connect other devices with a network or broadband device. 8 USB ports. ViewSonic VPC101 8

User Manual
Page 16
Press to know the PC No. ViewSonic VPC101 9 To record a CD or DVD, press the Eject button to insert a recordable CD or DVD into this drive and burn the data with CD/ DVD recording applications installed on your CD's collections, DVD movies, or access the data burned onto the discs. Item 1 CD/DVD drive 2 Eject button Description Press the Eject button and insert a CD/DVD into this drive to play your system. Right-side view Getting to open the disc tray.
Press to know the PC No. ViewSonic VPC101 9 To record a CD or DVD, press the Eject button to insert a recordable CD or DVD into this drive and burn the data with CD/ DVD recording applications installed on your CD's collections, DVD movies, or access the data burned onto the discs. Item 1 CD/DVD drive 2 Eject button Description Press the Eject button and insert a CD/DVD into this drive to play your system. Right-side view Getting to open the disc tray.
User Manual
Page 17
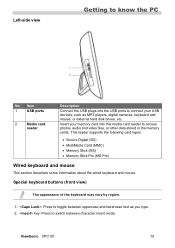
... 2 Media card reader Description Connect the USB plugs into the USB ports to connect your memory card into this media card reader to know the PC No. key: Press to toggle between character insert mode. This reader supports the following card types: • Secure Digital (SD) • MultiMedia Card (MMC) •... and lowercase text as MP3 players, digital cameras, keyboard and mouse, or external hard disk drives, etc. Insert your USB devices, such as you type. 2. ViewSonic VPC101 10
... 2 Media card reader Description Connect the USB plugs into the USB ports to connect your memory card into this media card reader to know the PC No. key: Press to toggle between character insert mode. This reader supports the following card types: • Secure Digital (SD) • MultiMedia Card (MMC) •... and lowercase text as MP3 players, digital cameras, keyboard and mouse, or external hard disk drives, etc. Insert your USB devices, such as you type. 2. ViewSonic VPC101 10

User Manual
Page 18
..., select "Control Panel" to open up , press to the desired location. 8. click the mouse. 9. Function key + ( ) + ( ) + ( ) + ( ) + ( ) Performed task Press to skip to perform specific tasks. ViewSonic VPC101 11 key: Press to activate the Start menu. 10. (Function) key: Press to the previous audio track or movie chapter. Mute key: Press to know...
..., select "Control Panel" to open up , press to the desired location. 8. click the mouse. 9. Function key + ( ) + ( ) + ( ) + ( ) + ( ) Performed task Press to skip to perform specific tasks. ViewSonic VPC101 11 key: Press to activate the Start menu. 10. (Function) key: Press to the previous audio track or movie chapter. Mute key: Press to know...

User Manual
Page 19
... destination before releasing the button. 2. Getting to know the PC Overview of the selected item. Indicator lights The table below describes the status that LED indicators present. Central wheel: Rotate the wheel to open a menu of the wired mouse (front view) 1. ViewSonic VPC101 12 Right button: Single-click to scroll up in green...
... destination before releasing the button. 2. Getting to know the PC Overview of the selected item. Indicator lights The table below describes the status that LED indicators present. Central wheel: Rotate the wheel to open a menu of the wired mouse (front view) 1. ViewSonic VPC101 12 Right button: Single-click to scroll up in green...
User Manual
Page 20
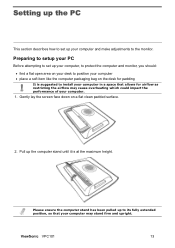
... position your computer • place a soft item like the computer packaging bag on a flat clean padded surface. 2. Preparing to setup your PC Before attempting to set up your computer. 1. ViewSonic VPC101 13 Pull up to the monitor. Gently lay the screen face down on the desk for padding It is at the maximum...
... position your computer • place a soft item like the computer packaging bag on a flat clean padded surface. 2. Preparing to setup your PC Before attempting to set up your computer. 1. ViewSonic VPC101 13 Pull up to the monitor. Gently lay the screen face down on the desk for padding It is at the maximum...
User Manual
Page 21
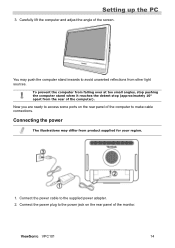
... adjust the angle of the computer). Connecting the power The illustrations may push the computer stand inwards to the supplied power adapter. 2. Setting up the PC 3. ViewSonic VPC101 14 You may differ from the rear of the screen.
... adjust the angle of the computer). Connecting the power The illustrations may push the computer stand inwards to the supplied power adapter. 2. Setting up the PC 3. ViewSonic VPC101 14 You may differ from the rear of the screen.
User Manual
Page 22
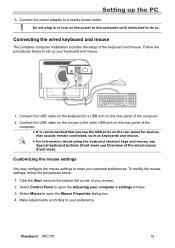
... procedures below . 1. Make adjustments according to set up the PC 3. Connect the USB cable on the keyboard to open the Mouse Properties dialog box. 4. Select Control Panel to a USB port on the mouse to open the Adjusting your keyboard and mouse. 1. ViewSonic VPC101 15 Connect the USB cable on the rear panel of...
... procedures below . 1. Make adjustments according to set up the PC 3. Connect the USB cable on the keyboard to open the Mouse Properties dialog box. 4. Select Control Panel to a USB port on the mouse to open the Adjusting your keyboard and mouse. 1. ViewSonic VPC101 15 Connect the USB cable on the rear panel of...
User Manual
Page 23
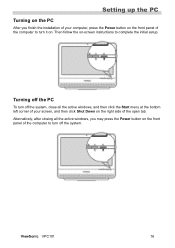
... the bottom left corner of your computer, press the Power button on the front panel of the computer to turn it on. Turning off the PC To turn off the system. Then follow the on-screen instructions to turn off the system, close all the active windows, you finish the installation... of your screen, and then click Shut Down on the right side of the open tab. Setting up the PC Turning on the PC After you may press the Power button on the front panel of the computer to complete the initial setup. ViewSonic VPC101 16
... the bottom left corner of your computer, press the Power button on the front panel of the computer to turn it on. Turning off the PC To turn off the system. Then follow the on-screen instructions to turn off the system, close all the active windows, you finish the installation... of your screen, and then click Shut Down on the right side of the open tab. Setting up the PC Turning on the PC After you may press the Power button on the front panel of the computer to complete the initial setup. ViewSonic VPC101 16

User Manual
Page 24
Brightness control To adjust the brightness level of the monitor, press the Brightness/Increase button to display the Brightness indicator, and then press the same button to increase the level or press the Decrease button to automatically optimize and adjust the screen settings while displaying video source from the D-sub input jack. ViewSonic VPC101 17 Setting up the PC Configuring the display You may press the Auto-adjust button to decrease the level.
Brightness control To adjust the brightness level of the monitor, press the Brightness/Increase button to display the Brightness indicator, and then press the same button to increase the level or press the Decrease button to automatically optimize and adjust the screen settings while displaying video source from the D-sub input jack. ViewSonic VPC101 17 Setting up the PC Configuring the display You may press the Auto-adjust button to decrease the level.
User Manual
Page 25
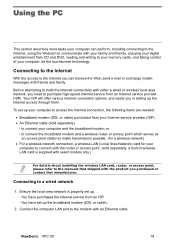
....) For details about installing the wireless LAN card, router, or access point, please refer to the modem with friends and family. ViewSonic VPC101 18 Connecting to the Internet With the access to the Internet you can perform, including connecting to the Internet, using the Webcam to... via the touchscreen technology. a built-in setting up your Internet service provider (ISP). • An Ethernet cable (sold separately; Using the PC This section describes more tasks your computer can browse the Web, send e-mail or exchange instant messages with an Ethernet cable. To set up ...
....) For details about installing the wireless LAN card, router, or access point, please refer to the modem with friends and family. ViewSonic VPC101 18 Connecting to the Internet With the access to the Internet you can perform, including connecting to the Internet, using the Webcam to... via the touchscreen technology. a built-in setting up your Internet service provider (ISP). • An Ethernet cable (sold separately; Using the PC This section describes more tasks your computer can browse the Web, send e-mail or exchange instant messages with an Ethernet cable. To set up ...
User Manual
Page 26
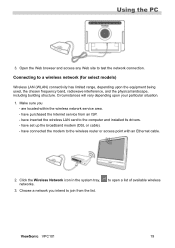
... join from an ISP. - are located within the wireless network service area. - have inserted the wireless LAN card to open a list of available wireless ViewSonic VPC101 19 Using the PC 3. have purchased the Internet service from the list. , to the computer and installed its drivers. - Click the Wireless Network icon in the system...
... join from an ISP. - are located within the wireless network service area. - have inserted the wireless LAN card to open a list of available wireless ViewSonic VPC101 19 Using the PC 3. have purchased the Internet service from the list. , to the computer and installed its drivers. - Click the Wireless Network icon in the system...

User Manual
Page 27
... a built-in real time via the preinstalled image capture software, or you can chat online in 1.3 megapixel webcam at the top center of the bezel. ViewSonic VPC101 20 With this webcam, you can capture still images or record videos via instant message programs. Check the ambient light conditions around the webcam to... WLAN manually, click "Disconnect" from the Wireless Network Connection list. If you will receive a message indicating that appear too dark or too light. Using the PC If the selected network requires security authentication, please enter user name and password. 4.
... a built-in real time via the preinstalled image capture software, or you can chat online in 1.3 megapixel webcam at the top center of the bezel. ViewSonic VPC101 20 With this webcam, you can capture still images or record videos via instant message programs. Check the ambient light conditions around the webcam to... WLAN manually, click "Disconnect" from the Wireless Network Connection list. If you will receive a message indicating that appear too dark or too light. Using the PC If the selected network requires security authentication, please enter user name and password. 4.

User Manual
Page 28
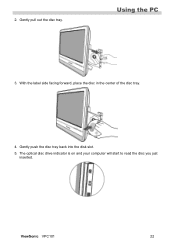
... Yes Yes Yes Rewritable Yes Yes Yes Yes Yes Yes Yes Inserting a disc When the optical disc drive is flashing, do not move the computer. 1. ViewSonic VPC101 21 When the indicator light is in use it to burn CD-R/CD-RW or DVD+R/DVD-R/DVD+RW/DVD-RW/ DVD-RAM discs. Press... the Eject button on the drive, as shown below. Using the PC Using the optical disc drive Your computer comes with an optical disc drive, which formats are supported by the optical disc drive. You can also...
... Yes Yes Yes Rewritable Yes Yes Yes Yes Yes Yes Yes Inserting a disc When the optical disc drive is flashing, do not move the computer. 1. ViewSonic VPC101 21 When the indicator light is in use it to burn CD-R/CD-RW or DVD+R/DVD-R/DVD+RW/DVD-RW/ DVD-RAM discs. Press... the Eject button on the drive, as shown below. Using the PC Using the optical disc drive Your computer comes with an optical disc drive, which formats are supported by the optical disc drive. You can also...
User Manual
Page 29
With the label side facing forward, place the disc in the center of the disc tray. 4. Using the PC 3. Gently push the disc tray back into the disk slot. 5. The optical disc drive indicator is on and your computer will start to read the disc you just inserted. 2. ViewSonic VPC101 22 Gently pull out the disc tray.
With the label side facing forward, place the disc in the center of the disc tray. 4. Using the PC 3. Gently push the disc tray back into the disk slot. 5. The optical disc drive indicator is on and your computer will start to read the disc you just inserted. 2. ViewSonic VPC101 22 Gently pull out the disc tray.