User's Guide
Page 6
...User's Guide 1 INTRODUCTION 2 Applications: ...2 Supported Features:...3 Wireless Performance Considerations 4 UNPACKING AND SETUP 5 Unpacking ...5 Setup...5 HARDWARE INSTALLATION 6 Front Panel...6 Rear Panel ...7 Side Panel...8 Hanging Way ...8 Hardware connections ...9 Connecting the WLAN Router ...9 Check the installation...10 PC NETWORK TCP/IP SETTINGS... ...12 Windows XP ...13 Windows Vista / 7 ...15 CONFIGURATION 17 Login to the WLAN Router through Wireless LAN 17 Login to the WLAN Router...17 Using the Web Browser...18 Setup Wizard...19 Advanced configuration ...31 Main...31 LAN & ...
...User's Guide 1 INTRODUCTION 2 Applications: ...2 Supported Features:...3 Wireless Performance Considerations 4 UNPACKING AND SETUP 5 Unpacking ...5 Setup...5 HARDWARE INSTALLATION 6 Front Panel...6 Rear Panel ...7 Side Panel...8 Hanging Way ...8 Hardware connections ...9 Connecting the WLAN Router ...9 Check the installation...10 PC NETWORK TCP/IP SETTINGS... ...12 Windows XP ...13 Windows Vista / 7 ...15 CONFIGURATION 17 Login to the WLAN Router through Wireless LAN 17 Login to the WLAN Router...17 Using the Web Browser...18 Setup Wizard...19 Advanced configuration ...31 Main...31 LAN & ...
User's Guide
Page 8
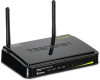
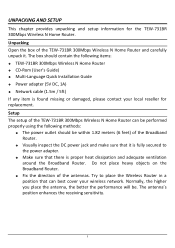
.... Lists the technical (general, physical and environmental, performance and Routers settings) specifications of the TEW-731BR 300Mbps Wireless N Home Router. Overview of this TEW-731BR 300Mbps Wireless N Home Router. Describes the front panel, rear panel and LED indicators of the TEW-731BR 300Mbps Wireless N Home Router. 1 Purpose This manual discusses how to your TEW-731BR 300Mbps Wireless N Home Router. Unpacking and Setup. Technical Specifications. Connecting the WLAN...
.... Lists the technical (general, physical and environmental, performance and Routers settings) specifications of the TEW-731BR 300Mbps Wireless N Home Router. Overview of this TEW-731BR 300Mbps Wireless N Home Router. Describes the front panel, rear panel and LED indicators of the TEW-731BR 300Mbps Wireless N Home Router. 1 Purpose This manual discusses how to your TEW-731BR 300Mbps Wireless N Home Router. Unpacking and Setup. Technical Specifications. Connecting the WLAN...
User's Guide
Page 12
... The antenna's position enhances the receiving sensitivity. 5 Unpacking Open the box of the TEW-731BR 300Mbps Wireless N Home Router can best cover your local reseller for the TEW-731BR 300Mbps Wireless N Home Router. The box should be within 1.82 meters (6 feet) of the antennas. UNPACKING ...the performance will be performed properly using the following methods: The power outlet should contain the following items: TEW-731BR 300Mbps Wireless N Home Router CD-Rom (User's Guide) Multi-Language Quick Installation Guide Power adapter (5V DC, 1A) ...
... The antenna's position enhances the receiving sensitivity. 5 Unpacking Open the box of the TEW-731BR 300Mbps Wireless N Home Router can best cover your local reseller for the TEW-731BR 300Mbps Wireless N Home Router. The box should be within 1.82 meters (6 feet) of the antennas. UNPACKING ...the performance will be performed properly using the following methods: The power outlet should contain the following items: TEW-731BR 300Mbps Wireless N Home Router CD-Rom (User's Guide) Multi-Language Quick Installation Guide Power adapter (5V DC, 1A) ...
User's Guide
Page 13
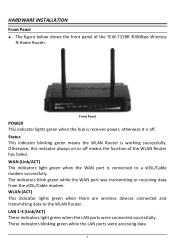
... port is off means the function of the TEW-731BR 300Mbps Wireless N Home Router. These indicators blinking green while the LAN ports were accessing data. 6 HARDWARE INSTALLATION Front Panel The figure below shows the front panel of the WLAN Router has failed. The indicators blink green while the... WAN port was transmitting or receiving data from the xDSL/Cable modem. WLAN (ACT) This indicator lights green when there are wireless devices connected and transmitting data to a xDSL/...
... port is off means the function of the TEW-731BR 300Mbps Wireless N Home Router. These indicators blinking green while the LAN ports were accessing data. 6 HARDWARE INSTALLATION Front Panel The figure below shows the front panel of the WLAN Router has failed. The indicators blink green while the... WAN port was transmitting or receiving data from the xDSL/Cable modem. WLAN (ACT) This indicator lights green when there are wireless devices connected and transmitting data to a xDSL/...
User's Guide
Page 14
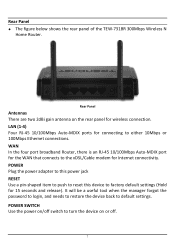
... connectivity. WAN In the four port broadband Router, there is an RJ-45 10/100Mbps Auto-MDIX port for the WAN that connects to the xDSL/Cable modem for connecting to factory default settings (Hold for wireless connection. Rear Panel The figure below shows the rear panel of the TEW-731BR 300Mbps Wireless N Home Router.
... connectivity. WAN In the four port broadband Router, there is an RJ-45 10/100Mbps Auto-MDIX port for the WAN that connects to the xDSL/Cable modem for connecting to factory default settings (Hold for wireless connection. Rear Panel The figure below shows the rear panel of the TEW-731BR 300Mbps Wireless N Home Router.
User's Guide
Page 15
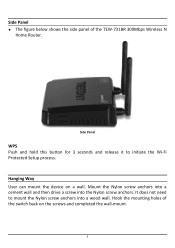
Hanging Way User can mount the device on the screws and completed the wall-mount. 8 Mount the Nylon screw anchors into a cement wall and then drive a screw into a wood wall. Side Panel WPS Push and hold this button for 3 seconds and release it to mount the Nylon screw anchors into the Nylon screw anchors. It does not need to initiate the Wi-Fi Protected Setup process. Side Panel The figure below shows the side panel of the switch back on a wall. Hook the mounting holes of the TEW-731BR 300Mbps Wireless N Home Router.
Hanging Way User can mount the device on the screws and completed the wall-mount. 8 Mount the Nylon screw anchors into a cement wall and then drive a screw into a wood wall. Side Panel WPS Push and hold this button for 3 seconds and release it to mount the Nylon screw anchors into the Nylon screw anchors. It does not need to initiate the Wi-Fi Protected Setup process. Side Panel The figure below shows the side panel of the switch back on a wall. Hook the mounting holes of the TEW-731BR 300Mbps Wireless N Home Router.
User's Guide
Page 16
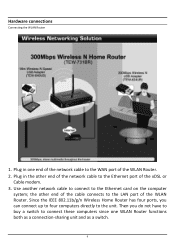
Hardware connections Connecting the WLAN Router 1. Plug in one WLAN Router functions both as a connection-sharing unit and as a switch. 9 Since the IEEE 802.11b/g/n Wireless Home Router has four ports, you do not have to buy a switch to the WAN port of the network cable to connect these computers since ...one end of the WLAN Router. 2. Plug in the other end of the network cable to ...
Hardware connections Connecting the WLAN Router 1. Plug in one WLAN Router functions both as a connection-sharing unit and as a switch. 9 Since the IEEE 802.11b/g/n Wireless Home Router has four ports, you do not have to buy a switch to the WAN port of the network cable to connect these computers since ...one end of the WLAN Router. 2. Plug in the other end of the network cable to ...
User's Guide
Page 24
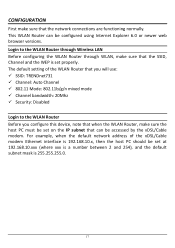
... versions. For example, when the default network address of the WLAN Router that you configure this device, note that when the WLAN Router, make sure that the SSID, Channel and the WEP is set... on the IP subnet that the network connections are functioning normally. This WLAN Router can be accessed by the xDSL/Cable modem. The default setting of the xDSL/Cable ...modem Ethernet interface is 255.255.255.0. 17 Login to the WLAN Router Before you will use: SSID: TRENDnet731 Channel: Auto Channel 802.11 Mode: ...
... versions. For example, when the default network address of the WLAN Router that you configure this device, note that when the WLAN Router, make sure that the SSID, Channel and the WEP is set... on the IP subnet that the network connections are functioning normally. This WLAN Router can be accessed by the xDSL/Cable modem. The default setting of the xDSL/Cable ...modem Ethernet interface is 255.255.255.0. 17 Login to the WLAN Router Before you will use: SSID: TRENDnet731 Channel: Auto Channel 802.11 Mode: ...
User's Guide
Page 26
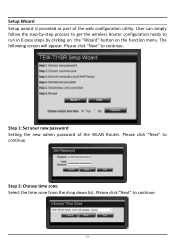
Please click "Next" to continue. Please click "Next" to continue. 19 Setup Wizard Setup wizard is provided as part of the WLAN Router. Step 1: Set your new password Setting the new admin password of the web configuration utility. Please click "Next" to run in 6 easy steps by clicking on` the "Wizard" button on the function menu. Step 2: Choose time zone Select the time zone from the drop down list. User can simply follow the step-by-step process to get the wireless Router configuration ready to continue. The following screen will appear.
Please click "Next" to continue. Please click "Next" to continue. 19 Setup Wizard Setup wizard is provided as part of the WLAN Router. Step 1: Set your new password Setting the new admin password of the web configuration utility. Please click "Next" to run in 6 easy steps by clicking on` the "Wizard" button on the function menu. Step 2: Choose time zone Select the time zone from the drop down list. User can simply follow the step-by-step process to get the wireless Router configuration ready to continue. The following screen will appear.
User's Guide
Page 37
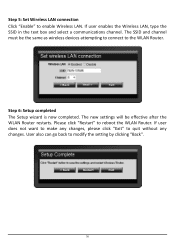
... in the text box and select a communications channel. The SSID and channel must be effective after the WLAN Router restarts. User also can go back to enable Wireless LAN. Step 5: Set Wireless LAN connection Click "Enable" to modify the setting by clicking "Back". 30 Please click "Restart" to quit... without any changes. The new settings will be the same as wireless devices attempting to connect to the WLAN Router. Step 6: Setup completed The Setup wizard is now completed. If user does not want to make any changes, please click...
... in the text box and select a communications channel. The SSID and channel must be effective after the WLAN Router restarts. User also can go back to enable Wireless LAN. Step 5: Set Wireless LAN connection Click "Enable" to modify the setting by clicking "Back". 30 Please click "Restart" to quit... without any changes. The new settings will be the same as wireless devices attempting to connect to the WLAN Router. Step 6: Setup completed The Setup wizard is now completed. If user does not want to make any changes, please click...
User's Guide
Page 51
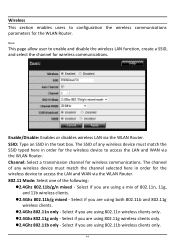
...Select if you are using a mix of any wireless device must match the SSID typed here in order for the wireless device to configuration the wireless communications parameters for the WLAN Router. Select if you are using both 802.11b and 802.11g wireless clients. 2.4Ghz 802.11n only - Select ... the LAN and WAN via the WLAN Router. Select if you are using 802.11g wireless clients only. 2.4Ghz 802.11b only - Enable/Disable: Enables or disables wireless LAN via the WLAN Router. 802.11 Mode: Select one of any wireless device must match the channel selected here ...
...Select if you are using a mix of any wireless device must match the SSID typed here in order for the wireless device to configuration the wireless communications parameters for the WLAN Router. Select if you are using both 802.11b and 802.11g wireless clients. 2.4Ghz 802.11n only - Select ... the LAN and WAN via the WLAN Router. Select if you are using 802.11g wireless clients only. 2.4Ghz 802.11b only - Enable/Disable: Enables or disables wireless LAN via the WLAN Router. 802.11 Mode: Select one of any wireless device must match the channel selected here ...
User's Guide
Page 52
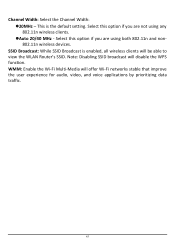
... disable the WPS function. Select this option if you are not using both 802.11n and non802.11n wireless devices. Select this option if you are using any 802.11n wireless clients. Auto 20/40 MHz - Note: Disabling SSID broadcast will offer Wi-Fi networks stable ...that improve the user experience for audio, video, and voice applications by prioritizing data traffic. 45 This is enabled, all wireless clients will be able to view the WLAN Router's SSID. SSID Broadcast: While SSID Broadcast is the default setting. Channel Width: Select the Channel Width: 20MHz -...
... disable the WPS function. Select this option if you are not using both 802.11n and non802.11n wireless devices. Select this option if you are using any 802.11n wireless clients. Auto 20/40 MHz - Note: Disabling SSID broadcast will offer Wi-Fi networks stable ...that improve the user experience for audio, video, and voice applications by prioritizing data traffic. 45 This is enabled, all wireless clients will be able to view the WLAN Router's SSID. SSID Broadcast: While SSID Broadcast is the default setting. Channel Width: Select the Channel Width: 20MHz -...
User's Guide
Page 53
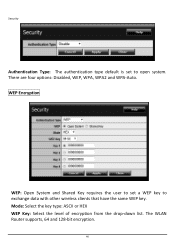
There are four options: Disabled, WEP, WPA, WPA2 and WPA-Auto. WEP Encryption WEP: Open System and Shared Key requires the user to set to exchange data with other wireless clients that have the same WEP key. The WLAN Router supports, 64 and 128-bit encryption. 46 Mode: Select the key type: ASCII or HEX WEP Key: Select the level of encryption from the drop-down list. Security Authentication Type: The authentication type default is set a WEP key to open system.
There are four options: Disabled, WEP, WPA, WPA2 and WPA-Auto. WEP Encryption WEP: Open System and Shared Key requires the user to set to exchange data with other wireless clients that have the same WEP key. The WLAN Router supports, 64 and 128-bit encryption. 46 Mode: Select the key type: ASCII or HEX WEP Key: Select the level of encryption from the drop-down list. Security Authentication Type: The authentication type default is set a WEP key to open system.
User's Guide
Page 59
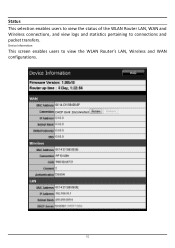
Device Information This screen enables users to connections and packet transfers. Status This selection enables users to view the status of the WLAN Router LAN, WAN and Wireless connections, and view logs and statistics pertaining to view the WLAN Router's LAN, Wireless and WAN configurations. 52
Device Information This screen enables users to connections and packet transfers. Status This selection enables users to view the status of the WLAN Router LAN, WAN and Wireless connections, and view logs and statistics pertaining to view the WLAN Router's LAN, Wireless and WAN configurations. 52
User's Guide
Page 60
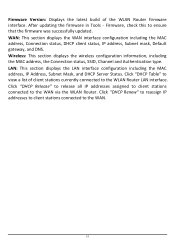
Click "DHCP Table" to view a list of the WLAN Router firmware interface. After updating the firmware in Tools - Click "DHCP Release" to release all IP addresses assigned to client stations connected to the WAN. 53 ... interface. Click "DHCP Renew" to reassign IP addresses to client stations connected to the WAN via the WLAN Router. Wireless: This section displays the wireless configuration information, including the MAC address, the Connection status, SSID, Channel and Authentication type. WAN: This section displays the WAN interface configuration including the MAC ...
Click "DHCP Table" to view a list of the WLAN Router firmware interface. After updating the firmware in Tools - Click "DHCP Release" to release all IP addresses assigned to client stations connected to the WAN. 53 ... interface. Click "DHCP Renew" to reassign IP addresses to client stations connected to the WAN via the WLAN Router. Wireless: This section displays the wireless configuration information, including the MAC address, the Connection status, SSID, Channel and Authentication type. WAN: This section displays the WAN interface configuration including the MAC ...
User's Guide
Page 64
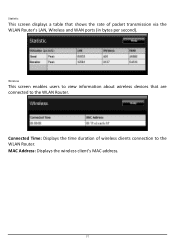
Connected Time: Displays the time duration of packet transmission via the WLAN Router's LAN, Wireless and WAN ports (in bytes per second). MAC Address: Displays the wireless client's MAC address. 57 Wireless This screen enables users to view information about wireless devices that shows the rate of wireless clients connection to the WLAN Router. Statistic This screen displays a table that are connected to the WLAN Router.
Connected Time: Displays the time duration of packet transmission via the WLAN Router's LAN, Wireless and WAN ports (in bytes per second). MAC Address: Displays the wireless client's MAC address. 57 Wireless This screen enables users to view information about wireless devices that shows the rate of wireless clients connection to the WLAN Router. Statistic This screen displays a table that are connected to the WLAN Router.
User's Guide
Page 69
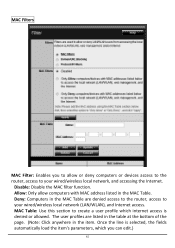
... MAC Table. Disable: Disable the MAC filter function. Once the line is denied or allowed. The user profiles are denied access to the router, access to your wired/wireless local network (LAN/WLAN), and Internet access. MAC Table: Use this section to create a user profile which internet access is selected, the fields... address listed in the item. MAC Filters MAC Filter: Enables you can edit.) 62 Allow: Only allow or deny computers or devices access to the router, access to your wired/wireless local network, and accessing the Internet.
... MAC Table. Disable: Disable the MAC filter function. Once the line is denied or allowed. The user profiles are denied access to the router, access to your wired/wireless local network (LAN/WLAN), and Internet access. MAC Table: Use this section to create a user profile which internet access is selected, the fields... address listed in the item. MAC Filters MAC Filter: Enables you can edit.) 62 Allow: Only allow or deny computers or devices access to the router, access to your wired/wireless local network, and accessing the Internet.
Quick Installation Guide
Page 2
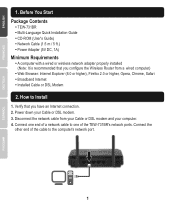
... the TEW-731BR's network ports. Before You Start Package Contents ŸTEW-731BR ŸMulti-Language Quick Installation Guide ŸCD-ROM (User's Guide) ŸNetwork Cable (1.5 m / 5 ft.) ŸPower Adapter (5V DC, 1A) Minimum Requirements ŸA computer with a wired or wireless network adapter properly installed (Note: It is recommended that you configure the Wireless Router from...
... the TEW-731BR's network ports. Before You Start Package Contents ŸTEW-731BR ŸMulti-Language Quick Installation Guide ŸCD-ROM (User's Guide) ŸNetwork Cable (1.5 m / 5 ft.) ŸPower Adapter (5V DC, 1A) Minimum Requirements ŸA computer with a wired or wireless network adapter properly installed (Note: It is recommended that you configure the Wireless Router from...
Quick Installation Guide
Page 3
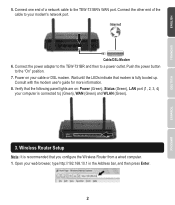
...that you configure the Wireless Router from a wired computer. 1. Wireless Router Setup Note: It is fully booted up. Connect the other end of a network cable to your web browser, type http://192.168.10.1 in the Address bar, and then press Enter. 2 Connect the power adapter to the TEW-731BR and then to the ..."On" position. 7. Connect one end of the cable to the TEW-731BR's WAN port. Push the power button to a power outlet. Consult with the modem user's guide for ...
...that you configure the Wireless Router from a wired computer. 1. Wireless Router Setup Note: It is fully booted up. Connect the other end of a network cable to your web browser, type http://192.168.10.1 in the Address bar, and then press Enter. 2 Connect the power adapter to the TEW-731BR and then to the ..."On" position. 7. Connect one end of the cable to the TEW-731BR's WAN port. Push the power button to a power outlet. Consult with the modem user's guide for ...
Quick Installation Guide
Page 4
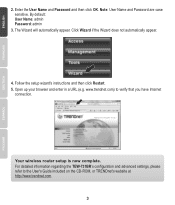
...admin 3. Your wireless router setup is now complete. The Wizard will automatically appear. Click Wizard if the Wizard does not automatically appear. 4. www.trendnet.com) to the User's Guide included on the CD-ROM, or TRENDnet's website at http://www.trendnet.com. 3 ...Follow the setup wizard's instructions and then click Restart. 5. 2. Note: User Name and Password are case sensitive. Open up your browser and enter in a URL (e.g. Enter the User Name and Password and then click OK. For detailed information regarding the TEW-731BR...
...admin 3. Your wireless router setup is now complete. The Wizard will automatically appear. Click Wizard if the Wizard does not automatically appear. 4. www.trendnet.com) to the User's Guide included on the CD-ROM, or TRENDnet's website at http://www.trendnet.com. 3 ...Follow the setup wizard's instructions and then click Restart. 5. 2. Note: User Name and Password are case sensitive. Open up your browser and enter in a URL (e.g. Enter the User Name and Password and then click OK. For detailed information regarding the TEW-731BR...


