User's Guide
Page 6
... GUIDE 1 Purpose ...1 Terms/Usage ...1 Overview of this User's Guide 1 INTRODUCTION 2 Applications: ...2 Supported Features:...3 Wireless Performance Considerations 4 UNPACKING AND SETUP 5 Unpacking ...5 Setup...5 HARDWARE INSTALLATION 6 Front Panel...6 Rear Panel ...7 Side Panel...8 Hanging Way ...8 Hardware connections ...9 Connecting the WLAN Router ...9 Check the installation...10 ...the WLAN Router through Wireless LAN 17 Login to the WLAN Router...17 Using the Web Browser...18 Setup Wizard...19 Advanced configuration ...31 Main...31 LAN & DHCP Server ...31 WAN ...33 Password ...41 vi
... GUIDE 1 Purpose ...1 Terms/Usage ...1 Overview of this User's Guide 1 INTRODUCTION 2 Applications: ...2 Supported Features:...3 Wireless Performance Considerations 4 UNPACKING AND SETUP 5 Unpacking ...5 Setup...5 HARDWARE INSTALLATION 6 Front Panel...6 Rear Panel ...7 Side Panel...8 Hanging Way ...8 Hardware connections ...9 Connecting the WLAN Router ...9 Check the installation...10 ...the WLAN Router through Wireless LAN 17 Login to the WLAN Router...17 Using the Web Browser...18 Setup Wizard...19 Advanced configuration ...31 Main...31 LAN & DHCP Server ...31 WAN ...33 Password ...41 vi
User's Guide
Page 7
Time ...42 Dynamic DNS...43 Wireless ...44 Basic...44 Security ...46 Advanced ...50 Wi-Fi Protected Setup...51 Status ...52 Device Information ...52 Log ...54 Log Setting...55 Statistic...57 Wireless ...57 Routing...58 Static ...58 Dynamic...59 Routing Table ...60 Access ...61 Filters ...61 Virtual Server...67 Special AP...69 DMZ...70 Firewall Settings ...71 Management...73 SNMP (Simple Network Management Protocol 73 Remote Management ...74 Capture Packets...75 Tools ...76 Restart ...76 Settings...76 Firmware ...77 Ping Test ...77 TECHNICAL SPECIFICATIONS 78 LIMITED WARRANTY 78 vii
Time ...42 Dynamic DNS...43 Wireless ...44 Basic...44 Security ...46 Advanced ...50 Wi-Fi Protected Setup...51 Status ...52 Device Information ...52 Log ...54 Log Setting...55 Statistic...57 Wireless ...57 Routing...58 Static ...58 Dynamic...59 Routing Table ...60 Access ...61 Filters ...61 Virtual Server...67 Special AP...69 DMZ...70 Firewall Settings ...71 Management...73 SNMP (Simple Network Management Protocol 73 Remote Management ...74 Capture Packets...75 Tools ...76 Restart ...76 Settings...76 Firmware ...77 Ping Test ...77 TECHNICAL SPECIFICATIONS 78 LIMITED WARRANTY 78 vii
User's Guide
Page 8
.../Cable Modem. Unpacking and Setup. Tells how you get started with wireless LAN and Fast Ethernet switch. Identifying External Components. This integrated access device combines Internet gateway functions with the basic installation of the TEW731BR 300Mbps Wireless N Home Router. Overview of the TEW-731BR 300Mbps Wireless N Home Router. 1 Describes the TEW-731BR 300Mbps Wireless N Home...
.../Cable Modem. Unpacking and Setup. Tells how you get started with wireless LAN and Fast Ethernet switch. Identifying External Components. This integrated access device combines Internet gateway functions with the basic installation of the TEW731BR 300Mbps Wireless N Home Router. Overview of the TEW-731BR 300Mbps Wireless N Home Router. 1 Describes the TEW-731BR 300Mbps Wireless N Home...

User's Guide
Page 9
... right out of corporations and into homes with the Internet. Online gaming: Through the local area network, online gaming and e-commerce services can be easily setup. However, allowing more than two computers to share one high-speed broadband connection through an Internet sharing device can share one public IP address over...
... right out of corporations and into homes with the Internet. Online gaming: Through the local area network, online gaming and e-commerce services can be easily setup. However, allowing more than two computers to share one high-speed broadband connection through an Internet sharing device can share one public IP address over...

User's Guide
Page 10
... connection 2 fixed external antennas support high speed performance and great coverage with MIMO technology Network Address Translation (NAT) firewall Wi-Fi Protected Setup (WPS) button for simple network connectivity Universal Plug and Play (UPnP) and Application Level Gateway support for Internet applications such as email, FTP, gaming...
... connection 2 fixed external antennas support high speed performance and great coverage with MIMO technology Network Address Translation (NAT) firewall Wi-Fi Protected Setup (WPS) button for simple network connectivity Universal Plug and Play (UPnP) and Application Level Gateway support for Internet applications such as email, FTP, gaming...
User's Guide
Page 12
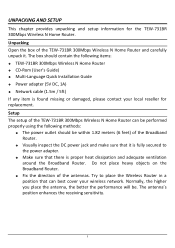
... your wireless network. The antenna's position enhances the receiving sensitivity. 5 UNPACKING AND SETUP This chapter provides unpacking and setup information for replacement. Try to the power adapter. Make sure that can be performed properly using the following items: TEW-731BR 300Mbps Wireless N Home Router CD-Rom (User's Guide) Multi-Language...
... your wireless network. The antenna's position enhances the receiving sensitivity. 5 UNPACKING AND SETUP This chapter provides unpacking and setup information for replacement. Try to the power adapter. Make sure that can be performed properly using the following items: TEW-731BR 300Mbps Wireless N Home Router CD-Rom (User's Guide) Multi-Language...
User's Guide
Page 15
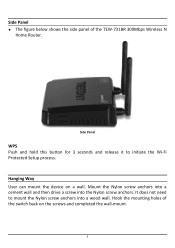
Side Panel The figure below shows the side panel of the switch back on a wall. Side Panel WPS Push and hold this button for 3 seconds and release it to mount the Nylon screw anchors into the Nylon screw anchors. Hanging Way User can mount the device on the screws and completed the wall-mount. 8 Hook the mounting holes of the TEW-731BR 300Mbps Wireless N Home Router. Mount the Nylon screw anchors into a cement wall and then drive a screw into a wood wall. It does not need to initiate the Wi-Fi Protected Setup process.
Side Panel The figure below shows the side panel of the switch back on a wall. Side Panel WPS Push and hold this button for 3 seconds and release it to mount the Nylon screw anchors into the Nylon screw anchors. Hanging Way User can mount the device on the screws and completed the wall-mount. 8 Hook the mounting holes of the TEW-731BR 300Mbps Wireless N Home Router. Mount the Nylon screw anchors into a cement wall and then drive a screw into a wood wall. It does not need to initiate the Wi-Fi Protected Setup process.
User's Guide
Page 26
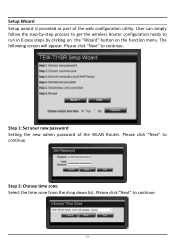
Step 1: Set your new password Setting the new admin password of the web configuration utility. Step 2: Choose time zone Select the time zone from the drop down list. Please click "Next" to continue. 19 Please click "Next" to continue. Setup Wizard Setup wizard is provided as part of the WLAN Router. User can simply follow the step-by-step process to get the wireless Router configuration ready to continue. The following screen will appear. Please click "Next" to run in 6 easy steps by clicking on` the "Wizard" button on the function menu.
Step 1: Set your new password Setting the new admin password of the web configuration utility. Step 2: Choose time zone Select the time zone from the drop down list. Please click "Next" to continue. 19 Please click "Next" to continue. Setup Wizard Setup wizard is provided as part of the WLAN Router. User can simply follow the step-by-step process to get the wireless Router configuration ready to continue. The following screen will appear. Please click "Next" to run in 6 easy steps by clicking on` the "Wizard" button on the function menu.
User's Guide
Page 37
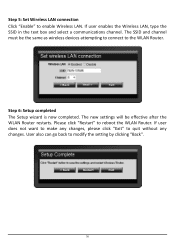
..." to quit without any changes, please click "Exit" to enable Wireless LAN. The SSID and channel must be effective after the WLAN Router restarts. Step 6: Setup completed The Setup wizard is now completed.
..." to quit without any changes, please click "Exit" to enable Wireless LAN. The SSID and channel must be effective after the WLAN Router restarts. Step 6: Setup completed The Setup wizard is now completed.
User's Guide
Page 58
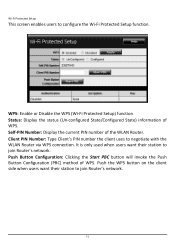
... Status: Display the status (Un-configured State/Configured State) information of WPS. Wi-Fi Protected Setup This screen enables users to negotiate with the WLAN Router via WPS connection. Push Button Configuration: Clicking the Start PBC button will invoke the Push ... when users want their station to join Router's network. Client PIN Number: Type Client's PIN number the client uses to configure the Wi-Fi Protected Setup function. Self-PIN Number: Display the current PIN number of the WLAN Router.
... Status: Display the status (Un-configured State/Configured State) information of WPS. Wi-Fi Protected Setup This screen enables users to negotiate with the WLAN Router via WPS connection. Push Button Configuration: Clicking the Start PBC button will invoke the Push ... when users want their station to join Router's network. Client PIN Number: Type Client's PIN number the client uses to configure the Wi-Fi Protected Setup function. Self-PIN Number: Display the current PIN number of the WLAN Router.
User's Guide
Page 83
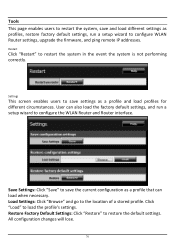
... load when necessary. Save Settings: Click "Save" to save the current configuration as profiles, restore factory default settings, run a setup wizard to configure the WLAN Router and Router interface. Tools This page enables users to restart the system, save and load different settings... as a profile that can also load the factory default settings, and run a setup wizard to configure WLAN Router settings, upgrade the firmware, and ping remote IP addresses. Settings This screen enables users to restore the default ...
... load when necessary. Save Settings: Click "Save" to save the current configuration as profiles, restore factory default settings, run a setup wizard to configure the WLAN Router and Router interface. Tools This page enables users to restart the system, save and load different settings... as a profile that can also load the factory default settings, and run a setup wizard to configure WLAN Router settings, upgrade the firmware, and ping remote IP addresses. Settings This screen enables users to restore the default ...
User's Guide
Page 85
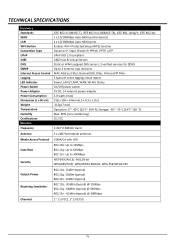
... 802.3u (100BASE-TX), IEEE 802.11b/g/n, IEEE 802.3az 1 x 10/100Mbps Auto-MDIX port (Internet) 4 x 10/100Mbps Auto-MDIX ports Enables Wi-Fi Protected Setup (WPS) function Dynamic IP, Static (Fixed) IP, PPPoE, PPTP, L2TP UPnP IGD 1.0 compliant DMZ host & Virtual Servers Static or WAN assigned DNS servers; 3 verified services...
... 802.3u (100BASE-TX), IEEE 802.11b/g/n, IEEE 802.3az 1 x 10/100Mbps Auto-MDIX port (Internet) 4 x 10/100Mbps Auto-MDIX ports Enables Wi-Fi Protected Setup (WPS) function Dynamic IP, Static (Fixed) IP, PPPoE, PPTP, L2TP UPnP IGD 1.0 compliant DMZ host & Virtual Servers Static or WAN assigned DNS servers; 3 verified services...
Quick Installation Guide
Page 3
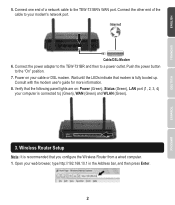
Connect the power adapter to the TEW-731BR and then to the "On" position. 7. Push the power button to a power outlet. Consult with the modem user's guide for more information. 8. Open your cable ... : Power (Green), Status (Green), LAN port (1, 2, 3, 4) your modem's network port. Connect one end of the cable to your computer is connected to the TEW-731BR's WAN port. Wireless Router Setup Note: It is fully booted up. Internet Cable/DSL-Modem 6. Verify that you configure the Wireless Router from a wired computer. 1. Connect the other...
Connect the power adapter to the TEW-731BR and then to the "On" position. 7. Push the power button to a power outlet. Consult with the modem user's guide for more information. 8. Open your cable ... : Power (Green), Status (Green), LAN port (1, 2, 3, 4) your modem's network port. Connect one end of the cable to your computer is connected to the TEW-731BR's WAN port. Wireless Router Setup Note: It is fully booted up. Internet Cable/DSL-Modem 6. Verify that you configure the Wireless Router from a wired computer. 1. Connect the other...
Quick Installation Guide
Page 4
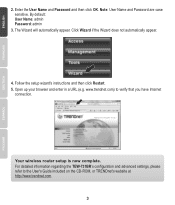
...sensitive. For detailed information regarding the TEW-731BR's configuration and advanced settings, please refer to verify that you have Internet connection. Follow the setup wizard's instructions and then click Restart. 5. Open up your browser and enter in a URL (e.g. www.trendnet.com) to the User's Guide ...included on the CD-ROM, or TRENDnet's website at http://www.trendnet.com. 3 Your wireless router setup is now complete. The Wizard will automatically appear. Click Wizard if the Wizard...
...sensitive. For detailed information regarding the TEW-731BR's configuration and advanced settings, please refer to verify that you have Internet connection. Follow the setup wizard's instructions and then click Restart. 5. Open up your browser and enter in a URL (e.g. www.trendnet.com) to the User's Guide ...included on the CD-ROM, or TRENDnet's website at http://www.trendnet.com. 3 Your wireless router setup is now complete. The Wizard will automatically appear. Click Wizard if the Wizard...


