User's Guide
Page 2
... correct the interference by the end user. This transmitter must accept any other antenna or transmitter. The following measures: - If this equipment. IMPORTANT NOTE: FCC Radiation Exposure Statement: This equipment complies with the limits for a Class B digital device, pursuant to Part 15 of some specific channels and/or operational frequency bands are country dependent and are designed...
... correct the interference by the end user. This transmitter must accept any other antenna or transmitter. The following measures: - If this equipment. IMPORTANT NOTE: FCC Radiation Exposure Statement: This equipment complies with the limits for a Class B digital device, pursuant to Part 15 of some specific channels and/or operational frequency bands are country dependent and are designed...
User's Guide
Page 3
... (EMC) standard for radio equipment and services; TRENDnet TEW-731BR [Greek] 1999/5/ΕΚ. Español Por medio de la presente TRENDnet declara que el TEW-731BR cumple con los [Spanish] requisitos esenciales y cualesquiera otras disposiciones aplicables o exigibles de la Directiva 1999/5/CE. This device may be used for setting up outdoor radio links and/or for setting up outdoor radio links in France and...
... (EMC) standard for radio equipment and services; TRENDnet TEW-731BR [Greek] 1999/5/ΕΚ. Español Por medio de la presente TRENDnet declara que el TEW-731BR cumple con los [Spanish] requisitos esenciales y cualesquiera otras disposiciones aplicables o exigibles de la Directiva 1999/5/CE. This device may be used for setting up outdoor radio links and/or for setting up outdoor radio links in France and...
User's Guide
Page 6
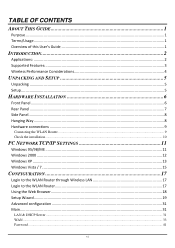
...Performance Considerations 4 UNPACKING AND SETUP 5 Unpacking ...5 Setup...5 HARDWARE INSTALLATION 6 Front Panel...6 Rear Panel ...7 Side Panel...8 Hanging Way ...8 Hardware connections ...9 Connecting the WLAN Router ...9 Check the installation...10 PC NETWORK TCP/IP SETTINGS 11 Windows 95/98/ME ...11 Windows 2000 ...12 Windows XP ...13 Windows Vista / 7 ...15 CONFIGURATION 17 Login to the WLAN Router through Wireless LAN 17 Login to the WLAN Router...17 Using the Web Browser...18 Setup Wizard...19 Advanced configuration ...31 Main...31 LAN & DHCP Server ...31 WAN ...33 Password ...41 vi
...Performance Considerations 4 UNPACKING AND SETUP 5 Unpacking ...5 Setup...5 HARDWARE INSTALLATION 6 Front Panel...6 Rear Panel ...7 Side Panel...8 Hanging Way ...8 Hardware connections ...9 Connecting the WLAN Router ...9 Check the installation...10 PC NETWORK TCP/IP SETTINGS 11 Windows 95/98/ME ...11 Windows 2000 ...12 Windows XP ...13 Windows Vista / 7 ...15 CONFIGURATION 17 Login to the WLAN Router through Wireless LAN 17 Login to the WLAN Router...17 Using the Web Browser...18 Setup Wizard...19 Advanced configuration ...31 Main...31 LAN & DHCP Server ...31 WAN ...33 Password ...41 vi
User's Guide
Page 7
Time ...42 Dynamic DNS...43 Wireless ...44 Basic...44 Security ...46 Advanced ...50 Wi-Fi Protected Setup...51 Status ...52 Device Information ...52 Log ...54 Log Setting...55 Statistic...57 Wireless ...57 Routing...58 Static ...58 Dynamic...59 Routing Table ...60 Access ...61 Filters ...61 Virtual Server...67 Special AP...69 DMZ...70 Firewall Settings ...71 Management...73 SNMP (Simple Network Management Protocol 73 Remote Management ...74 Capture Packets...75 Tools ...76 Restart ...76 Settings...76 Firmware ...77 Ping Test ...77 TECHNICAL SPECIFICATIONS 78 LIMITED WARRANTY 78 vii
Time ...42 Dynamic DNS...43 Wireless ...44 Basic...44 Security ...46 Advanced ...50 Wi-Fi Protected Setup...51 Status ...52 Device Information ...52 Log ...54 Log Setting...55 Statistic...57 Wireless ...57 Routing...58 Static ...58 Dynamic...59 Routing Table ...60 Access ...61 Filters ...61 Virtual Server...67 Special AP...69 DMZ...70 Firewall Settings ...71 Management...73 SNMP (Simple Network Management Protocol 73 Remote Management ...74 Capture Packets...75 Tools ...76 Restart ...76 Settings...76 Firmware ...77 Ping Test ...77 TECHNICAL SPECIFICATIONS 78 LIMITED WARRANTY 78 vii
User's Guide
Page 8
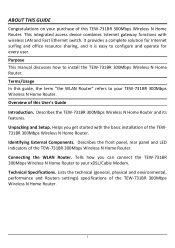
... Internet gateway functions with the basic installation of the TEW731BR 300Mbps Wireless N Home Router. Describes the TEW-731BR 300Mbps Wireless N Home Router and its features. Purpose This manual discusses how to configure and operate for every user. Unpacking and Setup. Lists the technical (general, physical and environmental, performance and Routers settings) specifications of this User's Guide Introduction. Identifying External Components. Helps you can connect the TEW-731BR 300Mbps Wireless N Home Router to your TEW-731BR 300Mbps Wireless N Home Router. Connecting the WLAN...
... Internet gateway functions with the basic installation of the TEW731BR 300Mbps Wireless N Home Router. Describes the TEW-731BR 300Mbps Wireless N Home Router and its features. Purpose This manual discusses how to configure and operate for every user. Unpacking and Setup. Lists the technical (general, physical and environmental, performance and Routers settings) specifications of this User's Guide Introduction. Identifying External Components. Helps you can connect the TEW-731BR 300Mbps Wireless N Home Router to your TEW-731BR 300Mbps Wireless N Home Router. Connecting the WLAN...

User's Guide
Page 9
... ready connection for the users, with wireless LAN and Fast Ethernet switch. Broadband network access is waning. Resource sharing: Share resources such as printers, scanners and other peripherals. for most people. This integrated access device combines Internet gateway functions with or without the network wires. All linked computers can be installed and configured right out of broadband capabilities over a single Internet connection to access the Internet at least two computers. File sharing...
... ready connection for the users, with wireless LAN and Fast Ethernet switch. Broadband network access is waning. Resource sharing: Share resources such as printers, scanners and other peripherals. for most people. This integrated access device combines Internet gateway functions with or without the network wires. All linked computers can be installed and configured right out of broadband capabilities over a single Internet connection to access the Internet at least two computers. File sharing...

User's Guide
Page 10
... antennas support high speed performance and great coverage with MIMO technology Network Address Translation (NAT) firewall Wi-Fi Protected Setup (WPS) button for simple network connectivity Universal Plug and Play (UPnP) and Application Level Gateway support for Internet applications such as email, FTP, gaming, remote desktop, Net Meeting, telnet and more Provides additional security with Internet Access Control (MAC Address, Domain, and IP Filtering) Easy remote management via Web browser Wireless security support for WEP, WPA...
... antennas support high speed performance and great coverage with MIMO technology Network Address Translation (NAT) firewall Wi-Fi Protected Setup (WPS) button for simple network connectivity Universal Plug and Play (UPnP) and Application Level Gateway support for Internet applications such as email, FTP, gaming, remote desktop, Net Meeting, telnet and more Provides additional security with Internet Access Control (MAC Address, Domain, and IP Filtering) Easy remote management via Web browser Wireless security support for WEP, WPA...
User's Guide
Page 12
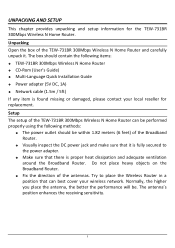
... provides unpacking and setup information for replacement. Try to the power adapter. Make sure that can be performed properly using the following items: TEW-731BR 300Mbps Wireless N Home Router CD-Rom (User's Guide) Multi-Language Quick Installation Guide Power adapter (5V DC, 1A) Network cable (1.5m / 5ft) If any item is proper heat dissipation and adequate ventilation around the Broadband Router. The antenna's position enhances the...
... provides unpacking and setup information for replacement. Try to the power adapter. Make sure that can be performed properly using the following items: TEW-731BR 300Mbps Wireless N Home Router CD-Rom (User's Guide) Multi-Language Quick Installation Guide Power adapter (5V DC, 1A) Network cable (1.5m / 5ft) If any item is proper heat dissipation and adequate ventilation around the Broadband Router. The antenna's position enhances the...
User's Guide
Page 13
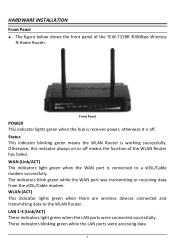
... blinking green while the LAN ports were accessing data. 6 Otherwise, this indicator always on or off . LAN 1-4 (Link/ACT) These indicators light green when the LAN ports were connected successfully. Front Panel POWER This indicator lights green when the hub is receives power, otherwise it is connected to the WLAN Router. WAN (Link/ACT) The indicators light green when the WAN port is off means the function of the TEW-731BR 300Mbps Wireless N Home Router. Status This indicator blinking green means the WLAN Router is working...
... blinking green while the LAN ports were accessing data. 6 Otherwise, this indicator always on or off . LAN 1-4 (Link/ACT) These indicators light green when the LAN ports were connected successfully. Front Panel POWER This indicator lights green when the hub is receives power, otherwise it is connected to the WLAN Router. WAN (Link/ACT) The indicators light green when the WAN port is off means the function of the TEW-731BR 300Mbps Wireless N Home Router. Status This indicator blinking green means the WLAN Router is working...
User's Guide
Page 14
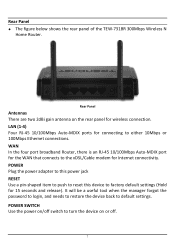
... the TEW-731BR 300Mbps Wireless N Home Router. Rear Panel Antennas There are two 2dBi gain antenna on /off switch to either 10Mbps or 100Mbps Ethernet connections. POWER Plug the power adapter to this power jack RESET Use a pin-shaped item to push to reset this device to default settings. POWER SWITCH Use the power on the rear panel for Internet connectivity. LAN (1-4) Four RJ-45 10/100Mbps Auto-MDIX ports for 15 seconds and release). WAN In the four port broadband Router, there...
... the TEW-731BR 300Mbps Wireless N Home Router. Rear Panel Antennas There are two 2dBi gain antenna on /off switch to either 10Mbps or 100Mbps Ethernet connections. POWER Plug the power adapter to this power jack RESET Use a pin-shaped item to push to reset this device to default settings. POWER SWITCH Use the power on the rear panel for Internet connectivity. LAN (1-4) Four RJ-45 10/100Mbps Auto-MDIX ports for 15 seconds and release). WAN In the four port broadband Router, there...
User's Guide
Page 24
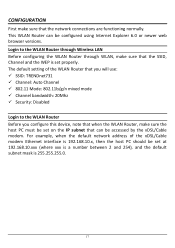
... the default network address of the WLAN Router that you will use: SSID: TRENDnet731 Channel: Auto Channel 802.11 Mode: 802.11b/g/n mixed mode Channel bandwidth: 20Mhz Security: Disabled Login to the WLAN Router through Wireless LAN Before configuring the WLAN Router through WLAN, make sure that the SSID, Channel and the WEP is 255.255.255.0. 17 CONFIGURATION First make sure that can be configured using Internet Explorer 6.0 or newer web browser versions. Login to the WLAN Router Before you configure this device, note...
... the default network address of the WLAN Router that you will use: SSID: TRENDnet731 Channel: Auto Channel 802.11 Mode: 802.11b/g/n mixed mode Channel bandwidth: 20Mhz Security: Disabled Login to the WLAN Router through Wireless LAN Before configuring the WLAN Router through WLAN, make sure that the SSID, Channel and the WEP is 255.255.255.0. 17 CONFIGURATION First make sure that can be configured using Internet Explorer 6.0 or newer web browser versions. Login to the WLAN Router Before you configure this device, note...
User's Guide
Page 40
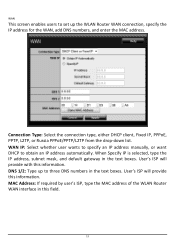
... WLAN Router WAN interface in this information. WAN IP: Select whether user wants to specify an IP address manually, or want DHCP to three DNS numbers in the text boxes. DNS 1/2: Type up the WLAN Router WAN connection, specify the IP address for the WAN, add DNS numbers, and enter the MAC address. Connection Type: Select the connection type, either DHCP client, Fixed IP, PPPoE, PPTP, L2TP, or Russia PPPoE/PPTP/L2TP from the drop-down list. When Specify IP is selected, type the IP address, subnet mask, and default gateway...
... WLAN Router WAN interface in this information. WAN IP: Select whether user wants to specify an IP address manually, or want DHCP to three DNS numbers in the text boxes. DNS 1/2: Type up the WLAN Router WAN connection, specify the IP address for the WAN, add DNS numbers, and enter the MAC address. Connection Type: Select the connection type, either DHCP client, Fixed IP, PPPoE, PPTP, L2TP, or Russia PPPoE/PPTP/L2TP from the drop-down list. When Specify IP is selected, type the IP address, subnet mask, and default gateway...
User's Guide
Page 58
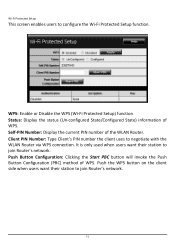
... users want their station to configure the Wi-Fi Protected Setup function. Push Button Configuration: Clicking the Start PBC button will invoke the Push Button Configuration (PBC) method of WPS. Wi-Fi Protected Setup This screen enables users to join Router's network. Self-PIN Number: Display the current PIN number of the WLAN Router. Push the WPS button on the client side when users want their station to negotiate with the WLAN Router via WPS connection. Client PIN Number: Type Client's PIN number the client uses to join Router's network...
... users want their station to configure the Wi-Fi Protected Setup function. Push Button Configuration: Clicking the Start PBC button will invoke the Push Button Configuration (PBC) method of WPS. Wi-Fi Protected Setup This screen enables users to join Router's network. Self-PIN Number: Display the current PIN number of the WLAN Router. Push the WPS button on the client side when users want their station to negotiate with the WLAN Router via WPS connection. Client PIN Number: Type Client's PIN number the client uses to join Router's network...
User's Guide
Page 65
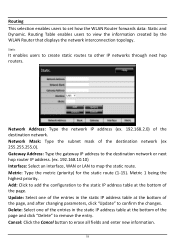
... interface, WAN or LAN to view the information created by the WLAN Router that displays the network interconnection topology. Metric: Type the metric (priority) for the static route (1-15). Network Address: Type the network IP address (ex. 192.168.2.0) of the destination network (ex 255.255.255.0). Metric 1 being the highest priority. Network Mask: Type the subnet mask of the destination network. Routing Table enables users to map the static route. Add: Click to add the configuration...
... interface, WAN or LAN to view the information created by the WLAN Router that displays the network interconnection topology. Metric: Type the metric (priority) for the static route (1-15). Network Address: Type the network IP address (ex. 192.168.2.0) of the destination network (ex 255.255.255.0). Metric 1 being the highest priority. Network Mask: Type the subnet mask of the destination network. Routing Table enables users to map the static route. Add: Click to add the configuration...

User's Guide
Page 70
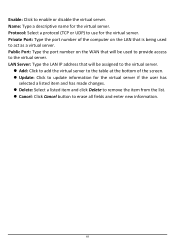
Update: Click to the list at the bottom of the fields. Add: Click to add the user to update information for the user, if you have changed any of the list and click Delete to erase all fields and enter new information. 63 Cancel: Click Cancel to remove the user profile. Delete: Select a user from the table at the bottom of the page. MAC Address: Type the MAC address of the user to be permitted/denied access. Name: Type the name of the user's network interface.
Update: Click to the list at the bottom of the fields. Add: Click to add the user to update information for the user, if you have changed any of the list and click Delete to erase all fields and enter new information. 63 Cancel: Click Cancel to remove the user profile. Delete: Select a user from the table at the bottom of the page. MAC Address: Type the MAC address of the user to be permitted/denied access. Name: Type the name of the user's network interface.
User's Guide
Page 75
... server. LAN Server: Type the LAN IP address that is being used to provide access to use for the virtual server. Private Port: Type the port number of the screen. Update: Click to update information for the virtual server if the user has selected a listed item and has made changes. Delete: Select a listed item and click Delete to remove the item from the list. Cancel: Click Cancel button to enable or disable...
... server. LAN Server: Type the LAN IP address that is being used to provide access to use for the virtual server. Private Port: Type the port number of the screen. Update: Click to update information for the virtual server if the user has selected a listed item and has made changes. Delete: Select a listed item and click Delete to remove the item from the list. Cancel: Click Cancel button to enable or disable...
User's Guide
Page 81
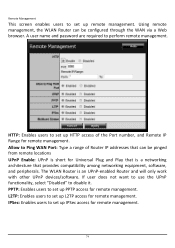
... be configured through the WAN via a Web browser. Allow to set up HTTP access of Router IP addresses that provides compatibility among networking equipment, software, and peripherals. The WLAN Router is a networking architecture that can be pinged from remote locations UPnP Enable: UPnP is short for Universal Plug and Play that is an UPnP-enabled Router and will only work with other UPnP devices/software. Remote Management This screen enables users to set up L2TP access for remote management. L2TP: Enables users to set up remote management. PPTP: Enables users...
... be configured through the WAN via a Web browser. Allow to set up HTTP access of Router IP addresses that provides compatibility among networking equipment, software, and peripherals. The WLAN Router is a networking architecture that can be pinged from remote locations UPnP Enable: UPnP is short for Universal Plug and Play that is an UPnP-enabled Router and will only work with other UPnP devices/software. Remote Management This screen enables users to set up L2TP access for remote management. L2TP: Enables users to set up remote management. PPTP: Enables users...
User's Guide
Page 83
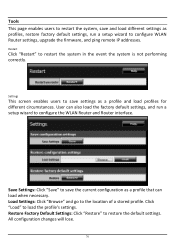
.... Restore Factory Default Settings: Click "Restore" to load the profile's settings. All configuration changes will lose. 76 Tools This page enables users to restart the system, save and load different settings as profiles, restore factory default settings, run a setup wizard to configure the WLAN Router and Router interface. Settings This screen enables users to configure WLAN Router settings, upgrade the firmware, and ping remote IP addresses. Save Settings: Click "Save" to save settings as a profile that can also load the factory default settings, and run a setup wizard to...
.... Restore Factory Default Settings: Click "Restore" to load the profile's settings. All configuration changes will lose. 76 Tools This page enables users to restart the system, save and load different settings as profiles, restore factory default settings, run a setup wizard to configure the WLAN Router and Router interface. Settings This screen enables users to configure WLAN Router settings, upgrade the firmware, and ping remote IP addresses. Save Settings: Click "Save" to save settings as a profile that can also load the factory default settings, and run a setup wizard to...
User's Guide
Page 85
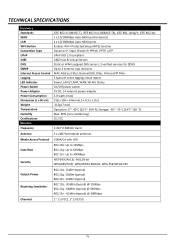
... MAC Address Filter, Domain/URL Filter, Protocol/IP Filter 5 types of event logging; TECHNICAL SPECIFICATIONS Hardware Standards WAN LAN WPS Button Connection Type UPnP DMZ DNS SNMP Internet Access Control Logging LED Indicator Power Switch Power Adapter Power Consumption Dimension (L x W x H) Weight Temperature Humidity Certifications Wireless Frequency IEEE 802.3 (10BASE-T), IEEE 802.3u (100BASE-TX), IEEE 802.11b/g/n, IEEE 802.3az 1 x 10/100Mbps Auto-MDIX port (Internet) 4 x 10/100Mbps Auto-MDIX ports Enables Wi-Fi Protected Setup (WPS) function Dynamic IP, Static (Fixed) IP, PPPoE, PPTP...
... MAC Address Filter, Domain/URL Filter, Protocol/IP Filter 5 types of event logging; TECHNICAL SPECIFICATIONS Hardware Standards WAN LAN WPS Button Connection Type UPnP DMZ DNS SNMP Internet Access Control Logging LED Indicator Power Switch Power Adapter Power Consumption Dimension (L x W x H) Weight Temperature Humidity Certifications Wireless Frequency IEEE 802.3 (10BASE-T), IEEE 802.3u (100BASE-TX), IEEE 802.11b/g/n, IEEE 802.3az 1 x 10/100Mbps Auto-MDIX port (Internet) 4 x 10/100Mbps Auto-MDIX ports Enables Wi-Fi Protected Setup (WPS) function Dynamic IP, Static (Fixed) IP, PPPoE, PPTP...
Quick Installation Guide
Page 3
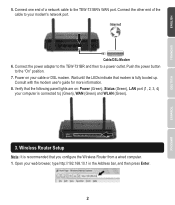
... Wireless Router from a wired computer. 1. 5. Open your modem's network port. Connect the power adapter to the TEW-731BR and then to the "On" position. 7. Power on : Power (Green), Status (Green), LAN port (1, 2, 3, 4) your computer is connected to your web browser, type http://192.168.10.1 in the Address bar, and then press Enter. 2 Push the power button to a power outlet. Wireless Router Setup Note: It is fully booted up. Connect one end of the cable to ) (Green), WAN (Green) and WLAN (Green). 3. Internet Cable/DSL-Modem 6. Consult with the modem user's guide...
... Wireless Router from a wired computer. 1. 5. Open your modem's network port. Connect the power adapter to the TEW-731BR and then to the "On" position. 7. Power on : Power (Green), Status (Green), LAN port (1, 2, 3, 4) your computer is connected to your web browser, type http://192.168.10.1 in the Address bar, and then press Enter. 2 Push the power button to a power outlet. Wireless Router Setup Note: It is fully booted up. Connect one end of the cable to ) (Green), WAN (Green) and WLAN (Green). 3. Internet Cable/DSL-Modem 6. Consult with the modem user's guide...


