User's Guide
Page 6
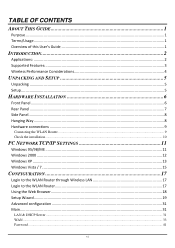
... INTRODUCTION 2 Applications: ...2 Supported Features:...3 Wireless Performance Considerations 4 UNPACKING AND SETUP 5 Unpacking ...5 Setup...5 HARDWARE INSTALLATION 6 Front Panel...6 Rear Panel ...7 Side Panel...8 Hanging Way ...8 Hardware connections ...9 Connecting the WLAN Router ...9 Check the installation...10 PC NETWORK TCP/IP SETTINGS 11 Windows 95/......13 Windows Vista / 7 ...15 CONFIGURATION 17 Login to the WLAN Router through Wireless LAN 17 Login to the WLAN Router...17 Using the Web Browser...18 Setup Wizard...19 Advanced configuration ...31 Main...31 LAN & DHCP Server ...31...
... INTRODUCTION 2 Applications: ...2 Supported Features:...3 Wireless Performance Considerations 4 UNPACKING AND SETUP 5 Unpacking ...5 Setup...5 HARDWARE INSTALLATION 6 Front Panel...6 Rear Panel ...7 Side Panel...8 Hanging Way ...8 Hardware connections ...9 Connecting the WLAN Router ...9 Check the installation...10 PC NETWORK TCP/IP SETTINGS 11 Windows 95/......13 Windows Vista / 7 ...15 CONFIGURATION 17 Login to the WLAN Router through Wireless LAN 17 Login to the WLAN Router...17 Using the Web Browser...18 Setup Wizard...19 Advanced configuration ...31 Main...31 LAN & DHCP Server ...31...
User's Guide
Page 8
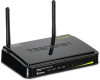
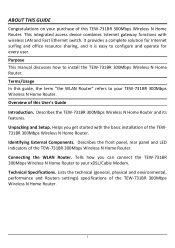
... xDSL/Cable Modem. Describes the front panel, rear panel and LED indicators of the TEW-731BR 300Mbps Wireless N Home Router. 1 It provides a complete solution for every user. Describes the TEW-731BR 300Mbps Wireless N Home Router and its features. Connecting the WLAN Router. Unpacking and Setup. ABOUT THIS GUIDE Congratulations on your purchase of this User's Guide Introduction. Identifying...
... xDSL/Cable Modem. Describes the front panel, rear panel and LED indicators of the TEW-731BR 300Mbps Wireless N Home Router. 1 It provides a complete solution for every user. Describes the TEW-731BR 300Mbps Wireless N Home Router and its features. Connecting the WLAN Router. Unpacking and Setup. ABOUT THIS GUIDE Congratulations on your purchase of this User's Guide Introduction. Identifying...
User's Guide
Page 12
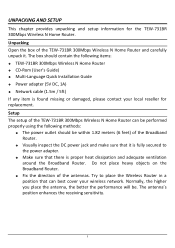
... item is proper heat dissipation and adequate ventilation around the Broadband Router. The box should be within 1.82 meters (6 feet) of the TEW-731BR 300Mbps Wireless N Home Router can best cover your local reseller for the TEW-731BR 300Mbps Wireless N Home Router. Setup The setup of the Broadband Router. Visually inspect the DC power jack and make sure that...
... item is proper heat dissipation and adequate ventilation around the Broadband Router. The box should be within 1.82 meters (6 feet) of the TEW-731BR 300Mbps Wireless N Home Router can best cover your local reseller for the TEW-731BR 300Mbps Wireless N Home Router. Setup The setup of the Broadband Router. Visually inspect the DC power jack and make sure that...
User's Guide
Page 15
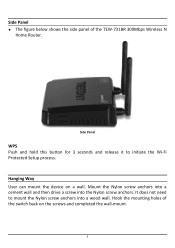
Hanging Way User can mount the device on the screws and completed the wall-mount. 8 Mount the Nylon screw anchors into a cement wall and then drive a screw into a wood wall. It does not need to initiate the Wi-Fi Protected Setup process. Hook the mounting holes of the TEW-731BR 300Mbps Wireless N Home Router. Side Panel WPS Push and hold this button for 3 seconds and release it to mount the Nylon screw anchors into the Nylon screw anchors. Side Panel The figure below shows the side panel of the switch back on a wall.
Hanging Way User can mount the device on the screws and completed the wall-mount. 8 Mount the Nylon screw anchors into a cement wall and then drive a screw into a wood wall. It does not need to initiate the Wi-Fi Protected Setup process. Hook the mounting holes of the TEW-731BR 300Mbps Wireless N Home Router. Side Panel WPS Push and hold this button for 3 seconds and release it to mount the Nylon screw anchors into the Nylon screw anchors. Side Panel The figure below shows the side panel of the switch back on a wall.
User's Guide
Page 26
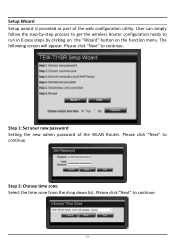
Setup Wizard Setup wizard is provided as part of the WLAN Router. Please click "Next" to continue. 19 Step 1: Set your new password Setting the new admin password of the web configuration utility. Please click "Next" to continue. User can simply follow the step-by clicking on` the "Wizard" button on the function menu. Please click "Next" to run in 6 easy steps by -step process to get the wireless Router configuration ready to continue. The following screen will appear. Step 2: Choose time zone Select the time zone from the drop down list.
Setup Wizard Setup wizard is provided as part of the WLAN Router. Please click "Next" to continue. 19 Step 1: Set your new password Setting the new admin password of the web configuration utility. Please click "Next" to continue. User can simply follow the step-by clicking on` the "Wizard" button on the function menu. Please click "Next" to run in 6 easy steps by -step process to get the wireless Router configuration ready to continue. The following screen will appear. Step 2: Choose time zone Select the time zone from the drop down list.
User's Guide
Page 37
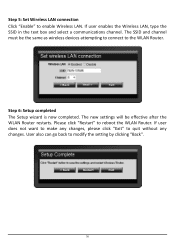
The SSID and channel must be effective after the WLAN Router restarts. Step 6: Setup completed The Setup wizard is now completed. The new settings will be the same as wireless devices attempting to connect to modify the setting by clicking "Back". 30 ...If user enables the Wireless LAN, type the SSID in the text box and select a communications channel. User also can go back to the WLAN Router...
The SSID and channel must be effective after the WLAN Router restarts. Step 6: Setup completed The Setup wizard is now completed. The new settings will be the same as wireless devices attempting to connect to modify the setting by clicking "Back". 30 ...If user enables the Wireless LAN, type the SSID in the text box and select a communications channel. User also can go back to the WLAN Router...
User's Guide
Page 58
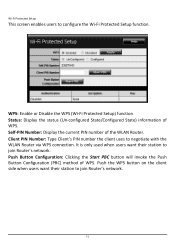
.... WPS: Enable or Disable the WPS (Wi-Fi Protected Setup) function Status: Display the status (Un-configured State/Configured State) information of WPS. Wi-Fi Protected Setup This screen enables users to negotiate with the WLAN Router via WPS connection. Self-PIN Number: Display the current PIN... number of the WLAN Router. Client PIN Number: Type Client's PIN number the client uses to...
.... WPS: Enable or Disable the WPS (Wi-Fi Protected Setup) function Status: Display the status (Un-configured State/Configured State) information of WPS. Wi-Fi Protected Setup This screen enables users to negotiate with the WLAN Router via WPS connection. Self-PIN Number: Display the current PIN... number of the WLAN Router. Client PIN Number: Type Client's PIN number the client uses to...
User's Guide
Page 83
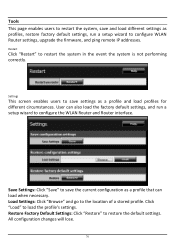
... Settings: Click "Save" to save the current configuration as a profile that can also load the factory default settings, and run a setup wizard to configure WLAN Router settings, upgrade the firmware, and ping remote IP addresses. Load Settings: Click "Browse" and go to restart the system in the ...Tools This page enables users to restart the system, save and load different settings as profiles, restore factory default settings, run a setup wizard to configure the WLAN Router and Router interface. Click "Load" to load the profile's settings. All configuration changes will lose. 76
... Settings: Click "Save" to save the current configuration as a profile that can also load the factory default settings, and run a setup wizard to configure WLAN Router settings, upgrade the firmware, and ping remote IP addresses. Load Settings: Click "Browse" and go to restart the system in the ...Tools This page enables users to restart the system, save and load different settings as profiles, restore factory default settings, run a setup wizard to configure the WLAN Router and Router interface. Click "Load" to load the profile's settings. All configuration changes will lose. 76
Quick Installation Guide
Page 3
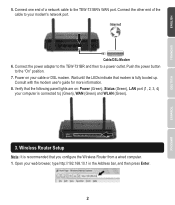
5. Connect the power adapter to the TEW-731BR and then to the "On" position. 7. Wireless Router Setup Note: It is recommended that modem is connected to) (Green), WAN (Green) and WLAN (Green). 3. Verify that the following panel lights are on your modem's ... that you configure the Wireless Router from a wired computer. 1. Connect the other end of a network cable to your cable or DSL modem. Consult with the modem user's guide for more information. 8. Open your computer is fully booted up. Connect one end of the cable to the TEW-731BR's WAN port. Internet Cable/DSL...
5. Connect the power adapter to the TEW-731BR and then to the "On" position. 7. Wireless Router Setup Note: It is recommended that modem is connected to) (Green), WAN (Green) and WLAN (Green). 3. Verify that the following panel lights are on your modem's ... that you configure the Wireless Router from a wired computer. 1. Connect the other end of a network cable to your cable or DSL modem. Consult with the modem user's guide for more information. 8. Open your computer is fully booted up. Connect one end of the cable to the TEW-731BR's WAN port. Internet Cable/DSL...
Quick Installation Guide
Page 4
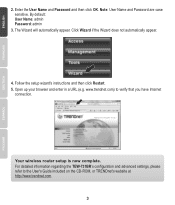
...detailed information regarding the TEW-731BR's configuration and advanced settings, please refer to verify that you have Internet connection. By default: User Name: admin Password: admin 3. Open up your browser and enter in a URL (e.g. Your wireless router setup is now complete. www.trendnet.com) to the User...'s Guide included on the CD-ROM, or TRENDnet's website at http://www.trendnet.com. 3 Click Wizard if the Wizard does not automatically appear. 4. 2. Note...
...detailed information regarding the TEW-731BR's configuration and advanced settings, please refer to verify that you have Internet connection. By default: User Name: admin Password: admin 3. Open up your browser and enter in a URL (e.g. Your wireless router setup is now complete. www.trendnet.com) to the User...'s Guide included on the CD-ROM, or TRENDnet's website at http://www.trendnet.com. 3 Click Wizard if the Wizard does not automatically appear. 4. 2. Note...


