User's Guide
Page 2
This equipment generates, uses and can be determined by one of the following measures: - If this equipment does cause harmful interference to radio or television reception, which can radiate radio frequency energy and, if not installed and used in accordance with Part 15 of the R&TTE Directive 1999/5/EC. IMPORTANT NOTE: FCC Radiation Exposure Statement: This equipment complies with minimum distance 20cm between the equipment and receiver. - This equipment should be co-located or operating in a particular installation. EU Declaration of Conformity This device complies with ...
This equipment generates, uses and can be determined by one of the following measures: - If this equipment does cause harmful interference to radio or television reception, which can radiate radio frequency energy and, if not installed and used in accordance with Part 15 of the R&TTE Directive 1999/5/EC. IMPORTANT NOTE: FCC Radiation Exposure Statement: This equipment complies with minimum distance 20cm between the equipment and receiver. - This equipment should be co-located or operating in a particular installation. EU Declaration of Conformity This device complies with ...
User's Guide
Page 3
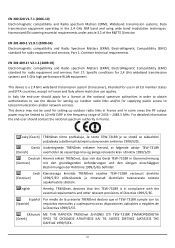
...Wideband transmission systems; Harmonized EN covering essential requirements under article 3.2 of Directive 1999/5/EC. English Hereby, TRENDnet, declares that this TEW-731BR is a 2.4 GHz wideband transmission system (transceiver), intended for use in all EU member states and...a license at følgende udstyr TEW-731BR [Danish] overholder de væsentlige krav og øvrige relevante krav i direktiv 1999/5/EF. TRENDnet TEW-731BR [Greek] 1999/5/ΕΚ. Eesti Käesolevaga kinnitab TRENDnet seadme TEW-731BR vastavust direktiivi [Estonian] 1999/5/EÜ ...
...Wideband transmission systems; Harmonized EN covering essential requirements under article 3.2 of Directive 1999/5/EC. English Hereby, TRENDnet, declares that this TEW-731BR is a 2.4 GHz wideband transmission system (transceiver), intended for use in all EU member states and...a license at følgende udstyr TEW-731BR [Danish] overholder de væsentlige krav og øvrige relevante krav i direktiv 1999/5/EF. TRENDnet TEW-731BR [Greek] 1999/5/ΕΚ. Eesti Käesolevaga kinnitab TRENDnet seadme TEW-731BR vastavust direktiivi [Estonian] 1999/5/EÜ ...
User's Guide
Page 6
TABLE OF CONTENTS ABOUT THIS GUIDE 1 Purpose ...1 Terms/Usage ...1 Overview of this User's Guide 1 INTRODUCTION 2 Applications: ...2 Supported Features:...3 Wireless Performance Considerations 4 UNPACKING AND SETUP 5 Unpacking ...5 Setup...5 HARDWARE INSTALLATION 6 Front Panel...6 Rear Panel ...7 Side Panel...8 Hanging Way ...8 Hardware connections ...9 Connecting the WLAN Router ...9 Check the installation...10 PC NETWORK TCP/IP SETTINGS 11 Windows 95/98/ME ...11 Windows 2000 ...12 Windows XP ...13 Windows Vista / 7 ...15 CONFIGURATION 17 Login to the WLAN Router through Wireless LAN...
TABLE OF CONTENTS ABOUT THIS GUIDE 1 Purpose ...1 Terms/Usage ...1 Overview of this User's Guide 1 INTRODUCTION 2 Applications: ...2 Supported Features:...3 Wireless Performance Considerations 4 UNPACKING AND SETUP 5 Unpacking ...5 Setup...5 HARDWARE INSTALLATION 6 Front Panel...6 Rear Panel ...7 Side Panel...8 Hanging Way ...8 Hardware connections ...9 Connecting the WLAN Router ...9 Check the installation...10 PC NETWORK TCP/IP SETTINGS 11 Windows 95/98/ME ...11 Windows 2000 ...12 Windows XP ...13 Windows Vista / 7 ...15 CONFIGURATION 17 Login to the WLAN Router through Wireless LAN...
User's Guide
Page 7
Time ...42 Dynamic DNS...43 Wireless ...44 Basic...44 Security ...46 Advanced ...50 Wi-Fi Protected Setup...51 Status ...52 Device Information ...52 Log ...54 Log Setting...55 Statistic...57 Wireless ...57 Routing...58 Static ...58 Dynamic...59 Routing Table ...60 Access ...61 Filters ...61 Virtual Server...67 Special AP...69 DMZ...70 Firewall Settings ...71 Management...73 SNMP (Simple Network Management Protocol 73 Remote Management ...74 Capture Packets...75 Tools ...76 Restart ...76 Settings...76 Firmware ...77 Ping Test ...77 TECHNICAL SPECIFICATIONS 78 LIMITED WARRANTY 78 vii
Time ...42 Dynamic DNS...43 Wireless ...44 Basic...44 Security ...46 Advanced ...50 Wi-Fi Protected Setup...51 Status ...52 Device Information ...52 Log ...54 Log Setting...55 Statistic...57 Wireless ...57 Routing...58 Static ...58 Dynamic...59 Routing Table ...60 Access ...61 Filters ...61 Virtual Server...67 Special AP...69 DMZ...70 Firewall Settings ...71 Management...73 SNMP (Simple Network Management Protocol 73 Remote Management ...74 Capture Packets...75 Tools ...76 Restart ...76 Settings...76 Firmware ...77 Ping Test ...77 TECHNICAL SPECIFICATIONS 78 LIMITED WARRANTY 78 vii
User's Guide
Page 8
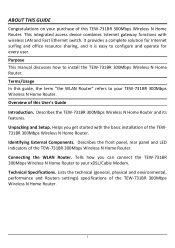
.... Terms/Usage In this guide, the term "the WLAN Router" refers to install the TEW-731BR 300Mbps Wireless N Home Router. Helps you can connect the TEW-731BR 300Mbps Wireless N Home Router to configure and operate for Internet surfing and office resource sharing,...panel, rear panel and LED indicators of the TEW-731BR 300Mbps Wireless N Home Router. 1 Lists the technical (general, physical and environmental, performance and Routers settings) specifications of the TEW-731BR 300Mbps Wireless N Home Router. Describes the TEW-731BR 300Mbps Wireless N Home Router and its features....
.... Terms/Usage In this guide, the term "the WLAN Router" refers to install the TEW-731BR 300Mbps Wireless N Home Router. Helps you can connect the TEW-731BR 300Mbps Wireless N Home Router to configure and operate for Internet surfing and office resource sharing,...panel, rear panel and LED indicators of the TEW-731BR 300Mbps Wireless N Home Router. 1 Lists the technical (general, physical and environmental, performance and Routers settings) specifications of the TEW-731BR 300Mbps Wireless N Home Router. Describes the TEW-731BR 300Mbps Wireless N Home Router and its features....

User's Guide
Page 9
The era of the family computing lifestyle. Networking technology is waning. However, allowing more than two computers to access the Internet, share resources, or play online games-the basis of the standalone PC is moving out of the exclusive domain of corporations and into homes with at the same time means less affordable, higher costs. The local area network connects home computers while also allowing any time, day or night has become a standard requirement for security and anti-hacking systems. 2 The scarcity of installing a separate modem and ISP line for each computer, while...
The era of the family computing lifestyle. Networking technology is waning. However, allowing more than two computers to access the Internet, share resources, or play online games-the basis of the standalone PC is moving out of the exclusive domain of corporations and into homes with at the same time means less affordable, higher costs. The local area network connects home computers while also allowing any time, day or night has become a standard requirement for security and anti-hacking systems. 2 The scarcity of installing a separate modem and ISP line for each computer, while...

User's Guide
Page 10
Actual data throughput and coverage will vary depending on interference, network traffic, building materials and other conditions. 3 Supported Features: Wi-Fi compliant with IEEE 802.11n and IEEE 802.11b/g standards 4 x 10/100Mbps Auto-MDIX LAN port and 1 x 10/100Mbps WAN port (Internet) Supports Cable/DSL modems with Dynamic IP, Static IP, PPPoE, PPTP, L2TP connection types High-speed data rates up to 300Mbps using an IEEE 802.11n connection 2 fixed external antennas support high speed performance and great coverage with MIMO technology ...
Actual data throughput and coverage will vary depending on interference, network traffic, building materials and other conditions. 3 Supported Features: Wi-Fi compliant with IEEE 802.11n and IEEE 802.11b/g standards 4 x 10/100Mbps Auto-MDIX LAN port and 1 x 10/100Mbps WAN port (Internet) Supports Cable/DSL modems with Dynamic IP, Static IP, PPPoE, PPTP, L2TP connection types High-speed data rates up to 300Mbps using an IEEE 802.11n connection 2 fixed external antennas support high speed performance and great coverage with MIMO technology ...
User's Guide
Page 11
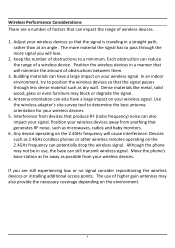
Position the wireless devices in a manner that will lose. 2. In an indoor environment, try to determine the best antenna orientation for your wireless devices so that the signal is traveling in use of factors that produce RF (radio frequency) noise can also impact your signal. Devices such as possible from devices that can also have a large impact on your wireless signal. The use , the base can have a large impact on your wireless signal. Each obstruction can potentially drop the wireless signal. Use the wireless adapter's site survey tool to position the ...
Position the wireless devices in a manner that will lose. 2. In an indoor environment, try to determine the best antenna orientation for your wireless devices so that the signal is traveling in use of factors that produce RF (radio frequency) noise can also impact your signal. Devices such as possible from devices that can also have a large impact on your wireless signal. The use , the base can have a large impact on your wireless signal. Each obstruction can potentially drop the wireless signal. Use the wireless adapter's site survey tool to position the ...
User's Guide
Page 12
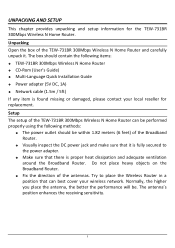
Normally, the higher you place the antenna, the better the performance will be performed properly using the following items: TEW-731BR 300Mbps Wireless N Home Router CD-Rom (User's Guide) Multi-Language Quick Installation Guide Power adapter (5V DC, 1A) ...that can be . The box should contain the following methods: The power outlet should be within 1.82 meters (6 feet) of the TEW-731BR 300Mbps Wireless N Home Router and carefully unpack it is fully secured to place the Wireless Router in a position that there is found missing or ...
Normally, the higher you place the antenna, the better the performance will be performed properly using the following items: TEW-731BR 300Mbps Wireless N Home Router CD-Rom (User's Guide) Multi-Language Quick Installation Guide Power adapter (5V DC, 1A) ...that can be . The box should contain the following methods: The power outlet should be within 1.82 meters (6 feet) of the TEW-731BR 300Mbps Wireless N Home Router and carefully unpack it is fully secured to place the Wireless Router in a position that there is found missing or ...
User's Guide
Page 13
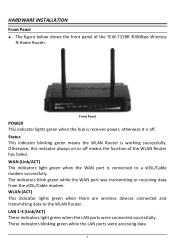
Front Panel POWER This indicator lights green when the hub is receives power, otherwise it is off means the function of the TEW-731BR 300Mbps Wireless N Home Router. WAN (Link/ACT) The indicators light green when the WAN port is working successfully. The indicators blink green while the WAN ...
Front Panel POWER This indicator lights green when the hub is receives power, otherwise it is off means the function of the TEW-731BR 300Mbps Wireless N Home Router. WAN (Link/ACT) The indicators light green when the WAN port is working successfully. The indicators blink green while the WAN ...
User's Guide
Page 14
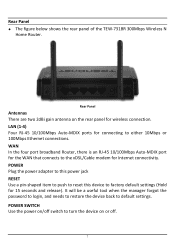
... (1-4) Four RJ-45 10/100Mbps Auto-MDIX ports for 15 seconds and release). Rear Panel The figure below shows the rear panel of the TEW-731BR 300Mbps Wireless N Home Router.
... (1-4) Four RJ-45 10/100Mbps Auto-MDIX ports for 15 seconds and release). Rear Panel The figure below shows the rear panel of the TEW-731BR 300Mbps Wireless N Home Router.
User's Guide
Page 15
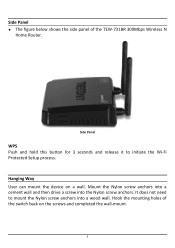
Side Panel WPS Push and hold this button for 3 seconds and release it to mount the Nylon screw anchors into the Nylon screw anchors. It does not need to initiate the Wi-Fi Protected Setup process. Side Panel The figure below shows the side panel of the switch back on a wall. Hanging Way User can mount the device on the screws and completed the wall-mount. 8 Mount the Nylon screw anchors into a cement wall and then drive a screw into a wood wall. Hook the mounting holes of the TEW-731BR 300Mbps Wireless N Home Router.
Side Panel WPS Push and hold this button for 3 seconds and release it to mount the Nylon screw anchors into the Nylon screw anchors. It does not need to initiate the Wi-Fi Protected Setup process. Side Panel The figure below shows the side panel of the switch back on a wall. Hanging Way User can mount the device on the screws and completed the wall-mount. 8 Mount the Nylon screw anchors into a cement wall and then drive a screw into a wood wall. Hook the mounting holes of the TEW-731BR 300Mbps Wireless N Home Router.
User's Guide
Page 16
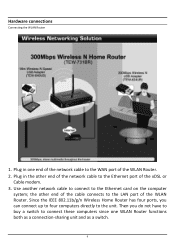
Use another network cable to connect to the unit. Since the IEEE 802.11b/g/n Wireless Home Router has four ports, you do not have to buy a switch to the LAN port of the cable connects to connect these computers since one end of the network cable to the Ethernet port of the WLAN Router. 2. Plug in the other end of the WLAN Router. Plug in one WLAN Router functions both as a connection-sharing unit and as a switch. 9 Hardware connections Connecting the WLAN Router 1. the other end of the network cable to the WAN port of the xDSL or Cable modem. 3. Then you can connect up...
Use another network cable to connect to the unit. Since the IEEE 802.11b/g/n Wireless Home Router has four ports, you do not have to buy a switch to the LAN port of the cable connects to connect these computers since one end of the network cable to the Ethernet port of the WLAN Router. 2. Plug in the other end of the WLAN Router. Plug in one WLAN Router functions both as a connection-sharing unit and as a switch. 9 Hardware connections Connecting the WLAN Router 1. the other end of the network cable to the WAN port of the xDSL or Cable modem. 3. Then you can connect up...
User's Guide
Page 17
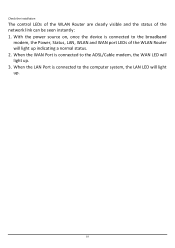
When the LAN Port is connected to the ADSL/Cable modem, the WAN LED will light up. 3. Check the installation The control LEDs of the WLAN Router are clearly visible and the status of the WLAN Router will light up indicating a normal status. 2. When the WAN Port is connected to the broadband modem, the Power, Status, LAN, WLAN and WAN port LEDs of the network link can be seen instantly: 1. With the power source on, once the device is connected to the computer system, the LAN LED will light up. 10
When the LAN Port is connected to the ADSL/Cable modem, the WAN LED will light up. 3. Check the installation The control LEDs of the WLAN Router are clearly visible and the status of the WLAN Router will light up indicating a normal status. 2. When the WAN Port is connected to the broadband modem, the Power, Status, LAN, WLAN and WAN port LEDs of the network link can be seen instantly: 1. With the power source on, once the device is connected to the computer system, the LAN LED will light up. 10
User's Guide
Page 18
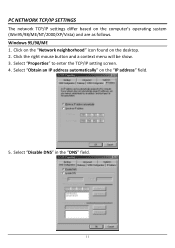
Click on the "Network neighborhood" icon found on the computer's operating system (Win95/98/ME/NT/2000/XP/Vista) and are as follows. Windows 95/98/ME 1. PC NETWORK TCP/IP SETTINGS The network TCP/IP settings differ based on the desktop. 2. Select "Obtain an IP address automatically" on the "IP address" field. 5. Select "Disable DNS" in the "DNS" field. 11 Select "Properties" to enter the TCP/IP setting screen. 4. Click the right mouse button and a context menu will be show. 3.
Click on the "Network neighborhood" icon found on the computer's operating system (Win95/98/ME/NT/2000/XP/Vista) and are as follows. Windows 95/98/ME 1. PC NETWORK TCP/IP SETTINGS The network TCP/IP settings differ based on the desktop. 2. Select "Obtain an IP address automatically" on the "IP address" field. 5. Select "Disable DNS" in the "DNS" field. 11 Select "Properties" to enter the TCP/IP setting screen. 4. Click the right mouse button and a context menu will be show. 3.
User's Guide
Page 19
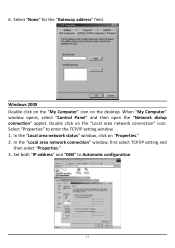
Select "None" for the "Gateway address" field. 6. Windows 2000 Double click on the "My Computer" icon on "Properties." 2. In the "Local area network status" window, click on the desktop. Double click on the "Local area network connection" icon. Set both "IP address" and "DNS" to enter the TCP/IP setting window. 1. Select "Properties" to Automatic configuration. 12 In the "Local area network connection" window, first select TCP/IP setting and then select "Properties." 3. When "My Computer" window opens, select "Control Panel" and then open the "Network dialup connection" ...
Select "None" for the "Gateway address" field. 6. Windows 2000 Double click on the "My Computer" icon on "Properties." 2. In the "Local area network status" window, click on the desktop. Double click on the "Local area network connection" icon. Set both "IP address" and "DNS" to enter the TCP/IP setting window. 1. Select "Properties" to Automatic configuration. 12 In the "Local area network connection" window, first select TCP/IP setting and then select "Properties." 3. When "My Computer" window opens, select "Control Panel" and then open the "Network dialup connection" ...
User's Guide
Page 20
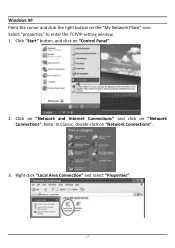
Note: In Classic, double-click on "Network Connections". Click on "Network and Internet Connections" and click on "Network Connections". 3. Windows XP Point the cursor and click the right button on "Control Panel". 2. Select "properties" to enter the TCP/IP setting window. 1. Click "Start" button, and click on the "My Network Place" icon. Right click "Local Area Connection" and select "Properties". 13
Note: In Classic, double-click on "Network Connections". Click on "Network and Internet Connections" and click on "Network Connections". 3. Windows XP Point the cursor and click the right button on "Control Panel". 2. Select "properties" to enter the TCP/IP setting window. 1. Click "Start" button, and click on the "My Network Place" icon. Right click "Local Area Connection" and select "Properties". 13
User's Guide
Page 21
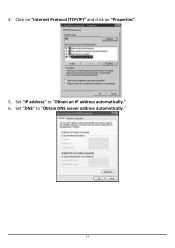
4. Set "DNS" to "Obtain an IP address automatically." 6. Click on "Internet Protocol (TCP/IP)" and click on "Properties". 5. Set "IP address" to "Obtain DNS server address automatically." 14
4. Set "DNS" to "Obtain an IP address automatically." 6. Click on "Internet Protocol (TCP/IP)" and click on "Properties". 5. Set "IP address" to "Obtain DNS server address automatically." 14
User's Guide
Page 22
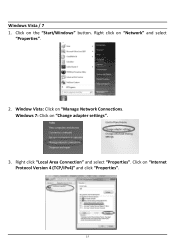
Right click "Local Area Connection" and select "Properties". Windows 7: Click on "Manage Network Connections. Window Vista: Click on "Change adapter settings". 3. Click on "Network" and select "Properties". 2. Windows Vista / 7 1. Right click on "Internet Protocol Version 4 (TCP/IPv4)" and click "Properties". 15 Click on the "Start/Windows" button.
Right click "Local Area Connection" and select "Properties". Windows 7: Click on "Manage Network Connections. Window Vista: Click on "Change adapter settings". 3. Click on "Network" and select "Properties". 2. Windows Vista / 7 1. Right click on "Internet Protocol Version 4 (TCP/IPv4)" and click "Properties". 15 Click on the "Start/Windows" button.
User's Guide
Page 23
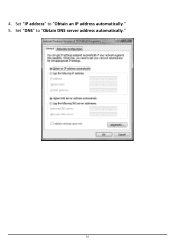
4. Set "DNS" to "Obtain an IP address automatically." 5. Set "IP address" to "Obtain DNS server address automatically." 16
4. Set "DNS" to "Obtain an IP address automatically." 5. Set "IP address" to "Obtain DNS server address automatically." 16
