User Guide
Page 3
...Save LEDs 1.6 Cancel button 1.7 Chapter 2: SETTING UP YOUR PRINTER Unpacking 2.2 Selecting a Location 2.3 Installing the Toner Cartridge 2.4 Loading Paper 2.7 Changing the Paper Size in the Paper Tray ......... 2.9 Connecting a Printer Cable 2.11 For Local Printing 2.11 For Network Printing 2.13... Turning the Printer On 2.14 Printing a Demo Page 2.15 Installing Printer Software 2.16 Printer Driver Features 2.17 Installing Printer Software in Windows 2.18 Installing Software...
...Save LEDs 1.6 Cancel button 1.7 Chapter 2: SETTING UP YOUR PRINTER Unpacking 2.2 Selecting a Location 2.3 Installing the Toner Cartridge 2.4 Loading Paper 2.7 Changing the Paper Size in the Paper Tray ......... 2.9 Connecting a Printer Cable 2.11 For Local Printing 2.11 For Network Printing 2.13... Turning the Printer On 2.14 Printing a Demo Page 2.15 Installing Printer Software 2.16 Printer Driver Features 2.17 Installing Printer Software in Windows 2.18 Installing Software...
User Guide
Page 4
Using the Set IP (BP20N only 2.32 Installing Set IP 2.32 Reinstalling Set IP 2.33 Removing Set IP 2.33 To Use Set IP 2.34 Chapter 3: USING PRINT MATERIALS Choosing Paper ... 3.19 Printing on Card Stock or Custom-sized Materials 3.21 Printing on Preprinted Paper 3.23 Chapter 4: PRINTING TASKS Printing a Document in Windows 4.2 Cancelling a Print Job 4.3 Printer Settings 4.4 Layout Tab 4.5 Paper Tab 4.6 Graphics Tab 4.8 Using the Toner Save Mode 4.11 Extras Tab 4.12 About Tab 4.13...
Using the Set IP (BP20N only 2.32 Installing Set IP 2.32 Reinstalling Set IP 2.33 Removing Set IP 2.33 To Use Set IP 2.34 Chapter 3: USING PRINT MATERIALS Choosing Paper ... 3.19 Printing on Card Stock or Custom-sized Materials 3.21 Printing on Preprinted Paper 3.23 Chapter 4: PRINTING TASKS Printing a Document in Windows 4.2 Cancelling a Print Job 4.3 Printer Settings 4.4 Layout Tab 4.5 Paper Tab 4.6 Graphics Tab 4.8 Using the Toner Save Mode 4.11 Extras Tab 4.12 About Tab 4.13...

User Guide
Page 5
... 4.31 Changing the Status Monitor Program Setting .... 4.31 Setting Up a Locally Shared Printer 4.32 In Windows 9x/Me 4.32 In Windows NT 4.0/2000/XP 4.33 Chapter 5: MAINTAINING YOUR PRINTER Maintaining the Toner Cartridge 5.2 Redistributing Toner 5.3 Replacing the Toner Cartridge 5.5 Cleaning the Printer 5.5 Cleaning the Outside 5.5 Cleaning the Inside 5.5 Printing Configuration Pages 5.8 Chapter 6: SOLVING...
... 4.31 Changing the Status Monitor Program Setting .... 4.31 Setting Up a Locally Shared Printer 4.32 In Windows 9x/Me 4.32 In Windows NT 4.0/2000/XP 4.33 Chapter 5: MAINTAINING YOUR PRINTER Maintaining the Toner Cartridge 5.2 Redistributing Toner 5.3 Replacing the Toner Cartridge 5.5 Cleaning the Printer 5.5 Cleaning the Outside 5.5 Cleaning the Inside 5.5 Printing Configuration Pages 5.8 Chapter 6: SOLVING...
User Guide
Page 6
... Panel A.2 Reinstalling Remote Control Panel A.3 Removing Remote Control Panel A.3 Selecting Print Settings A.4 Starting the Remote Control Panel A.4 Using the Remote Control Panel Tabs A.5 Appendix B: INSTALLING PRINTER OPTIONS Precautions When Installing Printer Options B.2 Installing Memory B.3 Removing the Memory B.6 Installing an Optional Paper Tray B.7 v
... Panel A.2 Reinstalling Remote Control Panel A.3 Removing Remote Control Panel A.3 Selecting Print Settings A.4 Starting the Remote Control Panel A.4 Using the Remote Control Panel Tabs A.5 Appendix B: INSTALLING PRINTER OPTIONS Precautions When Installing Printer Options B.2 Installing Memory B.3 Removing the Memory B.6 Installing an Optional Paper Tray B.7 v

User Guide
Page 7
Appendix C: SPECIFICATIONS Printer Specifications C.2 Paper Specifications C.3 Overview C.3 Supported Sizes of Paper C.4 Guidelines for Using Paper C.5 Paper Specifications C.6 Paper Output Capacity C.6 Printer and Paper Storage Environment C.7 Envelopes C.8 Labels C.10 Transparencies C.10 vi
Appendix C: SPECIFICATIONS Printer Specifications C.2 Paper Specifications C.3 Overview C.3 Supported Sizes of Paper C.4 Guidelines for Using Paper C.5 Paper Specifications C.6 Paper Output Capacity C.6 Printer and Paper Storage Environment C.7 Envelopes C.8 Labels C.10 Transparencies C.10 vi

User Guide
Page 12
1 Introduction Congratulations on the purchase of your printer! This chapter includes: • Special Features • Printer Components • Understanding the Control Panel
1 Introduction Congratulations on the purchase of your printer! This chapter includes: • Special Features • Printer Components • Understanding the Control Panel

User Guide
Page 13
...Regards WORLD BEST • You can print at up to 1200 dpi effective output. See page 4.16. 1.2 INTRODUCTION See page 4.8. • Your printer prints up to 22 pages-per-minute (Letter size), up to 20 pages-per-minute (A4 size). Tape the sheets together to the rear output...) and optional 250sheet input tray (Tray2) supports all standard sizes of paper. See page 4.21. • Print Posters. Special Features Your new printer is equipped with excellent quality and high speed • You can customise your document are magnified and printed across the selected sheet of paper. •...
...Regards WORLD BEST • You can print at up to 1200 dpi effective output. See page 4.16. 1.2 INTRODUCTION See page 4.8. • Your printer prints up to 22 pages-per-minute (Letter size), up to 20 pages-per-minute (A4 size). Tape the sheets together to the rear output...) and optional 250sheet input tray (Tray2) supports all standard sizes of paper. See page 4.21. • Print Posters. Special Features Your new printer is equipped with excellent quality and high speed • You can customise your document are magnified and printed across the selected sheet of paper. •...
User Guide
Page 14
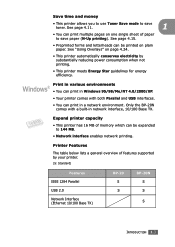
... S S S INTRODUCTION 1.3 See "Using Overlays" on one single sheet of paper to save toner. Save time and money • This printer allows you to use Toner Save mode to save paper (N-Up printing). See page 4.15. • Preprinted forms and letterheads can be printed...to 144 MB. • Network interface enables network printing. Expand printer capacity • This printer has 16 MB of features supported by substantially reducing power consumption when not printing. • This printer meets Energy Star guidelines for energy efficiency. Print in various environments ...
... S S S INTRODUCTION 1.3 See "Using Overlays" on one single sheet of paper to save toner. Save time and money • This printer allows you to use Toner Save mode to save paper (N-Up printing). See page 4.15. • Preprinted forms and letterheads can be printed...to 144 MB. • Network interface enables network printing. Expand printer capacity • This printer has 16 MB of features supported by substantially reducing power consumption when not printing. • This printer meets Energy Star guidelines for energy efficiency. Print in various environments ...
User Guide
Page 15
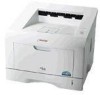
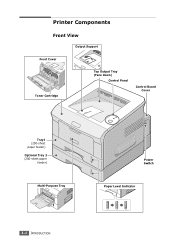
Printer Components Front View Output Support Front Cover Toner Cartridge Top Output Tray (Face down) Control Panel Control Board Cover Tray1 (250-sheet paper feeder) Optional Tray 2 (250-sheet paper feeder) Multi-Purpose Tray Power Switch Paper Level Indicator 1.4 INTRODUCTION
Printer Components Front View Output Support Front Cover Toner Cartridge Top Output Tray (Face down) Control Panel Control Board Cover Tray1 (250-sheet paper feeder) Optional Tray 2 (250-sheet paper feeder) Multi-Purpose Tray Power Switch Paper Level Indicator 1.4 INTRODUCTION
User Guide
Page 17
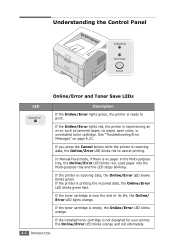
... 1.6 INTRODUCTION If the installed toner cartridge is receiving data, the Online/Error LED slowly blinks green. If the Online/Error lights red, the printer is near the end of its life, the Online/ Error LED lights orange. If the toner cartridge is ready to cancel printing. Understanding the... Control Panel Online/Error and Toner Save LEDs LED Description If the Online/Error lights green, the printer is empty, the Online/Error LED blinks orange. If the toner cartridge is experiencing an error, such as jammed paper, no paper in...
... 1.6 INTRODUCTION If the installed toner cartridge is receiving data, the Online/Error LED slowly blinks green. If the Online/Error lights red, the printer is near the end of its life, the Online/ Error LED lights orange. If the toner cartridge is ready to cancel printing. Understanding the... Control Panel Online/Error and Toner Save LEDs LED Description If the Online/Error lights green, the printer is empty, the Online/Error LED blinks orange. If the toner cartridge is experiencing an error, such as jammed paper, no paper in...
User Guide
Page 18
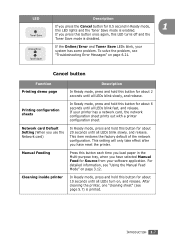
...the Network card) In Ready mode, press and hold this LED lights and the Toner Save mode is enabled. INTRODUCTION 1.7 After cleaning the printer, one "cleaning sheet" (see page 5.7) is disabled. Network card Default Setting (When you have selected Manual Feed for about 6 seconds ...until all LEDs turn on page 6.21. Cleaning inside printer In Ready mode, press and hold this button for about 2 seconds until all LEDs blink slowly, and release. Cancel button Function Description Printing...
...the Network card) In Ready mode, press and hold this LED lights and the Toner Save mode is enabled. INTRODUCTION 1.7 After cleaning the printer, one "cleaning sheet" (see page 5.7) is disabled. Network card Default Setting (When you have selected Manual Feed for about 6 seconds ...until all LEDs turn on page 6.21. Cleaning inside printer In Ready mode, press and hold this button for about 2 seconds until all LEDs blink slowly, and release. Cancel button Function Description Printing...
User Guide
Page 19
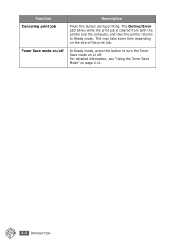
This may take some time depending on page 4.11. 1.8 INTRODUCTION For detailed information, see "Using the Toner Save Mode" on the size of the print job. The Online/Error LED blinks while the print job is cleared from both the printer and the computer, and then the printer returns to turn the Toner Save mode on /off . In Ready mode, press this button to Ready mode. Function Canceling print job Toner Save mode on or off Description Press this button during printing.
This may take some time depending on page 4.11. 1.8 INTRODUCTION For detailed information, see "Using the Toner Save Mode" on the size of the print job. The Online/Error LED blinks while the print job is cleared from both the printer and the computer, and then the printer returns to turn the Toner Save mode on /off . In Ready mode, press this button to Ready mode. Function Canceling print job Toner Save mode on or off Description Press this button during printing.
User Guide
Page 20
2 Setting Up Your Printer This chapter provides step by step information on setting up your printer. This chapter includes: • Unpacking • Installing the Toner Cartridge • Loading Paper • Connecting a Printer Cable • Turning the Printer On • Printing a Demo Page • Installing Printer Software • Reinstalling Printer Software • Removing Printer Software • Using the Set IP (BP20N only)
2 Setting Up Your Printer This chapter provides step by step information on setting up your printer. This chapter includes: • Unpacking • Installing the Toner Cartridge • Loading Paper • Connecting a Printer Cable • Turning the Printer On • Printing a Demo Page • Installing Printer Software • Reinstalling Printer Software • Removing Printer Software • Using the Set IP (BP20N only)

User Guide
Page 21
Make sure that the printer has been packed with the following items: Toner Cartridge Power Cord CD-ROM Safety Information Quick Install Guide NOTES: • If any items are missing or damaged, notify your dealer immediately. • Components may differ from one country to another. • The CD-ROM contains the printer driver, the User's Guide, and the Adobe Acrobat Reader programme. 2 Carefully remove all accessories from the printer. 2.2 SETTING UP YOUR PRINTER Unpacking 1 Remove the Printer and all of the packing tape from the packing carton.
Make sure that the printer has been packed with the following items: Toner Cartridge Power Cord CD-ROM Safety Information Quick Install Guide NOTES: • If any items are missing or damaged, notify your dealer immediately. • Components may differ from one country to another. • The CD-ROM contains the printer driver, the User's Guide, and the Adobe Acrobat Reader programme. 2 Carefully remove all accessories from the printer. 2.2 SETTING UP YOUR PRINTER Unpacking 1 Remove the Printer and all of the packing tape from the packing carton.

User Guide
Page 22
Allow extra space for opening of the rear out tray) •Right: 100 mm (enough space for ventilation) •Left: 100 mm SETTING UP YOUR PRINTER 2.3 Selecting a Location Select a level, stable place with adequate space for clearance space. The area should be well-ventilated and away from direct sunlight or sources ... be removed) •Back: 100 mm (enough space to allow opening covers and tray(s). See the image below for air circulation. Do not place the printer close to the edge of heat, cold, and humidity.
Allow extra space for opening of the rear out tray) •Right: 100 mm (enough space for ventilation) •Left: 100 mm SETTING UP YOUR PRINTER 2.3 Selecting a Location Select a level, stable place with adequate space for clearance space. The area should be well-ventilated and away from direct sunlight or sources ... be removed) •Back: 100 mm (enough space to allow opening covers and tray(s). See the image below for air circulation. Do not place the printer close to the edge of heat, cold, and humidity.

User Guide
Page 23
Don't use it might scratch the drum of the cartridge. 2.4 SETTING UP YOUR PRINTER Be careful not to open. for example, when opening/closing the tray or installing/ removing the toner cartridge. Installing the Toner Cartridge 1 Grasp the front cover and pull it toward you use a knife or other sharp object as it ; NOTE: Because the printer is very light, it may move when you to move the printer. 2 Remove the toner cartridge from its bag and remove the paper covering the cartridge.
Don't use it might scratch the drum of the cartridge. 2.4 SETTING UP YOUR PRINTER Be careful not to open. for example, when opening/closing the tray or installing/ removing the toner cartridge. Installing the Toner Cartridge 1 Grasp the front cover and pull it toward you use a knife or other sharp object as it ; NOTE: Because the printer is very light, it may move when you to move the printer. 2 Remove the toner cartridge from its bag and remove the paper covering the cartridge.

User Guide
Page 24
3 Gently shake the cartridge from side to side to distribute the toner evenly inside the printer, one on your clothing, wipe it with a piece of paper if left exposed for more than a few minutes and keep it in a flat and clean place. • If toner gets on each side. SETTING UP YOUR PRINTER 2.5 Hot water sets toner into fabric. 4 Locate the cartridge slots inside the cartridge. 2 NOTES: • To prevent damage, do not expose the toner cartridge to light for more than a few minutes. Cover it off with a dry cloth and wash clothing in cold water.
3 Gently shake the cartridge from side to side to distribute the toner evenly inside the printer, one on your clothing, wipe it with a piece of paper if left exposed for more than a few minutes and keep it in a flat and clean place. • If toner gets on each side. SETTING UP YOUR PRINTER 2.5 Hot water sets toner into fabric. 4 Locate the cartridge slots inside the cartridge. 2 NOTES: • To prevent damage, do not expose the toner cartridge to light for more than a few minutes. Cover it off with a dry cloth and wash clothing in cold water.

User Guide
Page 25
5 Grasp the handle and insert the cartridge into the printer until it snaps into place. 6 Close the front cover. NOTE: When printing text at 5% coverage, you can expect a toner cartridge life of approximately 5,000 pages.(3,500 pages for the toner cartridge that the cover is shipped with the machine) 2.6 SETTING UP YOUR PRINTER Make sure that is securely closed.
5 Grasp the handle and insert the cartridge into the printer until it snaps into place. 6 Close the front cover. NOTE: When printing text at 5% coverage, you can expect a toner cartridge life of approximately 5,000 pages.(3,500 pages for the toner cartridge that the cover is shipped with the machine) 2.6 SETTING UP YOUR PRINTER Make sure that is securely closed.

User Guide
Page 26
SETTING UP YOUR PRINTER 2.7 Loading Paper You can load approximately 250 sheets of paper in the tray. 1 Pull the tray out of the printer. 2 2 Prepare a stack of paper for loading by flexing or fanning the paper back and forth. Straighten the edges on a level surface. 3 Load paper with the print side facing down.
SETTING UP YOUR PRINTER 2.7 Loading Paper You can load approximately 250 sheets of paper in the tray. 1 Pull the tray out of the printer. 2 2 Prepare a stack of paper for loading by flexing or fanning the paper back and forth. Straighten the edges on a level surface. 3 Load paper with the print side facing down.

User Guide
Page 27
If you want to the paper limit mark on top. Paper overloading may cause paper jams. 5 Slide the tray back into the printer. 2.8 SETTING UP YOUR PRINTER The printed side should be facing up with paper feed, turn the paper around. NOTE: If you experience problems with an uncurled edge on the left inside wall of the tray. Make sure that all four corners are flat in the Paper Tray" on page 2.9. 4 Pay attention to change the paper size in the tray, see "Changing the Paper Size in the tray. You can load previously printed paper.
If you want to the paper limit mark on top. Paper overloading may cause paper jams. 5 Slide the tray back into the printer. 2.8 SETTING UP YOUR PRINTER The printed side should be facing up with paper feed, turn the paper around. NOTE: If you experience problems with an uncurled edge on the left inside wall of the tray. Make sure that all four corners are flat in the Paper Tray" on page 2.9. 4 Pay attention to change the paper size in the tray, see "Changing the Paper Size in the tray. You can load previously printed paper.


