
User Guide
Page 5
... Program Setting .... 4.31 Setting Up a Locally Shared Printer 4.32 In Windows 9x/Me 4.32 In Windows NT 4.0/2000/XP 4.33 Chapter 5: MAINTAINING YOUR PRINTER Maintaining the Toner Cartridge 5.2 Redistributing Toner 5.3 Replacing the Toner Cartridge 5.5 Cleaning the Printer 5.5 Cleaning the Outside 5.5 Cleaning the Inside 5.5 Printing Configuration Pages 5.8 Chapter 6: SOLVING PROBLEMS Troubleshooting Checklist 6.2 Solving General Printing...
... Program Setting .... 4.31 Setting Up a Locally Shared Printer 4.32 In Windows 9x/Me 4.32 In Windows NT 4.0/2000/XP 4.33 Chapter 5: MAINTAINING YOUR PRINTER Maintaining the Toner Cartridge 5.2 Redistributing Toner 5.3 Replacing the Toner Cartridge 5.5 Cleaning the Printer 5.5 Cleaning the Outside 5.5 Cleaning the Inside 5.5 Printing Configuration Pages 5.8 Chapter 6: SOLVING PROBLEMS Troubleshooting Checklist 6.2 Solving General Printing...
User Guide
Page 6
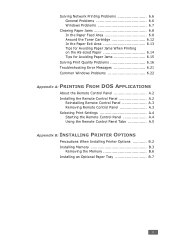
...6.14 Tips for Avoiding Paper Jams 6.15 Solving Print Quality Problems 6.16 Troubleshooting Error Messages 6.21 Common Windows Problems 6.22 Appendix A: PRINTING FROM DOS APPLICATIONS About the Remote ...Control Panel A.2 Installing the Remote Control Panel A.2 Reinstalling Remote Control Panel A.3 Removing Remote Control Panel A.3 Selecting Print Settings A.4 Starting the Remote Control Panel A.4 Using the Remote Control Panel Tabs A.5 Appendix B: INSTALLING PRINTER OPTIONS Precautions When Installing Printer...
...6.14 Tips for Avoiding Paper Jams 6.15 Solving Print Quality Problems 6.16 Troubleshooting Error Messages 6.21 Common Windows Problems 6.22 Appendix A: PRINTING FROM DOS APPLICATIONS About the Remote ...Control Panel A.2 Installing the Remote Control Panel A.2 Reinstalling Remote Control Panel A.3 Removing Remote Control Panel A.3 Selecting Print Settings A.4 Starting the Remote Control Panel A.4 Using the Remote Control Panel Tabs A.5 Appendix B: INSTALLING PRINTER OPTIONS Precautions When Installing Printer...
User Guide
Page 18
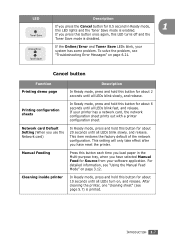
...you load paper in the Multi-purpose tray, when you have reset the printer. If you press this button once again, this button for about 6 seconds until all LEDs blink fast, and release. To solve the problem, see "Troubleshooting Error Messages" on , and release. Printing configuration sheets... In Ready mode, press and hold this button for about 10 seconds until all LEDs turn on page 6.21. Cleaning inside printer In Ready mode, press and hold this...
...you load paper in the Multi-purpose tray, when you have reset the printer. If you press this button once again, this button for about 6 seconds until all LEDs blink fast, and release. To solve the problem, see "Troubleshooting Error Messages" on , and release. Printing configuration sheets... In Ready mode, press and hold this button for about 10 seconds until all LEDs turn on page 6.21. Cleaning inside printer In Ready mode, press and hold this...

User Guide
Page 27
Paper overloading may cause paper jams. 5 Slide the tray back into the printer. 2.8 SETTING UP YOUR PRINTER The printed side should be facing up with paper feed, turn the paper around. Make sure that all four corners are flat in the Paper Tray" on page 2.9. 4 Pay attention to change the paper size in the tray, see "Changing the Paper Size in the tray. NOTE: If you experience problems with an uncurled edge on the left inside wall of the tray. You can load previously printed paper. If you want to the paper limit mark on top.
Paper overloading may cause paper jams. 5 Slide the tray back into the printer. 2.8 SETTING UP YOUR PRINTER The printed side should be facing up with paper feed, turn the paper around. Make sure that all four corners are flat in the Paper Tray" on page 2.9. 4 Pay attention to change the paper size in the tray, see "Changing the Paper Size in the tray. NOTE: If you experience problems with an uncurled edge on the left inside wall of the tray. You can load previously printed paper. If you want to the paper limit mark on top.

User Guide
Page 55
... MATERIALS NOTE: Using a material that does not conform to the specifications listed in the paper specification can cause problems that fits easily within the paper adjusters of the paper tray. • Weight : Your printer supports paper weight as follows: -16~24 lbs (60~90 g/m2) bond for the Tray1 or optional Tray2...
... MATERIALS NOTE: Using a material that does not conform to the specifications listed in the paper specification can cause problems that fits easily within the paper adjusters of the paper tray. • Weight : Your printer supports paper weight as follows: -16~24 lbs (60~90 g/m2) bond for the Tray1 or optional Tray2...

User Guide
Page 58
CAUTION: If you continuously print many pages, the surface of the top output tray has problems, such as excessive curl, try printing to touch the surface, and especially keep children away from the surface. Top... output tray Rear output tray 3 To use the rear output tray, open or close the rear output tray while the printer is closed. The top output tray should be sure that the rear output tray is printing. Be careful not to the rear ...hot. To use the top output tray, be used for most print jobs. Selecting the Output Location The printer has two output locations;
CAUTION: If you continuously print many pages, the surface of the top output tray has problems, such as excessive curl, try printing to touch the surface, and especially keep children away from the surface. Top... output tray Rear output tray 3 To use the rear output tray, open or close the rear output tray while the printer is closed. The top output tray should be sure that the rear output tray is printing. Be careful not to the rear ...hot. To use the top output tray, be used for most print jobs. Selecting the Output Location The printer has two output locations;

User Guide
Page 63
Pay attention to the paper limit mark on the centre of the tray with the print side face up. If you experience problems with an uncurled edge to print on previously printed paper from the Multi-Purpose Tray, the printed side should be facing down with paper feed, ... paper for loading by flexing or fanning the paper back and forth. The print material buckles if you load a stack that you want to the printer. NOTE: Make sure that is too deep or push it in too far. 3.10 USING PRINT MATERIALS Paper overloading may cause paper jams. If you...
Pay attention to the paper limit mark on the centre of the tray with the print side face up. If you experience problems with an uncurled edge to print on previously printed paper from the Multi-Purpose Tray, the printed side should be facing down with paper feed, ... paper for loading by flexing or fanning the paper back and forth. The print material buckles if you load a stack that you want to the printer. NOTE: Make sure that is too deep or push it in too far. 3.10 USING PRINT MATERIALS Paper overloading may cause paper jams. If you...
User Guide
Page 72
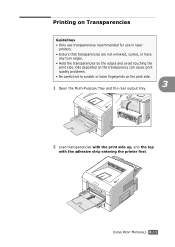
Oils deposited on the transparency can cause print quality problems. • Be careful not to scratch or leave fingerprints on Transparencies Guidelines • Only use transparencies recommended for use in laser printers. • Ensure that transparencies are not wrinkled, curled, or have any torn edges. • Hold the transparencies by the edges and avoid... the Multi-Purpose Tray and the rear output tray. 2 Load transparencies with the print side up, and the top with the adhesive strip entering the printer first.
Oils deposited on the transparency can cause print quality problems. • Be careful not to scratch or leave fingerprints on Transparencies Guidelines • Only use transparencies recommended for use in laser printers. • Ensure that transparencies are not wrinkled, curled, or have any torn edges. • Hold the transparencies by the edges and avoid... the Multi-Purpose Tray and the rear output tray. 2 Load transparencies with the print side up, and the top with the adhesive strip entering the printer first.

User Guide
Page 73
...select the appropriate paper source, type, and size in the software application. In this case, use the top output tray. If the problem persists, check if your transparencies meet the printer's specifications. • To prevent transparencies from sticking, do not let the printed sheets stack up as they can curl. NOTES: ...• If you print on a flat surface after removing them from the printer. 3.20 USING PRINT MATERIALS For details, see page 4.6. 5 After printing, close the Multi-Purpose Tray and the rear output tray.
...select the appropriate paper source, type, and size in the software application. In this case, use the top output tray. If the problem persists, check if your transparencies meet the printer's specifications. • To prevent transparencies from sticking, do not let the printed sheets stack up as they can curl. NOTES: ...• If you print on a flat surface after removing them from the printer. 3.20 USING PRINT MATERIALS For details, see page 4.6. 5 After printing, close the Multi-Purpose Tray and the rear output tray.

User Guide
Page 116
... substances can cause print quality problems, such as toner specks or smearing. NOTES: • While cleaning the inside of the printer will eliminate or reduce these problems. Cleaning inside the printer. You can accumulate inside the printer 1 Turn the printer off and unplug the power cord..., then wait for the printer to cool. Cleaning the inside of the printer, be careful not to ...
... substances can cause print quality problems, such as toner specks or smearing. NOTES: • While cleaning the inside of the printer will eliminate or reduce these problems. Cleaning inside the printer. You can accumulate inside the printer 1 Turn the printer off and unplug the power cord..., then wait for the printer to cool. Cleaning the inside of the printer, be careful not to ...

User Guide
Page 119
... mode with paper loaded in the tray. 2 Press and hold down the Cancel button on it. Use the configuration page to view current printer settings, to help troubleshoot printer problems, or to verify installation of paper from the tray and prints out a cleaning sheet with dust or toner particles on the control panel...
... mode with paper loaded in the tray. 2 Press and hold down the Cancel button on it. Use the configuration page to view current printer settings, to help troubleshoot printer problems, or to verify installation of paper from the tray and prints out a cleaning sheet with dust or toner particles on the control panel...
User Guide
Page 120
This chapter includes: • Troubleshooting Checklist • Solving General Printing Problems • Solving Network Printing Problems • Clearing Paper Jams • Solving Print Quality Problems • Troubleshooting Error Messages • Common Windows Problems 6 Solving problems This chapter provides helpful information for what to do if you encounter an error while using your printer.
This chapter includes: • Troubleshooting Checklist • Solving General Printing Problems • Solving Network Printing Problems • Clearing Paper Jams • Solving Print Quality Problems • Troubleshooting Error Messages • Common Windows Problems 6 Solving problems This chapter provides helpful information for what to do if you encounter an error while using your printer.

User Guide
Page 121
... If the page does not print, check the cable connection between the printer and the computer. • Check the print queue or print spooler to see If there is a print quality problem, go to "Solving Print if it is not working properly, perform ...• If the paper jams in the list below. If the printer fails to "Solving General Printing Problems" on page 6.8. If completing the checklist does not resolve the printer problem, check the following troubleshooting sections. • "Solving General Printing Problems" on page 6.3. • "Troubleshooting Error Messages" on page ...
... If the page does not print, check the cable connection between the printer and the computer. • Check the print queue or print spooler to see If there is a print quality problem, go to "Solving Print if it is not working properly, perform ...• If the paper jams in the list below. If the printer fails to "Solving General Printing Problems" on page 6.8. If completing the checklist does not resolve the printer problem, check the following troubleshooting sections. • "Solving General Printing Problems" on page 6.3. • "Troubleshooting Error Messages" on page ...
User Guide
Page 122
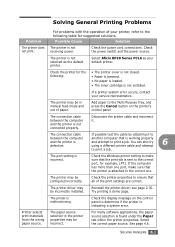
... by attaching it . Select Aficio BP20 Series PCL6 as the default printer. Check the Windows printer setting to make sure that is working properly and attempt to determine if the printer is attached to print a job. Reinstall the printer driver; Printer selects print materials from the wrong paper source. SOLVING PROBLEMS 6.3 Check the printer properties to ensure that...
... by attaching it . Select Aficio BP20 Series PCL6 as the default printer. Check the Windows printer setting to make sure that is working properly and attempt to determine if the printer is attached to print a job. Reinstall the printer driver; Printer selects print materials from the wrong paper source. SOLVING PROBLEMS 6.3 Check the printer properties to ensure that...

User Guide
Page 123
...computer may be set incorrectly. There is too much paper in the paper tray. There may be incorrect. Right-click the Aficio BP20 Series PCL6 printer icon, choose Properties, click the Details tab, and then choose the Spool Settings button. Simplify the page layout and remove any... memory in your application. Install more memory in your printer is being used . Ensure that meets the specifications required by the printer. Open the front cover and remove the debris. 6.4 SOLVING PROBLEMS Problem Paper does not feed into the printer. The paper size and the paper size settings do not...
...computer may be set incorrectly. There is too much paper in the paper tray. There may be incorrect. Right-click the Aficio BP20 Series PCL6 printer icon, choose Properties, click the Details tab, and then choose the Spool Settings button. Simplify the page layout and remove any... memory in your application. Install more memory in your printer is being used . Ensure that meets the specifications required by the printer. Open the front cover and remove the debris. 6.4 SOLVING PROBLEMS Problem Paper does not feed into the printer. The paper size and the paper size settings do not...

User Guide
Page 124
...The illustrations print incorrectly in the software application is selected. The software application Try printing a job from Windows (any printing problem after your printer is wrong. Some parts, such as Bit Image in the TrueType Options window of toner. Print the document with the ...(This assumes you are blank. If possible test the cable by attaching it to another application. Turn the printer off and then back on again. Problem Possible Cause Solution The printer prints, but The toner cartridge is loose or defective. If necessary, replace the toner cartridge.
...The illustrations print incorrectly in the software application is selected. The software application Try printing a job from Windows (any printing problem after your printer is wrong. Some parts, such as Bit Image in the TrueType Options window of toner. Print the document with the ...(This assumes you are blank. If possible test the cable by attaching it to another application. Turn the printer off and then back on again. Problem Possible Cause Solution The printer prints, but The toner cartridge is loose or defective. If necessary, replace the toner cartridge.

User Guide
Page 125
... displayed empty while Assign IP Address by mistake while configuring. adding a port and the printer doesn't function. 6.6 SOLVING PROBLEMS If it does not succeed, there must be a problem with print server. Check whether your PC. 2. Solving Network Printing Problems General Problems Problem Solution System does not function with sufficient permissions have been used. Print server does...
... displayed empty while Assign IP Address by mistake while configuring. adding a port and the printer doesn't function. 6.6 SOLVING PROBLEMS If it does not succeed, there must be a problem with print server. Check whether your PC. 2. Solving Network Printing Problems General Problems Problem Solution System does not function with sufficient permissions have been used. Print server does...

User Guide
Page 126
...• Make sure that there are on . 1. Set IP is connected to the "Set IP" 6 SOLVING PROBLEMS 6.7 The printer does not print. If not, check the communication status of the printers. • If IP address is unable to the computers, try ping command. If LAN is connected by routers, ...Set IP is assigned to detect the printers. 3. Windows Problems Problem The test page is not printed. Solution Turn off the printer, then turn it back on...
...• Make sure that there are on . 1. Set IP is connected to the "Set IP" 6 SOLVING PROBLEMS 6.7 The printer does not print. If not, check the communication status of the printers. • If IP address is unable to the computers, try ping command. If LAN is connected by routers, ...Set IP is assigned to detect the printers. 3. Windows Problems Problem The test page is not printed. Solution Turn off the printer, then turn it back on...

User Guide
Page 127
In the Paper Feed Area 1 Slide out Tray1 to expose the jammed paper. 6.8 SOLVING PROBLEMS If you do this, it , look inside of the supported size range has been used . Find and remove the jammed paper. If a paper jam occurs, .... • The front cover has been opened during a print job. Clearing Paper Jams Occasionally, paper can 't see it may damage the metal parts inside the printer. Some causes include: • The tray is outside of your machine and cause a short circuit. See "Paper Specifications" on the control panel lights red.
In the Paper Feed Area 1 Slide out Tray1 to expose the jammed paper. 6.8 SOLVING PROBLEMS If you do this, it , look inside of the supported size range has been used . Find and remove the jammed paper. If a paper jam occurs, .... • The front cover has been opened during a print job. Clearing Paper Jams Occasionally, paper can 't see it may damage the metal parts inside the printer. Some causes include: • The tray is outside of your machine and cause a short circuit. See "Paper Specifications" on the control panel lights red.

User Guide
Page 128
NOTE: If the jammed paper is not visible or if there is properly aligned in the tray. Make sure that all of the paper is resistance when you pull the paper, remove the tray from the printer and carefully pull the jammed paper free from the printer. 3 Slide the tray back into the printer. 6 4 Open and close the front cover to resume printing. SOLVING PROBLEMS 6.9 2 Remove any misfed paper by pulling it out by the visible edge.
NOTE: If the jammed paper is not visible or if there is properly aligned in the tray. Make sure that all of the paper is resistance when you pull the paper, remove the tray from the printer and carefully pull the jammed paper free from the printer. 3 Slide the tray back into the printer. 6 4 Open and close the front cover to resume printing. SOLVING PROBLEMS 6.9 2 Remove any misfed paper by pulling it out by the visible edge.


