User Guide
Page 3
... Control Panel 1.6 Online/Error and Toner Save LEDs 1.6 Cancel button 1.7 Chapter 2: SETTING UP YOUR PRINTER Unpacking 2.2 Selecting a Location 2.3 Installing the Toner Cartridge 2.4 Loading Paper 2.7 Changing the Paper Size in the Paper Tray ......... 2.9 Connecting a Printer Cable 2.11 For Local Printing 2.11 For Network Printing 2.13 Turning the Printer On 2.14 Printing a Demo Page 2.15 Installing Printer Software 2.16 Printer Driver Features 2.17 Installing Printer Software in Windows 2.18 Installing Software for Local Printing 2.18 Installing Software for Network Printing...
... Control Panel 1.6 Online/Error and Toner Save LEDs 1.6 Cancel button 1.7 Chapter 2: SETTING UP YOUR PRINTER Unpacking 2.2 Selecting a Location 2.3 Installing the Toner Cartridge 2.4 Loading Paper 2.7 Changing the Paper Size in the Paper Tray ......... 2.9 Connecting a Printer Cable 2.11 For Local Printing 2.11 For Network Printing 2.13 Turning the Printer On 2.14 Printing a Demo Page 2.15 Installing Printer Software 2.16 Printer Driver Features 2.17 Installing Printer Software in Windows 2.18 Installing Software for Local Printing 2.18 Installing Software for Network Printing...
User Guide
Page 4
... Selecting the Output Location 3.5 Printing to the Top Output Tray (Face down) ...... 3.5 Printing to the Rear Output Tray (Face up) ......... 3.6 Loading Paper 3.7 Using Tray1 or the Optional Tray2 3.8 Using the Multi-Purpose Tray 3.8 Using the Manual Feed Mode 3.12 Printing on Envelopes 3.14 Printing on Labels 3.17 Printing on Transparencies 3.19 Printing on Card Stock or Custom-sized Materials 3.21 Printing on Preprinted Paper 3.23 Chapter 4: PRINTING TASKS Printing a Document in Windows 4.2 Cancelling a Print Job 4.3 Printer Settings 4.4 Layout Tab 4.5 Paper Tab 4.6 Graphics...
... Selecting the Output Location 3.5 Printing to the Top Output Tray (Face down) ...... 3.5 Printing to the Rear Output Tray (Face up) ......... 3.6 Loading Paper 3.7 Using Tray1 or the Optional Tray2 3.8 Using the Multi-Purpose Tray 3.8 Using the Manual Feed Mode 3.12 Printing on Envelopes 3.14 Printing on Labels 3.17 Printing on Transparencies 3.19 Printing on Card Stock or Custom-sized Materials 3.21 Printing on Preprinted Paper 3.23 Chapter 4: PRINTING TASKS Printing a Document in Windows 4.2 Cancelling a Print Job 4.3 Printer Settings 4.4 Layout Tab 4.5 Paper Tab 4.6 Graphics...
User Guide
Page 17
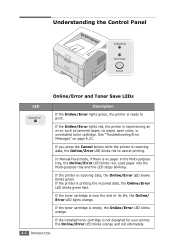
... press the Cancel button while the printer is receiving data, the Online/Error LED blinks red to print. In Manual Feed mode, if there is empty, the Online/Error LED blinks orange. Load paper into the Multi-purpose tray and the LED stops blinking. If the toner cartridge is no paper, open cover, or uninstalled toner cartridge. See "Troubleshooting Error Messages" on page 6.21. If the installed toner cartridge is near the end of its life, the Online/ Error LED lights orange. Understanding the Control Panel Online/Error and Toner Save LEDs LED...
... press the Cancel button while the printer is receiving data, the Online/Error LED blinks red to print. In Manual Feed mode, if there is empty, the Online/Error LED blinks orange. Load paper into the Multi-purpose tray and the LED stops blinking. If the toner cartridge is no paper, open cover, or uninstalled toner cartridge. See "Troubleshooting Error Messages" on page 6.21. If the installed toner cartridge is near the end of its life, the Online/ Error LED lights orange. Understanding the Control Panel Online/Error and Toner Save LEDs LED...
User Guide
Page 18
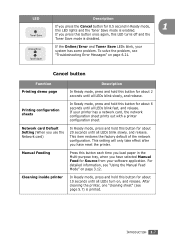
... page 3.12. After cleaning the printer, one "cleaning sheet" (see page 5.7) is enabled. This item restores the factory default of the network configuration. If the Online/Error and Toner Save LEDs blink, your software application. Manual Feeding Press this button each time you press this button once again, this LED lights and the Toner Save mode is printed. If your printer has a network card, the network configuration sheet prints out with a printer configuration sheet. If you load paper in Ready mode, 1 this LED turns off and the Toner Save mode is disabled...
... page 3.12. After cleaning the printer, one "cleaning sheet" (see page 5.7) is enabled. This item restores the factory default of the network configuration. If the Online/Error and Toner Save LEDs blink, your software application. Manual Feeding Press this button each time you press this button once again, this LED lights and the Toner Save mode is printed. If your printer has a network card, the network configuration sheet prints out with a printer configuration sheet. If you load paper in Ready mode, 1 this LED turns off and the Toner Save mode is disabled...

User Guide
Page 36
Printer Driver Features Your printer drivers will support the following standard features: • Paper source selection • Paper size, orientation and media type 2 • number of copies The table below lists a general overview of features supported by your printer drivers. Driver Feature Toner Save Print quality option Poster printing Multiple pages per sheet (N-up) Scale printing Fit to page printing Different source for first page Watermark Overlay Print order PCL6 driver Win 2000/XP Win 9x Win NT4.0 Y Y Y Y Y Y Y Y Y Y Y Y Y Y Y Y Y Y Y Y Y Y Y ...
Printer Driver Features Your printer drivers will support the following standard features: • Paper source selection • Paper size, orientation and media type 2 • number of copies The table below lists a general overview of features supported by your printer drivers. Driver Feature Toner Save Print quality option Poster printing Multiple pages per sheet (N-up) Scale printing Fit to page printing Different source for first page Watermark Overlay Print order PCL6 driver Win 2000/XP Win 9x Win NT4.0 Y Y Y Y Y Y Y Y Y Y Y Y Y Y Y Y Y Y Y Y Y Y Y ...

User Guide
Page 47
..., click Yes. 2.28 SETTING UP YOUR PRINTER NOTES: If you want to install from the list. b.Configure an IP address, subnet mask, and Default gateway for the printer manually and click Configure to the network, enter the port name and the IP address for the network printer. c. To add the printer to set the specific IP address for the printer. • To find a shared network printer (UNC Path), select Shared Printer [UNC] and enter...
..., click Yes. 2.28 SETTING UP YOUR PRINTER NOTES: If you want to install from the list. b.Configure an IP address, subnet mask, and Default gateway for the printer manually and click Configure to the network, enter the port name and the IP address for the network printer. c. To add the printer to set the specific IP address for the printer. • To find a shared network printer (UNC Path), select Shared Printer [UNC] and enter...

User Guide
Page 81
... Windows Start menu. 2 . Change the settings on the printer icon and: • In Windows 95/98/Me, select Properties. • In Windows 2000/XP, select Printing Preferences. • In Windows NT 4.0, select Document Default. 5. Your printer's Printing Preferences window consists of the printer options you need when using the current program. Change all of 5 tabs: Layout, Paper, Graphics, Extras, and About. To make them in the printer driver. Select the Aficio BP20 Series...
... Windows Start menu. 2 . Change the settings on the printer icon and: • In Windows 95/98/Me, select Properties. • In Windows 2000/XP, select Printing Preferences. • In Windows NT 4.0, select Document Default. 5. Your printer's Printing Preferences window consists of the printer options you need when using the current program. Change all of 5 tabs: Layout, Paper, Graphics, Extras, and About. To make them in the printer driver. Select the Aficio BP20 Series...

User Guide
Page 83
... enter up to use. Paper Tab Use the following options for more information about accessing printer properties. The setting appears on the list so that you to be printed. Enter the custom name you to choose the number of copies to choose the size of the paper loaded in the Size box, click Custom. Enter the paper size. 4.6 PRINTING TASKS You can select it. When the Custom Page Size window appears, set the size and click...
... enter up to use. Paper Tab Use the following options for more information about accessing printer properties. The setting appears on the list so that you to be printed. Enter the custom name you to choose the number of copies to choose the size of the paper loaded in the Size box, click Custom. Enter the paper size. 4.6 PRINTING TASKS You can select it. When the Custom Page Size window appears, set the size and click...

User Guide
Page 92
... sheet. 1 To change the print settings from the Paper tab. 3 Select the number of pages you want to print per sheet (1, 2, 4, 6, 9, or 16) on a single sheet of paper. You can select the number of pages to print on the Pages per Side drop-down list. 4 NOTE: This feature is not available when you select Fit to Page or Reduce/Enlarge from your software application, access printer properties. 1 2 3 4 123 456 Printing Multiple Pages on One Sheet...
... sheet. 1 To change the print settings from the Paper tab. 3 Select the number of pages you want to print per sheet (1, 2, 4, 6, 9, or 16) on a single sheet of paper. You can select the number of pages to print on the Pages per Side drop-down list. 4 NOTE: This feature is not available when you select Fit to Page or Reduce/Enlarge from your software application, access printer properties. 1 2 3 4 123 456 Printing Multiple Pages on One Sheet...

User Guide
Page 109
... Control Panel, and double- Close the window. 4 From the Start menu, select Printers from Settings and double-click your printer name. 5 Select Properties in the Shared Name field and click OK. Printing Across a Network Whether the printer is called the "host computer" on each computer that will print documents to install the Aficio BP20 series printer software on the network. click on the network through a Windows 9x/Me/XP/NT 4.0/2000 network printer connection...
... Control Panel, and double- Close the window. 4 From the Start menu, select Printers from Settings and double-click your printer name. 5 Select Properties in the Shared Name field and click OK. Printing Across a Network Whether the printer is called the "host computer" on each computer that will print documents to install the Aficio BP20 series printer software on the network. click on the network through a Windows 9x/Me/XP/NT 4.0/2000 network printer connection...

User Guide
Page 118
... will clean the drum inside the toner cartridge. See page A.6. MAINTAINING YOUR PRINTER 5.7 5 Reinsert the toner cartridge and close the cover. you should be set to print out a cleaning sheet automatically every 500 print pages. If it is turned on the country. 5 If you are experiencing blurred, faded, or smeared printouts, printing a cleaning sheet will produce a page with paper loaded in the Ready mode with toner debris, which should use inferior quality paper, because such paper may lower print quality. Make...
... will clean the drum inside the toner cartridge. See page A.6. MAINTAINING YOUR PRINTER 5.7 5 Reinsert the toner cartridge and close the cover. you should be set to print out a cleaning sheet automatically every 500 print pages. If it is turned on the country. 5 If you are experiencing blurred, faded, or smeared printouts, printing a cleaning sheet will produce a page with paper loaded in the Ready mode with toner debris, which should use inferior quality paper, because such paper may lower print quality. Make...

User Guide
Page 119
...troubleshoot printer problems, or to verify installation of paper from the tray and prints out a cleaning sheet with dust or toner particles on the control panel for about 6 seconds. Configuration pages print out. 5.8 MAINTAINING YOUR PRINTER 3 Your printer automatically picks up a sheet of optional accessories, such as memory, optional tray, and printer languages. Printing Configuration Pages From the printer's control panel, you can print a Configuration page. To print configuration pages: 1 Ensure that the printer is turned on and in the Ready mode with a printer configuration...
...troubleshoot printer problems, or to verify installation of paper from the tray and prints out a cleaning sheet with dust or toner particles on the control panel for about 6 seconds. Configuration pages print out. 5.8 MAINTAINING YOUR PRINTER 3 Your printer automatically picks up a sheet of optional accessories, such as memory, optional tray, and printer languages. Printing Configuration Pages From the printer's control panel, you can print a Configuration page. To print configuration pages: 1 Ensure that the printer is turned on and in the Ready mode with a printer configuration...
User Guide
Page 122
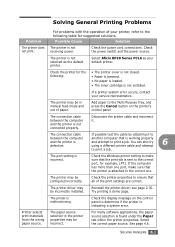
... working properly and attempt to print a job. The printer driver may be configured incorrectly. Reinstall the printer driver; Printer selects print materials from the wrong paper source. The paper source selection in manual feed mode and out of paper. Solving General Printing Problems Problem For problems with the operation of your printer, refer to the following : • The printer cover is not closed. • Paper is jammed. • No paper is loaded. • The toner cartridge is not installed. see page...
... working properly and attempt to print a job. The printer driver may be configured incorrectly. Reinstall the printer driver; Printer selects print materials from the wrong paper source. The paper source selection in manual feed mode and out of paper. Solving General Printing Problems Problem For problems with the operation of your printer, refer to the following : • The printer cover is not closed. • Paper is jammed. • No paper is loaded. • The toner cartridge is not installed. see page...

User Guide
Page 123
... page is too thick. The paper is blank. The paper size and the paper size settings do not match. The maximum print speed of your printer. Right-click the Aficio BP20 Series PCL6 printer icon, choose Properties, click the Details tab, and then choose the Spool Settings button. See "Installing Memory" on page B.3. Ensure that meets the specifications required by the printer. The paper keeps jamming. If using the top output tray (face-down). The page orientation setting...
... page is too thick. The paper is blank. The paper size and the paper size settings do not match. The maximum print speed of your printer. Right-click the Aficio BP20 Series PCL6 printer icon, choose Properties, click the Details tab, and then choose the Spool Settings button. See "Installing Memory" on page B.3. Ensure that meets the specifications required by the printer. The paper keeps jamming. If using the top output tray (face-down). The page orientation setting...
User Guide
Page 135
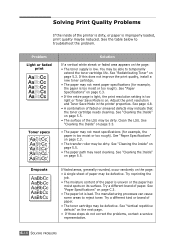
... page C.3. • If the entire page is light, the print resolution setting is too light or Toner Save Mode is too moist or too rough). See "Paper Specifications" on page 5.5. • The surface of the printer is dirty, or paper is improperly loaded, print quality maybe reduced. See "Cleaning the Inside" on page 5.5. The manufacturing processes can cause some areas to troubleshoot the problem. See "Cleaning the Inside" on page C.3. • The transfer roller...
... page C.3. • If the entire page is light, the print resolution setting is too light or Toner Save Mode is too moist or too rough). See "Paper Specifications" on page 5.5. • The surface of the printer is dirty, or paper is improperly loaded, print quality maybe reduced. See "Cleaning the Inside" on page 5.5. The manufacturing processes can cause some areas to troubleshoot the problem. See "Cleaning the Inside" on page C.3. • The transfer roller...

User Guide
Page 136
... page 5.5. • Check the paper type and quality. Contact a service representative. See "Installing the Toner Cartridge" on page C.3. • Remove the toner cartridge and install a new one . SOLVING PROBLEMS 6.17 See "Paper Specifications" on page 2.4. Vertical repetitive If marks repeatedly appear on the back of background shading becomes unacceptable, the procedures below may have the same problems, install a new toner cartridge. If the defects occur on the printed side of the printer may fix the problem. • Change to clean the cartridge...
... page 5.5. • Check the paper type and quality. Contact a service representative. See "Installing the Toner Cartridge" on page C.3. • Remove the toner cartridge and install a new one . SOLVING PROBLEMS 6.17 See "Paper Specifications" on page 2.4. Vertical repetitive If marks repeatedly appear on the back of background shading becomes unacceptable, the procedures below may have the same problems, install a new toner cartridge. If the defects occur on the printed side of the printer may fix the problem. • Change to clean the cartridge...

User Guide
Page 138
... repair. See "Paper Specifications" on page 5.5. • Check for leaking toner. See "Installing the Toner Cartridge" on page C.3. Contact a service representative. 6 Clean the inside of the printer. • Check the paper type and quality. Problem Wrinkles or creases Solution Ensure that should be solid black: • If you are using transparencies, try another type of transparency. Character Voids A Character voids are white areas within the parts of printouts are dirty • The transfer roller...
... repair. See "Paper Specifications" on page 5.5. • Check for leaking toner. See "Installing the Toner Cartridge" on page C.3. Contact a service representative. 6 Clean the inside of the printer. • Check the paper type and quality. Problem Wrinkles or creases Solution Ensure that should be solid black: • If you are using transparencies, try another type of transparency. Character Voids A Character voids are white areas within the parts of printouts are dirty • The transfer roller...
User Guide
Page 140
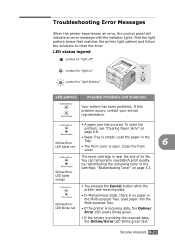
... data, the Online/ Error LED slowly blinks green. • If the printer is empty. Troubleshooting Error Messages When the printer experiences an error, the control panel will indicate an error message with the indicator lights. Load the paper in the Online/Error Tray. 6 LED lights red • The front cover is near the end of its life. Online/Error LED lights orange The toner cartridge is open. You can temporarily reestablish print quality by redistributing the remaining toner in the Multi-purpose Tray. LED status...
... data, the Online/ Error LED slowly blinks green. • If the printer is empty. Troubleshooting Error Messages When the printer experiences an error, the control panel will indicate an error message with the indicator lights. Load the paper in the Online/Error Tray. 6 LED lights red • The front cover is near the end of its life. Online/Error LED lights orange The toner cartridge is open. You can temporarily reestablish print quality by redistributing the remaining toner in the Multi-purpose Tray. LED status...
User Guide
Page 170
... card stock, print 3.21 cleaning sheet, print 5.7 components 1.4 configuration page, print 5.8 connect parallel 2.11 power cord 2.14 USB 2.12 control panel,use 1.6 custom-sized materials, print 3.21 D demo page, print 2.15 E envelopes, print 3.14 error, solve 6.21 F face down output tray 3.5 face up output tray 3.6 Favorite setting, use 4.14 features printer 1.2 printer driver 2.17 fit to page printing 4.19 H help, use 4.14 I image mode 4.8 install printer driver for Windows 2.16 printer options B.1 Remote Control Panel A.2 toner cartridge 2.4 Installing B.3 L labels, print 3.17 load, paper...
... card stock, print 3.21 cleaning sheet, print 5.7 components 1.4 configuration page, print 5.8 connect parallel 2.11 power cord 2.14 USB 2.12 control panel,use 1.6 custom-sized materials, print 3.21 D demo page, print 2.15 E envelopes, print 3.14 error, solve 6.21 F face down output tray 3.5 face up output tray 3.6 Favorite setting, use 4.14 features printer 1.2 printer driver 2.17 fit to page printing 4.19 H help, use 4.14 I image mode 4.8 install printer driver for Windows 2.16 printer options B.1 Remote Control Panel A.2 toner cartridge 2.4 Installing B.3 L labels, print 3.17 load, paper...

User Guide
Page 171
... quality 6.16 Windows 6.22 Q quality problems, solve 6.16 R rear output tray, use 3.6 reduced/enlarged printing 4.20 Remote Control Panel install A.2 start A.4 tabs A.5 resolution printing 4.8 S software overview 2.16 reinstall Windows 2.30 system requirements 2.18 uninstall Windows 2.31 specification paper C.3 printer C.2 status monitor, use 4.29 system requirements for Windows 2.18 T toner install 2.4 life 5.2 redistribute 5.3 replace 5.5 top output tray, use 3.5 transparencies, print 3.19 Tray 1, use 2.7 turn on, printer 2.14 U uninstall, software Windows 2.31 unpack 2.2 USB cable, connect...
... quality 6.16 Windows 6.22 Q quality problems, solve 6.16 R rear output tray, use 3.6 reduced/enlarged printing 4.20 Remote Control Panel install A.2 start A.4 tabs A.5 resolution printing 4.8 S software overview 2.16 reinstall Windows 2.30 system requirements 2.18 uninstall Windows 2.31 specification paper C.3 printer C.2 status monitor, use 4.29 system requirements for Windows 2.18 T toner install 2.4 life 5.2 redistribute 5.3 replace 5.5 top output tray, use 3.5 transparencies, print 3.19 Tray 1, use 2.7 turn on, printer 2.14 U uninstall, software Windows 2.31 unpack 2.2 USB cable, connect...


