
User Guide
Page 1
BP20N/BP20 User's Guide Read this machine and keep it handy for future reference. For safe and correct use, please be sure to read the Safety Information in this manual before you use this manual carefully before using the machine.
BP20N/BP20 User's Guide Read this machine and keep it handy for future reference. For safe and correct use, please be sure to read the Safety Information in this manual before you use this manual carefully before using the machine.

User Guide
Page 2
... Windows XP are registered trademarks of Microsoft Corporation. • All other brand or product names are subject to change without prior notice. Contents of this manual are trademarks of their respective companies or organisations.
... Windows XP are registered trademarks of Microsoft Corporation. • All other brand or product names are subject to change without prior notice. Contents of this manual are trademarks of their respective companies or organisations.
User Guide
Page 4
Using the Set IP (BP20N only 2.32 Installing Set IP 2.32 Reinstalling Set IP 2.33 Removing Set... (Face up) ......... 3.6 Loading Paper 3.7 Using Tray1 or the Optional Tray2 3.8 Using the Multi-Purpose Tray 3.8 Using the Manual Feed Mode 3.12 Printing on Envelopes 3.14 Printing on Labels 3.17 Printing on Transparencies 3.19 Printing on Card Stock or Custom-... 3.23 Chapter 4: PRINTING TASKS Printing a Document in Windows 4.2 Cancelling a Print Job 4.3 Printer Settings 4.4 Layout Tab 4.5 Paper Tab 4.6 Graphics Tab 4.8 Using the Toner Save Mode 4.11 Extras Tab 4.12 About Tab 4....
Using the Set IP (BP20N only 2.32 Installing Set IP 2.32 Reinstalling Set IP 2.33 Removing Set... (Face up) ......... 3.6 Loading Paper 3.7 Using Tray1 or the Optional Tray2 3.8 Using the Multi-Purpose Tray 3.8 Using the Manual Feed Mode 3.12 Printing on Envelopes 3.14 Printing on Labels 3.17 Printing on Transparencies 3.19 Printing on Card Stock or Custom-... 3.23 Chapter 4: PRINTING TASKS Printing a Document in Windows 4.2 Cancelling a Print Job 4.3 Printer Settings 4.4 Layout Tab 4.5 Paper Tab 4.6 Graphics Tab 4.8 Using the Toner Save Mode 4.11 Extras Tab 4.12 About Tab 4....

User Guide
Page 8
...in accordance with the local regulations. • Keep the machine away from flammable liquids, gases, and aerosols. vii Safety Information When using this manual. • Turn off the power and disconnect the power plug (by pulling the plug, not the cable) if any of the following safety... the plug, not the cable) if the power cable or plug becomes frayed or otherwise damaged. • To avoid hazardous electric shock or laser radiation exposure, do not remove any covers or screws other than those specified in death or serious injury. CAUTION: Indicates a potentially hazardous situation ...
...in accordance with the local regulations. • Keep the machine away from flammable liquids, gases, and aerosols. vii Safety Information When using this manual. • Turn off the power and disconnect the power plug (by pulling the plug, not the cable) if any of the following safety... the plug, not the cable) if the power cable or plug becomes frayed or otherwise damaged. • To avoid hazardous electric shock or laser radiation exposure, do not remove any covers or screws other than those specified in death or serious injury. CAUTION: Indicates a potentially hazardous situation ...
User Guide
Page 17
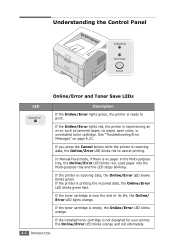
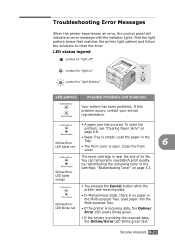
...the toner cartridge is receiving data, the Online/Error LED blinks red to print. In Manual Feed mode, if there is printing the received data, the Online/Error LED blinks green fast. If the printer is no paper, open cover, or uninstalled toner cartridge. If the installed toner cartridge is... LED blinks orange and red alternately. 1.6 INTRODUCTION If the toner cartridge is receiving data, the Online/Error LED slowly blinks green. If the printer is near the end of its life, the Online/ Error LED lights orange. Understanding the Control Panel Online/Error and Toner Save LEDs LED...
...the toner cartridge is receiving data, the Online/Error LED blinks red to print. In Manual Feed mode, if there is printing the received data, the Online/Error LED blinks green fast. If the printer is no paper, open cover, or uninstalled toner cartridge. If the installed toner cartridge is... LED blinks orange and red alternately. 1.6 INTRODUCTION If the toner cartridge is receiving data, the Online/Error LED slowly blinks green. If the printer is near the end of its life, the Online/ Error LED lights orange. Understanding the Control Panel Online/Error and Toner Save LEDs LED...
User Guide
Page 18
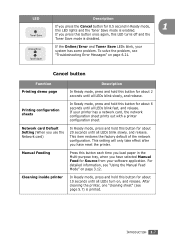
... until all LEDs turn on, and release. This setting will only take effect after you have selected Manual Feed for Source from your software application. Cleaning inside printer In Ready mode, press and hold this button for about 2 seconds until all LEDs blink slowly, ... LED turns off and the Toner Save mode is enabled. INTRODUCTION 1.7 After cleaning the printer, one "cleaning sheet" (see "Troubleshooting Error Messages" on page 3.12. For detailed information, see "Using the Manual Feed Mode" on page 6.21. LED Description If you press the Cancel button for ...
... until all LEDs turn on, and release. This setting will only take effect after you have selected Manual Feed for Source from your software application. Cleaning inside printer In Ready mode, press and hold this button for about 2 seconds until all LEDs blink slowly, ... LED turns off and the Toner Save mode is enabled. INTRODUCTION 1.7 After cleaning the printer, one "cleaning sheet" (see "Troubleshooting Error Messages" on page 3.12. For detailed information, see "Using the Manual Feed Mode" on page 6.21. LED Description If you press the Cancel button for ...

User Guide
Page 44
... 4 Select Typical installation for the printer. • To find a shared network printer (UNC Path), select Shared Printer [UNC] and enter the shared name manually or find a shared printer by clicking the Browse button. To add the printer to the network. Select the printer you want to install from the list and then click Next. • If you...
... 4 Select Typical installation for the printer. • To find a shared network printer (UNC Path), select Shared Printer [UNC] and enter the shared name manually or find a shared printer by clicking the Browse button. To add the printer to the network. Select the printer you want to install from the list and then click Next. • If you...
User Guide
Page 45
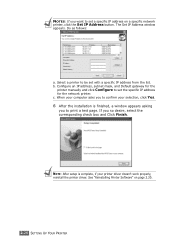
... corresponding check box and Click Finish. If you to set the specific IP address for the network printer. Configure an IP address, subnet mask, and Default gateway for the printer manually and click Configure to confirm your printer driver doesn't work properly, reinstall the printer driver. The Set IP Address window appears. Do as follows: a.
... corresponding check box and Click Finish. If you to set the specific IP address for the network printer. Configure an IP address, subnet mask, and Default gateway for the printer manually and click Configure to confirm your printer driver doesn't work properly, reinstall the printer driver. The Set IP Address window appears. Do as follows: a.

User Guide
Page 47
... address on the network appears. Select the printer you want to be set the specific IP address for the printer. • To find a shared network printer (UNC Path), select Shared Printer [UNC] and enter the shared name manually or find a shared printer by clicking the Browse button. Do as ...follows: a.Select a printer to install from the list. c. The Set ...
... address on the network appears. Select the printer you want to be set the specific IP address for the printer. • To find a shared network printer (UNC Path), select Shared Printer [UNC] and enter the shared name manually or find a shared printer by clicking the Browse button. Do as ...follows: a.Select a printer to install from the list. c. The Set ...

User Guide
Page 65
... print side up. 2 Slide the paper width guide and adjust it against the material without bending. 3.12 USING PRINT MATERIALS Using the Manual Feed Mode If you select Manual Feed in the Source option when changing print settings, you can be helpful when you want to check the print quality after each... the procedure for loading in the Multi-Purpose Tray, except you load paper sheetby-sheet in the Multi-Purpose Tray. This loading procedure is printed. Manually loading paper can manually load a sheet of the Multi-
... print side up. 2 Slide the paper width guide and adjust it against the material without bending. 3.12 USING PRINT MATERIALS Using the Manual Feed Mode If you select Manual Feed in the Source option when changing print settings, you can be helpful when you want to check the print quality after each... the procedure for loading in the Multi-Purpose Tray, except you load paper sheetby-sheet in the Multi-Purpose Tray. This loading procedure is printed. Manually loading paper can manually load a sheet of the Multi-

User Guide
Page 66
Repeat this step for Source from the software application, and then select the correct paper size and type. 5 Press the Cancel button on the printer to be printed. USING PRINT MATERIALS 3.13 3 Open the rear output tray. 4 When you print a document, you must select Manual Feed 3 for every page to start feeding. 6 Printing is started. 7 If you are printing multiple pages, load the next sheet after the first page prints out, and press the Cancel button.
Repeat this step for Source from the software application, and then select the correct paper size and type. 5 Press the Cancel button on the printer to be printed. USING PRINT MATERIALS 3.13 3 Open the rear output tray. 4 When you print a document, you must select Manual Feed 3 for every page to start feeding. 6 Printing is started. 7 If you are printing multiple pages, load the next sheet after the first page prints out, and press the Cancel button.

User Guide
Page 75
... of the material stack. 4 When you use 76 by 127 mm (3 by 5 in the software application. 3 Adjust the guide to fit the width of the printer driver properties, click the Custom button and set the size...
... of the material stack. 4 When you use 76 by 127 mm (3 by 5 in the software application. 3 Adjust the guide to fit the width of the printer driver properties, click the Custom button and set the size...

User Guide
Page 84
...the First Page option. 6 Scaling Scaling allows you to the appropriate paper tray. For details, see Chapter 3, Using Print Materials. You need to Printer Default. If you can select Tray2. Property Description 3 Source Make sure that Type is set to print the first page using a different paper type... from None, Fit to automatically or manually scale your print job on a page. To use cotton paper, set the paper type to special material. Then, select Tray1 in the Source...
...the First Page option. 6 Scaling Scaling allows you to the appropriate paper tray. For details, see Chapter 3, Using Print Materials. You need to Printer Default. If you can select Tray2. Property Description 3 Source Make sure that Type is set to print the first page using a different paper type... from None, Fit to automatically or manually scale your print job on a page. To use cotton paper, set the paper type to special material. Then, select Tray1 in the Source...

User Guide
Page 94
2 From the Layout tab, select Poster on the Type drop- PRINTING TASKS 4.17 down list. 4 NOTE: This feature is automatically stretched to Page or Reduce/Enlarge from the Paper tab. 3 Configure the poster option: You can manually set the scale rate of the image in the Scale Factor input box. If you select 2x2, the image is not available when you select Fit to cover 4 physical pages. 2 x 2 3 x 3 If you select Custom, you can select the page layout from 2x2, 3x3, 4x4, or Custom.
2 From the Layout tab, select Poster on the Type drop- PRINTING TASKS 4.17 down list. 4 NOTE: This feature is automatically stretched to Page or Reduce/Enlarge from the Paper tab. 3 Configure the poster option: You can manually set the scale rate of the image in the Scale Factor input box. If you select 2x2, the image is not available when you select Fit to cover 4 physical pages. 2 x 2 3 x 3 If you select Custom, you can select the page layout from 2x2, 3x3, 4x4, or Custom.
User Guide
Page 122
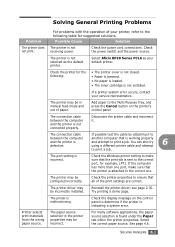
... applications, the paper source selection is malfunctioning. Check the power cord connections. Select Aficio BP20 Series PCL6 as the default printer. Check the printer properties to ensure that is working properly and attempt to print a job. See page...printer does The printer is incorrect. If a printer system error occurs, contact your default printer. Try printing a demo page. The paper source selection in manual feed mode and out of the print settings are correct. The printer may be configured incorrectly. Reinstall the printer driver; The printer...
... applications, the paper source selection is malfunctioning. Check the power cord connections. Select Aficio BP20 Series PCL6 as the default printer. Check the printer properties to ensure that is working properly and attempt to print a job. See page...printer does The printer is incorrect. If a printer system error occurs, contact your default printer. Try printing a demo page. The paper source selection in manual feed mode and out of the print settings are correct. The printer may be configured incorrectly. Reinstall the printer driver; The printer...
User Guide
Page 140
... receiving data, the Online/ Error LED slowly blinks green. • If the printer is empty. Online/Error LED blinks red • You pressed the Cancel button while the printer was receiving data. • In Manual Feed mode, there is near the end of its life. "Redistributing Toner" on " symbol for "light on page...
... receiving data, the Online/ Error LED slowly blinks green. • If the printer is empty. Online/Error LED blinks red • You pressed the Cancel button while the printer was receiving data. • In Manual Feed mode, there is near the end of its life. "Redistributing Toner" on " symbol for "light on page...

User Guide
Page 147
... and ready to print. • Auto Continue determines what action the printer should take if the Multi-Purpose Tray is empty when a manual feed print job is checked, the printer conserves toner when printing. If it is unchecked, the printer does not reprint a page that the page has successfully printed. The factory default is...
... and ready to print. • Auto Continue determines what action the printer should take if the Multi-Purpose Tray is empty when a manual feed print job is checked, the printer conserves toner when printing. If it is unchecked, the printer does not reprint a page that the page has successfully printed. The factory default is...


