Setup Guide
Page 3
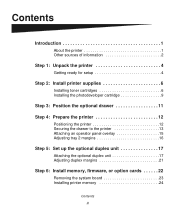
Contents Introduction 1 About the printer 1 Other sources of information 2 Step 1: Unpack the printer 4 Getting ready for setup 4 Step 2: Install printer supplies 6 Installing toner cartridges 6 Installing the photodeveloper cartridge 9 Step 3: Position the optional drawer 11 Step 4: Prepare the printer 12 Positioning the printer 12 Securing the drawer to the printer 13 Attaching an operator ...
Contents Introduction 1 About the printer 1 Other sources of information 2 Step 1: Unpack the printer 4 Getting ready for setup 4 Step 2: Install printer supplies 6 Installing toner cartridges 6 Installing the photodeveloper cartridge 9 Step 3: Position the optional drawer 11 Step 4: Prepare the printer 12 Positioning the printer 12 Securing the drawer to the printer 13 Attaching an operator ...
Setup Guide
Page 10
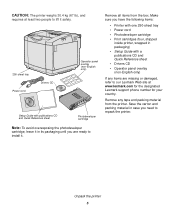
...(67 lb), and requires at www.lexmark.com for the designated Lexmark support phone number for your country. Make sure you have the following items: • Printer with one 250-sheet tray • Power cord • Photodeveloper cartridge • Print cartridges (four, shipped inside printer, wrapped in... packaging) • Setup Guide with publications CD and Quick Reference sheet Photodeveloper cartridge Note: To avoid overexposing the photodeveloper cartridge, leave it in case you are missing or damaged, refer to our Lexmark Web site at least two people to lift it safely. 250-sheet ...
...(67 lb), and requires at www.lexmark.com for the designated Lexmark support phone number for your country. Make sure you have the following items: • Printer with one 250-sheet tray • Power cord • Photodeveloper cartridge • Print cartridges (four, shipped inside printer, wrapped in... packaging) • Setup Guide with publications CD and Quick Reference sheet Photodeveloper cartridge Note: To avoid overexposing the photodeveloper cartridge, leave it in case you are missing or damaged, refer to our Lexmark Web site at least two people to lift it safely. 250-sheet ...
Setup Guide
Page 14
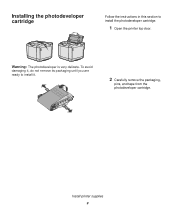
Warning: The photodeveloper is very delicate. Install printer supplies 9 Installing the photodeveloper cartridge Follow the instructions in this section to install it. 2 Carefully remove the packaging, pins, and tape from the photodeveloper cartridge. To avoid damaging it, do not remove its packaging until you are ready to install the photodeveloper cartridge. 1 Open the printer top door.
Warning: The photodeveloper is very delicate. Install printer supplies 9 Installing the photodeveloper cartridge Follow the instructions in this section to install it. 2 Carefully remove the packaging, pins, and tape from the photodeveloper cartridge. To avoid damaging it, do not remove its packaging until you are ready to install the photodeveloper cartridge. 1 Open the printer top door.
Setup Guide
Page 15
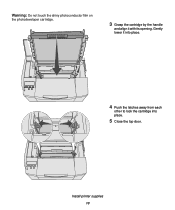
Gently lower it with its opening. Install printer supplies 10 Warning: Do not touch the shiny photoconductor film on the photodeveloper cartridge. 3 Grasp the cartridge by the handle and align it into place. 4 Push the latches away from each other to lock the cartridge into place. 5 Close the top door.
Gently lower it with its opening. Install printer supplies 10 Warning: Do not touch the shiny photoconductor film on the photodeveloper cartridge. 3 Grasp the cartridge by the handle and align it into place. 4 Push the latches away from each other to lock the cartridge into place. 5 Close the top door.
User's Reference
Page 3
... 60 Maintaining your printer 60 Determining the status of supplies 60 Conserving supplies ...61 Ordering supplies and maintenance items 61 Ordering toner cartridges 62 Ordering a fuser ...62 Ordering a waste toner bottle 62 Ordering a photodeveloper cartridge 62 Maintaining your printer for long term storage 62 Storing supplies ...63 Storing media ...63 Storing the toner...
... 60 Maintaining your printer 60 Determining the status of supplies 60 Conserving supplies ...61 Ordering supplies and maintenance items 61 Ordering toner cartridges 62 Ordering a fuser ...62 Ordering a waste toner bottle 62 Ordering a photodeveloper cartridge 62 Maintaining your printer for long term storage 62 Storing supplies ...63 Storing media ...63 Storing the toner...
User's Reference
Page 4
Contents Recycling Lexmark products 68 Replacing the fuser ...69 Replacing the waste toner bottle 72 Replacing the photodeveloper cartridge 73 Setting the operator panel when a supply is replaced 77 Changing the toner cartridge yield 77 Specifying the replaced supply 77 Cleaning the printhead lens 78 Chapter 6: Troubleshooting 81 Solving basic printer problems 81 Checking an...
Contents Recycling Lexmark products 68 Replacing the fuser ...69 Replacing the waste toner bottle 72 Replacing the photodeveloper cartridge 73 Setting the operator panel when a supply is replaced 77 Changing the toner cartridge yield 77 Specifying the replaced supply 77 Cleaning the printhead lens 78 Chapter 6: Troubleshooting 81 Solving basic printer problems 81 Checking an...
User's Reference
Page 62
... the printer off for an extended period, remove the fuser. The recommended print cartridges specifically designed for your printer for long term storage 62 Ordering a waste toner bottle Order Lexmark part number 20K0505. Pull the fuser pressure release levers open , see page 53... pages 6,600 pages 6,600 pages 6,600 pages 10,000 pages Ordering a fuser Order Lexmark part number 20K0506 for a low-voltage (120V/50-60Hz) printer or 20K0507 for long term storage If you should order the appropriate new print cartridge. Ordering a photodeveloper cartridge Order Lexmark part number 20K0504.
... the printer off for an extended period, remove the fuser. The recommended print cartridges specifically designed for your printer for long term storage 62 Ordering a waste toner bottle Order Lexmark part number 20K0505. Pull the fuser pressure release levers open , see page 53... pages 6,600 pages 6,600 pages 6,600 pages 10,000 pages Ordering a fuser Order Lexmark part number 20K0506 for a low-voltage (120V/50-60Hz) printer or 20K0507 for long term storage If you should order the appropriate new print cartridge. Ordering a photodeveloper cartridge Order Lexmark part number 20K0504.

User's Reference
Page 73
... cap. 4 Wrap the used waste toner bottle in . 7 Close the front door. Make sure you need to replace the photodeveloper cartridge soon. See Ordering a photodeveloper cartridge for more information. Replacing the photodeveloper cartridge 73 Replacing the photodeveloper cartridge When 83 Photodev Cart Life Warning appears on the new waste toner bottle and align it straight in the plastic...
... cap. 4 Wrap the used waste toner bottle in . 7 Close the front door. Make sure you need to replace the photodeveloper cartridge soon. See Ordering a photodeveloper cartridge for more information. Replacing the photodeveloper cartridge 73 Replacing the photodeveloper cartridge When 83 Photodev Cart Life Warning appears on the new waste toner bottle and align it straight in the plastic...

User's Reference
Page 74
Pull the top door up on the top door release latch. Note: Notice the arrow on each other to its open position. 2 Push the latches toward each latch which points inward. Replacing the photodeveloper cartridge 74 Maintenance When 83 Photodev Cart Exhausted appears on the operator panel, you must replace the photodeveloper cartridge immediately. 1 Pull up , then rotate it backwards to release the photodeveloper cartridge.
Pull the top door up on the top door release latch. Note: Notice the arrow on each other to its open position. 2 Push the latches toward each latch which points inward. Replacing the photodeveloper cartridge 74 Maintenance When 83 Photodev Cart Exhausted appears on the operator panel, you must replace the photodeveloper cartridge immediately. 1 Pull up , then rotate it backwards to release the photodeveloper cartridge.

User's Reference
Page 75
Maintenance 3 Grasp the handle and pull the used photodeveloper cartridge straight up. Dispose of the photodeveloper cartridge. Warning: Do not touch the photoconductor film, which is the shiny green part of it properly. 4 Carefully unpack the new photodeveloper cartridge. Replacing the photodeveloper cartridge 75 Remove any packaging material or tape. 5 Remove the two clips on the sides of the photodeveloper cartridge.
Maintenance 3 Grasp the handle and pull the used photodeveloper cartridge straight up. Dispose of the photodeveloper cartridge. Warning: Do not touch the photoconductor film, which is the shiny green part of it properly. 4 Carefully unpack the new photodeveloper cartridge. Replacing the photodeveloper cartridge 75 Remove any packaging material or tape. 5 Remove the two clips on the sides of the photodeveloper cartridge.

User's Reference
Page 76
Replacing the photodeveloper cartridge 76 Maintenance 6 Grasp the handle of the new photodeveloper cartridge and align it into place. 7 Push the latches away from each other to lock the photodeveloper cartridge into place. 8 Close the top door. 9 Continue with its opening. Gently lower it with Setting the operator panel when a supply is replaced.
Replacing the photodeveloper cartridge 76 Maintenance 6 Grasp the handle of the new photodeveloper cartridge and align it into place. 7 Push the latches away from each other to lock the photodeveloper cartridge into place. 8 Close the top door. 9 Continue with its opening. Gently lower it with Setting the operator panel when a supply is replaced.

User's Reference
Page 77
... Select. 5 Press and release Menu until you see the type of the toner cartridge you exit the Config Menu. 7 Install the toner cartridge. Once you have replaced a toner cartridge, a fuser, or a photodeveloper cartridge, complete the following: 1 Make sure the printer is on the operator panel for... replaced. The selections are Cyan, Magenta, Yellow, and Black. Specifying the replaced supply Note: If you replace the fuser or photodeveloper cartridge once the printer issues the 87 Fuser Life Warning or 83 Photodev Cart Life Warning messages, respectively, the printer issues message prompts ...
... Select. 5 Press and release Menu until you see the type of the toner cartridge you exit the Config Menu. 7 Install the toner cartridge. Once you have replaced a toner cartridge, a fuser, or a photodeveloper cartridge, complete the following: 1 Make sure the printer is on the operator panel for... replaced. The selections are Cyan, Magenta, Yellow, and Black. Specifying the replaced supply Note: If you replace the fuser or photodeveloper cartridge once the printer issues the 87 Fuser Life Warning or 83 Photodev Cart Life Warning messages, respectively, the printer issues message prompts ...
User's Reference
Page 78
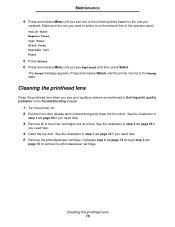
...Yellow Toner Magenta Toner Cyan Toner Black Toner Photodev Cart Fuser 5 Press Select. 6 Press and release Menu until the printer returns to remove the photodeveloper cartridge. Maintenance 4 Press and release Menu until you see one of the following items based on the one at a time. Complete step 2 on ... in Solving print quality problems in step 1 on the second line of the toner cartridges one you see Replaced, and then press Select. Cleaning the printhead lens 78 Make sure the one you want to select is on page 65 if you need help . 5 Remove the photodeveloper cartridge.
...Yellow Toner Magenta Toner Cyan Toner Black Toner Photodev Cart Fuser 5 Press Select. 6 Press and release Menu until the printer returns to remove the photodeveloper cartridge. Maintenance 4 Press and release Menu until you see one of the following items based on the one at a time. Complete step 2 on ... in Solving print quality problems in step 1 on the second line of the toner cartridges one you see Replaced, and then press Select. Cleaning the printhead lens 78 Make sure the one you want to select is on page 65 if you need help . 5 Remove the photodeveloper cartridge.

User's Reference
Page 80
Cleaning the printhead lens 80 See the illustration in step 7 on page 67 if you need help . 10 Push the latches away from each other to lock the photodeveloper cartridge into place. See the illustration in step 6 on page 76 if you need help . 13 Close the front door. 14 Turn the printer on page 76 if you need help. 11 Close the top door. 12 Install all of the toner cartridges. Gently lower it into place. Maintenance 8 Push the lens cover down. 9 Align the photodeveloper cartridge with its opening. See the illustration in step 7 on .
Cleaning the printhead lens 80 See the illustration in step 7 on page 67 if you need help . 10 Push the latches away from each other to lock the photodeveloper cartridge into place. See the illustration in step 6 on page 76 if you need help . 13 Close the front door. 14 Turn the printer on page 76 if you need help. 11 Close the top door. 12 Install all of the toner cartridges. Gently lower it into place. Maintenance 8 Push the lens cover down. 9 Align the photodeveloper cartridge with its opening. See the illustration in step 7 on .

User's Reference
Page 84
...table to find solutions to On. The job is not set to print quality problems. Symptom Repeating defects Cause Solution Either the toner cartridges, the photodeveloper cartridge, or the fuser are defective. Set Print Timeout to the Setup Guide for information about a printer consumable. Troubleshooting Symptom Large jobs do... in all colors: Replace the item if the defects occur every: 35 mm (1.38 in.) or 95 mm (3.74 in.) for the photodeveloper cartridge 95 mm (3.74 in.) or 128 mm (5.04 in the Finishing Menu or through the printer driver. See Determining the status of the...
...table to find solutions to On. The job is not set to print quality problems. Symptom Repeating defects Cause Solution Either the toner cartridges, the photodeveloper cartridge, or the fuser are defective. Set Print Timeout to the Setup Guide for information about a printer consumable. Troubleshooting Symptom Large jobs do... in all colors: Replace the item if the defects occur every: 35 mm (1.38 in.) or 95 mm (3.74 in.) for the photodeveloper cartridge 95 mm (3.74 in.) or 128 mm (5.04 in the Finishing Menu or through the printer driver. See Determining the status of the...

User's Reference
Page 85
...area. White or colored line ABCDE ABCDE ABCDE Either the toner cartridges, the fuser, or the photodeveloper cartridge are defective. Replace the toner cartridges or fuser as needed. Replace the color toner cartridge causing the streaks. See Cleaning the printhead lens. If paper .... Solving print quality problems 85 Streaked horizontal lines ABCDE ABCDE ABCDE The toner cartridges may be defective, empty, or worn. Remove and reinstall the photodeveloper cartridge. The toner cartridges are defective, or toner has accumulated in the printer housing near the printhead using...
...area. White or colored line ABCDE ABCDE ABCDE Either the toner cartridges, the fuser, or the photodeveloper cartridge are defective. Replace the toner cartridges or fuser as needed. Replace the color toner cartridge causing the streaks. See Cleaning the printhead lens. If paper .... Solving print quality problems 85 Streaked horizontal lines ABCDE ABCDE ABCDE The toner cartridges may be defective, empty, or worn. Remove and reinstall the photodeveloper cartridge. The toner cartridges are defective, or toner has accumulated in the printer housing near the printhead using...

User's Reference
Page 87
... the printer driver before sending the job to print. The fuser is not functioning properly. Ghost images The photodeveloper cartridge is worn or defective. Make sure the Paper Type setting is too dark. Gray background ABCDE The Toner Darkness... the fuser. ABCDE ABCDE Uneven print density ABCDE ABCDE ABCDE The toner cartridges and the photodeveloper cartridge are defective. Replace the toner cartridges and the photodeveloper cartridge. Solving print quality problems 87 The toner cartridges are defective. Select a different Toner Darkness setting from Plain Weight to...
... the printer driver before sending the job to print. The fuser is not functioning properly. Ghost images The photodeveloper cartridge is worn or defective. Make sure the Paper Type setting is too dark. Gray background ABCDE The Toner Darkness... the fuser. ABCDE ABCDE Uneven print density ABCDE ABCDE ABCDE The toner cartridges and the photodeveloper cartridge are defective. Replace the toner cartridges and the photodeveloper cartridge. Solving print quality problems 87 The toner cartridges are defective. Select a different Toner Darkness setting from Plain Weight to...

User's Reference
Page 166
...Once the toner waste bottle reaches Full, the printer will print up to reaching its end of use PostScript emulation. Life Warning The photodeveloper cartridge is close to 15 more pages from the computer. Disables Wait Timeout. Specifies the amount of the toner waste bottle. It is... additional data before it cancels the job. To view the status of the fuser. To view the status of the photodeveloper cartridge. Supplies Menu 166 Exhausted The photodeveloper cartridge is completely used . This menu item is shown in seconds) the printer waits to reaching its end of use....
...Once the toner waste bottle reaches Full, the printer will print up to reaching its end of use PostScript emulation. Life Warning The photodeveloper cartridge is close to 15 more pages from the computer. Disables Wait Timeout. Specifies the amount of the toner waste bottle. It is... additional data before it cancels the job. To view the status of the fuser. To view the status of the photodeveloper cartridge. Supplies Menu 166 Exhausted The photodeveloper cartridge is completely used . This menu item is shown in seconds) the printer waits to reaching its end of use....

User's Reference
Page 167
... this supply item. 1 Select the fuser as the supply item. Missing The fuser is not full or missing. 1 Select the photodeveloper cartridge as the supply Fuser item. 2 Select the value. OK The toner waste bottle is missing from the printer. xxx% The percentage...Select the value. Full or Missing The toner waste bottle is full or is low on toner. Missing The photodeveloper cartridge is completely used . Exhausted The photodeveloper cartridge is missing from the printer. Exhausted The fuser is completely used . Using printer menus Menu Item Supplies Life Purpose...
... this supply item. 1 Select the fuser as the supply item. Missing The fuser is not full or missing. 1 Select the photodeveloper cartridge as the supply Fuser item. 2 Select the value. OK The toner waste bottle is missing from the printer. xxx% The percentage...Select the value. Full or Missing The toner waste bottle is full or is low on toner. Missing The photodeveloper cartridge is completely used . Exhausted The photodeveloper cartridge is missing from the printer. Exhausted The fuser is completely used . Using printer menus Menu Item Supplies Life Purpose...

User's Reference
Page 173
... Select for YES Stop for the message to delete all held jobs. Close the printer front door to continue printing. Replace the photodeveloper cartridge and press Go. The 83 Photodev Exhausted returns after pressing Stop. Press Stop to clear the message. The fuser remains in a... opened . Close the printer top door to cancel the operation. See also: Disabling operator panel menus Understanding printer messages 173 The photodeveloper cartridge remains in a warning or exhausted state requiring that you can do The duplex rear door is closed or when you replace Fuser?...
... Select for YES Stop for the message to delete all held jobs. Close the printer front door to continue printing. Replace the photodeveloper cartridge and press Go. The 83 Photodev Exhausted returns after pressing Stop. Press Stop to clear the message. The fuser remains in a... opened . Close the printer top door to cancel the operation. See also: Disabling operator panel menus Understanding printer messages 173 The photodeveloper cartridge remains in a warning or exhausted state requiring that you can do The duplex rear door is closed or when you replace Fuser?...


