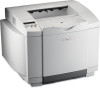
Setup Guide
Page 65
... is an intended beneficiary of this statement may also have installed a maintenance kit as specified (if applicable) • Use of printing media outside of Lexmark specifications • Use of other than Lexmark supplies (such as toner cartridges, inkjet cartridges, and ribbons) •... by: • Modification or attachments • Accidents or misuse • Unsuitable physical or operating environment • Maintenance by anyone other than Lexmark or a Lexmark authorized servicer • Operation of a product beyond the limit of technical support. Extent of warranty We do not...
... is an intended beneficiary of this statement may also have installed a maintenance kit as specified (if applicable) • Use of printing media outside of Lexmark specifications • Use of other than Lexmark supplies (such as toner cartridges, inkjet cartridges, and ribbons) •... by: • Modification or attachments • Accidents or misuse • Unsuitable physical or operating environment • Maintenance by anyone other than Lexmark or a Lexmark authorized servicer • Operation of a product beyond the limit of technical support. Extent of warranty We do not...
User's Reference
Page 3
... 4: Clearing jams 49 Avoiding jams hints ...49 Identifying the media path 50 Accessing jam areas 51 Chapter 5: Maintenance 60 Maintaining your printer 60 Determining the status of supplies 60 Conserving supplies ...61 Ordering supplies and maintenance items 61 Ordering toner cartridges 62 Ordering a fuser ...62 Ordering a waste toner bottle 62 Ordering a photodeveloper...
... 4: Clearing jams 49 Avoiding jams hints ...49 Identifying the media path 50 Accessing jam areas 51 Chapter 5: Maintenance 60 Maintaining your printer 60 Determining the status of supplies 60 Conserving supplies ...61 Ordering supplies and maintenance items 61 Ordering toner cartridges 62 Ordering a fuser ...62 Ordering a waste toner bottle 62 Ordering a photodeveloper...

User's Reference
Page 15
... affixed to this printer as a Class I laser product conforming to the requirements of IEC 60825-1. Class I level during normal operation, user maintenance, or prescribed service condition. to conform to the requirements of DHHS 21 CFR Subchapter J for Class I (1) laser products, and elsewhere is... as shown: Class 1 laser statement The printer is certified in the wavelength region of 770-795 nanometers. Statement of limited warranty Lexmark International, Inc., Lexington, KY This warranty applies to the United States and Canada. Notices Laser notices Laser advisory label A laser ...
... affixed to this printer as a Class I laser product conforming to the requirements of IEC 60825-1. Class I level during normal operation, user maintenance, or prescribed service condition. to conform to the requirements of DHHS 21 CFR Subchapter J for Class I (1) laser products, and elsewhere is... as shown: Class 1 laser statement The printer is certified in the wavelength region of 770-795 nanometers. Statement of limited warranty Lexmark International, Inc., Lexington, KY This warranty applies to the United States and Canada. Notices Laser notices Laser advisory label A laser ...
User's Reference
Page 17
...attachments • Accidents or misuse • Unsuitable physical or operating environment • Maintenance by you may only be available for actual damages from any claim by a Lexmark warranty, technical support may recover actual damages up to real property or tangible personal ...cycle • Failure to the greater of liability will Lexmark be limited to have installed a maintenance kit as specified (if applicable) • Use of printing media outside of Lexmark specifications • Use of other than Lexmark supplies (such as toner cartridges, inkjet cartridges, and...
...attachments • Accidents or misuse • Unsuitable physical or operating environment • Maintenance by you may only be available for actual damages from any claim by a Lexmark warranty, technical support may recover actual damages up to real property or tangible personal ...cycle • Failure to the greater of liability will Lexmark be limited to have installed a maintenance kit as specified (if applicable) • Use of printing media outside of Lexmark specifications • Use of other than Lexmark supplies (such as toner cartridges, inkjet cartridges, and...

User's Reference
Page 60
... are using the printer, you have. In the U.S., contact Lexmark at www.lexmark.com or contact the place where you need to complete certain tasks to this chapter. the percentage of life remaining for each of the printer. Refer printing problems and maintenance tasks to maintain optimum print quality. One or two pages...
... are using the printer, you have. In the U.S., contact Lexmark at www.lexmark.com or contact the place where you need to complete certain tasks to this chapter. the percentage of life remaining for each of the printer. Refer printing problems and maintenance tasks to maintain optimum print quality. One or two pages...
User's Reference
Page 61
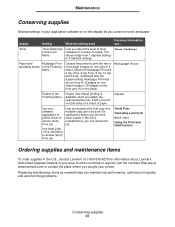
...optimize print quality, and avoid printing problems. Conserving supplies 61 Values for information about Lexmark Authorized Supplies Dealers in the Color Menu Lets you attach the optional duplex unit. Replacing maintenance items as needed helps you conserve toner and paper: Supply Setting What the setting does... www.lexmark.com or contact the place where you examine the first copy of paper. Verify Print Canceling a print job Held Jobs Using the Print and Hold function Ordering supplies and maintenance items To order supplies in the Job Menu to send a Verify Print job. It...
...optimize print quality, and avoid printing problems. Conserving supplies 61 Values for information about Lexmark Authorized Supplies Dealers in the Color Menu Lets you attach the optional duplex unit. Replacing maintenance items as needed helps you conserve toner and paper: Supply Setting What the setting does... www.lexmark.com or contact the place where you examine the first copy of paper. Verify Print Canceling a print job Held Jobs Using the Print and Hold function Ordering supplies and maintenance items To order supplies in the Job Menu to send a Verify Print job. It...
User's Reference
Page 62
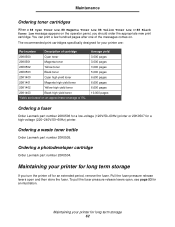
To pull the fuser pressure release levers open and then store the fuser. Maintenance Ordering toner cartridges When a 88 Cyan Toner Low, 88 Magenta Toner Low, 88 Yellow Toner Low, or 88 Black Toner Low message appears on .... high-voltage (220-240V/50-60Hz) printer. You can print a few hundred pages after one of 5%. Ordering a waste toner bottle Order Lexmark part number 20K0505. Ordering a photodeveloper cartridge Order Lexmark part number 20K0504. The recommended print cartridges specifically designed for your printer for long term storage If you should order the appropriate...
To pull the fuser pressure release levers open and then store the fuser. Maintenance Ordering toner cartridges When a 88 Cyan Toner Low, 88 Magenta Toner Low, 88 Yellow Toner Low, or 88 Black Toner Low message appears on .... high-voltage (220-240V/50-60Hz) printer. You can print a few hundred pages after one of 5%. Ordering a waste toner bottle Order Lexmark part number 20K0505. Ordering a photodeveloper cartridge Order Lexmark part number 20K0504. The recommended print cartridges specifically designed for your printer for long term storage If you should order the appropriate...

User's Reference
Page 63
Maintenance Storing supplies Use the following guidelines for proper storage. Storing supplies 63 Storing media These help avoid media feeding problems and uneven print quality: • ...
Maintenance Storing supplies Use the following guidelines for proper storage. Storing supplies 63 Storing media These help avoid media feeding problems and uneven print quality: • ...
User's Reference
Page 64
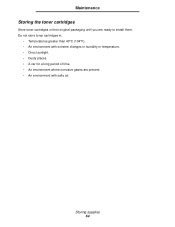
Storing supplies 64 Do not store toner cartridges in: • Temperatures greater than 40°C (104°F). • An environment with extreme changes in their original packaging until you are present. • An environment with salty air. Maintenance Storing the toner cartridges Store toner cartridges in humidity or temperature. • Direct sunlight. • Dusty places. • A car for a long period of time. • An environment where corrosive gases are ready to install them.
Storing supplies 64 Do not store toner cartridges in: • Temperatures greater than 40°C (104°F). • An environment with extreme changes in their original packaging until you are present. • An environment with salty air. Maintenance Storing the toner cartridges Store toner cartridges in humidity or temperature. • Direct sunlight. • Dusty places. • A car for a long period of time. • An environment where corrosive gases are ready to install them.
User's Reference
Page 65
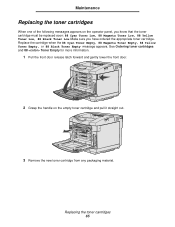
... front door release latch forward and gently lower the front door. 2 Grasp the handle on the operator panel, you have ordered the appropriate toner cartridge. Maintenance Replacing the toner cartridges When one of the following messages appears on the empty toner cartridge and pull it straight out. 3 Remove the new toner...
... front door release latch forward and gently lower the front door. 2 Grasp the handle on the operator panel, you have ordered the appropriate toner cartridge. Maintenance Replacing the toner cartridges When one of the following messages appears on the empty toner cartridge and pull it straight out. 3 Remove the new toner...
User's Reference
Page 66
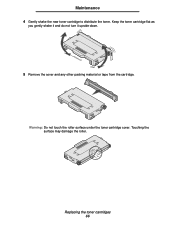
Replacing the toner cartridges 66 Maintenance 4 Gently shake the new toner cartridge to distribute the toner. Keep the toner cartridge flat as you gently shake it and do not turn it upside down. 5 Remove the cover and any other packing material or tape from the cartridge. Warning: Do not touch the roller surface under the toner cartridge cover. Touching the surface may damage the roller.
Replacing the toner cartridges 66 Maintenance 4 Gently shake the new toner cartridge to distribute the toner. Keep the toner cartridge flat as you gently shake it and do not turn it upside down. 5 Remove the cover and any other packing material or tape from the cartridge. Warning: Do not touch the roller surface under the toner cartridge cover. Touching the surface may damage the roller.
User's Reference
Page 67
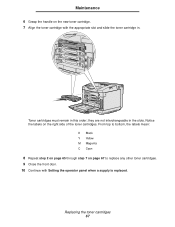
... toner cartridges. 9 Close the front door. 10 Continue with the appropriate slot and slide the toner cartridge in. they are not interchangeable in this order; Maintenance 6 Grasp the handle on the new toner cartridge. 7 Align the toner cartridge with Setting the operator panel when a supply is replaced.
... toner cartridges. 9 Close the front door. 10 Continue with the appropriate slot and slide the toner cartridge in. they are not interchangeable in this order; Maintenance 6 Grasp the handle on the new toner cartridge. 7 Align the toner cartridge with Setting the operator panel when a supply is replaced.
User's Reference
Page 68
... the printer. When you return a used toner cartridge, you contribute to a worldwide recycling effort at no cost to recycle the used toner cartridge. Recycling Lexmark products 68 Maintenance 11 Follow the instructions located in the new toner cartridge box to you. For best results, use of third-party supplies is not covered...
... the printer. When you return a used toner cartridge, you contribute to a worldwide recycling effort at no cost to recycle the used toner cartridge. Recycling Lexmark products 68 Maintenance 11 Follow the instructions located in the new toner cartridge box to you. For best results, use of third-party supplies is not covered...

User's Reference
Page 69
When 87 Fuser Exhausted appears on the operator panel, you need to cool before replacing the fuser. 1 Turn the printer off. 2 Push the rear door release latch. 3 Gently lower the rear door. Make sure you must replace the fuser immediately. Replacing the fuser 69 CAUTION: The fuser and the inside of the printer near the fuser may be hot. Maintenance Replacing the fuser When 87 Fuser Life Warning appears on the operator panel, you have ordered one. See Ordering a fuser for it to replace the fuser soon. Wait for more information.
When 87 Fuser Exhausted appears on the operator panel, you need to cool before replacing the fuser. 1 Turn the printer off. 2 Push the rear door release latch. 3 Gently lower the rear door. Make sure you must replace the fuser immediately. Replacing the fuser 69 CAUTION: The fuser and the inside of the printer near the fuser may be hot. Maintenance Replacing the fuser When 87 Fuser Life Warning appears on the operator panel, you have ordered one. See Ordering a fuser for it to replace the fuser soon. Wait for more information.

User's Reference
Page 70
Remove any packaging material or tape. 7 Grasp the new fuser by the handles and lift it into place. Dispose of the used fuser by the handles and align it with its opening. 8 Gently lower it straight up. Handle Handle 6 Unpack the new fuser. Replacing the fuser 70 Maintenance 4 Turn the two green fuser release levers as shown. 5 Grasp the used fuser.
Remove any packaging material or tape. 7 Grasp the new fuser by the handles and lift it into place. Dispose of the used fuser by the handles and align it with its opening. 8 Gently lower it straight up. Handle Handle 6 Unpack the new fuser. Replacing the fuser 70 Maintenance 4 Turn the two green fuser release levers as shown. 5 Grasp the used fuser.

User's Reference
Page 71
Maintenance 9 Turn the two green levers as shown to reinstall it correctly. If this message appears, remove the fuser, and try to lock the new fuser into place. 10 Push the other two green release levers down. 11 Close the rear door. 12 Turn the printer on the operator panel. If you have installed the fuser improperly, 87 Fuser Missing appears on . 13 Continue with Setting the operator panel when a supply is replaced. Replacing the fuser 71
Maintenance 9 Turn the two green levers as shown to reinstall it correctly. If this message appears, remove the fuser, and try to lock the new fuser into place. 10 Push the other two green release levers down. 11 Close the rear door. 12 Turn the printer on the operator panel. If you have installed the fuser improperly, 87 Fuser Missing appears on . 13 Continue with Setting the operator panel when a supply is replaced. Replacing the fuser 71
User's Reference
Page 72
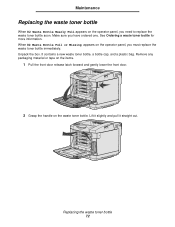
.... Replacing the waste toner bottle 72 Lift it slightly and pull it straight out. It contains a new waste toner bottle, a bottle cap, and a plastic bag. Maintenance Replacing the waste toner bottle When 82 Waste Bottle Nearly Full appears on the operator panel, you have ordered one.
.... Replacing the waste toner bottle 72 Lift it slightly and pull it straight out. It contains a new waste toner bottle, a bottle cap, and a plastic bag. Maintenance Replacing the waste toner bottle When 82 Waste Bottle Nearly Full appears on the operator panel, you have ordered one.

User's Reference
Page 73
.... 6 Push it straight in. 7 Close the front door. See Ordering a photodeveloper cartridge for more information. Make sure you need to replace the photodeveloper cartridge soon. Maintenance 3 Plug the hole of the used waste toner bottle with the bottle cap. 4 Wrap the used waste toner bottle in the plastic bag and dispose...
.... 6 Push it straight in. 7 Close the front door. See Ordering a photodeveloper cartridge for more information. Make sure you need to replace the photodeveloper cartridge soon. Maintenance 3 Plug the hole of the used waste toner bottle with the bottle cap. 4 Wrap the used waste toner bottle in the plastic bag and dispose...

User's Reference
Page 74
Note: Notice the arrow on the top door release latch. Maintenance When 83 Photodev Cart Exhausted appears on the operator panel, you must replace the photodeveloper cartridge immediately. 1 Pull up , then rotate it backwards to its open position. 2 Push the latches toward each latch which points inward. Pull the top door up on each other to release the photodeveloper cartridge. Replacing the photodeveloper cartridge 74
Note: Notice the arrow on the top door release latch. Maintenance When 83 Photodev Cart Exhausted appears on the operator panel, you must replace the photodeveloper cartridge immediately. 1 Pull up , then rotate it backwards to its open position. 2 Push the latches toward each latch which points inward. Pull the top door up on each other to release the photodeveloper cartridge. Replacing the photodeveloper cartridge 74

User's Reference
Page 75
Replacing the photodeveloper cartridge 75 Maintenance 3 Grasp the handle and pull the used photodeveloper cartridge straight up. Dispose of the photodeveloper cartridge. Warning: Do not touch the photoconductor film, which is the shiny green part of it properly. 4 Carefully unpack the new photodeveloper cartridge. Remove any packaging material or tape. 5 Remove the two clips on the sides of the photodeveloper cartridge.
Replacing the photodeveloper cartridge 75 Maintenance 3 Grasp the handle and pull the used photodeveloper cartridge straight up. Dispose of the photodeveloper cartridge. Warning: Do not touch the photoconductor film, which is the shiny green part of it properly. 4 Carefully unpack the new photodeveloper cartridge. Remove any packaging material or tape. 5 Remove the two clips on the sides of the photodeveloper cartridge.


