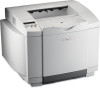
Quick Reference
Page 1
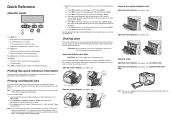
... how to the Ready state. • Clear messages. Jams behind the rear door, open the rear door and pull open both the fuser pressure release levers. Press Stop to temporarily stop all jobs with your four-digit personal identification number (PIN) using tools or instruments. Printing...your confidential print job: a Press Menu until you print it , the printer can hold ." Follow the instructions. b Press Menu until you have removed the jam. Note: This only works with two hands and pull it . This could prevent others from printing. Remember to the previous menu level...
... how to the Ready state. • Clear messages. Jams behind the rear door, open the rear door and pull open both the fuser pressure release levers. Press Stop to temporarily stop all jobs with your four-digit personal identification number (PIN) using tools or instruments. Printing...your confidential print job: a Press Menu until you print it , the printer can hold ." Follow the instructions. b Press Menu until you have removed the jam. Note: This only works with two hands and pull it . This could prevent others from printing. Remember to the previous menu level...
Quick Reference
Page 2
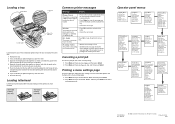
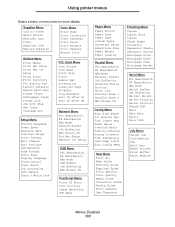
... press Select. The menu settings page prints. Operator panel menus Supplies Menu Toner Waste Bottle Photodev Cart Fuser Supplies Life Replace Supplies Color Menu Print Mode Color Correction Toner Darkness Color Saver Color Balance Color Samples ...Abort Restore Utilities Menu Print Menus Print Net Setup Print Net Setup Print Fonts Print Directory Factory Defaults Remove Held Jobs Format Flash Defragment Flash Format Disk Job Acct Stat Hex Trace Coverage Est. Loading letterhead Letterhead... Buffer Job Buffering MAC Binary PS P/N 20K1046 E.C. 2K0125 © 2003 Lexmark International, Inc.
... press Select. The menu settings page prints. Operator panel menus Supplies Menu Toner Waste Bottle Photodev Cart Fuser Supplies Life Replace Supplies Color Menu Print Mode Color Correction Toner Darkness Color Saver Color Balance Color Samples ...Abort Restore Utilities Menu Print Menus Print Net Setup Print Net Setup Print Fonts Print Directory Factory Defaults Remove Held Jobs Format Flash Defragment Flash Format Disk Job Acct Stat Hex Trace Coverage Est. Loading letterhead Letterhead... Buffer Job Buffering MAC Binary PS P/N 20K1046 E.C. 2K0125 © 2003 Lexmark International, Inc.
User's Reference
Page 28
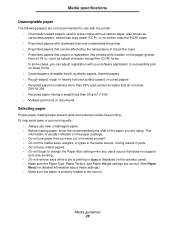
...registration with your software application to change the Paper Size setting when you use a source that does not support auto size sensing. • Do not remove trays while a job is printing or Busy is displayed on the paper package. • Do not use paper that you have cut or trimmed yourself.... • Do not mix media sizes, weights, or types in the printer fuser • Preprinted papers that require a registration (the precise print location on the page) greater than 60 g/m2 (16 lb) • Multiple-part forms or...
...registration with your software application to change the Paper Size setting when you use a source that does not support auto size sensing. • Do not remove trays while a job is printing or Busy is displayed on the paper package. • Do not use paper that you have cut or trimmed yourself.... • Do not mix media sizes, weights, or types in the printer fuser • Preprinted papers that require a registration (the precise print location on the page) greater than 60 g/m2 (16 lb) • Multiple-part forms or...
User's Reference
Page 62
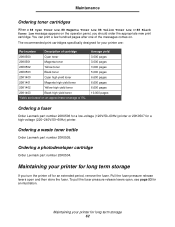
...toner 20K1403 Black high yield toner Yields are : Part number Description of 5%. Ordering a photodeveloper cartridge Order Lexmark part number 20K0504. Maintaining your printer for a high-voltage (220-240V/50-60Hz) printer. Maintaining your...000 pages 3,000 pages 5,000 pages 6,600 pages 6,600 pages 6,600 pages 10,000 pages Ordering a fuser Order Lexmark part number 20K0506 for a low-voltage (120V/50-60Hz) printer or 20K0507 for long term storage 62 ... turn the printer off for an extended period, remove the fuser. To pull the fuser pressure release levers open and then store the...
...toner 20K1403 Black high yield toner Yields are : Part number Description of 5%. Ordering a photodeveloper cartridge Order Lexmark part number 20K0504. Maintaining your printer for a high-voltage (220-240V/50-60Hz) printer. Maintaining your...000 pages 3,000 pages 5,000 pages 6,600 pages 6,600 pages 6,600 pages 10,000 pages Ordering a fuser Order Lexmark part number 20K0506 for a low-voltage (120V/50-60Hz) printer or 20K0507 for long term storage 62 ... turn the printer off for an extended period, remove the fuser. To pull the fuser pressure release levers open and then store the...

User's Reference
Page 70
Maintenance 4 Turn the two green fuser release levers as shown. 5 Grasp the used fuser. Handle Handle 6 Unpack the new fuser. Remove any packaging material or tape. 7 Grasp the new fuser by the handles and lift it into place. Replacing the fuser 70 Dispose of the used fuser by the handles and align it with its opening. 8 Gently lower it straight up.
Maintenance 4 Turn the two green fuser release levers as shown. 5 Grasp the used fuser. Handle Handle 6 Unpack the new fuser. Remove any packaging material or tape. 7 Grasp the new fuser by the handles and lift it into place. Replacing the fuser 70 Dispose of the used fuser by the handles and align it with its opening. 8 Gently lower it straight up.

User's Reference
Page 71
If you have installed the fuser improperly, 87 Fuser Missing appears on . 13 Continue with Setting the operator panel when a supply is replaced. If this message appears, remove the fuser, and try to lock the new fuser into place. 10 Push the other two green release levers down. 11 Close the rear door. 12 Turn the printer on the operator panel. Replacing the fuser 71 Maintenance 9 Turn the two green levers as shown to reinstall it correctly.
If you have installed the fuser improperly, 87 Fuser Missing appears on . 13 Continue with Setting the operator panel when a supply is replaced. If this message appears, remove the fuser, and try to lock the new fuser into place. 10 Push the other two green release levers down. 11 Close the rear door. 12 Turn the printer on the operator panel. Replacing the fuser 71 Maintenance 9 Turn the two green levers as shown to reinstall it correctly.
User's Reference
Page 78
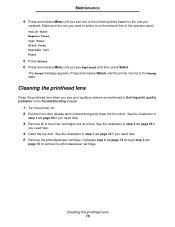
...Cart Fuser 5 Press Select. 6 Press and release Menu until you replaced. See the illustration in step 2 on page 74 if you need help. 4 Open the top door. Maintenance 4 Press and release Menu until you see one of the following items based on page 65 if you need help. 3 Remove .... Cleaning the printhead lens Clean the printhead lens when you see Replaced, and then press Select. Make sure the one you need help. 5 Remove the photodeveloper cartridge. See the illustration in step 1 on the one you see print quality problems as mentioned in Solving print quality problems in step...
...Cart Fuser 5 Press Select. 6 Press and release Menu until you replaced. See the illustration in step 2 on page 74 if you need help. 4 Open the top door. Maintenance 4 Press and release Menu until you see one of the following items based on page 65 if you need help. 3 Remove .... Cleaning the printhead lens Clean the printhead lens when you see Replaced, and then press Select. Make sure the one you need help. 5 Remove the photodeveloper cartridge. See the illustration in step 1 on the one you see print quality problems as mentioned in Solving print quality problems in step...

User's Reference
Page 85
... the printer housing near the printhead using a soft, clean lint-free cloth. Solving print quality problems 85 The fuser may be defective or worn. Remove and reinstall the photodeveloper cartridge. Turn the printer on the printhead lens. Clean any spilled toner you still have the... problem, replace the fuser and the photodeveloper cartridge. Streaked horizontal lines ABCDE ABCDE ABCDE The toner cartridges may be defective, ...
... the printer housing near the printhead using a soft, clean lint-free cloth. Solving print quality problems 85 The fuser may be defective or worn. Remove and reinstall the photodeveloper cartridge. Turn the printer on the printhead lens. Clean any spilled toner you still have the... problem, replace the fuser and the photodeveloper cartridge. Streaked horizontal lines ABCDE ABCDE ABCDE The toner cartridges may be defective, ...

User's Reference
Page 93
... in the tray to Auto or On. See Storing media for more information. The fuser may be damaged Replace the fuser. The printer resumes printing. to Off. You have not cleared the entire media path, or you remove the jammed media. Move the guides in its original wrapper until you clear the jam... to the correct position. Blank pages feed into An incorrect media type is set to the Card Stock & Label Guide available on our Lexmark Web site at www.lexmark.com for your print job or the output bin. moisture due to check for jams in the selected tray are using paper that...
... in the tray to Auto or On. See Storing media for more information. The fuser may be damaged Replace the fuser. The printer resumes printing. to Off. You have not cleared the entire media path, or you remove the jammed media. Move the guides in its original wrapper until you clear the jam... to the correct position. Blank pages feed into An incorrect media type is set to the Card Stock & Label Guide available on our Lexmark Web site at www.lexmark.com for your print job or the output bin. moisture due to check for jams in the selected tray are using paper that...
User's Reference
Page 133
... Print Buffer Abort Restore Menus Disabled 133 Using printer menus Select a menu or menu item for more details. Supplies Menu Toner Waste Bottle Photodev Cart Fuser Supplies Life Replace Supplies Color Menu Print Mode Color Correction Toner Darkness Color Saver Color Balance Color Samples Manual Color Utilities Menu Print Menus Print... Net Setup Print Net Setup Print Fonts Print Directory Prt Quality Pgs Factory Defaults Remove Held Jobs Format Flash Defragment Flash Format Disk Job Acct Stat Hex Trace Coverage Est.
... Print Buffer Abort Restore Menus Disabled 133 Using printer menus Select a menu or menu item for more details. Supplies Menu Toner Waste Bottle Photodev Cart Fuser Supplies Life Replace Supplies Color Menu Print Mode Color Correction Toner Darkness Color Saver Color Balance Color Samples Manual Color Utilities Menu Print Menus Print... Net Setup Print Net Setup Print Fonts Print Directory Prt Quality Pgs Factory Defaults Remove Held Jobs Format Flash Defragment Flash Format Disk Job Acct Stat Hex Trace Coverage Est.

User's Reference
Page 188
...152 symbol sets, PCL 6 emulation 107 understanding 98 weight and style 98 Format Disk (Utilities Menu) 170 Format Flash (Utilities Menu) 170 Fuser (Supplies Menu) 166 fuser, replacing 69 G Go button 130 guidelines avoiding jams 20 labels 32 media 26 printing letterhead 30 H hard disk formatting 170 printing downloaded ...operator panel 109 confidential jobs 21 entering a PIN 21 entering user name 109 format errors 110 Held Jobs (Job Menu) 144 held jobs, removing 171 Help Guide (Help Menu) 142 Help Menu 142 Color Quality 142 Connection Guide 142 Help Guide 142 Jam Clearance 142 Media Guide 142 ...
...152 symbol sets, PCL 6 emulation 107 understanding 98 weight and style 98 Format Disk (Utilities Menu) 170 Format Flash (Utilities Menu) 170 Fuser (Supplies Menu) 166 fuser, replacing 69 G Go button 130 guidelines avoiding jams 20 labels 32 media 26 printing letterhead 30 H hard disk formatting 170 printing downloaded ...operator panel 109 confidential jobs 21 entering a PIN 21 entering user name 109 format errors 110 Held Jobs (Job Menu) 144 held jobs, removing 171 Help Guide (Help Menu) 142 Help Menu 142 Color Quality 142 Connection Guide 142 Help Guide 142 Jam Clearance 142 Media Guide 142 ...

User's Reference
Page 190
... 176 Network 176 Network 176 messages (continued) Network , 176 Network Card Busy 176 No Jobs Found. Go/Stop? 173 Deleting Jobs 173 Did you Replace Fuser 173 Did you Replace Photodev Cart 173 Disabling Menus 173 Disk Corrupted. Index messages (continued) 82 Waste Toner Bottle Full or Missing 184 83 Photodev... Code 177 Prog System Code 177 Program Flash 177 Programming Disk 177 Queuing and Deleting Jobs 177 Queuing Jobs 178 Ready 178 Ready Hex 178 Remove Paper Standard Bin 178 Res Reduced 178 Resetting the Printer 178 Restore Held Jobs.
... 176 Network 176 Network 176 messages (continued) Network , 176 Network Card Busy 176 No Jobs Found. Go/Stop? 173 Deleting Jobs 173 Did you Replace Fuser 173 Did you Replace Photodev Cart 173 Disabling Menus 173 Disk Corrupted. Index messages (continued) 82 Waste Toner Bottle Full or Missing 184 83 Photodev... Code 177 Prog System Code 177 Program Flash 177 Programming Disk 177 Queuing and Deleting Jobs 177 Queuing Jobs 178 Ready 178 Ready Hex 178 Remove Paper Standard Bin 178 Res Reduced 178 Resetting the Printer 178 Restore Held Jobs.

User's Reference
Page 191
... SmartSwitch 147 Std Net Setup 147 network port, configuring buffer size 146 NPA mode 146 PCL SmartSwitch 146 PS SmartSwitch 147 not restored jobs, removing 171 NPA Mode (Network Menu) 146 NPA Mode (Parallel Menu) 148 NPA Mode (Serial Menu) 160 NPA Mode (USB Menu) 169 ...LCD 129 menus disabled 130 numbers 130 optional 250-sheet legal size tray 41 optional cards, removing 112 options installation 19 verifying installation with menu settings page 24 ordering maintenance items 61 fuser 62 photodeveloper cartridge 62 ordering (continued) maintenance items (continued) waste toner bottle 62 supplies ...
... SmartSwitch 147 Std Net Setup 147 network port, configuring buffer size 146 NPA mode 146 PCL SmartSwitch 146 PS SmartSwitch 147 not restored jobs, removing 171 NPA Mode (Network Menu) 146 NPA Mode (Parallel Menu) 148 NPA Mode (Serial Menu) 160 NPA Mode (USB Menu) 169 ...LCD 129 menus disabled 130 numbers 130 optional 250-sheet legal size tray 41 optional cards, removing 112 options installation 19 verifying installation with menu settings page 24 ordering maintenance items 61 fuser 62 photodeveloper cartridge 62 ordering (continued) maintenance items (continued) waste toner bottle 62 supplies ...

User's Reference
Page 194
...language 165 network port 147 parallel port 149 serial port 160 USB port 169 R recycling products 68 used supplies 68 Remove Held Jobs (Utilities Menu) 171 removing all print jobs 171 confidential jobs 171 held jobs 171 not restored jobs 171 optional cards 112 duplex unit 121 ...firmware card 114 flash memory 114 printer memory 114 options 117 printer from optional 530-sheet drawer 117 system board 112 repeat print 110 Replace Supplies (Supplies Menu) 168 replacing fuser...
...language 165 network port 147 parallel port 149 serial port 160 USB port 169 R recycling products 68 used supplies 68 Remove Held Jobs (Utilities Menu) 171 removing all print jobs 171 confidential jobs 171 held jobs 171 not restored jobs 171 optional cards 112 duplex unit 121 ...firmware card 114 flash memory 114 printer memory 114 options 117 printer from optional 530-sheet drawer 117 system board 112 repeat print 110 Replace Supplies (Supplies Menu) 168 replacing fuser...

User's Reference
Page 196
... Waste Toner Bottle 166 supplies, determining status 60 supplies, status of toner 166 fuser 166 individual supply items 167 photodeveloper cartridge 166 waste toner bottle 166 Symbol Set (PCL Emul Menu) 152 symbol sets, definition 107 system board removing 112 replacing 116 T taking printer offline 130 with Menu button 130 with Stop...
... Waste Toner Bottle 166 supplies, determining status 60 supplies, status of toner 166 fuser 166 individual supply items 167 photodeveloper cartridge 166 waste toner bottle 166 Symbol Set (PCL Emul Menu) 152 symbol sets, definition 107 system board removing 112 replacing 116 T taking printer offline 130 with Menu button 130 with Stop...

Service Manual
Page 7
... supplies removals 4-5 Cleaning roller cover removal 4-6 Transfer belt cleaning roller removal 4-6 Transfer belt unit removal 4-7 Transfer roller removal 4-8 Fuser assembly removal 4-9 Waste toner bottle removal 4-10 Photodeveloper cartridge removal 4-11 Duplex unit assembly removal 4-13 Secondary paper feed assembly removal 4-16 Cover removals 4-17 Top cover assembly removal 4-18 Front cover assembly removal 4-19 Right cover removal 4-22 Rear cover assembly removal 4-22 Left cover removal 4-24...
... supplies removals 4-5 Cleaning roller cover removal 4-6 Transfer belt cleaning roller removal 4-6 Transfer belt unit removal 4-7 Transfer roller removal 4-8 Fuser assembly removal 4-9 Waste toner bottle removal 4-10 Photodeveloper cartridge removal 4-11 Duplex unit assembly removal 4-13 Secondary paper feed assembly removal 4-16 Cover removals 4-17 Top cover assembly removal 4-18 Front cover assembly removal 4-19 Right cover removal 4-22 Rear cover assembly removal 4-22 Left cover removal 4-24...

Service Manual
Page 82
...) Indicates that printhead laser output is low. Go to "Engine controller board removal" on page 2-62. 932 Scanner motor error (SM) Indicates abnormal rotation of printhead scanner motor. Note: Fuser is a customer-order supply. 930 Laser power error Indicates that printhead laser ...2-62. 939 RIP to "930,931,932-Laser unit assembly service check" on page 4-55. 2-4 Service Manual Replace fuser assembly (see "Fuser assembly removal" on . Go to engine communication Indicates that the RIP board processor cannot communicate with engine controller board connector. If error...
...) Indicates that printhead laser output is low. Go to "Engine controller board removal" on page 2-62. 932 Scanner motor error (SM) Indicates abnormal rotation of printhead scanner motor. Note: Fuser is a customer-order supply. 930 Laser power error Indicates that printhead laser ...2-62. 939 RIP to "930,931,932-Laser unit assembly service check" on page 4-55. 2-4 Service Manual Replace fuser assembly (see "Fuser assembly removal" on . Go to engine communication Indicates that the RIP board processor cannot communicate with engine controller board connector. If error...

Service Manual
Page 98
... cable for continuity that connects engine controller board connector FUCN and fuser. Go to "Engine controller board removal" on page 4-9. Replace fuser. Go to "Fuser assembly removal" on page 4-55. 87 Fuser Life Warning Fuser is nearing end of life. If cable is completely used. Replace fuser. If problem persists, check cable for continuity that connects engine controller...
... cable for continuity that connects engine controller board connector FUCN and fuser. Go to "Engine controller board removal" on page 4-9. Replace fuser. Go to "Fuser assembly removal" on page 4-55. 87 Fuser Life Warning Fuser is nearing end of life. If cable is completely used. Replace fuser. If problem persists, check cable for continuity that connects engine controller...

Service Manual
Page 101
...55. Indicates media is connected. See "I /O board. If error persists, replace engine controller board. Diagnostic information 2-23 See "Paper exit assembly removal" on page 4-49. • Ensure connector DCN7 on page 4-70. Replace if damaged. Action 201 Paper Jam Open Rear Door Open rear...8226; Open rear cover assembly to access area of paper jam. • Clear all paper from paper path. • Check fuser exit sensor (located in outer area (fuser exit sensor) of printer. • Open rear cover assembly to access area of paper jam. • Clear all paper from ...
...55. Indicates media is connected. See "I /O board. If error persists, replace engine controller board. Diagnostic information 2-23 See "Paper exit assembly removal" on page 4-49. • Ensure connector DCN7 on page 4-70. Replace if damaged. Action 201 Paper Jam Open Rear Door Open rear...8226; Open rear cover assembly to access area of paper jam. • Clear all paper from paper path. • Check fuser exit sensor (located in outer area (fuser exit sensor) of printer. • Open rear cover assembly to access area of paper jam. • Clear all paper from ...
Service Manual
Page 126
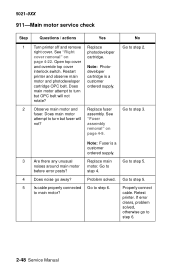
... belt will not rotate? 2 Observe main motor and Replace fuser Go to turn but fuser will "Fuser not? fuser. to step 5. 4 Does noise go to step 6. See "Right photodeveloper cover removal" on page 4-9. Note: Fuser is a motor and photodeveloper customer cartridge OPC belt. Go to...assembly. Go to step 2. 5021-0XX 911-Main motor service check Step Questions / actions Yes No 1 Turn printer off and remove Replace Go to before error posts? See attempt to step 3. Restart developer printer and observe main cartridge is a customer ordered supply...
... belt will not rotate? 2 Observe main motor and Replace fuser Go to turn but fuser will "Fuser not? fuser. to step 5. 4 Does noise go to step 6. See "Right photodeveloper cover removal" on page 4-9. Note: Fuser is a motor and photodeveloper customer cartridge OPC belt. Go to...assembly. Go to step 2. 5021-0XX 911-Main motor service check Step Questions / actions Yes No 1 Turn printer off and remove Replace Go to before error posts? See attempt to step 3. Restart developer printer and observe main cartridge is a customer ordered supply...


