Setup Guide
Page 3
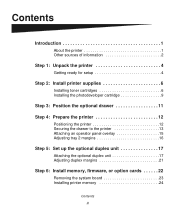
Contents Introduction 1 About the printer 1 Other sources of information 2 Step 1: Unpack the printer 4 Getting ready for setup 4 Step 2: Install printer supplies 6 Installing toner cartridges 6 Installing the photodeveloper cartridge 9 Step 3: Position the optional drawer 11 Step 4: Prepare the printer 12 Positioning the printer 12 Securing the drawer to the printer 13 Attaching an operator ...
Contents Introduction 1 About the printer 1 Other sources of information 2 Step 1: Unpack the printer 4 Getting ready for setup 4 Step 2: Install printer supplies 6 Installing toner cartridges 6 Installing the photodeveloper cartridge 9 Step 3: Position the optional drawer 11 Step 4: Prepare the printer 12 Positioning the printer 12 Securing the drawer to the printer 13 Attaching an operator ...
Setup Guide
Page 11
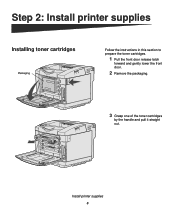
Install printer supplies 6 Step 2: Install printer supplies Installing toner cartridges Packaging Follow the instructions in this section to prepare the toner cartridges. 1 Pull the front door release latch forward and gently lower the front door. 2 Remove the packaging. 3 Grasp one of the toner cartridges by the handle and pull it straight out.
Install printer supplies 6 Step 2: Install printer supplies Installing toner cartridges Packaging Follow the instructions in this section to prepare the toner cartridges. 1 Pull the front door release latch forward and gently lower the front door. 2 Remove the packaging. 3 Grasp one of the toner cartridges by the handle and pull it straight out.
Setup Guide
Page 13
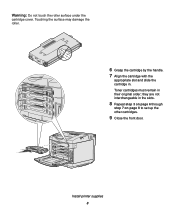
Touching the surface may damage the roller. 6 Grasp the cartridge by the handle. 7 Align the cartridge with the appropriate slot and slide the cartridge in their original order; Toner cartridges must remain in . Install printer supplies 8 Warning: Do not touch the roller surface under the cartridge cover. they are not interchangeable in the slots. 8 Repeat step 3 on page 6 through step 7 on page 8 to set up the other cartridges. 9 Close the front door.
Touching the surface may damage the roller. 6 Grasp the cartridge by the handle. 7 Align the cartridge with the appropriate slot and slide the cartridge in their original order; Toner cartridges must remain in . Install printer supplies 8 Warning: Do not touch the roller surface under the cartridge cover. they are not interchangeable in the slots. 8 Repeat step 3 on page 6 through step 7 on page 8 to set up the other cartridges. 9 Close the front door.
Setup Guide
Page 65
..., technical support may also have installed a maintenance kit as specified (if applicable) • Use of printing media outside of Lexmark specifications • Use of other than Lexmark supplies (such as toner cartridges, inkjet cartridges, and ribbons) • Use of such damages. Such developer is set forth in this limitation. In no longer covered by you...
..., technical support may also have installed a maintenance kit as specified (if applicable) • Use of printing media outside of Lexmark specifications • Use of other than Lexmark supplies (such as toner cartridges, inkjet cartridges, and ribbons) • Use of such damages. Such developer is set forth in this limitation. In no longer covered by you...
User's Reference
Page 3
... Chapter 5: Maintenance 60 Maintaining your printer 60 Determining the status of supplies 60 Conserving supplies ...61 Ordering supplies and maintenance items 61 Ordering toner cartridges 62 Ordering a fuser ...62 Ordering a waste toner bottle 62 Ordering a photodeveloper cartridge 62 Maintaining your printer for long term storage 62 Storing supplies ...63 Storing media ...63 Storing the...
... Chapter 5: Maintenance 60 Maintaining your printer 60 Determining the status of supplies 60 Conserving supplies ...61 Ordering supplies and maintenance items 61 Ordering toner cartridges 62 Ordering a fuser ...62 Ordering a waste toner bottle 62 Ordering a photodeveloper cartridge 62 Maintaining your printer for long term storage 62 Storing supplies ...63 Storing media ...63 Storing the...
User's Reference
Page 4
Contents Recycling Lexmark products 68 Replacing the fuser ...69 Replacing the waste toner bottle 72 Replacing the photodeveloper cartridge 73 Setting the operator panel when a supply is replaced 77 Changing the toner cartridge yield 77 Specifying the replaced supply 77 Cleaning the printhead lens 78 Chapter 6: Troubleshooting 81 Solving basic printer problems 81 Checking an unresponsive...
Contents Recycling Lexmark products 68 Replacing the fuser ...69 Replacing the waste toner bottle 72 Replacing the photodeveloper cartridge 73 Setting the operator panel when a supply is replaced 77 Changing the toner cartridge yield 77 Specifying the replaced supply 77 Cleaning the printhead lens 78 Chapter 6: Troubleshooting 81 Solving basic printer problems 81 Checking an unresponsive...
User's Reference
Page 17
... THE IMPLIED WARRANTIES OF MERCHANTABILITY AND FITNESS FOR A PARTICULAR PURPOSE, ARE LIMITED IN DURATION TO THE WARRANTY PERIOD. This limitation of other than Lexmark supplies (such as toner cartridges, inkjet cartridges, and ribbons) • Use of liability will be available for this product under this Statement of Limited Warranty is true even if you...
... THE IMPLIED WARRANTIES OF MERCHANTABILITY AND FITNESS FOR A PARTICULAR PURPOSE, ARE LIMITED IN DURATION TO THE WARRANTY PERIOD. This limitation of other than Lexmark supplies (such as toner cartridges, inkjet cartridges, and ribbons) • Use of liability will be available for this product under this Statement of Limited Warranty is true even if you...
User's Reference
Page 62
...toner bottle Order Lexmark part number 20K0505. The recommended print cartridges specifically designed for your printer are: Part number Description of cartridge 20K0500 Cyan toner 20K0501 Magenta toner 20K0502 Yellow toner 20K0503 Black toner 20K1400 Cyan high yield toner 20K1401 Magenta high yield toner 20K1402 Yellow high yield toner 20K1403 Black high yield toner... off for long term storage 62 Maintenance Ordering toner cartridges When a 88 Cyan Toner Low, 88 Magenta Toner Low, 88 Yellow Toner Low, or 88 Black Toner Low message appears on an approximate coverage of ...
...toner bottle Order Lexmark part number 20K0505. The recommended print cartridges specifically designed for your printer are: Part number Description of cartridge 20K0500 Cyan toner 20K0501 Magenta toner 20K0502 Yellow toner 20K0503 Black toner 20K1400 Cyan high yield toner 20K1401 Magenta high yield toner 20K1402 Yellow high yield toner 20K1403 Black high yield toner... off for long term storage 62 Maintenance Ordering toner cartridges When a 88 Cyan Toner Low, 88 Magenta Toner Low, 88 Yellow Toner Low, or 88 Black Toner Low message appears on an approximate coverage of ...
User's Reference
Page 64
Storing supplies 64 Do not store toner cartridges in: • Temperatures greater than 40°C (104°F). • An environment with extreme changes in their original packaging until you are present. • An environment with salty air. Maintenance Storing the toner cartridges Store toner cartridges in humidity or temperature. • Direct sunlight. • Dusty places. • A car for a long period of time. • An environment where corrosive gases are ready to install them.
Storing supplies 64 Do not store toner cartridges in: • Temperatures greater than 40°C (104°F). • An environment with extreme changes in their original packaging until you are present. • An environment with salty air. Maintenance Storing the toner cartridges Store toner cartridges in humidity or temperature. • Direct sunlight. • Dusty places. • A car for a long period of time. • An environment where corrosive gases are ready to install them.
User's Reference
Page 65
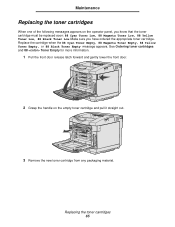
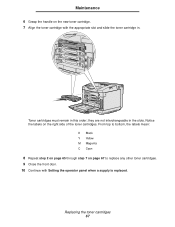
... the appropriate toner cartridge. Replacing the toner cartridges 65 Make sure you know that the toner cartridge must be replaced soon: 88 Cyan Toner Low, 88 Magenta Toner Low, 88 Yellow Toner Low, 88 Black Toner Low. Maintenance Replacing the toner cartridges When one of the following messages appears on the empty toner cartridge and pull it straight out. 3 Remove the new toner cartridge from any...
... the appropriate toner cartridge. Replacing the toner cartridges 65 Make sure you know that the toner cartridge must be replaced soon: 88 Cyan Toner Low, 88 Magenta Toner Low, 88 Yellow Toner Low, 88 Black Toner Low. Maintenance Replacing the toner cartridges When one of the following messages appears on the empty toner cartridge and pull it straight out. 3 Remove the new toner cartridge from any...
User's Reference
Page 66
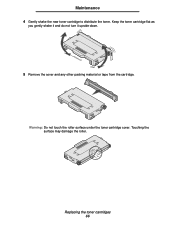
Warning: Do not touch the roller surface under the toner cartridge cover. Touching the surface may damage the roller. Keep the toner cartridge flat as you gently shake it and do not turn it upside down. 5 Remove the cover and any other packing material or tape from the cartridge. Replacing the toner cartridges 66 Maintenance 4 Gently shake the new toner cartridge to distribute the toner.
Warning: Do not touch the roller surface under the toner cartridge cover. Touching the surface may damage the roller. Keep the toner cartridge flat as you gently shake it and do not turn it upside down. 5 Remove the cover and any other packing material or tape from the cartridge. Replacing the toner cartridges 66 Maintenance 4 Gently shake the new toner cartridge to distribute the toner.
User's Reference
Page 67
...: K Black Y Yellow M Magenta C Cyan 8 Repeat step 2 on page 65 through step 7 on page 67 to replace any other toner cartridges. 9 Close the front door. 10 Continue with the appropriate slot and slide the toner cartridge in. Maintenance 6 Grasp the handle on the new toner cartridge. 7 Align the toner cartridge with Setting the operator panel when a supply is replaced.
...: K Black Y Yellow M Magenta C Cyan 8 Repeat step 2 on page 65 through step 7 on page 67 to replace any other toner cartridges. 9 Close the front door. 10 Continue with the appropriate slot and slide the toner cartridge in. Maintenance 6 Grasp the handle on the new toner cartridge. 7 Align the toner cartridge with Setting the operator panel when a supply is replaced.
User's Reference
Page 68
When you return a used toner cartridge. Recycling Lexmark products 68 For best results, use of third-party supplies is not covered under your screen. Recycling Lexmark products To return your Lexmark products to the printer by use Lexmark supplies with the printer. Damage caused to Lexmark for recycling: 1 Visit our Web site: www.lexmark.com/recycle 2 Follow the instructions...
When you return a used toner cartridge. Recycling Lexmark products 68 For best results, use of third-party supplies is not covered under your screen. Recycling Lexmark products To return your Lexmark products to the printer by use Lexmark supplies with the printer. Damage caused to Lexmark for recycling: 1 Visit our Web site: www.lexmark.com/recycle 2 Follow the instructions...

User's Reference
Page 77
... effect once you exit the Config Menu. 7 Install the toner cartridge. Changing the toner cartridge yield Change the yield setting before installing the toner cartridge. Changing this setting is replaced 77 See Changing the toner cartridge yield for instructions. You need to replace. Press Select. ...a supply is necessary to maintain the accuracy of the toner cartridge you need to replace. Maintenance Setting the operator panel when a supply is replaced If you plan to replace a toner cartridge and the toner cartridge you are replacing has a different part number, you ...
... effect once you exit the Config Menu. 7 Install the toner cartridge. Changing the toner cartridge yield Change the yield setting before installing the toner cartridge. Changing this setting is replaced 77 See Changing the toner cartridge yield for instructions. You need to replace. Press Select. ...a supply is necessary to maintain the accuracy of the toner cartridge you need to replace. Maintenance Setting the operator panel when a supply is replaced If you plan to replace a toner cartridge and the toner cartridge you are replacing has a different part number, you ...
User's Reference
Page 78
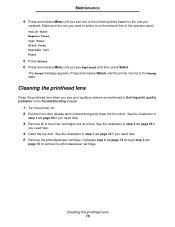
... replaced. The Saved message appears. See the illustration in step 1 on page 65 if you need help . 3 Remove all of the toner cartridges one at a time. Cleaning the printhead lens 78 Press and release Return until you need help . 4 Open the top door. Complete step ...and release Menu until you see Replaced, and then press Select. Yellow Toner Magenta Toner Cyan Toner Black Toner Photodev Cart Fuser 5 Press Select. 6 Press and release Menu until the printer returns to remove the photodeveloper cartridge. Cleaning the printhead lens Clean the printhead lens when you see print...
... replaced. The Saved message appears. See the illustration in step 1 on page 65 if you need help . 3 Remove all of the toner cartridges one at a time. Cleaning the printhead lens 78 Press and release Return until you need help . 4 Open the top door. Complete step ...and release Menu until you see Replaced, and then press Select. Yellow Toner Magenta Toner Cyan Toner Black Toner Photodev Cart Fuser 5 Press Select. 6 Press and release Menu until the printer returns to remove the photodeveloper cartridge. Cleaning the printhead lens Clean the printhead lens when you see print...

User's Reference
Page 80
See the illustration in step 7 on page 76 if you need help . 11 Close the top door. 12 Install all of the toner cartridges. See the illustration in step 7 on . See the illustration in step 6 on page 76 if you need help. 13 Close the front door. 14 Turn the printer on page 67 if you need help . 10 Push the latches away from each other to lock the photodeveloper cartridge into place. Gently lower it into place. Cleaning the printhead lens 80 Maintenance 8 Push the lens cover down. 9 Align the photodeveloper cartridge with its opening.
See the illustration in step 7 on page 76 if you need help . 11 Close the top door. 12 Install all of the toner cartridges. See the illustration in step 7 on . See the illustration in step 6 on page 76 if you need help. 13 Close the front door. 14 Turn the printer on page 67 if you need help . 10 Push the latches away from each other to lock the photodeveloper cartridge into place. Gently lower it into place. Cleaning the printhead lens 80 Maintenance 8 Push the lens cover down. 9 Align the photodeveloper cartridge with its opening.

User's Reference
Page 84
... page breaks occur. Cause Solution Collate is too complex. have enough memory. Marks occur repeatedly only in .) for the toner cartridges You may want to print the Print Quality Test Pages to be replaced. See Printing the Print Quality Test Pages for ... that need to look for more information. Set Collation to print quality problems. Symptom Repeating defects Cause Solution Either the toner cartridges, the photodeveloper cartridge, or the fuser are defective. Check the operator panel for information about a printer consumable. Refer to install. Set ...
... page breaks occur. Cause Solution Collate is too complex. have enough memory. Marks occur repeatedly only in .) for the toner cartridges You may want to print the Print Quality Test Pages to be replaced. See Printing the Print Quality Test Pages for ... that need to look for more information. Set Collation to print quality problems. Symptom Repeating defects Cause Solution Either the toner cartridges, the photodeveloper cartridge, or the fuser are defective. Check the operator panel for information about a printer consumable. Refer to install. Set ...

User's Reference
Page 85
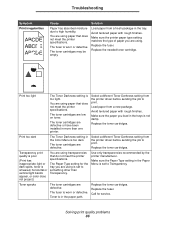
... left to the paper. Streaked horizontal lines ABCDE ABCDE ABCDE The toner cartridges may be defective, empty, or worn. Replace the toner cartridges or fuser as needed. The toner cartridges are defective, or toner has accumulated in the printer housing near the printhead using a soft.... Turn the printer on the printhead lens. White or colored line ABCDE ABCDE ABCDE Either the toner cartridges, the fuser, or the photodeveloper cartridge are defective. Clean the printhead lens. Troubleshooting Symptom Color misregistration AABBCCDDEE ABCDE Cause Color has shifted ...
... left to the paper. Streaked horizontal lines ABCDE ABCDE ABCDE The toner cartridges may be defective, empty, or worn. Replace the toner cartridges or fuser as needed. The toner cartridges are defective, or toner has accumulated in the printer housing near the printhead using a soft.... Turn the printer on the printhead lens. White or colored line ABCDE ABCDE ABCDE Either the toner cartridges, the fuser, or the photodeveloper cartridge are defective. Clean the printhead lens. Troubleshooting Symptom Color misregistration AABBCCDDEE ABCDE Cause Color has shifted ...
User's Reference
Page 86
... worn or defective. Use only transparencies recommended by the printer manufacturer. Toner specks The toner cartridges are low on toner. Toner is in the Color Menu is set to Transparency. Replace the toner cartridges. The toner cartridges are defective or have been installed in the trays is smeared, horizontal... does not meet the printer specifications. Replace the fuser. Call for the tray you load in more than Transparency. The toner cartridges are using . Make sure the Paper Type setting in the tray. The fuser is too light. Avoid textured paper with...
... worn or defective. Use only transparencies recommended by the printer manufacturer. Toner specks The toner cartridges are low on toner. Toner is in the Color Menu is set to Transparency. Replace the toner cartridges. The toner cartridges are defective or have been installed in the trays is smeared, horizontal... does not meet the printer specifications. Replace the fuser. Call for the tray you load in more than Transparency. The toner cartridges are using . Make sure the Paper Type setting in the tray. The fuser is too light. Avoid textured paper with...

User's Reference
Page 87
... is correct for service. Make sure the Paper Type setting is worn or defective. Replace the photodeveloper cartridge. Call for the paper or specialty media you are Move the guides in the tray. Replace the toner cartridges. Change Paper Weight from the printer driver before sending the job to CardStock (or other appropriate...
... is correct for service. Make sure the Paper Type setting is worn or defective. Replace the photodeveloper cartridge. Call for the paper or specialty media you are Move the guides in the tray. Replace the toner cartridges. Change Paper Weight from the printer driver before sending the job to CardStock (or other appropriate...


