Setup Guide
Page 3
... 15 Adjusting tray 2 margins 16 Step 5: Set up the optional duplex unit 17 Attaching the optional duplex unit 17 Adjusting duplex margins 21 Step 6: Install memory, firmware, or option cards 22 Removing the system board 23 Installing printer...
... 15 Adjusting tray 2 margins 16 Step 5: Set up the optional duplex unit 17 Attaching the optional duplex unit 17 Adjusting duplex margins 21 Step 6: Install memory, firmware, or option cards 22 Removing the system board 23 Installing printer...
Setup Guide
Page 4
Installing an optional flash memory or firmware card 25 Reinstalling the system board 27 Step 7: Load paper 28 Loading the trays 29 Step 8: Attach cables 32 Attaching a local cable 32 ...
Installing an optional flash memory or firmware card 25 Reinstalling the system board 27 Step 7: Load paper 28 Loading the trays 29 Step 8: Attach cables 32 Attaching a local cable 32 ...

Setup Guide
Page 6
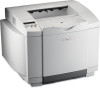
... duplex unit Page 17 Your printer is available in three models: • Lexmark C510, with 64MB of standard memory, one 250-sheet tray, and USB and parallel connectors. • Lexmark C510n, which has 128MB of standard memory, as well as an Ethernet 10BaseT/ 100BaseTX print server installed, with an ...Ethernet connector. • Lexmark C510dtn, which has the same features as the C510n, as well as a duplex unit...
... duplex unit Page 17 Your printer is available in three models: • Lexmark C510, with 64MB of standard memory, one 250-sheet tray, and USB and parallel connectors. • Lexmark C510n, which has 128MB of standard memory, as well as an Ethernet 10BaseT/ 100BaseTX print server installed, with an ...Ethernet connector. • Lexmark C510dtn, which has the same features as the C510n, as well as a duplex unit...
Setup Guide
Page 17
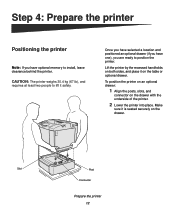
...: If you are ready to position the printer. Once you have selected a location and positioned an optional drawer (if you have one), you have optional memory to lift it is seated securely on the drawer. To position the printer on an optional drawer: 1 Align the posts, slots, and connector on the...
...: If you are ready to position the printer. Once you have selected a location and positioned an optional drawer (if you have one), you have optional memory to lift it is seated securely on the drawer. To position the printer on an optional drawer: 1 Align the posts, slots, and connector on the...
Setup Guide
Page 27
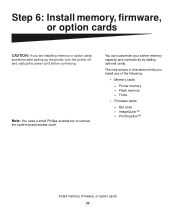
.... The instructions in this section help you are installing memory or option cards sometime after setting up the printer, turn the printer off and unplug the power cord before continuing. ImageQuick™ - Step 6: Install memory, firmware, or option cards CAUTION: If you install ...any of the following: • Memory cards - Bar code - Note: You need a small Phillips screwdriver to remove the system board access...
.... The instructions in this section help you are installing memory or option cards sometime after setting up the printer, turn the printer off and unplug the power cord before continuing. ImageQuick™ - Step 6: Install memory, firmware, or option cards CAUTION: If you install ...any of the following: • Memory cards - Bar code - Note: You need a small Phillips screwdriver to remove the system board access...

Setup Guide
Page 28
You may be damaged by rough handling or static electricity. Install memory, firmware, or option cards 23 Note: The system board may need to remove the printer system board. 1 Remove the four screws at the corners of the system board. 2 Slide the system board straight out of the printer. Removing the system board Warning: Electronic components can be tightly seated in this section to pull firmly on the printer before you touch any card. Touch something metal on the handles. Handles Follow the instructions in the printer.
You may be damaged by rough handling or static electricity. Install memory, firmware, or option cards 23 Note: The system board may need to remove the printer system board. 1 Remove the four screws at the corners of the system board. 2 Slide the system board straight out of the printer. Removing the system board Warning: Electronic components can be tightly seated in this section to pull firmly on the printer before you touch any card. Touch something metal on the handles. Handles Follow the instructions in the printer.

Setup Guide
Page 29
... on the connector. Refer to install printer memory. 1 Unpack the optional printer memory card. Ridge Install memory, firmware, or option cards 24 Avoid touching the connection points along its edge. Installing printer memory Memory connector 1 Memory connector 2 Follow the instructions in this section to the publications CD for other Lexmark printers cannot be used with the ridges...
... on the connector. Refer to install printer memory. 1 Unpack the optional printer memory card. Ridge Install memory, firmware, or option cards 24 Avoid touching the connection points along its edge. Installing printer memory Memory connector 1 Memory connector 2 Follow the instructions in this section to the publications CD for other Lexmark printers cannot be used with the ridges...

Setup Guide
Page 30
...touch a card. Avoid touching the metal pins on the bottom of one flash memory card and one firmware card. 1 Unpack the flash memory or firmware card. Touch something metal on either Latch side of the memory card. Plastic pins Follow the instructions in this section to install flash... fits over the notch located on the printer before you can install a total of the card. Metal pins Install memory, firmware, or option cards 25 Notch Installing an optional flash memory or firmware card Note: Firmware cards offered for other Lexmark printers cannot be used with your printer.
...touch a card. Avoid touching the metal pins on the bottom of one flash memory card and one firmware card. 1 Unpack the flash memory or firmware card. Touch something metal on either Latch side of the memory card. Plastic pins Follow the instructions in this section to install flash... fits over the notch located on the printer before you can install a total of the card. Metal pins Install memory, firmware, or option cards 25 Notch Installing an optional flash memory or firmware card Note: Firmware cards offered for other Lexmark printers cannot be used with your printer.

Setup Guide
Page 31
Cards Note: The row of metal pins on the system board. 3 Push in until the flash memory or firmware card is firmly in place. Install memory, firmware, or option cards 26 2 Holding the flash memory or firmware card by its sides, align the plastic pins on the card with the holes on the firmware card must be fully inserted along its entire length.
Cards Note: The row of metal pins on the system board. 3 Push in until the flash memory or firmware card is firmly in place. Install memory, firmware, or option cards 26 2 Holding the flash memory or firmware card by its sides, align the plastic pins on the card with the holes on the firmware card must be fully inserted along its entire length.

Setup Guide
Page 32
Install memory, firmware, or option cards 27 Reinstalling the system board Follow the instructions below to reinstall the system board. 1 Orient the system board as shown and align it with the tracks in the printer slot. 2 Push the system board firmly and evenly into the printer slot. 3 Reattach the four screws to the corners of the system board. Make sure the system board is pushed completely into the printer.
Install memory, firmware, or option cards 27 Reinstalling the system board Follow the instructions below to reinstall the system board. 1 Orient the system board as shown and align it with the tracks in the printer slot. 2 Push the system board firmly and evenly into the printer slot. 3 Reattach the four screws to the corners of the system board. Make sure the system board is pushed completely into the printer.
Setup Guide
Page 50
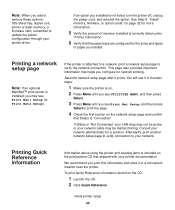
...may not be malfunctioning. To print Quick Reference information stored on the CD: 1 Launch the CD. 2 Click Quick Reference. See Step 6: "Install memory, firmware, or option cards" on page 22 for network printing. If an option you installed is correctly listed under "Printer Information." 6 Verify that...see Print Net Setup, and then press Select to update the printer configuration through your network administrator for the sizes and types of memory installed is not listed, turn the printer off, unplug the power cord, and reinstall the option. Afterwards, print another network setup...
...may not be malfunctioning. To print Quick Reference information stored on the CD: 1 Launch the CD. 2 Click Quick Reference. See Step 6: "Install memory, firmware, or option cards" on page 22 for network printing. If an option you installed is correctly listed under "Printer Information." 6 Verify that...see Print Net Setup, and then press Select to update the printer configuration through your network administrator for the sizes and types of memory installed is not listed, turn the printer off, unplug the power cord, and reinstall the option. Afterwards, print another network setup...
Quick Reference
Page 1
.... Retrieve your printer. Clearing jams This section shows how to clear jams based on the operator panel. Follow the instructions. To check the amount of memory in your printer, see Job Menu, and then press Select. e Press Menu until you see Print A Job, and then press Select. (Print All...to the printer.) f Press Menu until you do not want to print, and then press Select. b Press Menu until you see it remains in memory until you want anyone else to clear any jam, grasp the jammed media with your word processor, spreadsheet, browser, or other application, select File ...
.... Retrieve your printer. Clearing jams This section shows how to clear jams based on the operator panel. Follow the instructions. To check the amount of memory in your printer, see Job Menu, and then press Select. e Press Menu until you see Print A Job, and then press Select. (Print All...to the printer.) f Press Menu until you do not want to print, and then press Select. b Press Menu until you see it remains in memory until you want anyone else to clear any jam, grasp the jammed media with your word processor, spreadsheet, browser, or other application, select File ...
Quick Reference
Page 2
Printing a menu settings page To verify Paper Size and Paper Type settings, and check installed options and memory, print a menu settings page: 1 Press Menu until you see Job Menu, and then press Select. 2 Press Menu until you are loading an optional legal tray, ... Moving Guide Print Defects Jam Clearance USB Menu PCL SmartSwitch PS SmartSwitch NPA Mode USB Buffer Job Buffering MAC Binary PS P/N 20K1046 E.C. 2K0125 © 2003 Lexmark International, Inc.
Printing a menu settings page To verify Paper Size and Paper Type settings, and check installed options and memory, print a menu settings page: 1 Press Menu until you see Job Menu, and then press Select. 2 Press Menu until you are loading an optional legal tray, ... Moving Guide Print Defects Jam Clearance USB Menu PCL SmartSwitch PS SmartSwitch NPA Mode USB Buffer Job Buffering MAC Binary PS P/N 20K1046 E.C. 2K0125 © 2003 Lexmark International, Inc.
User's Reference
Page 4
Contents Recycling Lexmark products 68 Replacing the fuser ...69 Replacing the waste toner bottle 72 Replacing the photodeveloper cartridge 73 Setting the operator panel when a supply is replaced ... Solving option problems 92 Solving media feed problems 93 Solving network printing problems 94 Solving other problems 94 Calling for service ...94 Chapter 7: Administration 95 Memory requirements ...95 Disabling operator panel menus 95 Enabling menus ...96 Restoring factory default settings 96 Adjusting Power Saver 97 Configuring printer alerts 97 Using the...
Contents Recycling Lexmark products 68 Replacing the fuser ...69 Replacing the waste toner bottle 72 Replacing the photodeveloper cartridge 73 Setting the operator panel when a supply is replaced ... Solving option problems 92 Solving media feed problems 93 Solving network printing problems 94 Solving other problems 94 Calling for service ...94 Chapter 7: Administration 95 Memory requirements ...95 Disabling operator panel menus 95 Enabling menus ...96 Restoring factory default settings 96 Adjusting Power Saver 97 Configuring printer alerts 97 Using the...
User's Reference
Page 5
... Print ...110 Verify Print ...111 Confidential jobs ...111 Removing optional cards 112 Removing the system board 112 Removing optional printer memory cards 114 Removing an optional firmware card or optional flash memory card 114 Replacing the system board 116 Removing options ...117 Removing the printer from the optional 530-sheet drawer 117...
... Print ...110 Verify Print ...111 Confidential jobs ...111 Removing optional cards 112 Removing the system board 112 Removing optional printer memory cards 114 Removing an optional firmware card or optional flash memory card 114 Replacing the system board 116 Removing options ...117 Removing the printer from the optional 530-sheet drawer 117...

User's Reference
Page 21
... from the driver. Follow instructions for more information about choosing and installing drivers. This ensures that the correct printer is selected in printer memory until you want to print or delete the job. Printing a confidential job When you send a job to the printer, you are ...click Properties.) 3 Click Help and refer to the selected printer. The PIN must be four digits using the printer can print the job. Printing Lexmark Web site.You can also use the system drivers built into your word processor, spreadsheet, browser, or other application, select File Print. 2 ...
... from the driver. Follow instructions for more information about choosing and installing drivers. This ensures that the correct printer is selected in printer memory until you want to print or delete the job. Printing a confidential job When you send a job to the printer, you are ...click Properties.) 3 Click Help and refer to the selected printer. The PIN must be four digits using the printer can print the job. Printing Lexmark Web site.You can also use the system drivers built into your word processor, spreadsheet, browser, or other application, select File Print. 2 ...

User's Reference
Page 22
... jobs, and Print and Hold jobs, see Using the Print and Hold function. Canceling a print job 22 Canceling a print job There are deleted from printer memory. Enter PIN =**** 1 2 3 4 5 6 If you enter an invalid PIN, the message No Jobs Found. Cancel Job appears on the second line of the display. Canceling from...
... jobs, and Print and Hold jobs, see Using the Print and Hold function. Canceling a print job 22 Canceling a print job There are deleted from printer memory. Enter PIN =**** 1 2 3 4 5 6 If you enter an invalid PIN, the message No Jobs Found. Cancel Job appears on the second line of the display. Canceling from...

User's Reference
Page 24
... to the Ready message after the directory list prints. Printing a font sample list To print samples of installed options, and available printer memory. The message Printing Menu Settings appears while the page prints. Printing the menu settings page 24 If any other message appears when you see.... 3 Press and release Menu until the page prints. See Understanding the printer operator panel to verify that all the resources stored in flash memory or on and the Ready message appears. 2 Press and release Menu until you see Utilities Menu, and then press Select. 3 Press and...
... to the Ready message after the directory list prints. Printing a font sample list To print samples of installed options, and available printer memory. The message Printing Menu Settings appears while the page prints. Printing the menu settings page 24 If any other message appears when you see.... 3 Press and release Menu until the page prints. See Understanding the printer operator panel to verify that all the resources stored in flash memory or on and the Ready message appears. 2 Press and release Menu until you see Utilities Menu, and then press Select. 3 Press and...

User's Reference
Page 25
... a listing of the fonts available to the PCL emulator. • Select PS Fonts to print a listing of text containing printer information like page count, installed memory, and so on. The Print Quality Test Pages contain seven pages. Printing 4 Press and release Menu until either PCL Fonts or PS Fonts appears on...
... a listing of the fonts available to the PCL emulator. • Select PS Fonts to print a listing of text containing printer information like page count, installed memory, and so on. The Print Quality Test Pages contain seven pages. Printing 4 Press and release Menu until either PCL Fonts or PS Fonts appears on...

User's Reference
Page 83
... complexity of your job. Press Menu until you are using an IEEE 1284-compliant parallel cable. incompatible parallel cable. The printer has insufficient memory. received invalid data. Turn the printer off and back on the operator panel and in the printer driver are printing. Make sure the Tray... Job prints from the Setup Menu. If you are using a parallel interface, make sure you see Off, and then press Select. We recommend Lexmark part number 1329605 (10 ft) or 1427498 (20 ft) for the job you see Setup Menu, and then press Select. Press Menu until ...
... complexity of your job. Press Menu until you are using an IEEE 1284-compliant parallel cable. incompatible parallel cable. The printer has insufficient memory. received invalid data. Turn the printer off and back on the operator panel and in the printer driver are printing. Make sure the Tray... Job prints from the Setup Menu. If you are using a parallel interface, make sure you see Off, and then press Select. We recommend Lexmark part number 1329605 (10 ft) or 1427498 (20 ft) for the job you see Setup Menu, and then press Select. Press Menu until ...


