User Manual
Page 2
Contents Safety information 7 Learning about the printer 9 Finding information about the printer...9 Printer configurations...10 Understanding the printer control panel...14 Using the standard exit bin and paper stop...15 Additional printer setup 16 Installing internal options...16 Available internal options...16 ... card...19 Installing hardware options...21 Installing a 250- or 550-sheet drawer...21 Attaching cables...22 Installing printer software...23 Verifying printer setup...24 Printing a menu settings page...24 Printing a network setup page ...24 Loading paper and specialty media...
Contents Safety information 7 Learning about the printer 9 Finding information about the printer...9 Printer configurations...10 Understanding the printer control panel...14 Using the standard exit bin and paper stop...15 Additional printer setup 16 Installing internal options...16 Available internal options...16 ... card...19 Installing hardware options...21 Installing a 250- or 550-sheet drawer...21 Attaching cables...22 Installing printer software...23 Verifying printer setup...24 Printing a menu settings page...24 Printing a network setup page ...24 Loading paper and specialty media...
User Manual
Page 3
...papers ...41 Storing paper...41 Supported paper sizes, types, and weights...42 Paper types and weights supported by the printer ...42 Paper sizes supported by the printer ...43 Printing 45 Printing a document...45 Printing specialty documents...46 Tips on using letterhead...46 Tips on using transparencies...list...49 Printing a directory list...49 Printing the print quality test pages ...50 Canceling a print job...50 Canceling a print job from the printer control panel ...50 Canceling a print job from the computer ...50 Clearing jams 52 Avoiding jams...52 Identifying jams in the paper path...53...
...papers ...41 Storing paper...41 Supported paper sizes, types, and weights...42 Paper types and weights supported by the printer ...42 Paper sizes supported by the printer ...43 Printing 45 Printing a document...45 Printing specialty documents...46 Tips on using letterhead...46 Tips on using transparencies...list...49 Printing a directory list...49 Printing the print quality test pages ...50 Canceling a print job...50 Canceling a print job from the printer control panel ...50 Canceling a print job from the computer ...50 Clearing jams 52 Avoiding jams...52 Identifying jams in the paper path...53...
User Manual
Page 4
Understanding printer menus 64 Menus list...64 Paper menu...65 Default Source menu...65 Size/Type menu...65 Configure MP menu...67 Paper Texture menu ...68 Paper ... IPv6 menu...83 Network menu ...83 AppleTalk menu ...84 USB menu ...85 Parallel menu...86 Understanding printer messages 89 List of status and error messages...89 Maintaining the printer 97 Cleaning the exterior of the printer...97 Storing supplies...97 Conserving supplies...98 Checking the status of supplies from a network computer 98 Ordering...
Understanding printer menus 64 Menus list...64 Paper menu...65 Default Source menu...65 Size/Type menu...65 Configure MP menu...67 Paper Texture menu ...68 Paper ... IPv6 menu...83 Network menu ...83 AppleTalk menu ...84 USB menu ...85 Parallel menu...86 Understanding printer messages 89 List of status and error messages...89 Maintaining the printer 97 Cleaning the exterior of the printer...97 Storing supplies...97 Conserving supplies...98 Checking the status of supplies from a network computer 98 Ordering...

User Manual
Page 5
Replacing supplies...100 Replacing the toner cartridge ...100 Replacing the photoconductor kit ...101 Recycling Lexmark products...104 Moving the printer...104 Before moving the printer ...104 Moving the printer to another location...104 Setting the printer up in a new location ...105 Shipping the printer ...105 Administrative support 106 Finding advanced networking and administrator information 106 Adjusting Power...
Replacing supplies...100 Replacing the toner cartridge ...100 Replacing the photoconductor kit ...101 Recycling Lexmark products...104 Moving the printer...104 Before moving the printer ...104 Moving the printer to another location...104 Setting the printer up in a new location ...105 Shipping the printer ...105 Administrative support 106 Finding advanced networking and administrator information 106 Adjusting Power...
User Manual
Page 7
...cords and cables from the wall outlet before moving the printer, follow these guidelines to avoid personal injury or printer damage: • Turn the printer off , and then unplug the power cord from the printer before continuing. Lexmark is misused, a risk of procedures other replacement parts. ...Use of controls or adjustments or performance of fire or electrical shock results. CAUTION-HOT SURFACE: The inside of the printer near the product and easily ...
...cords and cables from the wall outlet before moving the printer, follow these guidelines to avoid personal injury or printer damage: • Turn the printer off , and then unplug the power cord from the printer before continuing. Lexmark is misused, a risk of procedures other replacement parts. ...Use of controls or adjustments or performance of fire or electrical shock results. CAUTION-HOT SURFACE: The inside of the printer near the product and easily ...

User Manual
Page 8
Note: Use the handholds located on both sides of the printer to lift it off of the optional drawer and set it aside instead of trying to lift the drawer and printer at the same time. • Lift the printer off the optional drawer. Safety information 8
Note: Use the handholds located on both sides of the printer to lift it off of the optional drawer and set it aside instead of trying to lift the drawer and printer at the same time. • Lift the printer off the optional drawer. Safety information 8
User Manual
Page 9
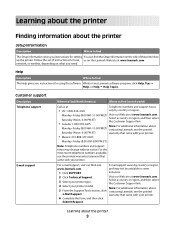
... you instructions for using the software. Visit our Web site at www.lexmark.com. While in some 1 Click SUPPORT. Monday-Friday (8:00 AM-11:00 PM ET) Visit our Web site at www.lexmark.com. 3 Select your printer. • Mexico: 001-888-377-0063 Monday-Friday (8:00 AM...instructions for setting You can find the Setup information on the Lexmark Web site at www.lexmark.com. Customer support Description Telephone support E-mail support Where to find (North America) Where to find (rest of the printer box up the printer. For e-mail support, visit our Web site: E-mail support...
... you instructions for using the software. Visit our Web site at www.lexmark.com. While in some 1 Click SUPPORT. Monday-Friday (8:00 AM-11:00 PM ET) Visit our Web site at www.lexmark.com. 3 Select your printer. • Mexico: 001-888-377-0063 Monday-Friday (8:00 AM...instructions for setting You can find the Setup information on the Lexmark Web site at www.lexmark.com. Customer support Description Telephone support E-mail support Where to find (North America) Where to find (rest of the printer box up the printer. For e-mail support, visit our Web site: E-mail support...
User Manual
Page 10
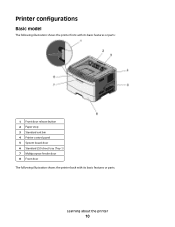
Printer configurations Basic model The following illustration shows the printer front with its basic features or parts: 1 Front door release button 2 Paper stop 3 Standard exit bin 4 Printer control panel 5 System board door 6 Standard 250-sheet tray (Tray 1) 7 Multipurpose feeder door 8 Front door The following illustration shows the printer back with its basic features or parts: Learning about the printer 10
Printer configurations Basic model The following illustration shows the printer front with its basic features or parts: 1 Front door release button 2 Paper stop 3 Standard exit bin 4 Printer control panel 5 System board door 6 Standard 250-sheet tray (Tray 1) 7 Multipurpose feeder door 8 Front door The following illustration shows the printer back with its basic features or parts: Learning about the printer 10
User Manual
Page 11
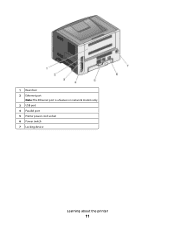
1 Rear door 2 Ethernet port Note: The Ethernet port is a feature on network models only. 3 USB port 4 Parallel port 5 Printer power cord socket 6 Power switch 7 Locking device Learning about the printer 11
1 Rear door 2 Ethernet port Note: The Ethernet port is a feature on network models only. 3 USB port 4 Parallel port 5 Printer power cord socket 6 Power switch 7 Locking device Learning about the printer 11
User Manual
Page 12
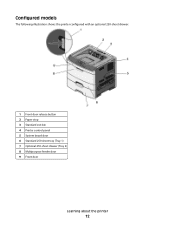
Configured models The following illustration shows the printer configured with an optional 250-sheet drawer: 1 Front door release button 2 Paper stop 3 Standard exit bin 4 Printer control panel 5 System board door 6 Standard 250-sheet tray (Tray 1) 7 Optional 250-sheet drawer (Tray 2) 8 Multipurpose feeder door 9 Front door Learning about the printer 12
Configured models The following illustration shows the printer configured with an optional 250-sheet drawer: 1 Front door release button 2 Paper stop 3 Standard exit bin 4 Printer control panel 5 System board door 6 Standard 250-sheet tray (Tray 1) 7 Optional 250-sheet drawer (Tray 2) 8 Multipurpose feeder door 9 Front door Learning about the printer 12

User Manual
Page 13
The following illustration shows the printer configured with an optional 550-sheet drawer: 1 Front door release button 2 Paper stop 3 Standard exit bin 4 Printer control panel 5 System board door 6 Standard 250-sheet tray (Tray 1) 7 Optional 550-sheet drawer (Tray 2) 8 Multipurpose feeder door 9 Front door Learning about the printer 13
The following illustration shows the printer configured with an optional 550-sheet drawer: 1 Front door release button 2 Paper stop 3 Standard exit bin 4 Printer control panel 5 System board door 6 Standard 250-sheet tray (Tray 1) 7 Optional 550-sheet drawer (Tray 2) 8 Multipurpose feeder door 9 Front door Learning about the printer 13
User Manual
Page 14
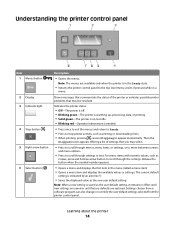
.... Release the button when the needed . 4 Stop button ( ) • Press once to exit the menus and return to Ready. • Press to stop printer activity, such as Copies, press and hold an arrow button to the top level menu screen if pressed while in the menu (called a menu item... is saved as the user default setting, it remains in effect until new settings are saved or until factory defaults are available only when the printer is needed number appears. • Opens a menu and displays the first item in a menu. 2 Display Shows messages that communicate the status of settings ...
.... Release the button when the needed . 4 Stop button ( ) • Press once to exit the menus and return to Ready. • Press to stop printer activity, such as Copies, press and hold an arrow button to the top level menu screen if pressed while in the menu (called a menu item... is saved as the user default setting, it remains in effect until new settings are saved or until factory defaults are available only when the printer is needed number appears. • Opens a menu and displays the first item in a menu. 2 Display Shows messages that communicate the status of settings ...
User Manual
Page 15
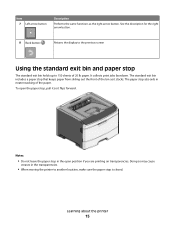
... print jobs facedown. Notes: • Do not leave the paper stop is closed. To open position if you are printing on transparencies. Learning about the printer 15 See the description for the right arrow button. 8 Back button ( ) Returns the display to the previous screen Using the standard exit bin and paper... stop The standard exit bin holds up to another location, make sure the paper stop in the transparencies. • When moving the printer to 150 sheets of 20 lb paper.
... print jobs facedown. Notes: • Do not leave the paper stop is closed. To open position if you are printing on transparencies. Learning about the printer 15 See the description for the right arrow button. 8 Back button ( ) Returns the display to the previous screen Using the standard exit bin and paper... stop The standard exit bin holds up to another location, make sure the paper stop in the transparencies. • When moving the printer to 150 sheets of 20 lb paper.
User Manual
Page 16
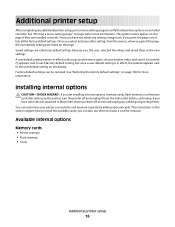
... the user default setting on the display. You can be restored. Once you select and save it. Factory default settings can customize your printer connectivity and memory capacity by adding optional cards. The instructions in effect, the asterisk appears next to locate a card for removal. Available... internal options CAUTION-SHOCK HAZARD: If you are installing internal options, memory cards, flash memory or a firmware card after setting up the printer, turn them as well and unplug any cables going to each factory default setting, but once a user default setting is in this page...
... the user default setting on the display. You can be restored. Once you select and save it. Factory default settings can customize your printer connectivity and memory capacity by adding optional cards. The instructions in effect, the asterisk appears next to locate a card for removal. Available... internal options CAUTION-SHOCK HAZARD: If you are installing internal options, memory cards, flash memory or a firmware card after setting up the printer, turn them as well and unplug any cables going to each factory default setting, but once a user default setting is in this page...
User Manual
Page 17
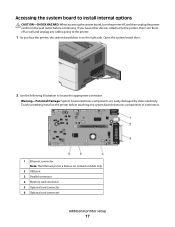
...the system board, turn them off , and then unplug the power cord from the wall outlet before touching any cables going to the printer. 1 As you have other devices attached to locate the appropriate connector. Open the system board door. 2 Use the following illustration to the... printer, then turn the printer off as well and unplug any system board electronic components or connectors. 1 Ethernet connector Note: The Ethernet port is on the right side...
...the system board, turn them off , and then unplug the power cord from the wall outlet before touching any cables going to the printer. 1 As you have other devices attached to locate the appropriate connector. Open the system board door. 2 Use the following illustration to the... printer, then turn the printer off as well and unplug any system board electronic components or connectors. 1 Ethernet connector Note: The Ethernet port is on the right side...

User Manual
Page 18
...system board. Note: Avoid touching the connection points along the edge of the card. 3 Align the memory card with its connector on the printer before continuing. Additional printer setup 18 Installing a memory card CAUTION-SHOCK HAZARD: If you have any other devices attached to the system board. To install the memory.... 2 Unpack the memory card. If you are accessing the system board or installing optional hardware or memory devices sometime after setting up the printer, then turn them off , and unplug the power cord from the wall outlet before touching any cables going into the...
...system board. Note: Avoid touching the connection points along the edge of the card. 3 Align the memory card with its connector on the printer before continuing. Additional printer setup 18 Installing a memory card CAUTION-SHOCK HAZARD: If you have any other devices attached to the system board. To install the memory.... 2 Unpack the memory card. If you are accessing the system board or installing optional hardware or memory devices sometime after setting up the printer, then turn them off , and unplug the power cord from the wall outlet before touching any cables going into the...
User Manual
Page 19
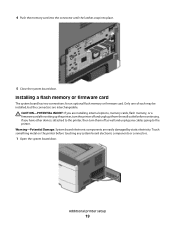
...board electronic components or connectors. 1 Open the system board door. Additional printer setup 19 If you are installing internal options, memory cards, flash memory, or a firmware card after setting up the printer, turn them off and unplug it from the wall outlet before touching... any cables going to the printer. Warning-Potential Damage: System board electronic components are interchangeable. Installing a flash memory ...
...board electronic components or connectors. 1 Open the system board door. Additional printer setup 19 If you are installing internal options, memory cards, flash memory, or a firmware card after setting up the printer, turn them off and unplug it from the wall outlet before touching... any cables going to the printer. Warning-Potential Damage: System board electronic components are interchangeable. Installing a flash memory ...
User Manual
Page 20
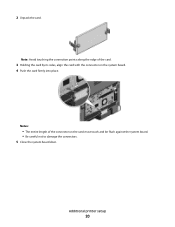
Additional printer setup 20 2 Unpack the card. Note: Avoid touching the connection points along the edge of the connector on the system board. 4 Push the card firmly into place. Notes: • The entire length of the card. 3 Holding the card by its sides, align the card with the connector on the card must touch and be flush against the system board. • Be careful not to damage the connectors. 5 Close the system board door.
Additional printer setup 20 2 Unpack the card. Note: Avoid touching the connection points along the edge of the connector on the system board. 4 Push the card firmly into place. Notes: • The entire length of the card. 3 Holding the card by its sides, align the card with the connector on the card must touch and be flush against the system board. • Be careful not to damage the connectors. 5 Close the system board door.
User Manual
Page 21
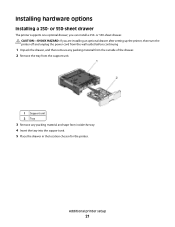
... drawer; or 550-sheet drawer. CAUTION-SHOCK HAZARD: If you can install a 250- you are installing an optional drawer after setting up the printer, then turn the printer off and unplug the power cord from the wall outlet before continuing 1 Unpack the drawer, and then remove any packing material from the outside... any packing material and tape from inside the tray. 4 Insert the tray into the support unit. 5 Place the drawer in the location chosen for the printer. Installing hardware options Installing a 250- Additional...
... drawer; or 550-sheet drawer. CAUTION-SHOCK HAZARD: If you can install a 250- you are installing an optional drawer after setting up the printer, then turn the printer off and unplug the power cord from the wall outlet before continuing 1 Unpack the drawer, and then remove any packing material from the outside... any packing material and tape from inside the tray. 4 Insert the tray into the support unit. 5 Place the drawer in the location chosen for the printer. Installing hardware options Installing a 250- Additional...
User Manual
Page 22
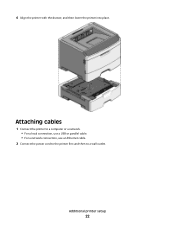
Additional printer setup 22 Attaching cables 1 Connect the printer to a computer or a network. • For a local connection, use a USB or parallel cable. • For a network connection, use an Ethernet cable. 2 Connect the power cord to the printer first and then to a wall outlet. 6 Align the printer with the drawer, and then lower the printer into place.
Additional printer setup 22 Attaching cables 1 Connect the printer to a computer or a network. • For a local connection, use a USB or parallel cable. • For a network connection, use an Ethernet cable. 2 Connect the power cord to the printer first and then to a wall outlet. 6 Align the printer with the drawer, and then lower the printer into place.


