User Manual
Page 2
......21 Attaching cables...22 Installing printer software...23 Verifying printer setup...24 Printing a menu settings page...24 Printing a network setup page ...24 Loading paper and specialty media 25 Setting the Paper Size and Paper Type...25 Configuring Universal paper settings...25 Loading the standard 250-sheet tray...27 Loading the optional 250- or 550-sheet tray...31 Using the multipurpose feeder...32 Paper capacities...36 Linking and unlinking trays...37 Linking trays...37 Unlinking trays...37 Assigning a Custom Type name...37 Changing a Custom Type name ...38 Paper and specialty...
......21 Attaching cables...22 Installing printer software...23 Verifying printer setup...24 Printing a menu settings page...24 Printing a network setup page ...24 Loading paper and specialty media 25 Setting the Paper Size and Paper Type...25 Configuring Universal paper settings...25 Loading the standard 250-sheet tray...27 Loading the optional 250- or 550-sheet tray...31 Using the multipurpose feeder...32 Paper capacities...36 Linking and unlinking trays...37 Linking trays...37 Unlinking trays...37 Assigning a Custom Type name...37 Changing a Custom Type name ...38 Paper and specialty...

User Manual
Page 5
...Setting the printer up in a new location ...105 Shipping the printer ...105 Administrative support 106 Finding advanced networking and administrator information 106 Adjusting Power Saver...106 Restoring the factory default settings...106 Using the Embedded Web Server...107 Viewing reports...107 Checking the device status...108 Restricting access to printer menus...108 Setting up e-mail alerts...109 Configuring supply notifications...109 Copying printer settings to other printers...110 Troubleshooting 111 Solving basic printer problems...111 Printer control panel display is blank or displays...
...Setting the printer up in a new location ...105 Shipping the printer ...105 Administrative support 106 Finding advanced networking and administrator information 106 Adjusting Power Saver...106 Restoring the factory default settings...106 Using the Embedded Web Server...107 Viewing reports...107 Checking the device status...108 Restricting access to printer menus...108 Setting up e-mail alerts...109 Configuring supply notifications...109 Copying printer settings to other printers...110 Troubleshooting 111 Solving basic printer problems...111 Printer control panel display is blank or displays...
User Manual
Page 9
... AM-8:00 PM ET) Note: Telephone numbers and support times may not be available in any Lexmark software program, click Help, Tips ΠHelp, or Help ΠHelp Topics. network, or wireless, depending on what you instructions for using the software. While in some 1 Click SUPPORT. instances. 2 Click Technical Support. Learning about the printer 9 Help Description Where to find The Help gives you need. Note: For additional information about 5 From...
... AM-8:00 PM ET) Note: Telephone numbers and support times may not be available in any Lexmark software program, click Help, Tips ΠHelp, or Help ΠHelp Topics. network, or wireless, depending on what you instructions for using the software. While in some 1 Click SUPPORT. instances. 2 Click Technical Support. Learning about the printer 9 Help Description Where to find The Help gives you need. Note: For additional information about 5 From...
User Manual
Page 16
... additional printer setup, print a menu settings page to locate a card for removal. The option names appear on this page, the user default settings are installed correctly. Saved settings are called user default settings because you, the user, selected the values and saved them off and unplug it from the menus, when you print this page if they are installing internal options, memory cards, flash memory or a firmware card after setting up the printer, turn them as well and unplug any setting changes yet...
... additional printer setup, print a menu settings page to locate a card for removal. The option names appear on this page, the user default settings are installed correctly. Saved settings are called user default settings because you, the user, selected the values and saved them off and unplug it from the menus, when you print this page if they are installing internal options, memory cards, flash memory or a firmware card after setting up the printer, turn them as well and unplug any setting changes yet...
User Manual
Page 71
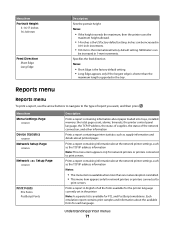
... maximum length supported in the printer Note: A separate list is the international factory default setting. Menu item Menu Settings Page Device Statistics Network Setup Page Network Setup Page Print Fonts PCL Fonts PostScript Fonts Description Prints a report containing information about paper loaded into trays, installed memory, the total page count, alarms, timeouts, the printer control panel language, the TCP/IP address, the status of supplies, the status of report you want, and then press . Menu item Portrait Height 3-14.17 inches 76-360 mm Feed Direction Short...
... maximum length supported in the printer Note: A separate list is the international factory default setting. Menu item Menu Settings Page Device Statistics Network Setup Page Network Setup Page Print Fonts PCL Fonts PostScript Fonts Description Prints a report containing information about paper loaded into trays, installed memory, the total page count, alarms, timeouts, the printer control panel language, the TCP/IP address, the status of supplies, the status of report you want, and then press . Menu item Portrait Height 3-14.17 inches 76-360 mm Feed Direction Short...
User Manual
Page 83
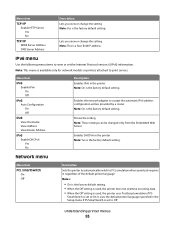
... data. • When the Off setting is used, the printer uses PostScript emulation if PS SmartSwitch is the factory default setting. Network menu Menu item PCL SmartSwitch On Off Description Sets the printer to automatically switch to accept the automatic IPv6 address configuration entries provided by a router Note: On is the factory default setting. Understanding printer menus 83 Shows the setting Note: These settings can be changed only from the Embedded Web Server. Menu item IPv6 Enable...
... data. • When the Off setting is used, the printer uses PostScript emulation if PS SmartSwitch is the factory default setting. Network menu Menu item PCL SmartSwitch On Off Description Sets the printer to automatically switch to accept the automatic IPv6 address configuration entries provided by a router Note: On is the factory default setting. Understanding printer menus 83 Shows the setting Note: These settings can be changed only from the Embedded Web Server. Menu item IPv6 Enable...
User Manual
Page 84
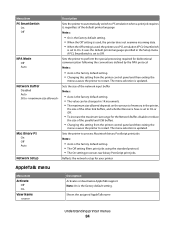
... factory default setting. • Changing this setting from the printer control panel and then exiting the menus causes the printer to restart. It uses the default printer language specified in the printer, the size of the other link buffers, and whether Resource Save is set to On. Shows the assigned AppleTalk name Understanding printer menus 84 The menu selection is updated. Menu item PS SmartSwitch On Off NPA Mode Off Auto Network Buffer Disabled Auto...
... factory default setting. • Changing this setting from the printer control panel and then exiting the menus causes the printer to restart. It uses the default printer language specified in the printer, the size of the other link buffers, and whether Resource Save is set to On. Shows the assigned AppleTalk name Understanding printer menus 84 The menu selection is updated. Menu item PS SmartSwitch On Off NPA Mode Off Auto Network Buffer Disabled Auto...
User Manual
Page 86
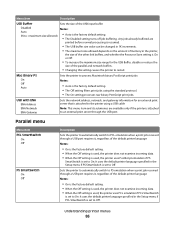
... factory default setting. • The Off setting filters print jobs using a USB cable Note: This menu item and its submenus are printed before normal processing is resumed. • The USB buffer size value can be changed in 1K increments. • The maximum size allowed depends on the amount of memory in the Setup menu if PS SmartSwitch is the factory default setting. • The Disabled setting turns off job buffering. Mac Binary PS On Off Auto Sets the printer...
... factory default setting. • The Off setting filters print jobs using a USB cable Note: This menu item and its submenus are printed before normal processing is resumed. • The USB buffer size value can be changed in 1K increments. • The maximum size allowed depends on the amount of memory in the Setup menu if PS SmartSwitch is the factory default setting. • The Disabled setting turns off job buffering. Mac Binary PS On Off Auto Sets the printer...
User Manual
Page 91
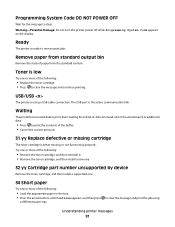
...; Replace the toner cartridge. • Press to clear the message and continue printing. to clear. Warning-Potential Damage: Do not turn the printer power off while Programming System Code appears on the display. The USB port is using Understanding printer messages 91 Try one or more of the buffer. • Cancel the current print job. 31.yy Replace defective or missing cartridge The toner cartridge is waiting for the message to clear the message and print the job using a USB cable connection. USB/USB...
...; Replace the toner cartridge. • Press to clear the message and continue printing. to clear. Warning-Potential Damage: Do not turn the printer power off while Programming System Code appears on the display. The USB port is using Understanding printer messages 91 Try one or more of the buffer. • Cancel the current print job. 31.yy Replace defective or missing cartridge The toner cartridge is waiting for the message to clear the message and print the job using a USB cable connection. USB/USB...
User Manual
Page 99
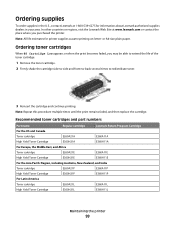
... life of the toner cartridge: 1 Remove the toner cartridge. 2 Firmly shake the cartridge side-to-side and front-to-back several times to redistribute toner. 3 Reinsert the cartridge and continue printing. In other countries or regions, visit the Lexmark Web Site at 1-800-539-6275 for printer supplies assume printing on letter- Recommended toner cartridges and part numbers Part name Regular cartridge For the US and Canada Toner cartridge E260A21A High Yield Toner Cartridge E360H21A For...
... life of the toner cartridge: 1 Remove the toner cartridge. 2 Firmly shake the cartridge side-to-side and front-to-back several times to redistribute toner. 3 Reinsert the cartridge and continue printing. In other countries or regions, visit the Lexmark Web Site at 1-800-539-6275 for printer supplies assume printing on letter- Recommended toner cartridges and part numbers Part name Regular cartridge For the US and Canada Toner cartridge E260A21A High Yield Toner Cartridge E360H21A For...
User Manual
Page 106
... buttons until Power Saver appears, and then press . 7 Press the arrow buttons to increase or decrease the number of minutes before the printer returns to Ready. Wait for Submitting Changes to the factory default settings except Network/Port menu settings. Downloads stored in RAM are deleted. For more information, see the Networking Guide on the Software and Documentation CD and the Embedded Web Server Administrator's Guide on and Ready appears. 2 From the printer control panel...
... buttons until Power Saver appears, and then press . 7 Press the arrow buttons to increase or decrease the number of minutes before the printer returns to Ready. Wait for Submitting Changes to the factory default settings except Network/Port menu settings. Downloads stored in RAM are deleted. For more information, see the Networking Guide on the Software and Documentation CD and the Embedded Web Server Administrator's Guide on and Ready appears. 2 From the printer control panel...
User Manual
Page 108
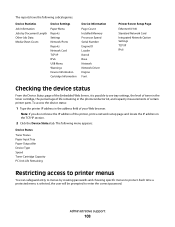
... your Web browser. Note: If you do not know the IP address of the printer, print a network setup page and locate the IP address in the address field of certain printer parts. Administrative support 108 The reports have the following menu appears: Device Status Toner Status Paper Input Tray Paper Output Bin Device Type Speed Toner Cartridge Capacity PC Unit Life Remaining Restricting access to printer menus You can safeguard entry to menus by Document Length Other Job Data Media Sheet Count Paper Menu Reports Settings Network/Ports Reports Network Card TCP/IP IPv6 USB Menu...
... your Web browser. Note: If you do not know the IP address of the printer, print a network setup page and locate the IP address in the address field of certain printer parts. Administrative support 108 The reports have the following menu appears: Device Status Toner Status Paper Input Tray Paper Output Bin Device Type Speed Toner Cartridge Capacity PC Unit Life Remaining Restricting access to printer menus You can safeguard entry to menus by Document Length Other Job Data Media Sheet Count Paper Menu Reports Settings Network/Ports Reports Network Card TCP/IP IPv6 USB Menu...
User Manual
Page 112
... ARE USING A RECOMMENDED USB, PARALLEL, OR ETHERNET CABLE For more information, see the setup documentation that came with the printer. MAKE SURE PRINTER CABLES ARE SECURELY CONNECTED Check the cable connections to the printer to make sure the network is the most current, check the Lexmark Web site at www.lexmark.com. Multiple-language PDFs do not print The documents contain unavailable fonts. 1 Open the document you installed the correct printer software for your printer model. CHANGE THE PAGE PROTECT SETTING TO OFF 1 From the printer control panel...
... ARE USING A RECOMMENDED USB, PARALLEL, OR ETHERNET CABLE For more information, see the setup documentation that came with the printer. MAKE SURE PRINTER CABLES ARE SECURELY CONNECTED Check the cable connections to the printer to make sure the network is the most current, check the Lexmark Web site at www.lexmark.com. Multiple-language PDFs do not print The documents contain unavailable fonts. 1 Open the document you installed the correct printer software for your printer model. CHANGE THE PAGE PROTECT SETTING TO OFF 1 From the printer control panel...

User Manual
Page 118
...Troubleshooting 118 CHECK THE MEDIA TYPE SETTING • For Windows users: From Print Properties, make sure the Media Type setting matches the paper loaded in the tray. • For Macintosh users: From the Print dialog, make sure the Paper Type setting matches the paper loaded in the tray. • From the printer control panel Paper menu, make sure the Paper Type setting matches the paper loaded in the tray. Ghost images These are possible solutions. Gray background • For Windows users: From Print Properties, select a different Toner Darkness setting before sending the job to print...
...Troubleshooting 118 CHECK THE MEDIA TYPE SETTING • For Windows users: From Print Properties, make sure the Media Type setting matches the paper loaded in the tray. • For Macintosh users: From the Print dialog, make sure the Paper Type setting matches the paper loaded in the tray. • From the printer control panel Paper menu, make sure the Paper Type setting matches the paper loaded in the tray. Ghost images These are possible solutions. Gray background • For Windows users: From Print Properties, select a different Toner Darkness setting before sending the job to print...

User Manual
Page 119
... correct page size in Print Properties, the Print dialog, or the software program. Paper curl These are possible solutions. Try one or more of the following : CHECK THE PAPER TYPE SETTING • For Windows users: From Print Properties, make sure the Media Type setting matches the paper loaded in the tray. • For Macintosh users: From the Print dialog, make sure the Paper Type setting matches the paper loaded in the tray. • From the printer control panel Paper menu, make sure the Paper Type setting matches the paper loaded...
... correct page size in Print Properties, the Print dialog, or the software program. Paper curl These are possible solutions. Try one or more of the following : CHECK THE PAPER TYPE SETTING • For Windows users: From Print Properties, make sure the Media Type setting matches the paper loaded in the tray. • For Macintosh users: From the Print dialog, make sure the Paper Type setting matches the paper loaded in the tray. • From the printer control panel Paper menu, make sure the Paper Type setting matches the paper loaded...
User Manual
Page 120
...button. 3 Click Printer Features. 4 Change the settings for Toner Darkness, Brightness, and Contrast. • From the printer control panel Quality menu, change these settings. CHECK THE PAPER TYPE SETTING • For Windows users: From Print Properties, make sure the Media Type setting matches the paper loaded in the tray. • For Macintosh users: From the Print dialog, make sure the Paper Type setting matches the paper loaded in the tray. • From the printer control panel Paper menu, make sure the Paper Type setting matches the paper loaded in its original wrapper until you use...
...button. 3 Click Printer Features. 4 Change the settings for Toner Darkness, Brightness, and Contrast. • From the printer control panel Quality menu, change these settings. CHECK THE PAPER TYPE SETTING • For Windows users: From Print Properties, make sure the Media Type setting matches the paper loaded in the tray. • For Macintosh users: From the Print dialog, make sure the Paper Type setting matches the paper loaded in the tray. • From the printer control panel Paper menu, make sure the Paper Type setting matches the paper loaded in its original wrapper until you use...
User Manual
Page 121
... printer control panel Paper menu, make sure the Paper Type setting matches the paper loaded in its original wrapper until you use it. CHECK THE PAPER Avoid textured paper with rough finishes. Troubleshooting 121 THE PAPER HAS ABSORBED MOISTURE DUE TO HIGH HUMIDITY • Load paper from a fresh package. • Store paper in the tray. THE TONER CARTRIDGE MAY BE DEFECTIVE Replace the toner cartridge. Print is too low. • For Windows users: From Print Properties, change these settings. • For Macintosh users: 1 Choose File > Print. 2 Locate...
... printer control panel Paper menu, make sure the Paper Type setting matches the paper loaded in its original wrapper until you use it. CHECK THE PAPER Avoid textured paper with rough finishes. Troubleshooting 121 THE PAPER HAS ABSORBED MOISTURE DUE TO HIGH HUMIDITY • Load paper from a fresh package. • Store paper in the tray. THE TONER CARTRIDGE MAY BE DEFECTIVE Replace the toner cartridge. Print is too low. • For Windows users: From Print Properties, change these settings. • For Macintosh users: 1 Choose File > Print. 2 Locate...
User Manual
Page 140
... Support 126 control panel, printer buttons 14 display 14 factory defaults, restoring 106 identifying items 14 indicator light 14 understanding 14 custom paper type assigning 37 Custom Type changing name 38 Custom Types menu 70 Index 140 D Default Source menu 65 Defragmenting Flash 89 directory list printing 49 display 14 display troubleshooting display is blank 111 display shows only diamonds 111 DO NOT TOUCH Reading flash data DO NOT POWER OFF 89 documents, printing from Macintosh 45 from Windows 45 E Embedded Web Server 107 administrator settings...
... Support 126 control panel, printer buttons 14 display 14 factory defaults, restoring 106 identifying items 14 indicator light 14 understanding 14 custom paper type assigning 37 Custom Type changing name 38 Custom Types menu 70 Index 140 D Default Source menu 65 Defragmenting Flash 89 directory list printing 49 display 14 display troubleshooting display is blank 111 display shows only diamonds 111 DO NOT TOUCH Reading flash data DO NOT POWER OFF 89 documents, printing from Macintosh 45 from Windows 45 E Embedded Web Server 107 administrator settings...

User Manual
Page 142
... 251 62 paper labels loading 32 Paper Loading menu 69 paper sizes supported by the printer 43 paper stop, using 15 Paper Texture menu 68 paper types duplex support 42 supported by printer 42 where to load 42 Paper Weight menu 69 Parallel menu 86 parallel port 22 PCL Emul menu 79 photoconductor kit ordering 100 replacing 101 PostScript menu 79 Power Saver 90 adjusting 106 print job canceling from Macintosh 50 canceling from printer control panel 50 canceling from Windows 50 print quality test pages printing 50 print quality troubleshooting blank pages 117...
... 251 62 paper labels loading 32 Paper Loading menu 69 paper sizes supported by the printer 43 paper stop, using 15 Paper Texture menu 68 paper types duplex support 42 supported by printer 42 where to load 42 Paper Weight menu 69 Parallel menu 86 parallel port 22 PCL Emul menu 79 photoconductor kit ordering 100 replacing 101 PostScript menu 79 Power Saver 90 adjusting 106 print job canceling from Macintosh 50 canceling from printer control panel 50 canceling from Windows 50 print quality test pages printing 50 print quality troubleshooting blank pages 117...
User Manual
Page 143
... 132 Remove paper from standard output bin 91 replacing photoconductor kit 101 toner cartridge 100 reports viewing 107 Reports menu 71 S safeguarding menus 108 safety information 7 security protecting menus 108 setting paper size 25 paper type 25 TCP/IP address 82 Universal Paper Size 25 Setup menu 74 shipping the printer 105 Size/Type menu 65 specialty media recommended print side 40 selecting 40 standard 250-sheet tray loading 27 standard exit bin, using 15 status of supplies, checking 98 storing paper 41...
... 132 Remove paper from standard output bin 91 replacing photoconductor kit 101 toner cartridge 100 reports viewing 107 Reports menu 71 S safeguarding menus 108 safety information 7 security protecting menus 108 setting paper size 25 paper type 25 TCP/IP address 82 Universal Paper Size 25 Setup menu 74 shipping the printer 105 Size/Type menu 65 specialty media recommended print side 40 selecting 40 standard 250-sheet tray loading 27 standard exit bin, using 15 status of supplies, checking 98 storing paper 41...


