User Manual
Page 4
......97 Storing supplies...97 Conserving supplies...98 Checking the status of supplies from a network computer 98 Ordering supplies...99 Ordering toner cartridges...99 Ordering a photoconductor kit ...100 Contents 4
......97 Storing supplies...97 Conserving supplies...98 Checking the status of supplies from a network computer 98 Ordering supplies...99 Ordering toner cartridges...99 Ordering a photoconductor kit ...100 Contents 4

User Manual
Page 5
Replacing supplies...100 Replacing the toner cartridge ...100 Replacing the photoconductor kit ...101 Recycling Lexmark products...104 Moving the printer...104 Before moving the printer ...104 Moving the printer to another location...104 Setting the printer up in a new location ......
Replacing supplies...100 Replacing the toner cartridge ...100 Replacing the photoconductor kit ...101 Recycling Lexmark products...104 Moving the printer...104 Before moving the printer ...104 Moving the printer to another location...104 Setting the printer up in a new location ......
User Manual
Page 54
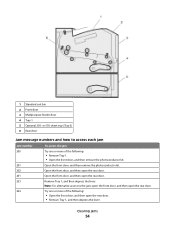
... Try one or more of the following : • Remove Tray 1. • Open the front door, and then remove the photoconductor kit. 201 Open the front door, and then remove the photoconductor kit. 202 Open the front door, and then open the rear door. 231 Open the front door, and then open the...
... Try one or more of the following : • Remove Tray 1. • Open the front door, and then remove the photoconductor kit. 201 Open the front door, and then remove the photoconductor kit. 202 Open the front door, and then open the rear door. 231 Open the front door, and then open the...
User Manual
Page 55
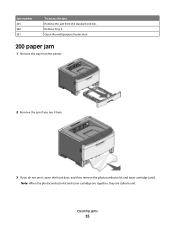
Remove Tray 2. Note: When the photoconductor kit and toner cartridge are together, they are called a unit. Open the multipurpose feeder door. 200 paper jam 1 Remove the tray from the standard exit bin. Jam number 235 242 251 To access the jam Remove the jam from the printer. 2 Remove the jam if you see it here. 3 If you do not see it, open the front door, and then remove the photoconductor kit and toner cartridge (unit). Clearing jams 55
Remove Tray 2. Note: When the photoconductor kit and toner cartridge are together, they are called a unit. Open the multipurpose feeder door. 200 paper jam 1 Remove the tray from the standard exit bin. Jam number 235 242 251 To access the jam Remove the jam from the printer. 2 Remove the jam if you see it here. 3 If you do not see it, open the front door, and then remove the photoconductor kit and toner cartridge (unit). Clearing jams 55

User Manual
Page 94
... the following: • Remove Tray 1. • Open the front door, and then remove the photoconductor kit and toner cartridge unit. 2 Remove the jam. 3 Replace the photoconductor kit and toner cartridge unit if you purchased your printer. 51 Defective flash detected Try one or more of the... indicates either where the paper is jammed or the number of the following : • Replace the photoconductor kit. • Press to continue printing. Install a new photoconductor kit. 42.xy Cartridge region mismatch Replace the toner cartridge with one that is correct for the region where you...
... the following: • Remove Tray 1. • Open the front door, and then remove the photoconductor kit and toner cartridge unit. 2 Remove the jam. 3 Replace the photoconductor kit and toner cartridge unit if you purchased your printer. 51 Defective flash detected Try one or more of the... indicates either where the paper is jammed or the number of the following : • Replace the photoconductor kit. • Press to continue printing. Install a new photoconductor kit. 42.xy Cartridge region mismatch Replace the toner cartridge with one that is correct for the region where you...

User Manual
Page 96
... or more of the following: • Remove Tray 1. • Open the front door, and then remove the photoconductor kit and toner cartridge unit. • Remove Tray 2. 2 Remove the jam. 3 Replace the photoconductor kit and toner cartridge unit if you removed it. 4 Close any open doors or trays. 5 Press to continue printing. 251...
... or more of the following: • Remove Tray 1. • Open the front door, and then remove the photoconductor kit and toner cartridge unit. • Remove Tray 2. 2 Remove the jam. 3 Replace the photoconductor kit and toner cartridge unit if you removed it. 4 Close any open doors or trays. 5 Press to continue printing. 251...
User Manual
Page 100
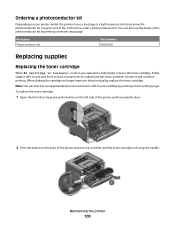
...toner cartridge When 88 Cartridge is left side of the printer and lowering the door. 2 Press the button on the base of the photoconductor kit, and then pull the toner cartridge out using the handle. Firmly shake it and continue printing. Note: You can also see approximately how... the toner cartridge. To replace the toner cartridge: 1 Open the front door by printing a network setup page. At this time, order a photoconductor kit. You can check to see the status of life. Maintaining the printer 100 When shaking the cartridge no longer improves the print quality, replace the...
...toner cartridge When 88 Cartridge is left side of the printer and lowering the door. 2 Press the button on the base of the photoconductor kit, and then pull the toner cartridge out using the handle. Firmly shake it and continue printing. Note: You can also see approximately how... the toner cartridge. To replace the toner cartridge: 1 Open the front door by printing a network setup page. At this time, order a photoconductor kit. You can check to see the status of life. Maintaining the printer 100 When shaking the cartridge no longer improves the print quality, replace the...
User Manual
Page 101
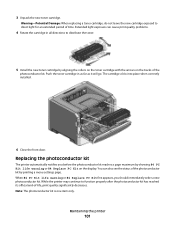
...cartridge. Warning-Potential Damage: When replacing a toner cartridge, do not leave the new cartridge exposed to function properly after the photoconductor kit has reached its official end-of-life, print quality significantly decreases. While the printer may continue to direct light for an extended ...period of the photoconductor kit. Push the toner cartridge in all directions to distribute the toner. 5 Install the new toner cartridge by aligning the rollers ...
...cartridge. Warning-Potential Damage: When replacing a toner cartridge, do not leave the new cartridge exposed to function properly after the photoconductor kit has reached its official end-of-life, print quality significantly decreases. While the printer may continue to direct light for an extended ...period of the photoconductor kit. Push the toner cartridge in all directions to distribute the toner. 5 Install the new toner cartridge by aligning the rollers ...
User Manual
Page 102
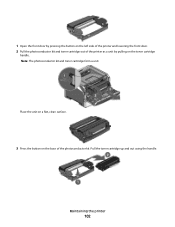
Maintaining the printer 102 Pull the toner cartridge up and out using the handle. Place the unit on a flat, clean surface. 3 Press the button on the toner cartridge handle. 1 Open the front door by pressing the button on the left side of the printer and lowering the front door. 2 Pull the photoconductor kit and toner cartridge out of the printer as a unit by pulling on the base of the photoconductor kit. Note: The photoconductor kit and toner cartridge form a unit.
Maintaining the printer 102 Pull the toner cartridge up and out using the handle. Place the unit on a flat, clean surface. 3 Press the button on the toner cartridge handle. 1 Open the front door by pressing the button on the left side of the printer and lowering the front door. 2 Pull the photoconductor kit and toner cartridge out of the printer as a unit by pulling on the base of the photoconductor kit. Note: The photoconductor kit and toner cartridge form a unit.
User Manual
Page 103
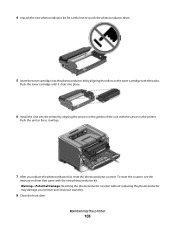
... into place. 6 Install the unit into the photoconductor kit by aligning the arrows on the toner cartridge with the new photoconductor kit. Push the toner cartridge until it will go. 7 After you replace the photoconductor kit, reset the photoconductor counter. To reset the counter, ...see the instruction sheet that came with the tracks. 4 Unpack the new photoconductor kit. Warning-Potential Damage: Resetting the photoconductor counter without replacing the ...
... into place. 6 Install the unit into the photoconductor kit by aligning the arrows on the toner cartridge with the new photoconductor kit. Push the toner cartridge until it will go. 7 After you replace the photoconductor kit, reset the photoconductor counter. To reset the counter, ...see the instruction sheet that came with the tracks. 4 Unpack the new photoconductor kit. Warning-Potential Damage: Resetting the photoconductor counter without replacing the ...
User Manual
Page 105
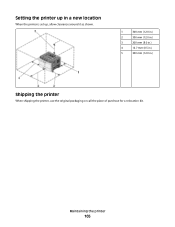
Maintaining the printer 105 Setting the printer up in a new location When the printer is set up, allow clearance around it as shown. 1 300 mm (12.0 in.) 2 300 mm (12.0 in.) 3 200 mm (8.0 in.) 4 12.7 mm (0.5 in.) 5 300 mm (12.0 in.) Shipping the printer When shipping the printer, use the original packaging or call the place of purchase for a relocation kit.
Maintaining the printer 105 Setting the printer up in a new location When the printer is set up, allow clearance around it as shown. 1 300 mm (12.0 in.) 2 300 mm (12.0 in.) 3 200 mm (8.0 in.) 4 12.7 mm (0.5 in.) 5 300 mm (12.0 in.) Shipping the printer When shipping the printer, use the original packaging or call the place of purchase for a relocation kit.
User Manual
Page 108
... passwords and choosing specific menus to see tray settings, the level of toner in the toner cartridge, the percentage of life remaining in the photoconductor kit, and capacity measurements of certain printer parts. Each time a protected menu is possible to protect. To access the device status: 1 Type the printer IP address...
... passwords and choosing specific menus to see tray settings, the level of toner in the toner cartridge, the percentage of life remaining in the photoconductor kit, and capacity measurements of certain printer parts. Each time a protected menu is possible to protect. To access the device status: 1 Type the printer IP address...
User Manual
Page 117
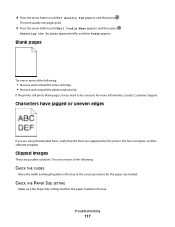
... Printer appears briefly, and then Ready appears. For more of the following : • Remove and reinstall the toner cartridge. • Remove and reinstall the photoconductor kit. Clipped images These are supported by the printer, the host computer, and the software program. Try one or more information, contact Customer Support. Troubleshooting 117...
... Printer appears briefly, and then Ready appears. For more of the following : • Remove and reinstall the toner cartridge. • Remove and reinstall the photoconductor kit. Clipped images These are supported by the printer, the host computer, and the software program. Try one or more information, contact Customer Support. Troubleshooting 117...

User Manual
Page 118
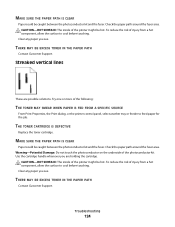
Try one or more of the following: THE PHOTOCONDUCTOR KIT IS DEFECTIVE Replace the photoconductor kit. Gray background • For Windows users: From Print Properties, select a different Toner Darkness setting before sending the job to print. • For Macintosh users: From ...
Try one or more of the following: THE PHOTOCONDUCTOR KIT IS DEFECTIVE Replace the photoconductor kit. Gray background • For Windows users: From Print Properties, select a different Toner Darkness setting before sending the job to print. • For Macintosh users: From ...
User Manual
Page 124
... EXCESS TONER IN THE PAPER PATH Contact Customer Support. CAUTION-HOT SURFACE: The inside of the printer might be caught between the photoconductor kit and the fuser. THE TONER CARTRIDGE IS DEFECTIVE Replace the toner cartridge. Clear any paper you see . MAKE SURE THE PAPER PATH... be hot. THERE MAY BE EXCESS TONER IN THE PAPER PATH Contact Customer Support. Troubleshooting 124 To reduce the risk of the photoconductor kit. Streaked vertical lines These are holding the cartridge. Clear any paper you see . Warning-Potential Damage: Do not touch the photoconductor on...
... EXCESS TONER IN THE PAPER PATH Contact Customer Support. CAUTION-HOT SURFACE: The inside of the printer might be caught between the photoconductor kit and the fuser. THE TONER CARTRIDGE IS DEFECTIVE Replace the toner cartridge. Clear any paper you see . MAKE SURE THE PAPER PATH... be hot. THERE MAY BE EXCESS TONER IN THE PAPER PATH Contact Customer Support. Troubleshooting 124 To reduce the risk of the photoconductor kit. Streaked vertical lines These are holding the cartridge. Clear any paper you see . Warning-Potential Damage: Do not touch the photoconductor on...
User Manual
Page 140
... 21 56 Standard parallel port disabled 93 56 Standard USB port disabled 93 58 Too many flash options installed 93 84 PC Kit life warning 94 84 Replace PC Kit 94 88.yy Cartridge is low 94 A AppleTalk menu 84 attaching cables 22 B Busy 89 buttons 14 C cables Ethernet 22 parallel 22...
... 21 56 Standard parallel port disabled 93 56 Standard USB port disabled 93 58 Too many flash options installed 93 84 PC Kit life warning 94 84 Replace PC Kit 94 88.yy Cartridge is low 94 A AppleTalk menu 84 attaching cables 22 B Busy 89 buttons 14 C cables Ethernet 22 parallel 22...

User Manual
Page 142
... support 42 supported by printer 42 where to load 42 Paper Weight menu 69 Parallel menu 86 parallel port 22 PCL Emul menu 79 photoconductor kit ordering 100 replacing 101 PostScript menu 79 Power Saver 90 adjusting 106 print job canceling from Macintosh 50 canceling from printer control panel 50 canceling... 93 56 Standard parallel port disabled 93 56 Standard USB port disabled 93 58 Too many flash options installed 93 84 PC Kit life warning 94 84 Replace PC Kit 94 88.yy Cartridge is low 94 Busy 89 Canceling 89 Close front door 89 Defragmenting Flash 89 DO NOT TOUCH Reading...
... support 42 supported by printer 42 where to load 42 Paper Weight menu 69 Parallel menu 86 parallel port 22 PCL Emul menu 79 photoconductor kit ordering 100 replacing 101 PostScript menu 79 Power Saver 90 adjusting 106 print job canceling from Macintosh 50 canceling from printer control panel 50 canceling... 93 56 Standard parallel port disabled 93 56 Standard USB port disabled 93 58 Too many flash options installed 93 84 PC Kit life warning 94 84 Replace PC Kit 94 88.yy Cartridge is low 94 Busy 89 Canceling 89 Close front door 89 Defragmenting Flash 89 DO NOT TOUCH Reading...
User Manual
Page 143
... 91 Q Quality menu 77 R Ready 91 recommended print side 40 recycled paper using 41 recycling Lexmark products 104 WEEE statement 132 Remove paper from standard output bin 91 replacing photoconductor kit 101 toner cartridge 100 reports viewing 107 Reports menu 71 S safeguarding menus 108 safety information 7 ...using 15 status of supplies, checking 98 storing paper 41 supplies 97 supplies conserving 98 status of 98 storing 97 supplies, ordering photoconductor kit 100 toner cartridges 99 supply notifications configuring 109 system board accessing 17 T TCP/IP menu 82 tips card stock 49 envelopes 47 ...
... 91 Q Quality menu 77 R Ready 91 recommended print side 40 recycled paper using 41 recycling Lexmark products 104 WEEE statement 132 Remove paper from standard output bin 91 replacing photoconductor kit 101 toner cartridge 100 reports viewing 107 Reports menu 71 S safeguarding menus 108 safety information 7 ...using 15 status of supplies, checking 98 storing paper 41 supplies 97 supplies conserving 98 status of 98 storing 97 supplies, ordering photoconductor kit 100 toner cartridges 99 supply notifications configuring 109 system board accessing 17 T TCP/IP menu 82 tips card stock 49 envelopes 47 ...

