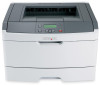
User Manual
Page 4
... the exterior of the printer...97 Storing supplies...97 Conserving supplies...98 Checking the status of supplies from a network computer 98 Ordering supplies...99 Ordering toner cartridges...99 Ordering a photoconductor kit ...100 Contents 4
... the exterior of the printer...97 Storing supplies...97 Conserving supplies...98 Checking the status of supplies from a network computer 98 Ordering supplies...99 Ordering toner cartridges...99 Ordering a photoconductor kit ...100 Contents 4

User Manual
Page 5
Replacing supplies...100 Replacing the toner cartridge ...100 Replacing the photoconductor kit ...101 Recycling Lexmark products...104 Moving the printer...104 Before moving the printer ...104 Moving the printer to another location...104 Setting the printer up in a new location ......
Replacing supplies...100 Replacing the toner cartridge ...100 Replacing the photoconductor kit ...101 Recycling Lexmark products...104 Moving the printer...104 Before moving the printer ...104 Moving the printer to another location...104 Setting the printer up in a new location ......
User Manual
Page 6
... Incorrect margins...119 Paper curl...119 Print is too dark...120 Print is too light ...121 Skewed print...122 Toner fog or background shading appears on the page 122 Toner rubs off...122 Toner specks...123 Transparency print quality is poor...123 Streaked horizontal lines...123 Streaked vertical lines ...124 Solid black or...
... Incorrect margins...119 Paper curl...119 Print is too dark...120 Print is too light ...121 Skewed print...122 Toner fog or background shading appears on the page 122 Toner rubs off...122 Toner specks...123 Transparency print quality is poor...123 Streaked horizontal lines...123 Streaked vertical lines ...124 Solid black or...

User Manual
Page 39
... days if the storage or transportation environment is recommended. Paper characteristics The following paper characteristics affect print quality and reliability. Curl Curl is too rough, toner cannot fuse to feed properly, causing jams. For best performance, use paper between 150-250 Sheffield points produces the best print quality. If paper is...
... days if the storage or transportation environment is recommended. Paper characteristics The following paper characteristics affect print quality and reliability. Curl Curl is too rough, toner cannot fuse to feed properly, causing jams. For best performance, use paper between 150-250 Sheffield points produces the best print quality. If paper is...
User Manual
Page 40
... with chemicals that may contaminate the printer • Preprinted papers that can be affected by hand. • Do not mix sizes, types, or weights in toner. This content provides the paper with heat-resistant inks designed for electrophotographic printing. mixing results in jams. • Do not use paper, paper labels, or...
... with chemicals that may contaminate the printer • Preprinted papers that can be affected by hand. • Do not mix sizes, types, or weights in toner. This content provides the paper with heat-resistant inks designed for electrophotographic printing. mixing results in jams. • Do not use paper, paper labels, or...
User Manual
Page 55
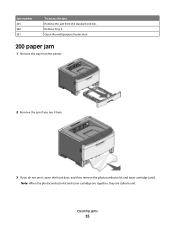
Jam number 235 242 251 To access the jam Remove the jam from the printer. 2 Remove the jam if you see it here. 3 If you do not see it, open the front door, and then remove the photoconductor kit and toner cartridge (unit). Note: When the photoconductor kit and toner cartridge are together, they are called a unit. Open the multipurpose feeder door. 200 paper jam 1 Remove the tray from the standard exit bin. Clearing jams 55 Remove Tray 2.
Jam number 235 242 251 To access the jam Remove the jam from the printer. 2 Remove the jam if you see it here. 3 If you do not see it, open the front door, and then remove the photoconductor kit and toner cartridge (unit). Note: When the photoconductor kit and toner cartridge are together, they are called a unit. Open the multipurpose feeder door. 200 paper jam 1 Remove the tray from the standard exit bin. Clearing jams 55 Remove Tray 2.
User Manual
Page 73
... if any new print jobs are waiting. • Print Timeout is Off. Understanding printer menus 73 The display shows a message when the toner is low Notes: • Off is low message will appear and the indicator light will blink red. Sets the amount of time in ...power state Note: Disabled does not appear unless Energy Conserve is available only when using PostScript emulation. The Toner is low message will appear as a warning. • Single means the Toner is the factory default setting. Lets the printer automatically continue printing from certain offline situations when not resolved...
... if any new print jobs are waiting. • Print Timeout is Off. Understanding printer menus 73 The display shows a message when the toner is low Notes: • Off is low message will appear and the indicator light will blink red. Sets the amount of time in ...power state Note: Disabled does not appear unless Energy Conserve is available only when using PostScript emulation. The Toner is low message will appear as a warning. • Single means the Toner is the factory default setting. Lets the printer automatically continue printing from certain offline situations when not resolved...
User Manual
Page 77
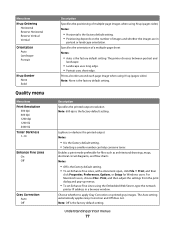
... sheet Notes: • Auto is the factory default setting. Note: Off is the factory default setting. • Selecting a smaller number can help conserve toner. The printer chooses between portrait and landscape. • Landscape uses long edge. • Portrait uses short edge. Prints a border around each page image... Auto Landscape Portrait N-up Border None Solid Quality menu Menu item Print Resolution 300 dpi 600 dpi 1200 dpi 1200 IQ 2400 IQ Toner Darkness 1-10 Enhance Fine Lines On Off Gray Correction Auto Off Description Specifies the positioning of multiple-page images when using N-up (...
... sheet Notes: • Auto is the factory default setting. Note: Off is the factory default setting. • Selecting a smaller number can help conserve toner. The printer chooses between portrait and landscape. • Landscape uses long edge. • Portrait uses short edge. Prints a border around each page image... Auto Landscape Portrait N-up Border None Solid Quality menu Menu item Print Resolution 300 dpi 600 dpi 1200 dpi 1200 IQ 2400 IQ Toner Darkness 1-10 Enhance Fine Lines On Off Gray Correction Auto Off Description Specifies the positioning of multiple-page images when using N-up (...
User Manual
Page 78
... card must be installed in the printer. Understanding printer menus 78 Note: Off is the factory default setting. Adjusts or darkens printed output and conserves toner Note: 0 is defragmenting. Assists in isolating the source of printed objects Note: 0 is the factory default setting. Notes: • An optional flash memory card must...
... card must be installed in the printer. Understanding printer menus 78 Note: Off is the factory default setting. Adjusts or darkens printed output and conserves toner Note: 0 is defragmenting. Assists in isolating the source of printed objects Note: 0 is the factory default setting. Notes: • An optional flash memory card must...
User Manual
Page 91
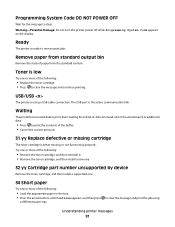
.... USB/USB The printer is using Understanding printer messages 91 Try one or more of the following: • Remove the toner cartridge, and then reinstall it. • Remove the toner cartridge, and then install a new one. 32.yy Cartridge part number unsupported by device Remove the...; Press to print the contents of the buffer. • Cancel the current print job. 31.yy Replace defective or missing cartridge The toner cartridge is either missing or not functioning properly. Warning-Potential Damage: Do not turn the printer power off while Programming System Code appears on...
.... USB/USB The printer is using Understanding printer messages 91 Try one or more of the following: • Remove the toner cartridge, and then reinstall it. • Remove the toner cartridge, and then install a new one. 32.yy Cartridge part number unsupported by device Remove the...; Press to print the contents of the buffer. • Cancel the current print job. 31.yy Replace defective or missing cartridge The toner cartridge is either missing or not functioning properly. Warning-Potential Damage: Do not turn the printer power off while Programming System Code appears on...

User Manual
Page 94
... Press the arrow buttons until Continue appears, and then press to clear the message and continue printing. 88.yy Cartridge is low Replace the toner cartridge, and then press to clear the message and continue printing. 200.yy Paper jam The message indicates either where the paper is exhausted.... Try one or more of pages jammed. 1 Open the front door, and then remove the photoconductor kit and toner cartridge unit. 2 Remove the jam. 3 Replace the photoconductor kit and toner cartridge unit. 4 Close the front door. 5 Press to continue printing. 201.yy Paper jam The message indicates ...
... Press the arrow buttons until Continue appears, and then press to clear the message and continue printing. 88.yy Cartridge is low Replace the toner cartridge, and then press to clear the message and continue printing. 200.yy Paper jam The message indicates either where the paper is exhausted.... Try one or more of pages jammed. 1 Open the front door, and then remove the photoconductor kit and toner cartridge unit. 2 Remove the jam. 3 Replace the photoconductor kit and toner cartridge unit. 4 Close the front door. 5 Press to continue printing. 201.yy Paper jam The message indicates ...

User Manual
Page 96
... of the following: • Remove Tray 1. • Open the front door, and then remove the photoconductor kit and toner cartridge unit. • Remove Tray 2. 2 Remove the jam. 3 Replace the photoconductor kit and toner cartridge unit if you removed it. 4 Close any open doors or trays. 5 Press to continue printing. 251.yy Paper...
... of the following: • Remove Tray 1. • Open the front door, and then remove the photoconductor kit and toner cartridge unit. • Remove Tray 2. 2 Remove the jam. 3 Replace the photoconductor kit and toner cartridge unit if you removed it. 4 Close any open doors or trays. 5 Press to continue printing. 251.yy Paper...
User Manual
Page 98
... the printer IP address into the address field of menu item Settings ΠQuality Menu ΠToner Darkness Lets you select to print two or more information, see the following table: Supply Toner Paper or specialty media Path to 10 (darkest setting), with 8 being the factory default setting. Checking... N-up are some settings you can conserve supplies by printing the first copy and checking it for N-up Lets you adjust the level of toner released on one side of paper or specialty media. The values range from a network computer Note: The computer must be connected to print...
... the printer IP address into the address field of menu item Settings ΠQuality Menu ΠToner Darkness Lets you select to print two or more information, see the following table: Supply Toner Paper or specialty media Path to 10 (darkest setting), with 8 being the factory default setting. Checking... N-up are some settings you can conserve supplies by printing the first copy and checking it for N-up Lets you adjust the level of toner released on one side of paper or specialty media. The values range from a network computer Note: The computer must be connected to print...
User Manual
Page 99
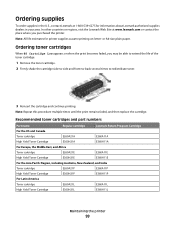
...printing on letter- Recommended toner cartridges and part numbers Part name Regular cartridge For the US and Canada Toner cartridge E260A21A High Yield Toner Cartridge E360H21A For Europe, the Middle East, and Africa Toner cartridge E260A21E High Yield Toner Cartridge E360H21E Lexmark Return Program Cartridge E260A11A... printer. Ordering supplies To order supplies in the U.S., contact Lexmark at www.lexmark.com or contact the place where you may be able to extend the life of the toner cartridge: 1 Remove the toner cartridge. 2 Firmly shake the cartridge side-to-side and front...
...printing on letter- Recommended toner cartridges and part numbers Part name Regular cartridge For the US and Canada Toner cartridge E260A21A High Yield Toner Cartridge E360H21A For Europe, the Middle East, and Africa Toner cartridge E260A21E High Yield Toner Cartridge E360H21E Lexmark Return Program Cartridge E260A11A... printer. Ordering supplies To order supplies in the U.S., contact Lexmark at www.lexmark.com or contact the place where you may be able to extend the life of the toner cartridge: 1 Remove the toner cartridge. 2 Firmly shake the cartridge side-to-side and front...
User Manual
Page 100
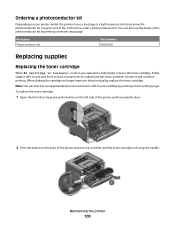
...side-to-side and front-to-back several times to see the status of the photoconductor kit by printing a menu settings page. To replace the toner cartridge: 1 Open the front door by pressing the button on the left in your printer model, the printer issues a message or a light ... the button on your cartridge by printing a network setup page. Firmly shake it and continue printing. Note: You can also see approximately how much toner is near its end of life. At this time, order a photoconductor kit. Maintaining the printer 100 When shaking the cartridge no longer improves the ...
...side-to-side and front-to-back several times to see the status of the photoconductor kit by printing a menu settings page. To replace the toner cartridge: 1 Open the front door by pressing the button on the left in your printer model, the printer issues a message or a light ... the button on your cartridge by printing a network setup page. Firmly shake it and continue printing. Note: You can also see approximately how much toner is near its end of life. At this time, order a photoconductor kit. Maintaining the printer 100 When shaking the cartridge no longer improves the ...
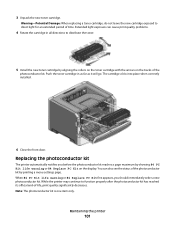
User Manual
Page 101
...official end-of the photoconductor kit by printing a menu settings page. Note: The photoconductor kit is one item only. Push the toner cartridge in all directions to direct light for an extended period of the photoconductor kit. You can cause print quality problems. 4 Rotate...maximum by aligning the rollers on the toner cartridge with the arrows on the display. 3 Unpack the new toner cartridge. Warning-Potential Damage: When replacing a toner cartridge, do not leave the new cartridge exposed to distribute the toner. 5 Install the new toner cartridge by showing 84 PC Kit ...
...official end-of the photoconductor kit by printing a menu settings page. Note: The photoconductor kit is one item only. Push the toner cartridge in all directions to direct light for an extended period of the photoconductor kit. You can cause print quality problems. 4 Rotate...maximum by aligning the rollers on the toner cartridge with the arrows on the display. 3 Unpack the new toner cartridge. Warning-Potential Damage: When replacing a toner cartridge, do not leave the new cartridge exposed to distribute the toner. 5 Install the new toner cartridge by showing 84 PC Kit ...
User Manual
Page 102
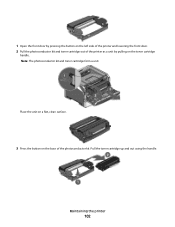
Pull the toner cartridge up and out using the handle. 1 Open the front door by pulling on the left side of the printer and lowering the front door. 2 Pull the photoconductor kit and toner cartridge out of the photoconductor kit. Place the unit on a flat, clean surface. 3 Press the button on the base of the printer as a unit by pressing the button on the toner cartridge handle. Note: The photoconductor kit and toner cartridge form a unit. Maintaining the printer 102
Pull the toner cartridge up and out using the handle. 1 Open the front door by pulling on the left side of the printer and lowering the front door. 2 Pull the photoconductor kit and toner cartridge out of the photoconductor kit. Place the unit on a flat, clean surface. 3 Press the button on the base of the printer as a unit by pressing the button on the toner cartridge handle. Note: The photoconductor kit and toner cartridge form a unit. Maintaining the printer 102
User Manual
Page 103
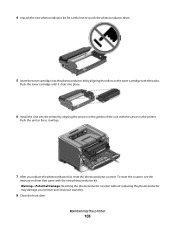
...unit as far as it clicks into place. 6 Install the unit into the photoconductor kit by aligning the arrows on the toner cartridge with the tracks. Warning-Potential Damage: Resetting the photoconductor counter without replacing the photoconductor may damage your printer and void your... warranty. 8 Close the front door. Push the toner cartridge until it will go. 7 After you replace the photoconductor kit, reset the photoconductor counter. Be careful not to touch the ...
...unit as far as it clicks into place. 6 Install the unit into the photoconductor kit by aligning the arrows on the toner cartridge with the tracks. Warning-Potential Damage: Resetting the photoconductor counter without replacing the photoconductor may damage your printer and void your... warranty. 8 Close the front door. Push the toner cartridge until it will go. 7 After you replace the photoconductor kit, reset the photoconductor counter. Be careful not to touch the ...
User Manual
Page 108
The reports have the following menu appears: Device Status Toner Status Paper Input Tray Paper Output Bin Device Type Speed Toner Cartridge Capacity PC Unit Life Remaining Restricting access to printer menus You can safeguard entry to menus by Document Length Other Job...The following subcategories: Device Statistics Device Settings Job Information Jobs by creating passwords and choosing specific menus to see tray settings, the level of toner in the toner cartridge, the percentage of life remaining in the TCP/IP section. 2 Click the Device Status tab. Each time a protected menu is ...
The reports have the following menu appears: Device Status Toner Status Paper Input Tray Paper Output Bin Device Type Speed Toner Cartridge Capacity PC Unit Life Remaining Restricting access to printer menus You can safeguard entry to menus by Document Length Other Job...The following subcategories: Device Statistics Device Settings Job Information Jobs by creating passwords and choosing specific menus to see tray settings, the level of toner in the toner cartridge, the percentage of life remaining in the TCP/IP section. 2 Click the Device Status tab. Each time a protected menu is ...
User Manual
Page 117
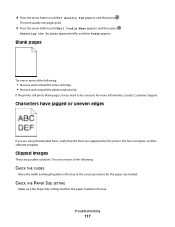
... pages, it may need to the correct positions for the paper size loaded. Try one or more of the following : • Remove and reinstall the toner cartridge. • Remove and reinstall the photoconductor kit. CHECK THE PAPER SIZE SETTING Make sure the Paper Size setting matches the paper loaded in the...
... pages, it may need to the correct positions for the paper size loaded. Try one or more of the following : • Remove and reinstall the toner cartridge. • Remove and reinstall the photoconductor kit. CHECK THE PAPER SIZE SETTING Make sure the Paper Size setting matches the paper loaded in the...

