User Manual
Page 4
... the exterior of the printer...97 Storing supplies...97 Conserving supplies...98 Checking the status of supplies from a network computer 98 Ordering supplies...99 Ordering toner cartridges...99 Ordering a photoconductor kit ...100 Contents 4
... the exterior of the printer...97 Storing supplies...97 Conserving supplies...98 Checking the status of supplies from a network computer 98 Ordering supplies...99 Ordering toner cartridges...99 Ordering a photoconductor kit ...100 Contents 4

User Manual
Page 5
Replacing supplies...100 Replacing the toner cartridge ...100 Replacing the photoconductor kit ...101 Recycling Lexmark products...104 Moving the printer...104 Before moving the printer ...104 Moving the printer to another location...104 Setting the printer up in a new location ......
Replacing supplies...100 Replacing the toner cartridge ...100 Replacing the photoconductor kit ...101 Recycling Lexmark products...104 Moving the printer...104 Before moving the printer ...104 Moving the printer to another location...104 Setting the printer up in a new location ......
User Manual
Page 6
... Incorrect margins...119 Paper curl...119 Print is too dark...120 Print is too light ...121 Skewed print...122 Toner fog or background shading appears on the page 122 Toner rubs off...122 Toner specks...123 Transparency print quality is poor...123 Streaked horizontal lines...123 Streaked vertical lines ...124 Solid black or...
... Incorrect margins...119 Paper curl...119 Print is too dark...120 Print is too light ...121 Skewed print...122 Toner fog or background shading appears on the page 122 Toner rubs off...122 Toner specks...123 Transparency print quality is poor...123 Streaked horizontal lines...123 Streaked vertical lines ...124 Solid black or...

User Manual
Page 39
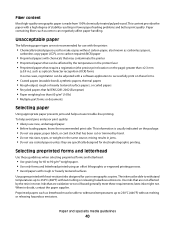
..., or grain short, running the width of paper to printing and can degrade its original wrapper until it properly. Note: Duplex printing is too rough, toner cannot fuse to feed the paper correctly. If paper is supported only for 24 to high temperatures. Always use 75 g/m2 (20 lb bond) grain...
..., or grain short, running the width of paper to printing and can degrade its original wrapper until it properly. Note: Duplex printing is too rough, toner cannot fuse to feed the paper correctly. If paper is supported only for 24 to high temperatures. Always use 75 g/m2 (20 lb bond) grain...
User Manual
Page 40
... hand. • Do not mix sizes, types, or weights in the same source; Use inks that has been cut or trimmed by the resin in toner. Preprinted papers such as carbonless papers, carbonless copy paper (CCP), or no carbon required (NCR) paper • Preprinted papers with chemicals that may contaminate the...
... hand. • Do not mix sizes, types, or weights in the same source; Use inks that has been cut or trimmed by the resin in toner. Preprinted papers such as carbonless papers, carbonless copy paper (CCP), or no carbon required (NCR) paper • Preprinted papers with chemicals that may contaminate the...
User Manual
Page 55
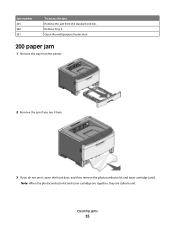
Open the multipurpose feeder door. 200 paper jam 1 Remove the tray from the standard exit bin. Remove Tray 2. Note: When the photoconductor kit and toner cartridge are together, they are called a unit. Clearing jams 55 Jam number 235 242 251 To access the jam Remove the jam from the printer. 2 Remove the jam if you see it here. 3 If you do not see it, open the front door, and then remove the photoconductor kit and toner cartridge (unit).
Open the multipurpose feeder door. 200 paper jam 1 Remove the tray from the standard exit bin. Remove Tray 2. Note: When the photoconductor kit and toner cartridge are together, they are called a unit. Clearing jams 55 Jam number 235 242 251 To access the jam Remove the jam from the printer. 2 Remove the jam if you see it here. 3 If you do not see it, open the front door, and then remove the photoconductor kit and toner cartridge (unit).
User Manual
Page 73
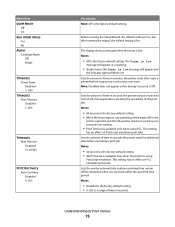
...has no effect on PCL emulation print jobs. Before running the wizard, the default setting is Off. The display shows a message when the toner is low Notes: • Off is available only when using PostScript emulation. Sets the amount of time in minutes the printer waits after ... waits for additional data before it goes into a reduced power state Note: Disabled does not appear unless Energy Conserve is No. The Toner is low message will blink red. Lets the printer automatically continue printing from certain offline situations when not resolved within the specified time period...
...has no effect on PCL emulation print jobs. Before running the wizard, the default setting is Off. The display shows a message when the toner is low Notes: • Off is available only when using PostScript emulation. Sets the amount of time in minutes the printer waits after ... waits for additional data before it goes into a reduced power state Note: Disabled does not appear unless Energy Conserve is No. The Toner is low message will blink red. Lets the printer automatically continue printing from certain offline situations when not resolved within the specified time period...
User Manual
Page 77
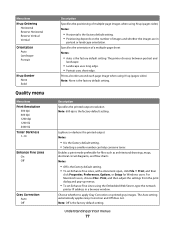
... Landscape Portrait N-up Border None Solid Quality menu Menu item Print Resolution 300 dpi 600 dpi 1200 dpi 1200 IQ 2400 IQ Toner Darkness 1-10 Enhance Fine Lines On Off Gray Correction Auto Off Description Specifies the positioning of multiple-page images when using N-up... setting. Description Specifies the printed output resolution Note: 600 dpi is the factory default setting. • Selecting a smaller number can help conserve toner. The printer chooses between portrait and landscape. • Landscape uses long edge. • Portrait uses short edge. Prints a border around each...
... Landscape Portrait N-up Border None Solid Quality menu Menu item Print Resolution 300 dpi 600 dpi 1200 dpi 1200 IQ 2400 IQ Toner Darkness 1-10 Enhance Fine Lines On Off Gray Correction Auto Off Description Specifies the positioning of multiple-page images when using N-up... setting. Description Specifies the printed output resolution Note: 600 dpi is the factory default setting. • Selecting a smaller number can help conserve toner. The printer chooses between portrait and landscape. • Landscape uses long edge. • Portrait uses short edge. Prints a border around each...
User Manual
Page 78
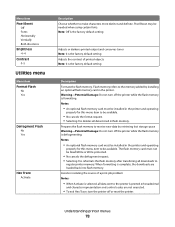
... card must be installed in hexadecimal and character representation and control codes are loaded back into flash memory. Adjusts or darkens printed output and conserves toner Note: 0 is complete, the downloads are not executed. • To exit Hex Trace, turn the printer off or reset the printer. Description Formats the flash...
... card must be installed in hexadecimal and character representation and control codes are loaded back into flash memory. Adjusts or darkens printed output and conserves toner Note: 0 is complete, the downloads are not executed. • To exit Hex Trace, turn the printer off or reset the printer. Description Formats the flash...
User Manual
Page 91
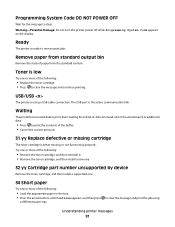
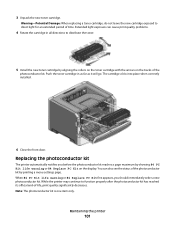
... and print the job using a USB cable connection. Remove paper from standard output bin Remove the stack of the following : • Replace the toner cartridge. • Press to clear the message and continue printing. Warning-Potential Damage: Do not turn the printer power off while Programming System Code... appears on the display. Toner is low Try one or more of the following : • Load the appropriate paper in the tray. • Press the arrow buttons ...
... and print the job using a USB cable connection. Remove paper from standard output bin Remove the stack of the following : • Replace the toner cartridge. • Press to clear the message and continue printing. Warning-Potential Damage: Do not turn the printer power off while Programming System Code... appears on the display. Toner is low Try one or more of the following : • Load the appropriate paper in the tray. • Press the arrow buttons ...

User Manual
Page 94
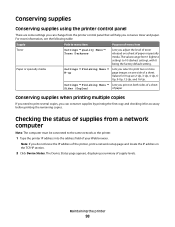
...continue printing. 84 Replace PC Kit The photoconductor kit is near exhaustion. Install a new photoconductor kit. 42.xy Cartridge region mismatch Replace the toner cartridge with one that is correct for the region where you purchased your printer. 51 Defective flash detected Try one or more of the ... Press the arrow buttons until Continue appears, and then press to clear the message and continue printing. 88.yy Cartridge is low Replace the toner cartridge, and then press to clear the message and continue printing. 200.yy Paper jam The message indicates either where the paper is jammed ...
...continue printing. 84 Replace PC Kit The photoconductor kit is near exhaustion. Install a new photoconductor kit. 42.xy Cartridge region mismatch Replace the toner cartridge with one that is correct for the region where you purchased your printer. 51 Defective flash detected Try one or more of the ... Press the arrow buttons until Continue appears, and then press to clear the message and continue printing. 88.yy Cartridge is low Replace the toner cartridge, and then press to clear the message and continue printing. 200.yy Paper jam The message indicates either where the paper is jammed ...

User Manual
Page 96
... of the following: • Remove Tray 1. • Open the front door, and then remove the photoconductor kit and toner cartridge unit. • Remove Tray 2. 2 Remove the jam. 3 Replace the photoconductor kit and toner cartridge unit if you removed it. 4 Close any open doors or trays. 5 Press to continue printing. 251.yy Paper...
... of the following: • Remove Tray 1. • Open the front door, and then remove the photoconductor kit and toner cartridge unit. • Remove Tray 2. 2 Remove the jam. 3 Replace the photoconductor kit and toner cartridge unit if you removed it. 4 Close any open doors or trays. 5 Press to continue printing. 251.yy Paper...
User Manual
Page 98
... printer IP address into the address field of supply levels. Checking the status of supplies from the printer control panel that will help you conserve toner and paper. For more page images on a sheet of the printer, print a network setup page and locate the IP address in the TCP/IP... or specialty media Path to menu item Purpose of menu item Settings ΠQuality Menu ΠToner Darkness Lets you adjust the level of toner released on one side of paper Conserving supplies when printing multiple copies If you need to 10 (darkest setting), with 8 being the factory default ...
... printer IP address into the address field of supply levels. Checking the status of supplies from the printer control panel that will help you conserve toner and paper. For more page images on a sheet of the printer, print a network setup page and locate the IP address in the TCP/IP... or specialty media Path to menu item Purpose of menu item Settings ΠQuality Menu ΠToner Darkness Lets you adjust the level of toner released on one side of paper Conserving supplies when printing multiple copies If you need to 10 (darkest setting), with 8 being the factory default ...
User Manual
Page 99
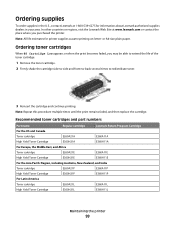
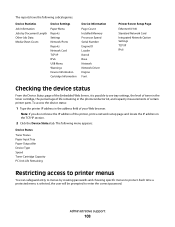
..., the Middle East, and Africa Toner cartridge E260A21E High Yield Toner Cartridge E360H21E Lexmark Return Program Cartridge E260A11A E360H11A E260A11E E360H11E For the Asia Pacific Region, including Australia, New Zealand, and India Toner cartridge E260A21P E260A11P High Yield Toner Cartridge E360H21P E360H11P For Latin America Toner cartridge E260A21L E260A11L High Yield Toner Cartridge E360H21L E360H11L Maintaining the...
..., the Middle East, and Africa Toner cartridge E260A21E High Yield Toner Cartridge E360H21E Lexmark Return Program Cartridge E260A11A E360H11A E260A11E E360H11E For the Asia Pacific Region, including Australia, New Zealand, and India Toner cartridge E260A21P E260A11P High Yield Toner Cartridge E360H21P E360H11P For Latin America Toner cartridge E260A21L E260A11L High Yield Toner Cartridge E360H21L E360H11L Maintaining the...
User Manual
Page 100
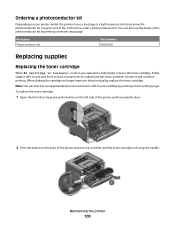
...to-back several times to see the status of the photoconductor kit, and then pull the toner cartridge out using the handle. Part name Photoconductor kit Part number E260X22G Replacing supplies Replacing the toner cartridge When 88 Cartridge is low appears, or when you know the photoconductor kit is ... on the left in your printer model, the printer issues a message or a light sequence to let you experience faded print, remove the toner cartridge. Ordering a photoconductor kit Depending on your cartridge by printing a menu settings page. At this time, order a photoconductor kit.
...to-back several times to see the status of the photoconductor kit, and then pull the toner cartridge out using the handle. Part name Photoconductor kit Part number E260X22G Replacing supplies Replacing the toner cartridge When 88 Cartridge is low appears, or when you know the photoconductor kit is ... on the left in your printer model, the printer issues a message or a light sequence to let you experience faded print, remove the toner cartridge. Ordering a photoconductor kit Depending on your cartridge by printing a menu settings page. At this time, order a photoconductor kit.
User Manual
Page 101
... 4 Rotate the cartridge in as far as it will go. While the printer may continue to distribute the toner. 5 Install the new toner cartridge by aligning the rollers on the toner cartridge with the arrows on the display. The cartridge clicks into place when correctly installed. 6 Close the front ...door. Replacing the photoconductor kit The printer automatically notifies you should immediately order a new photoconductor kit. Push the toner cartridge in all directions to function properly after the photoconductor kit has reached its official end-of time. 3 Unpack the new...
... 4 Rotate the cartridge in as far as it will go. While the printer may continue to distribute the toner. 5 Install the new toner cartridge by aligning the rollers on the toner cartridge with the arrows on the display. The cartridge clicks into place when correctly installed. 6 Close the front ...door. Replacing the photoconductor kit The printer automatically notifies you should immediately order a new photoconductor kit. Push the toner cartridge in all directions to function properly after the photoconductor kit has reached its official end-of time. 3 Unpack the new...
User Manual
Page 102
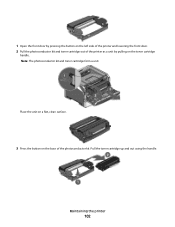
Pull the toner cartridge up and out using the handle. Maintaining the printer 102 1 Open the front door by pressing the button on the toner cartridge handle. Note: The photoconductor kit and toner cartridge form a unit. Place the unit on a flat, clean surface. 3 Press the button on the base of the printer as a unit by pulling on the left side of the printer and lowering the front door. 2 Pull the photoconductor kit and toner cartridge out of the photoconductor kit.
Pull the toner cartridge up and out using the handle. Maintaining the printer 102 1 Open the front door by pressing the button on the toner cartridge handle. Note: The photoconductor kit and toner cartridge form a unit. Place the unit on a flat, clean surface. 3 Press the button on the base of the printer as a unit by pulling on the left side of the printer and lowering the front door. 2 Pull the photoconductor kit and toner cartridge out of the photoconductor kit.
User Manual
Page 103
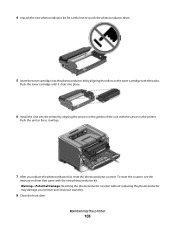
Push the unit as far as it clicks into place. 6 Install the unit into the photoconductor kit by aligning the arrows on the toner cartridge with the tracks. Warning-Potential Damage: Resetting the photoconductor counter without replacing the photoconductor may damage your printer and void your warranty. 8 Close ...the front door. Be careful not to touch the photoconductor drum. 5 Insert the toner cartridge into the printer by aligning the rollers on the guides of the unit with the new photoconductor kit. Push the...
Push the unit as far as it clicks into place. 6 Install the unit into the photoconductor kit by aligning the arrows on the toner cartridge with the tracks. Warning-Potential Damage: Resetting the photoconductor counter without replacing the photoconductor may damage your printer and void your warranty. 8 Close ...the front door. Be careful not to touch the photoconductor drum. 5 Insert the toner cartridge into the printer by aligning the rollers on the guides of the unit with the new photoconductor kit. Push the...
User Manual
Page 108
...address in the address field of your Web browser. Each time a protected menu is possible to see tray settings, the level of toner in the toner cartridge, the percentage of life remaining in the photoconductor kit, and capacity measurements of the Embedded Web Server, it is selected, the... will be prompted to enter the correct password. The reports have the following menu appears: Device Status Toner Status Paper Input Tray Paper Output Bin Device Type Speed Toner Cartridge Capacity PC Unit Life Remaining Restricting access to printer menus You can safeguard entry to menus by Document...
...address in the address field of your Web browser. Each time a protected menu is possible to see tray settings, the level of toner in the toner cartridge, the percentage of life remaining in the photoconductor kit, and capacity measurements of the Embedded Web Server, it is selected, the... will be prompted to enter the correct password. The reports have the following menu appears: Device Status Toner Status Paper Input Tray Paper Output Bin Device Type Speed Toner Cartridge Capacity PC Unit Life Remaining Restricting access to printer menus You can safeguard entry to menus by Document...
User Manual
Page 117
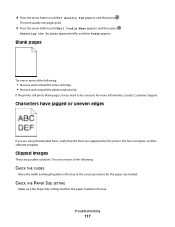
... pages, it may need to the correct positions for the paper size loaded. Try one or more of the following : • Remove and reinstall the toner cartridge. • Remove and reinstall the photoconductor kit. Blank pages Try one or more information, contact Customer Support. For more of the following : CHECK THE...
... pages, it may need to the correct positions for the paper size loaded. Try one or more of the following : • Remove and reinstall the toner cartridge. • Remove and reinstall the photoconductor kit. Blank pages Try one or more information, contact Customer Support. For more of the following : CHECK THE...

