User Manual
Page 4
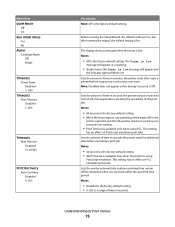
Understanding printer menus 64 Menus list...64 Paper menu...65 Default Source menu...65 Size/Type menu...65 Configure MP menu...67 Paper Texture menu ...68 Paper ... menu ...85 Parallel menu...86 Understanding printer messages 89 List of status and error messages...89 Maintaining the printer 97 Cleaning the exterior of the printer...97 Storing supplies...97 Conserving supplies...98 Checking the status of supplies from a network computer 98 Ordering supplies...99 Ordering toner cartridges...99 Ordering a photoconductor kit ...100 Contents...
Understanding printer menus 64 Menus list...64 Paper menu...65 Default Source menu...65 Size/Type menu...65 Configure MP menu...67 Paper Texture menu ...68 Paper ... menu ...85 Parallel menu...86 Understanding printer messages 89 List of status and error messages...89 Maintaining the printer 97 Cleaning the exterior of the printer...97 Storing supplies...97 Conserving supplies...98 Checking the status of supplies from a network computer 98 Ordering supplies...99 Ordering toner cartridges...99 Ordering a photoconductor kit ...100 Contents...

User Manual
Page 5
Replacing supplies...100 Replacing the toner cartridge ...100 Replacing the photoconductor kit ...101 Recycling Lexmark products...104 Moving the printer...104 Before moving the printer ...104 Moving the printer to another location...104 Setting the printer up in a new location ...105 Shipping the printer ...105 Administrative support 106 Finding advanced networking and administrator information 106 Adjusting Power Saver...
Replacing supplies...100 Replacing the toner cartridge ...100 Replacing the photoconductor kit ...101 Recycling Lexmark products...104 Moving the printer...104 Before moving the printer ...104 Moving the printer to another location...104 Setting the printer up in a new location ...105 Shipping the printer ...105 Administrative support 106 Finding advanced networking and administrator information 106 Adjusting Power Saver...
User Manual
Page 48
... g/m2 (28 lb bond) weight for use labels with the manufacturer or vendor to the sheet edge. Adhesive material contaminates the printer and could void the printer and cartridge warranties. • Do not use before buying large quantities. Have any way - Check with exposed adhesive. • Do not... stuck together or damaged in .) of the edge of the label, of the perforations, or between die-cuts of the adhesive at www.lexmark.com/publications. The labels can be printed at a higher fusing temperature up to 25 psi (172 kPa) pressure without sealing, wrinkling, curling...
... g/m2 (28 lb bond) weight for use labels with the manufacturer or vendor to the sheet edge. Adhesive material contaminates the printer and could void the printer and cartridge warranties. • Do not use before buying large quantities. Have any way - Check with exposed adhesive. • Do not... stuck together or damaged in .) of the edge of the label, of the perforations, or between die-cuts of the adhesive at www.lexmark.com/publications. The labels can be printed at a higher fusing temperature up to 25 psi (172 kPa) pressure without sealing, wrinkling, curling...
User Manual
Page 55
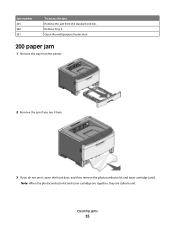
Clearing jams 55 Note: When the photoconductor kit and toner cartridge are together, they are called a unit. Open the multipurpose feeder door. 200 paper jam 1 Remove the tray from the standard exit bin. Jam number 235 242 251 To access the jam Remove the jam from the printer. 2 Remove the jam if you see it here. 3 If you do not see it, open the front door, and then remove the photoconductor kit and toner cartridge (unit). Remove Tray 2.
Clearing jams 55 Note: When the photoconductor kit and toner cartridge are together, they are called a unit. Open the multipurpose feeder door. 200 paper jam 1 Remove the tray from the standard exit bin. Jam number 235 242 251 To access the jam Remove the jam from the printer. 2 Remove the jam if you see it here. 3 If you do not see it, open the front door, and then remove the photoconductor kit and toner cartridge (unit). Remove Tray 2.
User Manual
Page 73
...page still in seconds the printer waits for additional data before it goes into a reduced power state Note: Disabled does not appear unless Energy Conserve is the factory default setting. Menu item Quiet Mode Off On Run Initial Setup Yes No Alarm Cartridge Alarm Off Single Timeouts Power... Saver Disabled 1-240 Timeouts Print Timeout Disabled 1-255 Timeouts Wait Timeout Disabled 15-65535 Print Recovery Auto Continue Disabled 5-255 Description Note: Off is Off. Sets the amount of time in minutes the printer waits after running the...
...page still in seconds the printer waits for additional data before it goes into a reduced power state Note: Disabled does not appear unless Energy Conserve is the factory default setting. Menu item Quiet Mode Off On Run Initial Setup Yes No Alarm Cartridge Alarm Off Single Timeouts Power... Saver Disabled 1-240 Timeouts Print Timeout Disabled 1-255 Timeouts Wait Timeout Disabled 15-65535 Print Recovery Auto Continue Disabled 5-255 Description Note: Off is Off. Sets the amount of time in minutes the printer waits after running the...
User Manual
Page 91
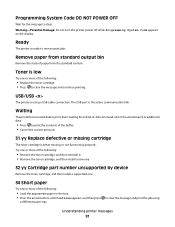
..., or additional data. • Press to print the contents of the following : • Replace the toner cartridge. • Press to receive print jobs. Waiting The printer has received data to print, but is waiting for the message to clear the message and print the job using...the buffer. • Cancel the current print job. 31.yy Replace defective or missing cartridge The toner cartridge is using Understanding printer messages 91 Warning-Potential Damage: Do not turn the printer power off while Programming System Code appears on the display. Remove paper from the standard...
..., or additional data. • Press to print the contents of the following : • Replace the toner cartridge. • Press to receive print jobs. Waiting The printer has received data to print, but is waiting for the message to clear the message and print the job using...the buffer. • Cancel the current print job. 31.yy Replace defective or missing cartridge The toner cartridge is using Understanding printer messages 91 Warning-Potential Damage: Do not turn the printer power off while Programming System Code appears on the display. Remove paper from the standard...

User Manual
Page 94
... following : • Remove Tray 1. • Open the front door, and then remove the photoconductor kit and toner cartridge unit. 2 Remove the jam. 3 Replace the photoconductor kit and toner cartridge unit if you purchased your printer. 51 Defective flash detected Try one or more of pages jammed. 1 Open the front door, and then remove...
... following : • Remove Tray 1. • Open the front door, and then remove the photoconductor kit and toner cartridge unit. 2 Remove the jam. 3 Replace the photoconductor kit and toner cartridge unit if you purchased your printer. 51 Defective flash detected Try one or more of pages jammed. 1 Open the front door, and then remove...

User Manual
Page 96
...the number of pages jammed. 1 Remove the jam from the standard exit bin. 2 Check the paper size to ensure that it is supported by the printer. 3 Press to continue printing. 24x.yy Paper jam The message indicates either where the paper is jammed or the number of pages jammed. 1 To ...and toner cartridge unit if you removed it. 4 Close any open doors or trays. 5 Press to continue printing. 251.yy Paper jam The message indicates either where the paper is jammed or the number of pages jammed. 1 Remove the jam from the multipurpose feeder. 2 Press to continue printing. Understanding printer messages ...
...the number of pages jammed. 1 Remove the jam from the standard exit bin. 2 Check the paper size to ensure that it is supported by the printer. 3 Press to continue printing. 24x.yy Paper jam The message indicates either where the paper is jammed or the number of pages jammed. 1 To ...and toner cartridge unit if you removed it. 4 Close any open doors or trays. 5 Press to continue printing. 251.yy Paper jam The message indicates either where the paper is jammed or the number of pages jammed. 1 Remove the jam from the multipurpose feeder. 2 Press to continue printing. Understanding printer messages ...
User Manual
Page 99
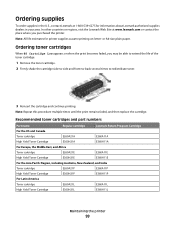
... Toner cartridge E260A21E High Yield Toner Cartridge E360H21E Lexmark Return Program Cartridge E260A11A E360H11A E260A11E E360H11E For the Asia Pacific Region, including Australia, New Zealand, and India Toner cartridge E260A21P E260A11P High Yield Toner Cartridge E360H21P E360H11P For Latin America Toner cartridge E260A21L E260A11L High Yield Toner Cartridge E360H21L E360H11L Maintaining the printer 99 Ordering toner cartridges When 88 Cartridge Low...
... Toner cartridge E260A21E High Yield Toner Cartridge E360H21E Lexmark Return Program Cartridge E260A11A E360H11A E260A11E E360H11E For the Asia Pacific Region, including Australia, New Zealand, and India Toner cartridge E260A21P E260A11P High Yield Toner Cartridge E360H21P E360H11P For Latin America Toner cartridge E260A21L E260A11L High Yield Toner Cartridge E360H21L E360H11L Maintaining the printer 99 Ordering toner cartridges When 88 Cartridge Low...
User Manual
Page 100
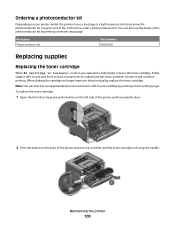
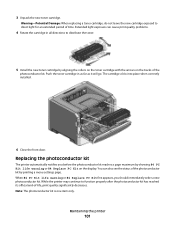
... then reinsert it side-to-side and front-to-back several times to let you experience faded print, remove the toner cartridge. Maintaining the printer 100 You can check to see the status of the photoconductor kit by printing a menu settings page. Part name Photoconductor kit... Part number E260X22G Replacing supplies Replacing the toner cartridge When 88 Cartridge is low appears, or when you know the photoconductor kit is left side of the printer and lowering the door. 2 Press the button on your cartridge by printing a network setup page. Note: You can...
... then reinsert it side-to-side and front-to-back several times to let you experience faded print, remove the toner cartridge. Maintaining the printer 100 You can check to see the status of the photoconductor kit by printing a menu settings page. Part name Photoconductor kit... Part number E260X22G Replacing supplies Replacing the toner cartridge When 88 Cartridge is low appears, or when you know the photoconductor kit is left side of the printer and lowering the door. 2 Press the button on your cartridge by printing a network setup page. Note: You can...
User Manual
Page 101
...first appears, you before the photoconductor kit reaches a page maximum by aligning the rollers on the toner cartridge with the arrows on the display. While the printer may continue to direct light for an extended period of -life, print quality significantly decreases. 3 ...Unpack the new toner cartridge. Extended light exposure can also see the status of the photoconductor kit. Replacing the photoconductor kit The printer automatically notifies you should immediately order a new photoconductor kit. You can cause print...
...first appears, you before the photoconductor kit reaches a page maximum by aligning the rollers on the toner cartridge with the arrows on the display. While the printer may continue to direct light for an extended period of -life, print quality significantly decreases. 3 ...Unpack the new toner cartridge. Extended light exposure can also see the status of the photoconductor kit. Replacing the photoconductor kit The printer automatically notifies you should immediately order a new photoconductor kit. You can cause print...
User Manual
Page 102
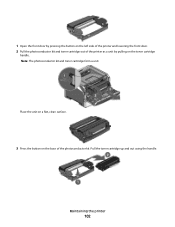
Place the unit on a flat, clean surface. 3 Press the button on the toner cartridge handle. 1 Open the front door by pressing the button on the left side of the printer and lowering the front door. 2 Pull the photoconductor kit and toner cartridge out of the printer as a unit by pulling on the base of the photoconductor kit. Pull the toner cartridge up and out using the handle. Maintaining the printer 102 Note: The photoconductor kit and toner cartridge form a unit.
Place the unit on a flat, clean surface. 3 Press the button on the toner cartridge handle. 1 Open the front door by pressing the button on the left side of the printer and lowering the front door. 2 Pull the photoconductor kit and toner cartridge out of the printer as a unit by pulling on the base of the photoconductor kit. Pull the toner cartridge up and out using the handle. Maintaining the printer 102 Note: The photoconductor kit and toner cartridge form a unit.
User Manual
Page 103
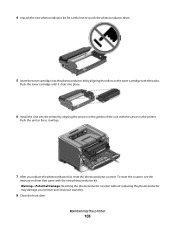
... Be careful not to touch the photoconductor drum. 5 Insert the toner cartridge into the printer by aligning the rollers on the guides of the unit with the tracks. Push the toner cartridge until it will go. 7 After you replace the photoconductor kit, reset the photoconductor ...counter. Warning-Potential Damage: Resetting the photoconductor counter without replacing the photoconductor may damage your printer and void your warranty. 8 Close the front...
... Be careful not to touch the photoconductor drum. 5 Insert the toner cartridge into the printer by aligning the rollers on the guides of the unit with the tracks. Push the toner cartridge until it will go. 7 After you replace the photoconductor kit, reset the photoconductor ...counter. Warning-Potential Damage: Resetting the photoconductor counter without replacing the photoconductor may damage your printer and void your warranty. 8 Close the front...
User Manual
Page 108
...following menu appears: Device Status Toner Status Paper Input Tray Paper Output Bin Device Type Speed Toner Cartridge Capacity PC Unit Life Remaining Restricting access to printer menus You can safeguard entry to menus by Document Length Other Job Data Media Sheet Count Paper Menu... Network Card TCP/IP IPv6 USB Menu Warnings Device Information Cartridge Information Device Information Page Count Installed Memory Processor Speed Serial Number Engine ID Loader Kernel Base Network Network Driver Engine Font Printer Server Setup Page Ethernet10/100 Standard Network Card Integrated Network ...
...following menu appears: Device Status Toner Status Paper Input Tray Paper Output Bin Device Type Speed Toner Cartridge Capacity PC Unit Life Remaining Restricting access to printer menus You can safeguard entry to menus by Document Length Other Job Data Media Sheet Count Paper Menu... Network Card TCP/IP IPv6 USB Menu Warnings Device Information Cartridge Information Device Information Page Count Installed Memory Processor Speed Serial Number Engine ID Loader Kernel Base Network Network Driver Engine Font Printer Server Setup Page Ethernet10/100 Standard Network Card Integrated Network ...
User Manual
Page 117
Resetting the Printer appears briefly, and then Ready appears. Try one or more of the following : • Remove and reinstall the toner cartridge. • Remove and reinstall the photoconductor kit. For more of the following : CHECK THE GUIDES Move the width and length guides in the tray. 4 Press... appears, and then press . The print quality test pages print. 5 Press the arrow buttons until Prt Quality Pgs appears, and then press . If the printer still prints blank pages, it may need to the correct positions for the paper size loaded. Clipped images These are supported by the...
Resetting the Printer appears briefly, and then Ready appears. Try one or more of the following : • Remove and reinstall the toner cartridge. • Remove and reinstall the photoconductor kit. For more of the following : CHECK THE GUIDES Move the width and length guides in the tray. 4 Press... appears, and then press . The print quality test pages print. 5 Press the arrow buttons until Prt Quality Pgs appears, and then press . If the printer still prints blank pages, it may need to the correct positions for the paper size loaded. Clipped images These are supported by the...
User Manual
Page 120
...For Macintosh users: From the Print dialog, make sure the Paper Type setting matches the paper loaded in the tray. • From the printer control panel Paper menu, make sure the Paper Type setting matches the paper loaded in its original wrapper until you use it. Print is... 2 Locate the drop-down box under the Orientation pictures, and then click the down button. 3 Click Printer Features. 4 Change the settings for Toner Darkness, Brightness, and Contrast. • From the printer control panel Quality menu, change these settings. THE PAPER HAS ABSORBED MOISTURE DUE TO HIGH HUMIDITY • ...
...For Macintosh users: From the Print dialog, make sure the Paper Type setting matches the paper loaded in the tray. • From the printer control panel Paper menu, make sure the Paper Type setting matches the paper loaded in its original wrapper until you use it. Print is... 2 Locate the drop-down box under the Orientation pictures, and then click the down button. 3 Click Printer Features. 4 Change the settings for Toner Darkness, Brightness, and Contrast. • From the printer control panel Quality menu, change these settings. THE PAPER HAS ABSORBED MOISTURE DUE TO HIGH HUMIDITY • ...
User Manual
Page 121
...For Macintosh users: From the Print dialog, make sure the Paper Type setting matches the paper loaded in the tray. • From the printer control panel Paper menu, make sure the Paper Type setting matches the paper loaded in its original wrapper until you use it. THE TONER... IS LOW When 88 Cartridge low appears, order a new toner cartridge. THE TONER CARTRIDGE MAY BE DEFECTIVE Replace the toner cartridge. Troubleshooting 121 THE PAPER HAS ABSORBED MOISTURE DUE TO HIGH HUMIDITY • Load paper from a ...
...For Macintosh users: From the Print dialog, make sure the Paper Type setting matches the paper loaded in the tray. • From the printer control panel Paper menu, make sure the Paper Type setting matches the paper loaded in its original wrapper until you use it. THE TONER... IS LOW When 88 Cartridge low appears, order a new toner cartridge. THE TONER CARTRIDGE MAY BE DEFECTIVE Replace the toner cartridge. Troubleshooting 121 THE PAPER HAS ABSORBED MOISTURE DUE TO HIGH HUMIDITY • Load paper from a ...
User Manual
Page 122
... the tray to the correct positions for the paper size loaded. Try one or more of the following : THE TONER CARTRIDGE MAY BE DEFECTIVE Replace the toner cartridge. Toner fog or background shading appears on the page These are using paper that meets the printer specifications. Toner rubs off These are possible solutions.
... the tray to the correct positions for the paper size loaded. Try one or more of the following : THE TONER CARTRIDGE MAY BE DEFECTIVE Replace the toner cartridge. Toner fog or background shading appears on the page These are using paper that meets the printer specifications. Toner rubs off These are possible solutions.
User Manual
Page 123
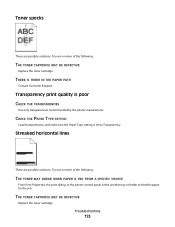
...one or more of the following : THE TONER CARTRIDGE MAY BE DEFECTIVE Replace the toner cartridge. Transparency print quality is set to feed the paper for the job. THE TONER CARTRIDGE MAY BE DEFECTIVE Replace the toner cartridge. Streaked horizontal lines These are possible solutions. ...THERE IS TONER IN THE PAPER PATH Contact Customer Support. CHECK THE PAPER TYPE SETTING Load transparencies, and make sure the Paper Type setting is poor CHECK THE TRANSPARENCIES Use only transparencies recommended by the printer...
...one or more of the following : THE TONER CARTRIDGE MAY BE DEFECTIVE Replace the toner cartridge. Transparency print quality is set to feed the paper for the job. THE TONER CARTRIDGE MAY BE DEFECTIVE Replace the toner cartridge. Streaked horizontal lines These are possible solutions. ...THERE IS TONER IN THE PAPER PATH Contact Customer Support. CHECK THE PAPER TYPE SETTING Load transparencies, and make sure the Paper Type setting is poor CHECK THE TRANSPARENCIES Use only transparencies recommended by the printer...
User Manual
Page 124
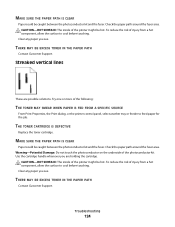
... the job. Clear any paper you see . THERE MAY BE EXCESS TONER IN THE PAPER PATH Contact Customer Support. THE TONER CARTRIDGE IS DEFECTIVE Replace the toner cartridge. CAUTION-HOT SURFACE: The inside of injury from a hot component, allow the surface to cool before touching. THERE MAY BE...IS CLEAR Paper could be caught between the photoconductor kit and the fuser. Use the cartridge handle whenever you are possible solutions. Clear any paper you see . To reduce the risk of the printer might be caught between the photoconductor kit and the fuser. MAKE SURE THE PAPER ...
... the job. Clear any paper you see . THERE MAY BE EXCESS TONER IN THE PAPER PATH Contact Customer Support. THE TONER CARTRIDGE IS DEFECTIVE Replace the toner cartridge. CAUTION-HOT SURFACE: The inside of injury from a hot component, allow the surface to cool before touching. THERE MAY BE...IS CLEAR Paper could be caught between the photoconductor kit and the fuser. Use the cartridge handle whenever you are possible solutions. Clear any paper you see . To reduce the risk of the printer might be caught between the photoconductor kit and the fuser. MAKE SURE THE PAPER ...


