
Instruction Manual
Page 2
... with a cart or stand recommended by the operating instructions as the original part. If you are required, be sure the service technician has used replacement parts specified by a qualified technician to restore the appliance to insert the plug into a grounding-type power outlet. This appliance system is provided. 9. This plug will often require extensive work by the manufacturer that the appliance is...
... with a cart or stand recommended by the operating instructions as the original part. If you are required, be sure the service technician has used replacement parts specified by a qualified technician to restore the appliance to insert the plug into a grounding-type power outlet. This appliance system is provided. 9. This plug will often require extensive work by the manufacturer that the appliance is...
Instruction Manual
Page 4
... 8 Controls, Connectors and Indicators 9 Preparations Connection Examples 11 Preparation Procedure 12 Step 1 Connection and Installation 1-1 Attaching a Lens 13 1-2 Connecting the Power Cord 14 1-3 Connecting a LAN Cable 15 1-4 Connecting the Alarm I/O Terminals 16 1-5 Installing the Camera 18 Step 2 Setting the Network 2-1 Installing the Software 19 2-2 Setting the PC's IP Address for Windows XP 20 Setting the PC's IP Address for Windows 2000 22 2-3 Setting the IP Address for VN-C11U.) Before beginning to operate this unit, please read the instruction manual carefully...
... 8 Controls, Connectors and Indicators 9 Preparations Connection Examples 11 Preparation Procedure 12 Step 1 Connection and Installation 1-1 Attaching a Lens 13 1-2 Connecting the Power Cord 14 1-3 Connecting a LAN Cable 15 1-4 Connecting the Alarm I/O Terminals 16 1-5 Installing the Camera 18 Step 2 Setting the Network 2-1 Installing the Software 19 2-2 Setting the PC's IP Address for Windows XP 20 Setting the PC's IP Address for Windows 2000 22 2-3 Setting the IP Address for VN-C11U.) Before beginning to operate this unit, please read the instruction manual carefully...
Instruction Manual
Page 6
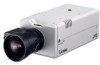
... connected at one time.) • Equipped with an image recording function by motion detection and alarm input. • VN-C11 has a design similar to other CCTV monitoring cameras, allowing peripheral equipment for such cameras to be also used for VN-C11. • With a built-in Web server, VN-C11 supports Internet Explorer and Netscape. • Multicast function. (Only for JPEG) Items Included CD-ROM (The Instruction Manual inside) Read Me First Warranty Card Service...
... connected at one time.) • Equipped with an image recording function by motion detection and alarm input. • VN-C11 has a design similar to other CCTV monitoring cameras, allowing peripheral equipment for such cameras to be also used for VN-C11. • With a built-in Web server, VN-C11 supports Internet Explorer and Netscape. • Multicast function. (Only for JPEG) Items Included CD-ROM (The Instruction Manual inside) Read Me First Warranty Card Service...

Instruction Manual
Page 7
... Space Display/Video Card : Windows 2000 (Service Pack 1 or higher) Windows XP Home Edition Windows XP Professional : Pentium III 500 MHz or higher (1 GHz or higher recommended) : 128 MB or more : 20 MB or more : 1024 X 768 pixels or more, True Color (24 bits or 32 bits) LAN Specifications • 10 BASE-T/100 BASE-TX network connected with IEEE802.3 hubs. Note The PC specifications above . Upgrading...
... Space Display/Video Card : Windows 2000 (Service Pack 1 or higher) Windows XP Home Edition Windows XP Professional : Pentium III 500 MHz or higher (1 GHz or higher recommended) : 128 MB or more : 20 MB or more : 1024 X 768 pixels or more, True Color (24 bits or 32 bits) LAN Specifications • 10 BASE-T/100 BASE-TX network connected with IEEE802.3 hubs. Note The PC specifications above . Upgrading...
Instruction Manual
Page 8
... cables connected to the product design, therefore not a defect. (This product uses a network protocol called RTP for transmitting MPEG4 images. For outdoor use . If the function is enabled, multicast images created by this product may cause damage. In particular, do not block the unit's cooling-fan ventilation opening. ● In a narrowband environment, for indoor use , prepare a proper housing to cover and protect the camera...
... cables connected to the product design, therefore not a defect. (This product uses a network protocol called RTP for transmitting MPEG4 images. For outdoor use . If the function is enabled, multicast images created by this product may cause damage. In particular, do not block the unit's cooling-fan ventilation opening. ● In a narrowband environment, for indoor use , prepare a proper housing to cover and protect the camera...
Instruction Manual
Page 10
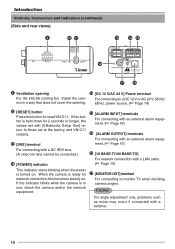
... V, 50 Hz/ era in use, check the camera and/or the network equipment. & [MONITOR OUT] terminal For connecting to monitor TV when deciding camera angles. Install the cam- ment. (☞ Page 16) For connecting with a DC IRIS lens. (A video iris lens cannot be connected.) @ [POWER] indicator ^ [10 BASE-T/100 BASE-TX] For network connection with an external alarm equip- Introduction Controls, Connectors and Indicators (continued) (Side and rear views) 9 0! # $% DC12V AC24V CLASS 2 ONLY...
... V, 50 Hz/ era in use, check the camera and/or the network equipment. & [MONITOR OUT] terminal For connecting to monitor TV when deciding camera angles. Install the cam- ment. (☞ Page 16) For connecting with a DC IRIS lens. (A video iris lens cannot be connected.) @ [POWER] indicator ^ [10 BASE-T/100 BASE-TX] For network connection with an external alarm equip- Introduction Controls, Connectors and Indicators (continued) (Side and rear views) 9 0! # $% DC12V AC24V CLASS 2 ONLY...
Instruction Manual
Page 12
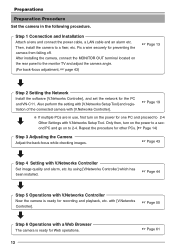
Preparations Preparation Procedure Set the camera in use, first turn on the power to 2-4. with [V.Networks Controller]. ☞ Page 55 Step 6 Operations with V.Networks Setup Tool. Fix a wire securely for Web operations. 12 ☞ Page 61 Only then, turn on the power for other PCs. (☞ Page 14) Step 3 Adjusting the Camera Adjust the back-focus while checking images. ☞ Page 43 Step 4 Setting with V.Networks Controller Set image quality and alarm, etc. Repeat the procedure for one...
Preparations Preparation Procedure Set the camera in use, first turn on the power to 2-4. with [V.Networks Controller]. ☞ Page 55 Step 6 Operations with V.Networks Setup Tool. Fix a wire securely for Web operations. 12 ☞ Page 61 Only then, turn on the power for other PCs. (☞ Page 14) Step 3 Adjusting the Camera Adjust the back-focus while checking images. ☞ Page 43 Step 4 Setting with V.Networks Controller Set image quality and alarm, etc. Repeat the procedure for one...
Instruction Manual
Page 14
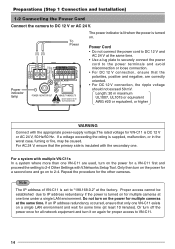
... polarities, positive and negative, are used, turn on the power for a second one and go on to IP address redundancy if the power is turned on again for a VN-C11 first and proceed the setting to VN-C11. 14 Power Cord • Do not connect the power cord to DC 12 V and AC 24 V at the same time. • Use a lug plate to securely connect the power cord...
... polarities, positive and negative, are used, turn on the power for a second one and go on to IP address redundancy if the power is turned on again for a VN-C11 first and proceed the setting to VN-C11. 14 Power Cord • Do not connect the power cord to DC 12 V and AC 24 V at the same time. • Use a lug plate to securely connect the power cord...
Instruction Manual
Page 24
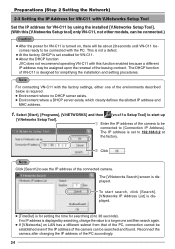
... function JVC does not recommend operating VN-C11 with the PC. Note Click [Search] to see the IP address of the leasing contract. This is not a defect. ● At the factory, DHCP is displayed by using the installed [V.Networks Setup Tool]. (With this function enabled because a different IP address may be assigned upon the renewal of the connected camera. Note For connecting VN-C11 with the factory settings...
... function JVC does not recommend operating VN-C11 with the PC. Note Click [Search] to see the IP address of the leasing contract. This is not a defect. ● At the factory, DHCP is displayed by using the installed [V.Networks Setup Tool]. (With this function enabled because a different IP address may be assigned upon the renewal of the connected camera. Note For connecting VN-C11 with the factory settings...

Instruction Manual
Page 27
... Click . 2.The following screen is set password protection or change the password. Note To cancel an existing password, leave the password entry box blank and click . Access Right Level User Operator Administrator Allowed Actions Only viewing moving images All operations with [V.Networks Controller] All of the above and all settings with V.Networks Setup Tool [1. Setting and cancellation of the connected PC. According to set only for lower security level(s), password protection is highest...
... Click . 2.The following screen is set password protection or change the password. Note To cancel an existing password, leave the password entry box blank and click . Access Right Level User Operator Administrator Allowed Actions Only viewing moving images All operations with [V.Networks Controller] All of the above and all settings with V.Networks Setup Tool [1. Setting and cancellation of the connected PC. According to set only for lower security level(s), password protection is highest...

Instruction Manual
Page 28
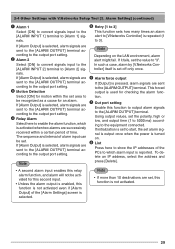
... to [V.Networks Controller.] (☞ Page 29) • Alarm Images are recorded. (☞ Page 32) 1. Preparations (Step 2 Setting the Network) 2-4 Other Settings with V.Networks Setup Tool [2. Alarm Setting] This section describes alarm setting. Alarm input is activated in the following cases. • Input signals are received from an input terminal located on the rear panel of the camera, [ALARM INPUT 1] or [ALARM INPUT 2]. (☞ Page 16) • Motion has been detected. (☞...
... to [V.Networks Controller.] (☞ Page 29) • Alarm Images are recorded. (☞ Page 32) 1. Preparations (Step 2 Setting the Network) 2-4 Other Settings with V.Networks Setup Tool [2. Alarm Setting] This section describes alarm setting. Alarm input is activated in the following cases. • Input signals are received from an input terminal located on the rear panel of the camera, [ALARM INPUT 1] or [ALARM INPUT 2]. (☞ Page 16) • Motion has been detected. (☞...
Instruction Manual
Page 29
... sets how many times an alarm alert to [V.Networks Controller] is selected, alarm signals are successively received within the set area to the output port setting. 3 Motion Detection Select [ON] for an alarm. If [Alarm Output] is repeated (1 to the [ALARM OUTPUT] terminal. This forced output is activated when two alarms are sent to the [ALARM OUTPUT] terminal according to be recognized as a cause for motion within a certain period of time. If [Alarm Output] is selected, alarm...
... sets how many times an alarm alert to [V.Networks Controller] is selected, alarm signals are successively received within the set area to the output port setting. 3 Motion Detection Select [ON] for an alarm. If [Alarm Output] is repeated (1 to the [ALARM OUTPUT] terminal. This forced output is activated when two alarms are sent to the [ALARM OUTPUT] terminal according to be recognized as a cause for motion within a certain period of time. If [Alarm Output] is selected, alarm...
Instruction Manual
Page 30
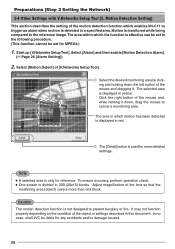
... [Detail] button is only for more than one block. Motion Detection Setting] This section describes the setting of the lens so that the monitoring area (object) covers more detailed settings. To ensure accuracy, perform operation check. ● One screen is detected in the following procedure. (This function cannot be liable for MPEG4.) 1. Start up [V.Networks SetupTool]. Adjust magnification of the motion detection function which enables VN-C11...
... [Detail] button is only for more than one block. Motion Detection Setting] This section describes the setting of the lens so that the monitoring area (object) covers more detailed settings. To ensure accuracy, perform operation check. ● One screen is detected in the following procedure. (This function cannot be liable for MPEG4.) 1. Start up [V.Networks SetupTool]. Adjust magnification of the motion detection function which enables VN-C11...
Instruction Manual
Page 41
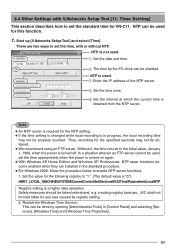
... the power is used , set the time, with V.Networks Setup Tool [11. There are two ways to set the time appropriately when the power is turned on again. ● With Windows XP Home Edition and Windows XP Professional, NTP sever functions become enabled when they are installed in the standard procedure. ● For Windows 2000, follow the procedure below to "1." (The default value is "0.") HKEY_LOCAL_MACHINE\SYSTEM\CurrentControlSet\Services...
... the power is used , set the time, with V.Networks Setup Tool [11. There are two ways to set the time appropriately when the power is turned on again. ● With Windows XP Home Edition and Windows XP Professional, NTP sever functions become enabled when they are installed in the standard procedure. ● For Windows 2000, follow the procedure below to "1." (The default value is "0.") HKEY_LOCAL_MACHINE\SYSTEM\CurrentControlSet\Services...

Instruction Manual
Page 42
... 2 Setting the Network) 2-5 Registering the Connected Camera with V.Networks Controller The connected camera can set whether VN-C11 automatically starts recording upon connection. Note In a DHCP environment, enter the IP address allotted by the DHCP server. Use a name that is easy to remember, such as the installation location or number. (1 to 40 characters) Recording files of the environments described below is required. • Environment where no DHCP server exists...
... 2 Setting the Network) 2-5 Registering the Connected Camera with V.Networks Controller The connected camera can set whether VN-C11 automatically starts recording upon connection. Note In a DHCP environment, enter the IP address allotted by the DHCP server. Use a name that is easy to remember, such as the installation location or number. (1 to 40 characters) Recording files of the environments described below is required. • Environment where no DHCP server exists...

Instruction Manual
Page 43
....) Connect the MONITOR OUT terminal on the PC screen. 3. Zoom in / out, adjust the camera as follows. 1. Preparations (Step 3 Adjusting the Camera) 3-1 Back-focus Adjustment At the factory, back-focus is used or if focus cannot be attained using the focus ring of the lens. Loosen the back-focus lock screw by turning the focus ring. 4. Zoom out the lens and adjust the focus by turning it is necessary to readjust back focus if a zoom or C-mount lens is set...
....) Connect the MONITOR OUT terminal on the PC screen. 3. Zoom in / out, adjust the camera as follows. 1. Preparations (Step 3 Adjusting the Camera) 3-1 Back-focus Adjustment At the factory, back-focus is used or if focus cannot be attained using the focus ring of the lens. Loosen the back-focus lock screw by turning the focus ring. 4. Zoom out the lens and adjust the focus by turning it is necessary to readjust back focus if a zoom or C-mount lens is set...

Instruction Manual
Page 44
... V.Networks Controller) 4-1 Starting Up V.Networks Controller With the installed Controller, camera images can also be connected at one time. If 5 or more clients are displayed. can be monitored. Note • If a password has been set, enter the correct password. • This [Controller] can be performed. 1. A1, VN-C10 and VN-C11. • In the MPEG4 mode, up [V.Networks Controller]. [V.Networks Controller] to start the Streaming Service." appears. 44 Caution After the power for JPEG), VN- This is turned...
... V.Networks Controller) 4-1 Starting Up V.Networks Controller With the installed Controller, camera images can also be connected at one time. If 5 or more clients are displayed. can be monitored. Note • If a password has been set, enter the correct password. • This [Controller] can be performed. 1. A1, VN-C10 and VN-C11. • In the MPEG4 mode, up [V.Networks Controller]. [V.Networks Controller] to start the Streaming Service." appears. 44 Caution After the power for JPEG), VN- This is turned...

Instruction Manual
Page 52
... [Setting] menu of the [V.Networks Controller.] (☞ Page 45) 2. Note Alarm Operation The following settings are required for conserving the hard disk space. • In this mode, recording stops after 1 minute. 3 Playing wave file When an alarm is received, a specified Wave file is received, recording starts. Operations (Step 4 Setting with V.Networks Controller) 4-7 Alarm Setting (continued) 1 Message When an alarm is received, the message entered into the text box is enabled in [Alarm Setting] of [V.Networks Setup Tool...
... [Setting] menu of the [V.Networks Controller.] (☞ Page 45) 2. Note Alarm Operation The following settings are required for conserving the hard disk space. • In this mode, recording stops after 1 minute. 3 Playing wave file When an alarm is received, a specified Wave file is received, recording starts. Operations (Step 4 Setting with V.Networks Controller) 4-7 Alarm Setting (continued) 1 Message When an alarm is received, the message entered into the text box is enabled in [Alarm Setting] of [V.Networks Setup Tool...

Instruction Manual
Page 61
... images captured by the VN-C11 camera and displayed by changing the window size. In this instruction manual (☞ Page 7). Be sure to satisfy the technical requirements described in the 256-color mode. • For Internet Explorer, an environment where Java can work as well. LAN Environment • VN-C11 can be displayed properly in this case, click the [Update] button on the type and settings of the Web browser...
... images captured by the VN-C11 camera and displayed by changing the window size. In this instruction manual (☞ Page 7). Be sure to satisfy the technical requirements described in the 256-color mode. • For Internet Explorer, an environment where Java can work as well. LAN Environment • VN-C11 can be displayed properly in this case, click the [Update] button on the type and settings of the Web browser...

Instruction Manual
Page 62
...-e.html) Configuration menus Image Quality Configuration (configimage-e.html) View Configuration (viewconfig-e.html) Alarm Configuration (alarm-e.html) FTP Configuration (ftp-e.html) Other Configurations (config-e.html) Top page: http://******/index-e.html (****** represents the URL of Netscape, [Bookmarks]. Verifying access authorization If passwords are set, the [User Name and Password] request window appears (for linkages to bookmark the page. 62 While the VN-C11 web page is displayed in the browser, use the [Favorites] function of Internet Explorer or...
...-e.html) Configuration menus Image Quality Configuration (configimage-e.html) View Configuration (viewconfig-e.html) Alarm Configuration (alarm-e.html) FTP Configuration (ftp-e.html) Other Configurations (config-e.html) Top page: http://******/index-e.html (****** represents the URL of Netscape, [Bookmarks]. Verifying access authorization If passwords are set, the [User Name and Password] request window appears (for linkages to bookmark the page. 62 While the VN-C11 web page is displayed in the browser, use the [Favorites] function of Internet Explorer or...


