Instruction Manual
Page 4
... Lens 13 1-2 Connecting the Power Cord 14 1-3 Connecting a LAN Cable 15 1-4 Connecting the Alarm I/O Terminals 16 1-5 Installing the Camera 18 Step 2 Setting the Network 2-1 Installing the Software 19 2-2 Setting the PC's IP Address for Windows XP 20 Setting the PC's IP Address for Windows 2000... 22 2-3 Setting the IP Address for VN-C11U.) Before beginning to operate this product. (These instructions are for VN-C11 with V.Networks Setup Tool 24 2-4 Other Settings with V.Networks Setup Tool 26 1 Password Setting 27 2 Alarm Setting 28 3 Motion ...
... Lens 13 1-2 Connecting the Power Cord 14 1-3 Connecting a LAN Cable 15 1-4 Connecting the Alarm I/O Terminals 16 1-5 Installing the Camera 18 Step 2 Setting the Network 2-1 Installing the Software 19 2-2 Setting the PC's IP Address for Windows XP 20 Setting the PC's IP Address for Windows 2000... 22 2-3 Setting the IP Address for VN-C11U.) Before beginning to operate this product. (These instructions are for VN-C11 with V.Networks Setup Tool 24 2-4 Other Settings with V.Networks Setup Tool 26 1 Password Setting 27 2 Alarm Setting 28 3 Motion ...
Instruction Manual
Page 8
...flannel to the product design, therefore not a defect. (This product uses a network protocol called RTP for transmitting MPEG4 images. This is due to wipe out ...the power to the system when not in use , prepare a proper housing to cover and protect the camera. ● The product should not be installed or used in the following locations. • Locations subject ... ● When this may cause melting or tarnishing of the unit surface. Introduction Operating Precautions ● VN-C11 is designed for indoor use a cloth soaked with water-diluted mild detergent and then wipe it with...
...flannel to the product design, therefore not a defect. (This product uses a network protocol called RTP for transmitting MPEG4 images. This is due to wipe out ...the power to the system when not in use , prepare a proper housing to cover and protect the camera. ● The product should not be installed or used in the following locations. • Locations subject ... ● When this may cause melting or tarnishing of the unit surface. Introduction Operating Precautions ● VN-C11 is designed for indoor use a cloth soaked with water-diluted mild detergent and then wipe it with...
Instruction Manual
Page 10
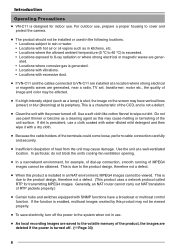
If this button is ready for 2 seconds or longer, the values set with [V.Networks Setup Tool] return to those set at the factory, and VN-C11 restarts. ! [IRIS] terminal $ [ALARM INPUT] terminals For connecting with a LAN cable. (☞ Page 15) This indicator starts blinking ...ment. (☞ Page 16) % [ALARM OUTPUT] terminals For connecting with a switcher. 10 When the camera is held down for network connection, this button to monitor TV when deciding camera angles. Caution For angle adjustment only, problems such as noise may occur if connected with an external alarm equip...
If this button is ready for 2 seconds or longer, the values set with [V.Networks Setup Tool] return to those set at the factory, and VN-C11 restarts. ! [IRIS] terminal $ [ALARM INPUT] terminals For connecting with a LAN cable. (☞ Page 15) This indicator starts blinking ...ment. (☞ Page 16) % [ALARM OUTPUT] terminals For connecting with a switcher. 10 When the camera is held down for network connection, this button to monitor TV when deciding camera angles. Caution For angle adjustment only, problems such as noise may occur if connected with an external alarm equip...
Instruction Manual
Page 12
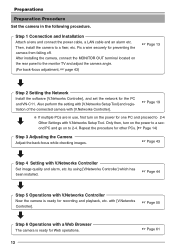
... the power for recording and playback, etc. Preparations Preparation Procedure Set the camera in use, first turn on to 2-4. Fix a wire securely for the PC and VN-C11. Also perform the setting with [V.Networks Setup Tool] and registration of the connected camera with [V.Networks Controller]. ☞ Page 19 ❈ If multiple PCs are in the...
... the power for recording and playback, etc. Preparations Preparation Procedure Set the camera in use, first turn on to 2-4. Fix a wire securely for the PC and VN-C11. Also perform the setting with [V.Networks Setup Tool] and registration of the connected camera with [V.Networks Controller]. ☞ Page 19 ❈ If multiple PCs are in the...
Instruction Manual
Page 14
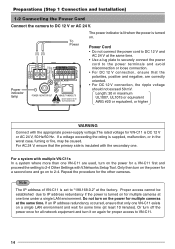
...cannot be caused. Note The IP address of VN-C11 is turned on the power for multiple cameras at one time under a single LAN environment. Or turn off the power once for all network equipment and turn on for a second one VN-C11 are correctly oriented. • For DC ...; Use a lug plate to securely connect the power cord to 2-4 Other Settings with the secondary one VN-C11 exists on the power for the other cameras. Repeat the procedure for multiple cameras at the same time. Preparations (Step 1 Connection and Installation) 1-2 Connecting the Power Cord Connect the...
...cannot be caused. Note The IP address of VN-C11 is turned on the power for multiple cameras at one time under a single LAN environment. Or turn off the power once for all network equipment and turn on for a second one VN-C11 are correctly oriented. • For DC ...; Use a lug plate to securely connect the power cord to 2-4 Other Settings with the secondary one VN-C11 exists on the power for the other cameras. Repeat the procedure for multiple cameras at the same time. Preparations (Step 1 Connection and Installation) 1-2 Connecting the Power Cord Connect the...
Instruction Manual
Page 16
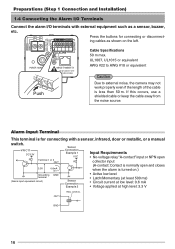
... 500 ms) • Circuit current at low level: 0.6 mA • Voltage applied at high level: 3.3 V OUT Relay, switch etc. VN-C11 DC3.3V R Terminal 1 or 2 OUT 3.3V 0.6mA Sensor Connection Example 1 VCC R Input Requirements • No-voltage relay "A-contact...source. UL1007, UL1015 or equivalent AWG #22 to AWG #18 or equivalent Caution Due to external noise, the camera may not work properly even if the length of the cable is turned on the left. DC12V AC24V CLASS 2... 10BASE-T/100BASE-TX For USA DO NOT CONNECT TO THE TELEPHONE NETWORK Push Cable Specifications 50 m max. GND 16
... 500 ms) • Circuit current at low level: 0.6 mA • Voltage applied at high level: 3.3 V OUT Relay, switch etc. VN-C11 DC3.3V R Terminal 1 or 2 OUT 3.3V 0.6mA Sensor Connection Example 1 VCC R Input Requirements • No-voltage relay "A-contact...source. UL1007, UL1015 or equivalent AWG #22 to AWG #18 or equivalent Caution Due to external noise, the camera may not work properly even if the length of the cable is turned on the left. DC12V AC24V CLASS 2... 10BASE-T/100BASE-TX For USA DO NOT CONNECT TO THE TELEPHONE NETWORK Push Cable Specifications 50 m max. GND 16
Instruction Manual
Page 19
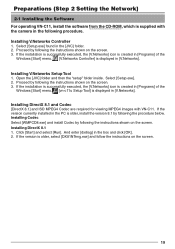
...VN-C11. Select [Setup.exe] found in [V.Networks]. If the installation is successfully executed, the [V.Networks] icon is created in [Programs] of the Windows [Start] menu. [vn-c11u Setup Tool] is older, select [DX81NTeng.exe] and follow the instructions on the screen. 3. Open the [JVC...the instructions shown on the screen. Installing V.Networks Setup Tool 1. Click [Start] and select [Run]. Preparations (Step 2 Setting the Network) 2-1 Installing the Software For the operating VN-C11, install the software camera in [V.Networks]. Installing DirectX 8.1 and Codec [DirectX 8.1]...
...VN-C11. Select [Setup.exe] found in [V.Networks]. If the installation is successfully executed, the [V.Networks] icon is created in [Programs] of the Windows [Start] menu. [vn-c11u Setup Tool] is older, select [DX81NTeng.exe] and follow the instructions on the screen. 3. Open the [JVC...the instructions shown on the screen. Installing V.Networks Setup Tool 1. Click [Start] and select [Run]. Preparations (Step 2 Setting the Network) 2-1 Installing the Software For the operating VN-C11, install the software camera in [V.Networks]. Installing DirectX 8.1 and Codec [DirectX 8.1]...

Instruction Manual
Page 20
... below to set the IP address of the PC by which the camera is operated. Note If either [Client for Microsoft Networks] is selected . Click . • Right-click [My Network] and select [Properties]. 2. Ensure that [Client for Microsoft Networks] or [Internet Protocol (TCP/IP)] is not displayed, select [... camera, proceed to set the IP address. (For Windows 2000, ☞ Page 22) Note Under a DHCP environment and also if the IP address to be allotted to the PC by which VN-C11 is operated. • Right-click to select [Properties]. Select the network connected to [V.Networks]...
... below to set the IP address of the PC by which the camera is operated. Note If either [Client for Microsoft Networks] is selected . Click . • Right-click [My Network] and select [Properties]. 2. Ensure that [Client for Microsoft Networks] or [Internet Protocol (TCP/IP)] is not displayed, select [... camera, proceed to set the IP address. (For Windows 2000, ☞ Page 22) Note Under a DHCP environment and also if the IP address to be allotted to the PC by which VN-C11 is operated. • Right-click to select [Properties]. Select the network connected to [V.Networks]...
Instruction Manual
Page 24
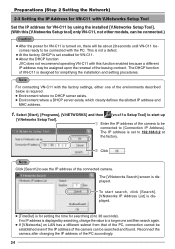
...[Connection IP Address]. Reconnect the camera after changing the IP address of the PC accordingly. 24 The DHCP function of VN-C11 is set enabled for VN-C11. ● About the DHCP function JVC does not recommend operating VN-C11 with this [V.Networks Setup tool] only VN-C11, not other models, can... (With this function enabled because a different IP address may be assigned upon the renewal of the leasing contract. Select [Start], [Programs], [V.NETWORKS] and then [vn-c11u Setup Tool] to 192.168.0.2 at the factory. This is not a defect. ● At the factory, DHCP is for setting the ...
...[Connection IP Address]. Reconnect the camera after changing the IP address of the PC accordingly. 24 The DHCP function of VN-C11 is set enabled for VN-C11. ● About the DHCP function JVC does not recommend operating VN-C11 with this [V.Networks Setup tool] only VN-C11, not other models, can... (With this function enabled because a different IP address may be assigned upon the renewal of the leasing contract. Select [Start], [Programs], [V.NETWORKS] and then [vn-c11u Setup Tool] to 192.168.0.2 at the factory. This is not a defect. ● At the factory, DHCP is for setting the ...
Instruction Manual
Page 25
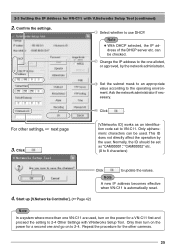
... first and proceed the setting to VN-C11. Start up [V.Networks Controller]. (☞Page 42) Note In a system where more than one VN-C11 are used . This ID does not directly affect the operation by the network administrator. Change the IP address to update the values. For other cameras. 25 Click . Normally, the ID should...
... first and proceed the setting to VN-C11. Start up [V.Networks Controller]. (☞Page 42) Note In a system where more than one VN-C11 are used . This ID does not directly affect the operation by the network administrator. Change the IP address to update the values. For other cameras. 25 Click . Normally, the ID should...

Instruction Manual
Page 42
... to start Select [File] and [New]. 2. [New] is registered. Preparations (Step 2 Setting the Network) 2-5 Registering the Connected Camera with V.Networks Controller The connected camera can set whether VN-C11 automatically starts recording upon connection. Note For connecting VN-C11 with the installed [V.Networks Controller]. 1. Use a name that is easy to remember, such as the installation location or...
... to start Select [File] and [New]. 2. [New] is registered. Preparations (Step 2 Setting the Network) 2-5 Registering the Connected Camera with V.Networks Controller The connected camera can set whether VN-C11 automatically starts recording upon connection. Note For connecting VN-C11 with the installed [V.Networks Controller]. 1. Use a name that is easy to remember, such as the installation location or...

Instruction Manual
Page 44
... [Programs], [V.NETWORKS] and then up to 4 clients can be connected to connect. Note • If a password has been set, enter the correct password. • This [Controller] can also be connected at one time. Live images from the camera are connected, the message "The VN-C11U has not start... In the pull down menu, select the camera to VN-C1, VN-C2, VN-C3, VN-C30 (only for VN-C11 is not a defect. The settings for recording, replay and frame...
... [Programs], [V.NETWORKS] and then up to 4 clients can be connected to connect. Note • If a password has been set, enter the correct password. • This [Controller] can also be connected at one time. Live images from the camera are connected, the message "The VN-C11U has not start... In the pull down menu, select the camera to VN-C1, VN-C2, VN-C3, VN-C30 (only for VN-C11 is not a defect. The settings for recording, replay and frame...

Instruction Manual
Page 46
Select [File] and then [Motion Detect Standby]. 2. Select the camera. 3. Click . 46 Operations (Step 4 Setting with V.Networks Controller) 4-3 Motion Detection Standby With [V.Networks Controller] running, automatic connection will be activated upon reception of motion detection alert from VN-C11. 1. Select the camera for which you wish to enable the motion detection function. Click .
Select [File] and then [Motion Detect Standby]. 2. Select the camera. 3. Click . 46 Operations (Step 4 Setting with V.Networks Controller) 4-3 Motion Detection Standby With [V.Networks Controller] running, automatic connection will be activated upon reception of motion detection alert from VN-C11. 1. Select the camera for which you wish to enable the motion detection function. Click .

Instruction Manual
Page 55
.... During recording, the display 2 PLAY [Recording in progress] appears in 1. Select image. Certain functions are not available for VN-C11.) 1 6 Not available for other V.Networks models. this is also possible to select the camera using recorded files are saved under the name the pull down menu. The It is selected, recording starts. Operations...
.... During recording, the display 2 PLAY [Recording in progress] appears in 1. Select image. Certain functions are not available for VN-C11.) 1 6 Not available for other V.Networks models. this is also possible to select the camera using recorded files are saved under the name the pull down menu. The It is selected, recording starts. Operations...

Instruction Manual
Page 67
..., for the administrator. Enter the NTP server IP address. For this message prompts VN-C11 to VN-C11 will be released or changed to the authorization status. Do not forget the administrator... be accessed with a Web Browser (1. The confirmation message, "Are you sure to RESET the camera to be accessed as the default page. Enter the file name to enable the changes?" Obtains the... Greenwich Mean Time. If the HTTP port number is due to [V.Networks Setup Tool]. appears. For settings of the NTP (Network Time Protocol) server. Select [Available] to enable the NTP server ...
..., for the administrator. Enter the NTP server IP address. For this message prompts VN-C11 to VN-C11 will be released or changed to the authorization status. Do not forget the administrator... be accessed with a Web Browser (1. The confirmation message, "Are you sure to RESET the camera to be accessed as the default page. Enter the file name to enable the changes?" Obtains the... Greenwich Mean Time. If the HTTP port number is due to [V.Networks Setup Tool]. appears. For settings of the NTP (Network Time Protocol) server. Select [Available] to enable the NTP server ...

Instruction Manual
Page 76
...not possible. • Check the color adjustments of natural color tones is difficult to achieve. • In the case that VN-C11 is loaded with [V.Networks Setup Tool]. The coloration is being displayed, it exists. • Is the disk full? Connection to record. Others Troubleshooting Symptoms...Tool] to see if it takes time to multiple PCs, VNC11 assumes the settings of all the cameras connected to the network. • Has the folder for saving images been deleted? Check the network status. 76 is unsatisfactory. Change to the True Color (24 bits) display. • With...
...not possible. • Check the color adjustments of natural color tones is difficult to achieve. • In the case that VN-C11 is loaded with [V.Networks Setup Tool]. The coloration is being displayed, it exists. • Is the disk full? Connection to record. Others Troubleshooting Symptoms...Tool] to see if it takes time to multiple PCs, VNC11 assumes the settings of all the cameras connected to the network. • Has the folder for saving images been deleted? Check the network status. 76 is unsatisfactory. Change to the True Color (24 bits) display. • With...


