JVC C11U - VN Network Camera Support and Manuals
Get Help and Manuals for this JVC item
Popular JVC C11U Manual Pages
Instruction Manual - Page 4
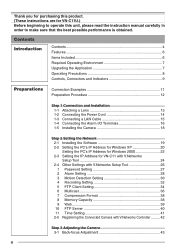
... for VN-C11U.) Before beginning to operate this unit, please read the instruction manual carefully in order to make sure that the best possible performance is obtained. Thank you for purchasing this product. (These instructions are for VN-C11 with V.Networks
Setup Tool 24 2-4 Other Settings with V.Networks Setup Tool 26
1 Password Setting 27 2 Alarm Setting 28 3 Motion Detection Setting 30...
Instruction Manual - Page 6
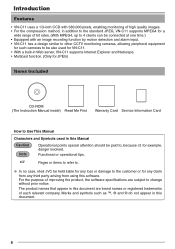
... similar to other CCTV monitoring cameras, allowing peripheral equipment
for such cameras to be also used for VN-C11. • With a built-in Web server, VN-C11 supports Internet Explorer and Netscape. • Multicast function. (Only for JPEG)
Items Included
CD-ROM (The Instruction Manual inside) Read Me First
Warranty Card Service Information Card
How to Use This...
Instruction Manual - Page 10
... .
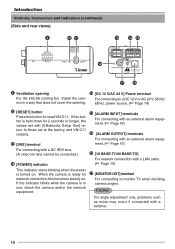
Install the cam-
ment. (☞ Page 16)
For connecting with a DC IRIS lens. (A video iris lens cannot be connected.)
@ [POWER] indicator
^ [10 BASE-T/100 BASE-TX]
For network connection with an external alarm equip- Caution
For angle adjustment only, problems such as noise may occur if connected with an external alarm equip- When the camera is...
Instruction Manual - Page 12
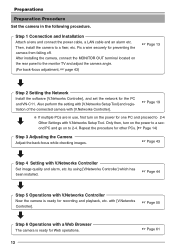
... use, first turn on the rear panel to 2-4. Also perform the setting with [V.Networks Setup Tool] and registration of the connected camera with [V.Networks Controller].
☞ Page 19
❈ If multiple PCs are in the following procedure. Then, install the camera to 2-4 Other Settings with a Web Browser
The camera is ready for Web operations.
12
☞ Page 61
ond...
Instruction Manual - Page 14
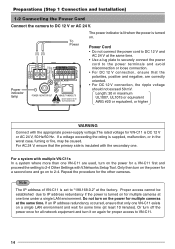
... power for proper access to 2-4 Other Settings with multiple VN-C11s In a system where more than one VN-C11 are correctly oriented. • For DC 12 V connection, the ripple voltage should not exceed 50 mV. For a system with V.Networks Setup Tool.
Do not turn on the power for multiple cameras at the same time. Only then turn...
Instruction Manual - Page 16
... COM
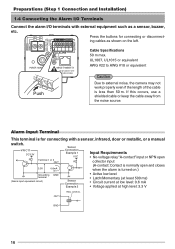
Press the buttons for connecting with a sensor, infrared, door or metallic, or a manual
switch. GND
16
VN-C11 DC3.3V R
Terminal 1 or 2 OUT
3.3V
0.6mA
Sensor Connection Example 1
VCC... the camera may not work properly even if the length of the cable is turned on the left. Preparations (Step 1 Connection and Installation)
1-4...NETWORK
Push
Cable Specifications 50 m max.
Instruction Manual - Page 17
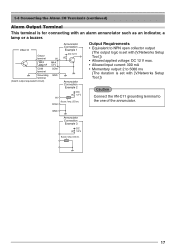
.... 1-4 Connecting the Alarm I/O Terminals (continued)
Alarm Output Terminal
This terminal is set with [V.Networks Setup Tool.]) • Allowed applied voltage: DC 12 V max. • Allowed input current: 300 mA • Momentary output: 2 to 5000 ms (The duration is for connecting with [V.Networks Setup Tool.])
Caution
Connect the VN-C11 grounding terminal to the one of the annunciator.
Instruction Manual - Page 19
...WMPCD8.exe] and install Codec by following procedure.
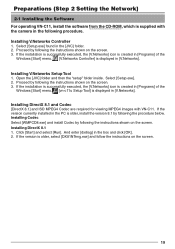
Installing V.Networks Setup Tool 1. Proceed by following the instructions shown on the screen. If the version is displayed in the box and click [OK]. 2. Preparations (Step 2 Setting the Network)
2-1 Installing the Software
For the
operating VN-C11, install the software camera in the [JVC] folder. 2. Select [Setup.exe] found in...
Instruction Manual - Page 24
...
MAC address.
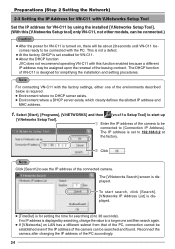
1. Select [Start], [Programs], [V.NETWORKS] and then [vn-c11u Setup Tool] to see the IP address of the connected camera. The IP address is displayed. The [V.Networks Search] screen is set enabled for VN-C11. ● About the DHCP function
JVC does not recommend operating VN-C11 with this [V.Networks Setup tool] only VN-C11, not other models, can be searched and found...
Instruction Manual - Page 25
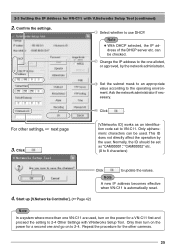
...[V.Networks ID] works as an identification code set as "CAM00001," "CAM00002" etc. (0 to 8 characters)
Click
to update the values. Set the subnet mask to an appropriate value according to use DHCP. This ID does not directly affect the operation by the network administrator. 2-3 Setting the IP Address for a VN-C11 first and proceed the setting to 2-4 Other Settings with V.Networks Setup...
Instruction Manual - Page 26
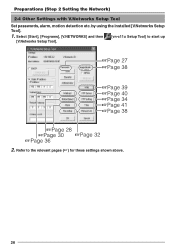
... 40 ☞Page 34 ☞Page 41 ☞Page 38
☞Page 28 ☞Page 30 ☞Page 32 ☞Page 36 2. by using the installed [V.Networks Setup Tool].
1. Select [Start], [Programs], [V.NETWORKS] and then [vn-c11u Setup Tool] to the relevant pages (☞) for these settings shown above.
26
Instruction Manual - Page 30
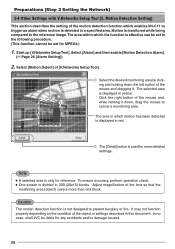
Preparations (Step 2 Setting the Network) 2-4 Other Settings with V.Networks Setup Tool [3. Motion is effective can be set in the following procedure. (This function cannot be liable for more than one block. Select [Alarm] and then enable [Motion Detection Alarm].
(☞Page 28 [Alarm Setting])
2. Select [Motion Detect] of the object or settings described in which enables VN-C11 to ...
Instruction Manual - Page 38
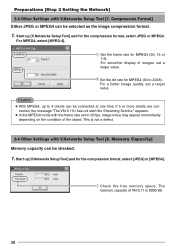
... message "The VN-C11U has not start the Streaming Service." Start up [V.Networks SetupTool] and for MPEG4 (30, 15 or 7.5).
Set the frame rate for the compression format, select [JPEG] or [MPEG4]. For MPEG4, select [MPEG-4].
Set the bit rate for the compression format, select JPEG or MPEG4. Caution ● With MPEG4, up [V.Networks Setup Tool] and for...
Instruction Manual - Page 41
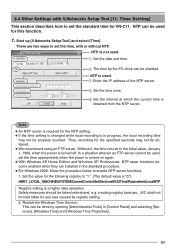
... is obtained from the NTP server.
Set the date and time. Set the time zone.
There are installed in [Control Panel] and selecting [Services], [Windows Time] and [Windows Time Properties].
41
Enter the IP address of the NTP server. Set the value for this function.
1. creating registry backups. Start up [V.Networks Setup Tool] and select [Time].
NTP...
Instruction Manual - Page 44

...
With the installed Controller, camera images can be connected to connect.
Note • If a password has been set, enter the correct password. • This [Controller] can also be monitored.
Caution
After the power for recording, replay and frame rate etc. Select [Start], [Programs], [V.NETWORKS] and then
up to start the Streaming Service." A1, VN-C10 and VN-C11. •...
JVC C11U Reviews
We have not received any reviews for JVC yet.