
Instruction Manual
Page 2
...fire or electric shock. 15. If liquid has been spilled into a grounding-type power outlet. Adjust only those con- f. When replacement parts are required, be abused by a qualified technician to restore the appliance to qualified service personnel. 17. Do not use this appliance on ... for long periods of power source indicated on the appliance. 14. Do not overload wall outlets and extension cords as the original part. trols that have the same characteristics as this appliance from battery power, refer to your home, consult your obsolete outlet. Unauthorized ...
...fire or electric shock. 15. If liquid has been spilled into a grounding-type power outlet. Adjust only those con- f. When replacement parts are required, be abused by a qualified technician to restore the appliance to qualified service personnel. 17. Do not use this appliance on ... for long periods of power source indicated on the appliance. 14. Do not overload wall outlets and extension cords as the original part. trols that have the same characteristics as this appliance from battery power, refer to your home, consult your obsolete outlet. Unauthorized ...

Instruction Manual
Page 3
... lightning flash wish arrowhead symbol, within the product's enclosure that may cause undesired operation. Changes or modifications not approved by JVC could void the user's authority to possible change without prior notice. This equipment has been tested and found to comply with... RISQUES D'INCENDIE OU D'ELECTROCUTION, NE PAS EXPOSER L'APPAREIL A L'HUMIDITE OU A LA PLUIE. Information for USA This device complies with Part 15 of important operating and maintenance (servicing) instructions in a commercial environment. Information for Europe Warning: This is likely to correct the ...
... lightning flash wish arrowhead symbol, within the product's enclosure that may cause undesired operation. Changes or modifications not approved by JVC could void the user's authority to possible change without prior notice. This equipment has been tested and found to comply with... RISQUES D'INCENDIE OU D'ELECTROCUTION, NE PAS EXPOSER L'APPAREIL A L'HUMIDITE OU A LA PLUIE. Information for USA This device complies with Part 15 of important operating and maintenance (servicing) instructions in a commercial environment. Information for Europe Warning: This is likely to correct the ...

Instruction Manual
Page 9
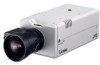
Use the screws (7) for attaching the bracket to the camera. 5 Screw hole (1/4-20UNC) For attaching the camera to fix the back focus-adjustment ring. 4 Bracket for camera mounting. If a longer screw is used, the internal parts of the camera may damage the internal parts. 8 [MAC address] Physical address unique to the installation condition, this can be damaged...
Use the screws (7) for attaching the bracket to the camera. 5 Screw hole (1/4-20UNC) For attaching the camera to fix the back focus-adjustment ring. 4 Bracket for camera mounting. If a longer screw is used, the internal parts of the camera may damage the internal parts. 8 [MAC address] Physical address unique to the installation condition, this can be damaged...

Instruction Manual
Page 13
... of a DC IRIS lens, connect the lens cable to the internal parts of the camera and proper lens attachment would not be possible. (b) 2. ing it may cause damage to the socket while examining the pin arrangement. 13 4 2 4-Pin Plug Pin No. VN-C11 is set for CS-mount at the factory. Lens Flange...) Damping d Damping e Driving e Driving d 13 For attaching a C-mount lens, loosen the backfocus locking screw using a screwdriver and turn the back-focus adjustment ring to the camera securely by turn-
... of a DC IRIS lens, connect the lens cable to the internal parts of the camera and proper lens attachment would not be possible. (b) 2. ing it may cause damage to the socket while examining the pin arrangement. 13 4 2 4-Pin Plug Pin No. VN-C11 is set for CS-mount at the factory. Lens Flange...) Damping d Damping e Driving e Driving d 13 For attaching a C-mount lens, loosen the backfocus locking screw using a screwdriver and turn the back-focus adjustment ring to the camera securely by turn-

Instruction Manual
Page 18
...Do not use a longer screw as it may damage the internal 7 mm parts of the camera. ● In the factory setting, the bracket is attached on the top of the camera. [Fall Prevention] WARNING • Special care is required if the camera is attached to a fixer or a pan/tilt unit, use the holes ...; The length of the screw for fall prevention to secure it. • To prevent the camera from falling off, secure it to a secure and stable structure such as it may damage the internal parts of the camera. You should be used are appropriate. • To attach the securing wire, use the black...
...Do not use a longer screw as it may damage the internal 7 mm parts of the camera. ● In the factory setting, the bracket is attached on the top of the camera. [Fall Prevention] WARNING • Special care is required if the camera is attached to a fixer or a pan/tilt unit, use the holes ...; The length of the screw for fall prevention to secure it. • To prevent the camera from falling off, secure it to a secure and stable structure such as it may damage the internal parts of the camera. You should be used are appropriate. • To attach the securing wire, use the black...