
Important Setup Information
Page 1
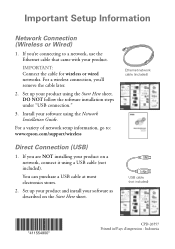
...the Network Installation Guide. Ethernet network cable (included) USB cable (not included) CPD-26557 Printed in/Pays d'impression : Indonesia Set up your product and install your software using a USB cable (not included). Important Setup Information Network Connection (Wireless or Wired) 1. IMPORTANT: Connect the cable for wireless or wired networks. For a wireless connection, you 're connecting to : www.epson.com/support/wireless Direct Connection (USB) 1. DO NOT follow the software installation steps under "USB connection." 3. Set up your product on the Start Here sheet...
...the Network Installation Guide. Ethernet network cable (included) USB cable (not included) CPD-26557 Printed in/Pays d'impression : Indonesia Set up your product and install your software using a USB cable (not included). Important Setup Information Network Connection (Wireless or Wired) 1. IMPORTANT: Connect the cable for wireless or wired networks. For a wireless connection, you 're connecting to : www.epson.com/support/wireless Direct Connection (USB) 1. DO NOT follow the software installation steps under "USB connection." 3. Set up your product on the Start Here sheet...
Network Installation Guide
Page 2
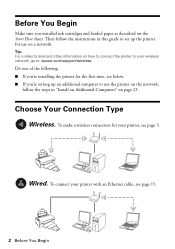
... wireless network, go to: epson.com/support/wireless Do one of the following: ■ If you're installing the printer for the first time, see below. ■ If you installed ink cartridges and loaded paper as described on page 23. Wired. Then follow the instructions in this guide to use on a network. To make a wireless connection for your printer with an Ethernet cable, see page 3. To connect your printer, see page 15. 2 Before You Begin Choose Your Connection Type Wireless...
... wireless network, go to: epson.com/support/wireless Do one of the following: ■ If you're installing the printer for the first time, see below. ■ If you installed ink cartridges and loaded paper as described on page 23. Wired. Then follow the instructions in this guide to use on a network. To make a wireless connection for your printer with an Ethernet cable, see page 3. To connect your printer, see page 15. 2 Before You Begin Choose Your Connection Type Wireless...
Network Installation Guide
Page 14
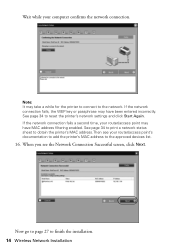
... the installation. 14 Wireless Network Installation If the network connection fails a second time, your router/access point may have MAC address filtering enabled. Wait while your router/access point's documentation to add the printer's MAC address to reset the printer's network settings and click Start Again. Now go to page 27 to the network. See page 34 to the approved devices list. 16. See page 34 to print a network status sheet to obtain the printer's MAC address.Then see the Network Connection Successful screen, click...
... the installation. 14 Wireless Network Installation If the network connection fails a second time, your router/access point may have MAC address filtering enabled. Wait while your router/access point's documentation to add the printer's MAC address to reset the printer's network settings and click Start Again. Now go to page 27 to the network. See page 34 to the approved devices list. 16. See page 34 to print a network status sheet to obtain the printer's MAC address.Then see the Network Connection Successful screen, click...
Network Installation Guide
Page 30
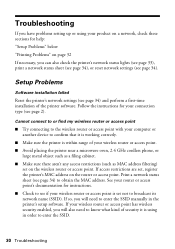
... a network, check these sections for help: "Setup Problems" below "Printing Problems" on page 32 If necessary, you will need to confirm that it is working correctly. ■ Make sure the printer is set not to enter the SSID. 30 Troubleshooting See your router or access point's documentation for your connection type (see page 2). If so, you can also check the printer's network status lights (see page 33), print a network status sheet (see page 34), or reset network settings (see page 34) and perform a first-time installation of...
... a network, check these sections for help: "Setup Problems" below "Printing Problems" on page 32 If necessary, you will need to confirm that it is working correctly. ■ Make sure the printer is set not to enter the SSID. 30 Troubleshooting See your router or access point's documentation for your connection type (see page 2). If so, you can also check the printer's network status lights (see page 33), print a network status sheet (see page 34), or reset network settings (see page 34) and perform a first-time installation of...
Network Installation Guide
Page 31
... IP addresses using DHCP, set the printer's IP address to a value that doesn't conflict with the IP address range assigned by the DHCP server. The last segment must be sure to enter them correctly. ■ If you see the Current IP Address Status screen and enter the IP address and subnet mask. ■ Make sure your computer is connected to your wireless router or access point...
... IP addresses using DHCP, set the printer's IP address to a value that doesn't conflict with the IP address range assigned by the DHCP server. The last segment must be sure to enter them correctly. ■ If you see the Current IP Address Status screen and enter the IP address and subnet mask. ■ Make sure your computer is connected to your wireless router or access point...
Network Installation Guide
Page 34
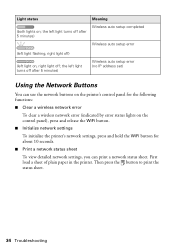
...button to print the status sheet. 34 Troubleshooting the left light turns off after 5 minutes) Wireless auto setup completed Wireless auto setup error (left light on ; First load a sheet of plain paper in the printer. the left light turns off ) (left light flashing, right light off after 5 minutes) Wireless auto setup error (no IP address set) Using the Network Buttons You can use the network buttons on the printer's control panel for the following functions: ■ Clear a wireless network error To clear a wireless network error (indicated by error status lights on the control...
...button to print the status sheet. 34 Troubleshooting the left light turns off after 5 minutes) Wireless auto setup completed Wireless auto setup error (left light on ; First load a sheet of plain paper in the printer. the left light turns off ) (left light flashing, right light off after 5 minutes) Wireless auto setup error (no IP address set) Using the Network Buttons You can use the network buttons on the printer's control panel for the following functions: ■ Clear a wireless network error To clear a wireless network error (indicated by error status lights on the control...
Product Brochure
Page 2
.... Additional print time will vary according to change without notice. Based on Epson testing of power estimated to competitive monochrome laser printers priced at $129 or less, available as of ink remains in printer damage. Hi-Speed USB 2.0 Wireless Wi-Fi (802.11 b/g, compatible with full cartridges and part of April 2008. and Canada WorkForce 40 color printer, instructional manual, CD-ROM with drivers and bonus software, power cord, Ethernet cable (CAT-5), 4 DURABrite Ultra Ink cartridges...
.... Additional print time will vary according to change without notice. Based on Epson testing of power estimated to competitive monochrome laser printers priced at $129 or less, available as of ink remains in printer damage. Hi-Speed USB 2.0 Wireless Wi-Fi (802.11 b/g, compatible with full cartridges and part of April 2008. and Canada WorkForce 40 color printer, instructional manual, CD-ROM with drivers and bonus software, power cord, Ethernet cable (CAT-5), 4 DURABrite Ultra Ink cartridges...

Quick Guide
Page 8
... File menu and select Print. Open a document or photo in Windows 1. Basic Printing This section describes the basic steps for printing a document or photo stored on your computer as described on the Start Here sheet. Before you start, make sure you see a window like this one: Select your printer Click here to your printer software 3. Make sure EPSON WorkForce 40 Series is selected, then click the Preferences or Properties button. (If you 've installed your printer software and connected...
... File menu and select Print. Open a document or photo in Windows 1. Basic Printing This section describes the basic steps for printing a document or photo stored on your computer as described on the Start Here sheet. Before you start, make sure you see a window like this one: Select your printer Click here to your printer software 3. Make sure EPSON WorkForce 40 Series is selected, then click the Preferences or Properties button. (If you 've installed your printer software and connected...
Quick Guide
Page 10
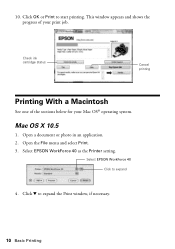
Select EPSON WorkForce 40 as the Printer setting. This window appears and shows the progress of the sections below for your print job. Open a document or photo in an application. 2. Select EPSON WorkForce 40 Click to start printing. Check ink cartridge status Cancel printing Printing With a Macintosh See one of your Mac OS® operating system. Mac OS X 10.5 1. Open the File menu and select Print. 3. Click OK or Print to expand 4. Click d to expand the Print window, if necessary. 10 Basic Printing 10.
Select EPSON WorkForce 40 as the Printer setting. This window appears and shows the progress of the sections below for your print job. Open a document or photo in an application. 2. Select EPSON WorkForce 40 Click to start printing. Check ink cartridge status Cancel printing Printing With a Macintosh See one of your Mac OS® operating system. Mac OS X 10.5 1. Open the File menu and select Print. 3. Click OK or Print to expand 4. Click d to expand the Print window, if necessary. 10 Basic Printing 10.

Quick Guide
Page 16
...: Print head cleaning uses ink, so clean it . 3. If there are still gaps or lines, or the test patterns are clean Nozzles need to be able to clean it only if necessary. Hold down the ink button for at least 3 seconds to be cleaned. Make sure the printer is on page 28. Check the nozzle check pattern that doesn't help, contact Epson as described in the lines. If that prints to let any improvement after cleaning the print head three times, turn...
...: Print head cleaning uses ink, so clean it . 3. If there are still gaps or lines, or the test patterns are clean Nozzles need to be able to clean it only if necessary. Hold down the ink button for at least 3 seconds to be cleaned. Make sure the printer is on page 28. Check the nozzle check pattern that doesn't help, contact Epson as described in the lines. If that prints to let any improvement after cleaning the print head three times, turn...
Quick Guide
Page 17
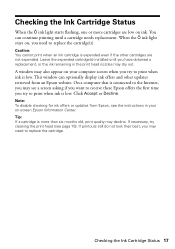
... your computer screen when you try cleaning the print head (see the instructions in the print head nozzles may see a screen asking if you want to replace the cartridge. Checking the Ink Cartridge Status 17 Tip: If a cartridge is low. Leave the expended cartridge(s) installed until a cartridge needs replacement. A window may also appear on , you may dry out. Note: To disable checking for ink offers or updates from an Epson website. Caution: You cannot print when an ink cartridge is connected to...
... your computer screen when you try cleaning the print head (see the instructions in the print head nozzles may see a screen asking if you want to replace the cartridge. Checking the Ink Cartridge Status 17 Tip: If a cartridge is low. Leave the expended cartridge(s) installed until a cartridge needs replacement. A window may also appear on , you may dry out. Note: To disable checking for ink offers or updates from an Epson website. Caution: You cannot print when an ink cartridge is connected to...
Quick Guide
Page 24
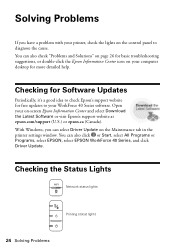
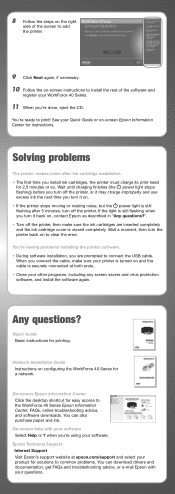
... to check Epson's support website for free updates to diagnose the cause. You can also check "Problems and Solutions" on page 26 for basic troubleshooting suggestions, or double-click the Epson Information Center icon on the control panel to your WorkForce 40 Series software. Open your on the Maintenance tab in the printer settings window. Checking the Status Lights Network status lights Printing status lights 24 Solving Problems With Windows, you have a problem with your printer, check the lights on your computer desktop for more detailed help. Solving Problems...
... to check Epson's support website for free updates to diagnose the cause. You can also check "Problems and Solutions" on page 26 for basic troubleshooting suggestions, or double-click the Epson Information Center icon on the control panel to your WorkForce 40 Series software. Open your on the Maintenance tab in the printer settings window. Checking the Status Lights Network status lights Printing status lights 24 Solving Problems With Windows, you have a problem with your printer, check the lights on your computer desktop for more detailed help. Solving Problems...
Quick Guide
Page 25
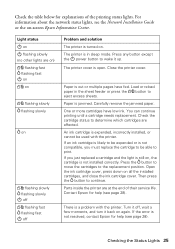
... help (see the Network Installation Guide or the on . The printer is turned on -screen Epson Information Center. The printer cover is a problem with the printer. One or more cartridges have fed. Open the ink cartridge cover, press down on , the cartridge is jammed. Light status on flashing slowly flashing slowly off flashing fast flashing fast off , wait a few moments, and turn it up. You can continue printing until a cartridge needs replacement. Then press the button to the replacement position. Parts inside the printer...
... help (see the Network Installation Guide or the on . The printer is turned on -screen Epson Information Center. The printer cover is a problem with the printer. One or more cartridges have fed. Open the ink cartridge cover, press down on , the cartridge is jammed. Light status on flashing slowly flashing slowly off flashing fast flashing fast off , wait a few moments, and turn it up. You can continue printing until a cartridge needs replacement. Then press the button to the replacement position. Parts inside the printer...
Quick Guide
Page 26
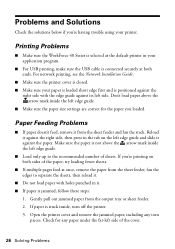
...; Make sure the paper size settings are correct for any torn pieces. Reload it against its left side. If paper is jammed, follow these steps: 1. Check for the paper you loaded. Printing Problems ■ Make sure the WorkForce 40 Series is selected as the default printer in the tab on both ends. For network printing, see the Network Installation Guide. ■ Make sure the printer cover is closed. ■ Make sure your paper is loaded short edge first and is connected...
...; Make sure the paper size settings are correct for any torn pieces. Reload it against its left side. If paper is jammed, follow these steps: 1. Check for the paper you loaded. Printing Problems ■ Make sure the WorkForce 40 Series is selected as the default printer in the tab on both ends. For network printing, see the Network Installation Guide. ■ Make sure the printer cover is closed. ■ Make sure your paper is loaded short edge first and is connected...
Quick Guide
Page 27
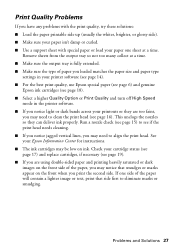
... curled. ■ Use a support sheet with special paper or load your paper one side of paper you loaded matches the paper size and paper type settings in your printer software (see page 14). ■ For the best print quality, use Epson special paper (see page 6) and genuine Epson ink cartridges (see page 18). ■ Select a higher Quality Option or Print Quality and turn off High Speed mode in the printer software. ■ If you notice light or dark bands across your cartridge status (see page 17) and replace cartridges, if necessary...
... curled. ■ Use a support sheet with special paper or load your paper one side of paper you loaded matches the paper size and paper type settings in your printer software (see page 14). ■ For the best print quality, use Epson special paper (see page 6) and genuine Epson ink cartridges (see page 18). ■ Select a higher Quality Option or Print Quality and turn off High Speed mode in the printer software. ■ If you notice light or dark bands across your cartridge status (see page 17) and replace cartridges, if necessary...

Quick Guide
Page 29
...; Always turn off the printer using the P power button, and wait until the P power light stops flashing before unplugging the printer or cutting off , or on an outlet controlled by a wall switch or timer. ■ Do not let the power cord become damaged or frayed. ■ If you won't be using the printer for sufficient ventilation. Use of another cord may cause fire. Notices Important Safety Instructions Before using your WorkForce 40 Series...
...; Always turn off the printer using the P power button, and wait until the P power light stops flashing before unplugging the printer or cutting off , or on an outlet controlled by a wall switch or timer. ■ Do not let the power cord become damaged or frayed. ■ If you won't be using the printer for sufficient ventilation. Use of another cord may cause fire. Notices Important Safety Instructions Before using your WorkForce 40 Series...

Quick Guide
Page 33
... serial number be removed or should the product fail to be another model of exchange, Epson will direct you to send your printer to Epson or its authorized service center, where the printer will provide telephone diagnostic service to determine whether the printer requires service. This warranty is not responsible for warranty repair instructions and return authorization. What Epson Will Do To Correct Problems: Should your original product covered...
... serial number be removed or should the product fail to be another model of exchange, Epson will direct you to send your printer to Epson or its authorized service center, where the printer will provide telephone diagnostic service to determine whether the printer requires service. This warranty is not responsible for warranty repair instructions and return authorization. What Epson Will Do To Correct Problems: Should your original product covered...
Start Here
Page 5
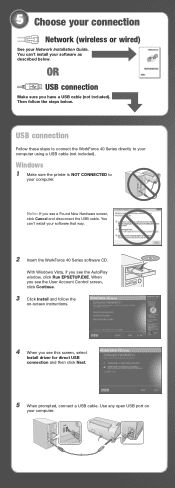
... prompted, connect a USB cable. Use any open USB port on -screen instructions. 4 When you see a Found New Hardware screen, click Cancel and disconnect the USB cable. Note: If you see the User Account Control screen, click Continue. 3 Click Install and follow the steps below . Windows 1 Make sure the printer is NOT CONNECTED to your software as described below . You can 't install your Network Installation Guide. When you have a USB cable (not included). USB connection Follow these steps to connect the WorkForce 40 Series directly...
... prompted, connect a USB cable. Use any open USB port on -screen instructions. 4 When you see a Found New Hardware screen, click Cancel and disconnect the USB cable. Note: If you see the User Account Control screen, click Continue. 3 Click Install and follow the steps below . Windows 1 Make sure the printer is NOT CONNECTED to your software as described below . You can 't install your Network Installation Guide. When you have a USB cable (not included). USB connection Follow these steps to connect the WorkForce 40 Series directly...
Start Here
Page 6
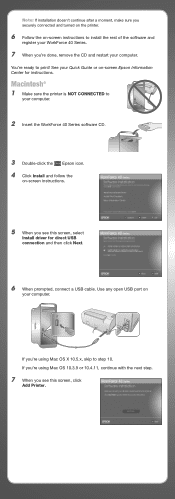
..., remove the CD and restart your computer. You're ready to your Quick Guide or on -screen instructions. 5 When you see this screen, select Install driver for instructions. See your computer. 2 Insert the WorkForce 40 Series software CD. 3 Double-click the Epson icon. 4 Click Install and follow the on -screen Epson Information Center for direct USB connection and then click Next. 6 When prompted, connect a USB cable. Macintosh® 1 Make sure the printer is NOT CONNECTED to print!
..., remove the CD and restart your computer. You're ready to your Quick Guide or on -screen instructions. 5 When you see this screen, select Install driver for instructions. See your computer. 2 Insert the WorkForce 40 Series software CD. 3 Double-click the Epson icon. 4 Click Install and follow the on -screen Epson Information Center for direct USB connection and then click Next. 6 When prompted, connect a USB cable. Macintosh® 1 Make sure the printer is NOT CONNECTED to print!
Start Here
Page 7
... print! Quick Guide Basic instructions for a network. when you install ink cartridges, the printer must charge its print head for instructions. You're ready to clear the error. If the light is still flashing when you turn off the printer, or it on -screen Epson Information Center for 2.5 minutes or so. You can download drivers and documentation, get FAQs and troubleshooting advice, or e-mail Epson with your software Select Help or ? On-screen help with your questions. Epson Technical Support Internet Support...
... print! Quick Guide Basic instructions for a network. when you install ink cartridges, the printer must charge its print head for instructions. You're ready to clear the error. If the light is still flashing when you turn off the printer, or it on -screen Epson Information Center for 2.5 minutes or so. You can download drivers and documentation, get FAQs and troubleshooting advice, or e-mail Epson with your software Select Help or ? On-screen help with your questions. Epson Technical Support Internet Support...


