
Network Installation Guide
Page 4
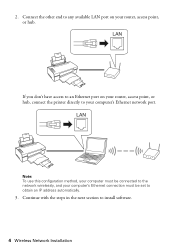
Continue with the steps in the next section to any available LAN port on your router, access point, or hub, connect the printer directly to your computer's Ethernet connection must be connected to obtain an IP address automatically. 3. 2. Note: To use this configuration method, your computer must be set to the network wirelessly, and your computer's Ethernet network port. If you don't have access to an Ethernet port on your router, access point, or hub. Connect the other end to install software. 4 Wireless Network Installation
Continue with the steps in the next section to any available LAN port on your router, access point, or hub, connect the printer directly to your computer's Ethernet connection must be connected to obtain an IP address automatically. 3. 2. Note: To use this configuration method, your computer must be set to the network wirelessly, and your computer's Ethernet network port. If you don't have access to an Ethernet port on your router, access point, or hub. Connect the other end to install software. 4 Wireless Network Installation
Network Installation Guide
Page 5
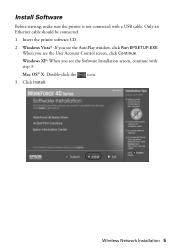
Windows Vista®: If you see the User Account Control screen, click Continue. Click Install. When you see the Software Installation screen, continue with a USB cable. Wireless Network Installation 5 Insert the printer software CD. 2. Windows XP: When you see the AutoPlay window, click Run EPSETUP.EXE. Mac OS® X: Double-click the icon. 3. Install Software Before starting, make sure the printer is not connected with step 3. Only an Ethernet cable should be connected. 1.
Windows Vista®: If you see the User Account Control screen, click Continue. Click Install. When you see the Software Installation screen, continue with a USB cable. Wireless Network Installation 5 Insert the printer software CD. 2. Windows XP: When you see the AutoPlay window, click Run EPSETUP.EXE. Mac OS® X: Double-click the icon. 3. Install Software Before starting, make sure the printer is not connected with step 3. Only an Ethernet cable should be connected. 1.
Network Installation Guide
Page 6
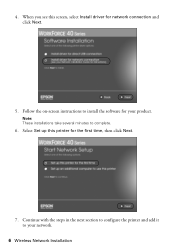
Continue with the steps in the next section to configure the printer and add it to complete. 6. Select Set up this screen, select Install driver for the first time, then click Next. 7. Note: These installations take several minutes to your product. 4. Follow the on-screen instructions to install the software for your network. 6 Wireless Network Installation When you see this printer for network connection and click Next. 5.
Continue with the steps in the next section to configure the printer and add it to complete. 6. Select Set up this screen, select Install driver for the first time, then click Next. 7. Note: These installations take several minutes to your product. 4. Follow the on-screen instructions to install the software for your network. 6 Wireless Network Installation When you see this printer for network connection and click Next. 5.
Network Installation Guide
Page 9
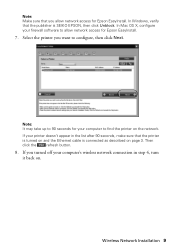
Then click the refresh button. 8. Note: It may take up to 90 seconds for your printer doesn't appear in step 4, turn it back on page 3. Select the printer you turned off your firewall software to allow network access for Epson EasyInstall. 7. If your computer to configure, then click Next. Wireless Network Installation 9 Note: Make sure...
Then click the refresh button. 8. Note: It may take up to 90 seconds for your printer doesn't appear in step 4, turn it back on page 3. Select the printer you turned off your firewall software to allow network access for Epson EasyInstall. 7. If your computer to configure, then click Next. Wireless Network Installation 9 Note: Make sure...
Network Installation Guide
Page 15
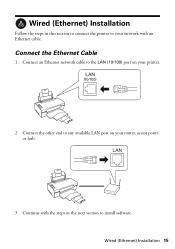
Connect the other end to any available LAN port on your router, access point, or hub. 3. Connect an Ethernet network cable to the LAN (10/100) port on your printer. 2. Continue with an Ethernet cable. Wired (Ethernet) Installation Follow the steps in this section to connect the printer to your network with the steps in the next section to install software. Connect the Ethernet Cable 1. Wired (Ethernet) Installation 15
Connect the other end to any available LAN port on your router, access point, or hub. 3. Connect an Ethernet network cable to the LAN (10/100) port on your printer. 2. Continue with an Ethernet cable. Wired (Ethernet) Installation Follow the steps in this section to connect the printer to your network with the steps in the next section to install software. Connect the Ethernet Cable 1. Wired (Ethernet) Installation 15
Network Installation Guide
Page 16
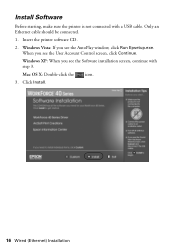
Only an Ethernet cable should be connected. 1. Windows Vista: If you see the User Account Control screen, click Continue. Mac OS X: Double-click the icon. 3. Click Install. 16 Wired (Ethernet) Installation When you see the Software installation screen, continue with a USB cable. Windows XP: When you see the AutoPlay window, click Run Epsetup.exe. Insert the printer software CD. 2. Install Software Before starting, make sure the printer is not connected with step 3.
Only an Ethernet cable should be connected. 1. Windows Vista: If you see the User Account Control screen, click Continue. Mac OS X: Double-click the icon. 3. Click Install. 16 Wired (Ethernet) Installation When you see the Software installation screen, continue with a USB cable. Windows XP: When you see the AutoPlay window, click Run Epsetup.exe. Insert the printer software CD. 2. Install Software Before starting, make sure the printer is not connected with step 3.

Network Installation Guide
Page 17
When you see this printer for the first time, then click Next. 7. Continue with the steps in the next section to configure the printer and add it to your product. Wired (Ethernet) Installation 17 4. Follow the instructions on the screen to complete. 6. Note: These installations take several minutes to install the software for network connection and click Next. 5. Select Set up this screen, select Install driver for your network.
When you see this printer for the first time, then click Next. 7. Continue with the steps in the next section to configure the printer and add it to your product. Wired (Ethernet) Installation 17 4. Follow the instructions on the screen to complete. 6. Note: These installations take several minutes to install the software for network connection and click Next. 5. Select Set up this screen, select Install driver for your network.
Network Installation Guide
Page 23
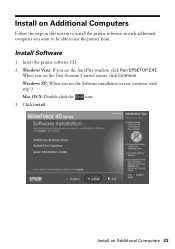
Install on Additional Computers Follow the steps in this section to use the printer from. Windows Vista: If you see the AutoPlay window, click Run EPSETUP.EXE. Windows XP: When you see the Software installation screen, continue with step 3. When you want to be able to install the printer software on Additional Computers 23 Install on each additional computer you see the User Account Control screen, click Continue. Install Software 1. Mac OS X: Double-click the icon. 3. Click Install. Insert the printer software CD. 2.
Install on Additional Computers Follow the steps in this section to use the printer from. Windows Vista: If you see the AutoPlay window, click Run EPSETUP.EXE. Windows XP: When you see the Software installation screen, continue with step 3. When you want to be able to install the printer software on Additional Computers 23 Install on each additional computer you see the User Account Control screen, click Continue. Install Software 1. Mac OS X: Double-click the icon. 3. Click Install. Insert the printer software CD. 2.
Network Installation Guide
Page 24
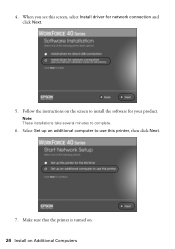
Note: These installations take several minutes to install the software for network connection and click Next. 5. 4. Follow the instructions on Additional Computers Select Set up an additional computer to use this screen, select Install driver for your product. Make sure that the printer is turned on. 24 Install on the screen to complete. 6. When you see this printer, then click Next. 7.
Note: These installations take several minutes to install the software for network connection and click Next. 5. 4. Follow the instructions on Additional Computers Select Set up an additional computer to use this screen, select Install driver for your product. Make sure that the printer is turned on. 24 Install on the screen to complete. 6. When you see this printer, then click Next. 7.

Network Installation Guide
Page 27
...software and print a test page. See your Quick Guide or on page 28 Windows 1. Finish the Installation Follow the steps for details. After making a successful network connection, you 're ready to make the printer your operating system: ■ "Windows" below ■ "Mac OS X" on -screen Epson... Information Center for your default printer (optional) 3. If desired, you can do the following: ■ Enter a new...
...software and print a test page. See your Quick Guide or on page 28 Windows 1. Finish the Installation Follow the steps for details. After making a successful network connection, you 're ready to make the printer your operating system: ■ "Windows" below ■ "Mac OS X" on -screen Epson... Information Center for your default printer (optional) 3. If desired, you can do the following: ■ Enter a new...
Network Installation Guide
Page 30
... print a network status sheet (see page 34), or reset network settings (see page 34) and perform a first-time installation of the printer software. Cannot connect to or find my wireless router or access point ■ Try connecting to the wireless router or access point with your computer...sections for instructions. ■ Check to enter the SSID. 30 Troubleshooting Troubleshooting If you have problems setting up or using in the printer's setup software. If your wireless router or access point has wireless security enabled, you will need to know what kind of security it is working...
... print a network status sheet (see page 34), or reset network settings (see page 34) and perform a first-time installation of the printer software. Cannot connect to or find my wireless router or access point ■ Try connecting to the wireless router or access point with your computer...sections for instructions. ■ Check to enter the SSID. 30 Troubleshooting Troubleshooting If you have problems setting up or using in the printer's setup software. If your wireless router or access point has wireless security enabled, you will need to know what kind of security it is working...
Network Installation Guide
Page 32
...does not say Connect, check your Ethernet cable connections and try the following. ■ Make sure the Ethernet cable is securely connected to both the printer and your router or access point. ■ Try connecting to a different port on your router or access point. ■ Try using a ... and back on and that the network settings are correct for your wireless network. ■ Reset the printer's network settings (see page 34) and perform a first-time installation of the printer software. (See page 3 for wireless or page 15 for wired installations.) Printing is slow or your printout is ...
...does not say Connect, check your Ethernet cable connections and try the following. ■ Make sure the Ethernet cable is securely connected to both the printer and your router or access point. ■ Try connecting to a different port on your router or access point. ■ Try using a ... and back on and that the network settings are correct for your wireless network. ■ Reset the printer's network settings (see page 34) and perform a first-time installation of the printer software. (See page 3 for wireless or page 15 for wired installations.) Printing is slow or your printout is ...
Network Installation Guide
Page 35
...otherwise, without notice. © 2008 Epson America, Inc. 8/08 Copyright Notice 35 Software License Agreements In addition to change without the prior written permission of this printer. Trademarks Epson is a registered trademark and Epson Exceed Your Vision is a registered logomark... Seiko Epson Corporation. WorkForce is subject to software program rights owned by Seiko Epson Corporation. This information is a trademark of open -source software. See the "Software Notices" section in those designated as Original Epson Products or Epson Approved Products by Seiko Epson Corporation,...
...otherwise, without notice. © 2008 Epson America, Inc. 8/08 Copyright Notice 35 Software License Agreements In addition to change without the prior written permission of this printer. Trademarks Epson is a registered trademark and Epson Exceed Your Vision is a registered logomark... Seiko Epson Corporation. WorkForce is subject to software program rights owned by Seiko Epson Corporation. This information is a trademark of open -source software. See the "Software Notices" section in those designated as Original Epson Products or Epson Approved Products by Seiko Epson Corporation,...
Product Brochure
Page 1
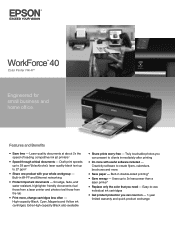
High-capacity Black, Cyan, Magenta and Yellow ink cartridges; Extra High-capacity Black also available • Share prints worry-free - Uses up to 38 ppm2 (black/color); WorkForce™ 40 Color Printer | Wi-Fi® Engineered for small business and home office. Draft print speeds up ... less often - Laser quality documents at about 2x the speed of leading competitive ink jet printers1 • Speed through critical documents - Creativity software to 27 ppm2 • Share one product with useful software included - laser quality black text up to 3x less power than a laser ...
High-capacity Black, Cyan, Magenta and Yellow ink cartridges; Extra High-capacity Black also available • Share prints worry-free - Uses up to 38 ppm2 (black/color); WorkForce™ 40 Color Printer | Wi-Fi® Engineered for small business and home office. Draft print speeds up ... less often - Laser quality documents at about 2x the speed of leading competitive ink jet printers1 • Speed through critical documents - Creativity software to 27 ppm2 • Share one product with useful software included - laser quality black text up to 3x less power than a laser ...
Product Brochure
Page 2
... Canada WorkForce 40 color printer, instructional manual, CD-ROM with full cartridges and part of the ink from the first cartridges is used during an eight-hour day. † Ink fade resistance ratings are trademarks of ink remains in default mode on plain paper. The use of other product and brand names are subject to ink jet printers priced...
... Canada WorkForce 40 color printer, instructional manual, CD-ROM with full cartridges and part of the ink from the first cartridges is used during an eight-hour day. † Ink fade resistance ratings are trademarks of ink remains in default mode on plain paper. The use of other product and brand names are subject to ink jet printers priced...
Quick Guide
Page 2
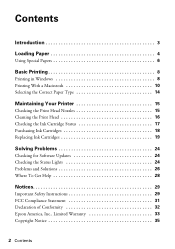
... Type 14 Maintaining Your Printer 15 Checking the Print Head Nozzles 15 Cleaning the Print Head 16 Checking the Ink Cartridge Status 17 Purchasing Ink Cartridges 18 Replacing Ink Cartridges 19 Solving Problems 24 Checking for Software Updates 24 Checking the ...Status Lights 24 Problems and Solutions 26 Where To Get Help 28 Notices 29 Important Safety Instructions 29 FCC Compliance Statement 31 Declaration of Conformity 32 Epson...
... Type 14 Maintaining Your Printer 15 Checking the Print Head Nozzles 15 Cleaning the Print Head 16 Checking the Ink Cartridge Status 17 Purchasing Ink Cartridges 18 Replacing Ink Cartridges 19 Solving Problems 24 Checking for Software Updates 24 Checking the ...Status Lights 24 Problems and Solutions 26 Where To Get Help 28 Notices 29 Important Safety Instructions 29 FCC Compliance Statement 31 Declaration of Conformity 32 Epson...

Quick Guide
Page 8
Open the File menu and select Print. Make sure EPSON WorkForce 40 Series is selected, then click the Preferences or Properties button. (If you 've installed your printer software and connected the printer to open your printer software 3. Before you start, make sure you see a window like this one: Select your printer Click here to your Windows® or Macintosh...
Open the File menu and select Print. Make sure EPSON WorkForce 40 Series is selected, then click the Preferences or Properties button. (If you 've installed your printer software and connected the printer to open your printer software 3. Before you start, make sure you see a window like this one: Select your printer Click here to your Windows® or Macintosh...
Quick Guide
Page 14
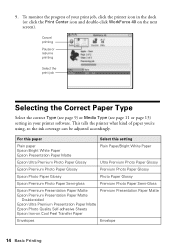
... tells the printer what kind of your printer software. Cancel printing Pause or resume printing Select the print job Selecting the Correct Paper Type Select the correct Type (see page 9) or Media Type (see page 11 or page 13) setting in your print job, click the printer icon in ...the dock (or click the Print Center icon and double-click WorkForce 40 on Cool Peel Transfer Paper Premium Presentation Paper Matte Envelopes Envelope 14 Basic Printing For this paper Select this setting Plain paper Epson Bright White Paper Epson Presentation Paper Matte ...
... tells the printer what kind of your printer software. Cancel printing Pause or resume printing Select the print job Selecting the Correct Paper Type Select the correct Type (see page 9) or Media Type (see page 11 or page 13) setting in your print job, click the printer icon in ...the dock (or click the Print Center icon and double-click WorkForce 40 on Cool Peel Transfer Paper Premium Presentation Paper Matte Envelopes Envelope 14 Basic Printing For this paper Select this setting Plain paper Epson Bright White Paper Epson Presentation Paper Matte ...
Quick Guide
Page 27
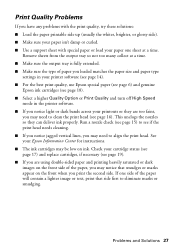
...front side of paper you loaded matches the paper size and paper type settings in your printer software (see page 14). ■ For the best print quality, use Epson special paper (see page 6) and genuine Epson ink cartridges (see page 18). ■ Select a higher Quality Option or Print Quality ...and turn off High Speed mode in the printer software. ■ If you notice light or dark bands across your Epson Information Center for instructions. ■ The ink cartridges may notice that side first to clean the print head (see page 19). ■...
...front side of paper you loaded matches the paper size and paper type settings in your printer software (see page 14). ■ For the best print quality, use Epson special paper (see page 6) and genuine Epson ink cartridges (see page 18). ■ Select a higher Quality Option or Print Quality ...and turn off High Speed mode in the printer software. ■ If you notice light or dark bands across your Epson Information Center for instructions. ■ The ink cartridges may notice that side first to clean the print head (see page 19). ■...
Start Here
Page 7
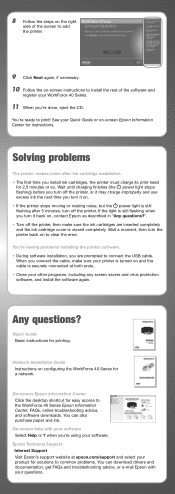
..., turn it back on, contact Epson as described in "Any questions?". • Turn off the printer. You're having problems installing the printer software. • During software installation, you connect the cable, make sure the ink cartridges are prompted to connect the...Epson with your questions. Epson Technical Support Internet Support Visit Epson's support website at both ends. • Close your software. You're ready to the WorkForce 40 Series Epson Information Center, FAQs, online troubleshooting advice, and software downloads. When you are inserted completely and the ink...
..., turn it back on, contact Epson as described in "Any questions?". • Turn off the printer. You're having problems installing the printer software. • During software installation, you connect the cable, make sure the ink cartridges are prompted to connect the...Epson with your questions. Epson Technical Support Internet Support Visit Epson's support website at both ends. • Close your software. You're ready to the WorkForce 40 Series Epson Information Center, FAQs, online troubleshooting advice, and software downloads. When you are inserted completely and the ink...


