
Network Installation Guide
Page 3
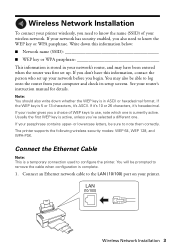
...Connect the Ethernet Cable Note: This is complete. 1. Connect an Ethernet network cable to note them correctly. Wireless Network Installation To connect your printer wirelessly, you need to know the name (SSID) of WEP keys to use, note which one . If your router gives you a choice... it's 10 or 26 characters, it 's ASCII. If your router's instruction manual for details. If you 've selected a different one is stored in ASCII or hexadecimal format. If the WEP key is in your printer. Wireless Network Installation 3 Usually the first WEP key is active, unless you ...
...Connect the Ethernet Cable Note: This is complete. 1. Connect an Ethernet network cable to note them correctly. Wireless Network Installation To connect your printer wirelessly, you need to know the name (SSID) of WEP keys to use, note which one . If your router gives you a choice... it's 10 or 26 characters, it 's ASCII. If your router's instruction manual for details. If you 've selected a different one is stored in ASCII or hexadecimal format. If the WEP key is in your printer. Wireless Network Installation 3 Usually the first WEP key is active, unless you ...

Network Installation Guide
Page 10
Select your router or access point doesn't broadcast its network name (SSID), select Manually Enter Network Name (SSID) and enter the network name. Note: If your network name (SSID) from the list of available networks, then click Next. Click Next. Select Wireless (remove Ethernet cable when prompted) as the network communication type, then click Next. 10. 9. On the next screen, select your wireless network security type, then click Next. 10 Wireless Network Installation
Select your router or access point doesn't broadcast its network name (SSID), select Manually Enter Network Name (SSID) and enter the network name. Note: If your network name (SSID) from the list of available networks, then click Next. Click Next. Select Wireless (remove Ethernet cable when prompted) as the network communication type, then click Next. 10. 9. On the next screen, select your wireless network security type, then click Next. 10 Wireless Network Installation
Network Installation Guide
Page 12
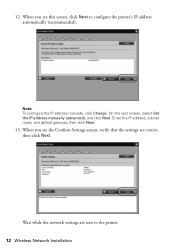
When you see this screen, click Next to the printer. 12 Wireless Network Installation Enter the IP address, subnet mask, and default gateway, then click Next. 13. When you see the Confirm Settings screen, verify that the settings are sent to configure the printer's IP address automatically (recommended). Wait while the network settings are correct, then click Next. Note: To configure the IP address manually, click Change. On the next screen, select Set the IP address manually (advanced), and click Next. 12.
When you see this screen, click Next to the printer. 12 Wireless Network Installation Enter the IP address, subnet mask, and default gateway, then click Next. 13. When you see the Confirm Settings screen, verify that the settings are sent to configure the printer's IP address automatically (recommended). Wait while the network settings are correct, then click Next. Note: To configure the IP address manually, click Change. On the next screen, select Set the IP address manually (advanced), and click Next. 12.

Network Installation Guide
Page 21
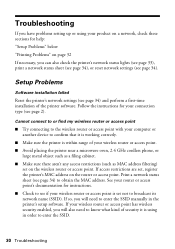
When you see this screen, click Next to your network. On the next screen, select Set the IP address manually (advanced), and click Next. Enter the IP address, subnet mask, and default gateway, then click Next. 9. When you see the Confirm Settings screen, verify that the settings are correct, then click Next. 8. Note: To configure the IP address manually, click Change. Wait while the printer connects to configure the IP address automatically (recommended). Wired (Ethernet) Installation 21
When you see this screen, click Next to your network. On the next screen, select Set the IP address manually (advanced), and click Next. Enter the IP address, subnet mask, and default gateway, then click Next. 9. When you see the Confirm Settings screen, verify that the settings are correct, then click Next. 8. Note: To configure the IP address manually, click Change. Wait while the printer connects to configure the IP address automatically (recommended). Wired (Ethernet) Installation 21
Network Installation Guide
Page 30
...wireless router or access point has wireless security enabled, you will need to broadcast its network name (SSID). If so, you can also check the printer's network status lights (see page 33), print a network status sheet (see page 34), or reset network settings (see page 2). If access restrictions.... If your computer or another device to confirm that it is set , register the printer's MAC address on page 32 If necessary, you will also need to enter the SSID manually in order to obtain the MAC address. See your connection type (see page 34). Follow the instructions for ...
...wireless router or access point has wireless security enabled, you will need to broadcast its network name (SSID). If so, you can also check the printer's network status lights (see page 33), print a network status sheet (see page 34), or reset network settings (see page 2). If access restrictions.... If your computer or another device to confirm that it is set , register the printer's MAC address on page 32 If necessary, you will also need to enter the SSID manually in order to obtain the MAC address. See your connection type (see page 34). Follow the instructions for ...
Network Installation Guide
Page 31
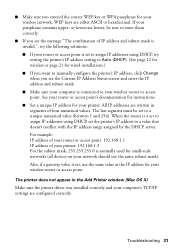
... address setting to Auto (DHCP). (See page 12 for wireless or page 21 for your printer. Also, if a gateway value is set to manually configure the printer's IP address, click Change when you entered the correct WEP key or WPA passphrase for your wireless network. The last segment must be sure... access point. For example: IP address of your router or access point: 192.168.1.1 IP address of four numerical values. The printer does not appear in segments of your printer: 192.168.1.3 For the subnet mask, 255.255.255.0 is a set to assign IP addresses using DHCP, try the following...
... address setting to Auto (DHCP). (See page 12 for wireless or page 21 for your printer. Also, if a gateway value is set to manually configure the printer's IP address, click Change when you entered the correct WEP key or WPA passphrase for your wireless network. The last segment must be sure... access point. For example: IP address of your router or access point: 192.168.1.1 IP address of four numerical values. The printer does not appear in segments of your printer: 192.168.1.3 For the subnet mask, 255.255.255.0 is a set to assign IP addresses using DHCP, try the following...
Network Installation Guide
Page 32
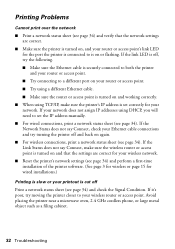
... For wireless connections, print a network status sheet (see page 34). If the Network Status does not say Connect, make sure the printer's IP address is set the IP address manually. ■ For wired connections, print a network status sheet (see page 34) and check the Signal Condition. If it's poor..., try the following. ■ Make sure the Ethernet cable is securely connected to both the printer and your router or access point....
... For wireless connections, print a network status sheet (see page 34). If the Network Status does not say Connect, make sure the printer's IP address is set the IP address manually. ■ For wired connections, print a network status sheet (see page 34) and check the Signal Condition. If it's poor..., try the following. ■ Make sure the Ethernet cable is securely connected to both the printer and your router or access point....
Network Installation Guide
Page 33
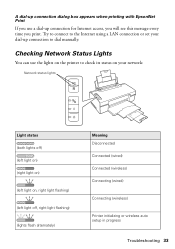
... Status Lights You can use a dial-up connection for Internet access, you will see this message every time you use the lights on the printer to check its status on your dial-up connection dialog box appears when printing with EpsonNet Print If you print. A dial-up connection to the...(left light on, right light flashing) (left light off, right light flashing) (lights flash alternately) Meaning Disconnected Connected (wired) Connected (wireless) Connecting (wired) Connecting (wireless) Printer initializing or wireless auto setup in progress Troubleshooting 33 Try to connect to dial...
... Status Lights You can use a dial-up connection for Internet access, you will see this message every time you use the lights on the printer to check its status on your dial-up connection dialog box appears when printing with EpsonNet Print If you print. A dial-up connection to the...(left light on, right light flashing) (left light off, right light flashing) (lights flash alternately) Meaning Disconnected Connected (wired) Connected (wireless) Connecting (wired) Connecting (wireless) Printer initializing or wireless auto setup in progress Troubleshooting 33 Try to connect to dial...
Product Brochure
Page 2
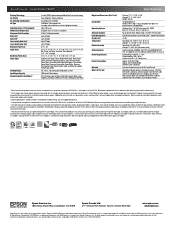
...per minute (ppm) speeds measured after first page, based on black text patterns in these marks. Based on Epson testing of power estimated to be used for the latest information. ††We recommend that you use and...WorkForce 40 color printer, instructional manual, CD-ROM with drivers and bonus software, power cord, Ethernet cable (CAT-5), 4 DURABrite Ultra Ink cartridges (one 97 Extra High-capacity Black ink cartridge and three 69 standardcapacity color ink cartridges: Cyan, Magenta, Yellow) 1 Black text printing about two times faster compared to ink jet printers...
...per minute (ppm) speeds measured after first page, based on black text patterns in these marks. Based on Epson testing of power estimated to be used for the latest information. ††We recommend that you use and...WorkForce 40 color printer, instructional manual, CD-ROM with drivers and bonus software, power cord, Ethernet cable (CAT-5), 4 DURABrite Ultra Ink cartridges (one 97 Extra High-capacity Black ink cartridge and three 69 standardcapacity color ink cartridges: Cyan, Magenta, Yellow) 1 Black text printing about two times faster compared to ink jet printers...
Quick Guide
Page 3
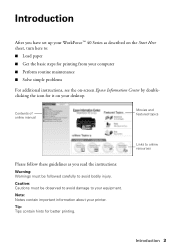
... injury. Caution: Cautions must be observed to avoid damage to your WorkForce™ 40 Series as described on the Start Here sheet, turn here to online resources Introduction 3 Contents of online manual Movies and featured topics Please follow these guidelines as you have set up... it on -screen Epson Information Center by doubleclicking the icon for better printing. Links to : ■ Load paper ■ Get the basic steps for printing from your computer ■ Perform routine maintenance ■ Solve simple problems For additional instructions, see the on your printer.
... injury. Caution: Cautions must be observed to avoid damage to your WorkForce™ 40 Series as described on the Start Here sheet, turn here to online resources Introduction 3 Contents of online manual Movies and featured topics Please follow these guidelines as you have set up... it on -screen Epson Information Center by doubleclicking the icon for better printing. Links to : ■ Load paper ■ Get the basic steps for printing from your computer ■ Perform routine maintenance ■ Solve simple problems For additional instructions, see the on your printer.


