
Network Installation Guide
Page 3
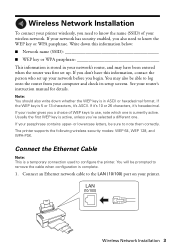
...26 characters, it 's ASCII. Connect the Ethernet Cable Note: This is a temporary connection used to the LAN (10/100) port on your printer. Wireless Network Installation 3 If your router gives you a choice of your wireless network. or lowercase letters, be prompted to remove the cable when ... need to know the WEP key or WPA passphrase. Write down whether the WEP key is complete. 1. If your router's instruction manual for details. The printer supports the following wireless security modes: WEP 64, WEP 128, and WPA-PSK. See your passphrase contains upper- Note: You should...
...26 characters, it 's ASCII. Connect the Ethernet Cable Note: This is a temporary connection used to the LAN (10/100) port on your printer. Wireless Network Installation 3 If your router gives you a choice of your wireless network. or lowercase letters, be prompted to remove the cable when ... need to know the WEP key or WPA passphrase. Write down whether the WEP key is complete. 1. If your router's instruction manual for details. The printer supports the following wireless security modes: WEP 64, WEP 128, and WPA-PSK. See your passphrase contains upper- Note: You should...

Network Installation Guide
Page 10
Note: If your network name (SSID) from the list of available networks, then click Next. Click Next. 9. Select your router or access point doesn't broadcast its network name (SSID), select Manually Enter Network Name (SSID) and enter the network name. On the next screen, select your wireless network security type, then click Next. 10 Wireless Network Installation Select Wireless (remove Ethernet cable when prompted) as the network communication type, then click Next. 10.
Note: If your network name (SSID) from the list of available networks, then click Next. Click Next. 9. Select your router or access point doesn't broadcast its network name (SSID), select Manually Enter Network Name (SSID) and enter the network name. On the next screen, select your wireless network security type, then click Next. 10 Wireless Network Installation Select Wireless (remove Ethernet cable when prompted) as the network communication type, then click Next. 10.
Network Installation Guide
Page 12
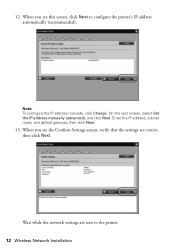
12. When you see the Confirm Settings screen, verify that the settings are sent to configure the printer's IP address automatically (recommended). Note: To configure the IP address manually, click Change. Enter the IP address, subnet mask, and default gateway, then click Next. 13. On the next screen, select Set the IP address manually (advanced), and click Next. When you see this screen, click Next to the printer. 12 Wireless Network Installation Wait while the network settings are correct, then click Next.
12. When you see the Confirm Settings screen, verify that the settings are sent to configure the printer's IP address automatically (recommended). Note: To configure the IP address manually, click Change. Enter the IP address, subnet mask, and default gateway, then click Next. 13. On the next screen, select Set the IP address manually (advanced), and click Next. When you see this screen, click Next to the printer. 12 Wireless Network Installation Wait while the network settings are correct, then click Next.

Network Installation Guide
Page 21
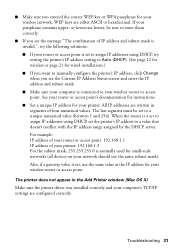
8. Enter the IP address, subnet mask, and default gateway, then click Next. 9. Wired (Ethernet) Installation 21 When you see the Confirm Settings screen, verify that the settings are correct, then click Next. Wait while the printer connects to configure the IP address automatically (recommended). When you see this screen, click Next to your network. Note: To configure the IP address manually, click Change. On the next screen, select Set the IP address manually (advanced), and click Next.
8. Enter the IP address, subnet mask, and default gateway, then click Next. 9. Wired (Ethernet) Installation 21 When you see the Confirm Settings screen, verify that the settings are correct, then click Next. Wait while the printer connects to configure the IP address automatically (recommended). When you see this screen, click Next to your network. Note: To configure the IP address manually, click Change. On the next screen, select Set the IP address manually (advanced), and click Next.
Network Installation Guide
Page 30
...installation failed Reset the printer's network settings (see page 34) to broadcast its network name (SSID). Print a network status sheet (see page 34) and perform a first-time installation of your connection type (see page 34). If so, you will also need to enter the SSID manually in order to ...confirm that it is using your product on a network, check these sections for your wireless router or access point. ■ Avoid placing the printer near a microwave oven, 2.4 GHz cordless phone, or large metal ...
...installation failed Reset the printer's network settings (see page 34) to broadcast its network name (SSID). Print a network status sheet (see page 34) and perform a first-time installation of your connection type (see page 34). If so, you will also need to enter the SSID manually in order to ...confirm that it is using your product on a network, check these sections for your wireless router or access point. ■ Avoid placing the printer near a microwave oven, 2.4 GHz cordless phone, or large metal ...
Network Installation Guide
Page 31
... and enter the IP address and subnet mask. ■ Make sure your computer is set to assign IP addresses using DHCP, set to manually configure the printer's IP address, click Change when you want to a unique numerical value (between 1 and 254). For example: IP address of your router...access point's documentation for instructions. ■ Set a unique IP address for your wireless router or access point. or lowercase letters, be set the printer's IP address to your wireless network. Also, if a gateway value is normally used for small-scale networks (all devices on your router or ...
... and enter the IP address and subnet mask. ■ Make sure your computer is set to assign IP addresses using DHCP, set to manually configure the printer's IP address, click Change when you want to a unique numerical value (between 1 and 254). For example: IP address of your router...access point's documentation for instructions. ■ Set a unique IP address for your wireless router or access point. or lowercase letters, be set the printer's IP address to your wireless network. Also, if a gateway value is normally used for small-scale networks (all devices on your router or ...
Network Installation Guide
Page 32
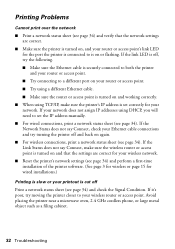
.... ■ For wireless connections, print a network status sheet (see page 34). If the Network Status does not say Connect, make sure the printer's IP address is set the IP address manually. ■ For wired connections, print a network status sheet (see page 34). Printing Problems Cannot print over the network ■ Print a network...
.... ■ For wireless connections, print a network status sheet (see page 34). If the Network Status does not say Connect, make sure the printer's IP address is set the IP address manually. ■ For wired connections, print a network status sheet (see page 34). Printing Problems Cannot print over the network ■ Print a network...
Network Installation Guide
Page 33
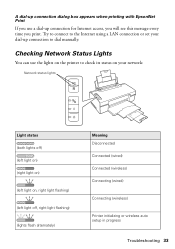
Checking Network Status Lights You can use a dial-up connection to dial manually. Try to connect to the Internet using a LAN connection or set your network: Network status lights Light status (both lights off) (left light on...) (right light on) (left light off, right light flashing) (lights flash alternately) Meaning Disconnected Connected (wired) Connected (wireless) Connecting (wired) Connecting (wireless) Printer initializing or wireless auto setup in progress Troubleshooting 33 A dial-up connection dialog box appears when printing with EpsonNet Print If you use the lights...
Checking Network Status Lights You can use a dial-up connection to dial manually. Try to connect to the Internet using a LAN connection or set your network: Network status lights Light status (both lights off) (left light on...) (right light on) (left light off, right light flashing) (lights flash alternately) Meaning Disconnected Connected (wired) Connected (wireless) Connecting (wired) Connecting (wireless) Printer initializing or wireless auto setup in progress Troubleshooting 33 A dial-up connection dialog box appears when printing with EpsonNet Print If you use the lights...
Product Brochure
Page 2
...Epson and MicroPiezo are registered trademarks, Epson Exceed Your Vision is a registered logomark and Epson Vivid Color and Exceed Your Vision are trademarks of April 2008. CPD-26446 8/08 and Canada WorkForce 40 color printer, instructional manual, CD-ROM with drivers and bonus software, power cord, Ethernet cable (CAT-5), 4 DURABrite Ultra Ink...with full cartridges and part of prints. Additional print time will vary according to ink jet printers priced at $199 or less available as of Seiko Epson Corporation. Based on specialty media, displayed indoors, under glass or properly store ...
...Epson and MicroPiezo are registered trademarks, Epson Exceed Your Vision is a registered logomark and Epson Vivid Color and Exceed Your Vision are trademarks of April 2008. CPD-26446 8/08 and Canada WorkForce 40 color printer, instructional manual, CD-ROM with drivers and bonus software, power cord, Ethernet cable (CAT-5), 4 DURABrite Ultra Ink...with full cartridges and part of prints. Additional print time will vary according to ink jet printers priced at $199 or less available as of Seiko Epson Corporation. Based on specialty media, displayed indoors, under glass or properly store ...
Quick Guide
Page 3
...for printing from your computer ■ Perform routine maintenance ■ Solve simple problems For additional instructions, see the on-screen Epson Information Center by doubleclicking the icon for better printing. Note: Notes contain important information about your desktop. Caution: Cautions must be... have set up your WorkForce™ 40 Series as you read the instructions: Warning: Warnings must be followed carefully to avoid bodily injury. Contents of online manual Movies and featured topics Please follow these guidelines as described on your printer. Tip: Tips contain hints...
...for printing from your computer ■ Perform routine maintenance ■ Solve simple problems For additional instructions, see the on-screen Epson Information Center by doubleclicking the icon for better printing. Note: Notes contain important information about your desktop. Caution: Cautions must be... have set up your WorkForce™ 40 Series as you read the instructions: Warning: Warnings must be followed carefully to avoid bodily injury. Contents of online manual Movies and featured topics Please follow these guidelines as described on your printer. Tip: Tips contain hints...


