
Network Installation Guide
Page 5
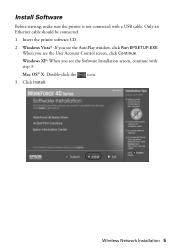
Wireless Network Installation 5 Insert the printer software CD. 2. Click Install. When you see the AutoPlay window, click Run EPSETUP.EXE. Mac OS® X: Double-click the icon. 3. Only an Ethernet cable should be connected. 1. Install Software Before starting, make sure the printer is not connected with step 3. Windows Vista®: If you see the Software Installation screen, continue with a USB cable. Windows XP: When you see the User Account Control screen, click Continue.
Wireless Network Installation 5 Insert the printer software CD. 2. Click Install. When you see the AutoPlay window, click Run EPSETUP.EXE. Mac OS® X: Double-click the icon. 3. Only an Ethernet cable should be connected. 1. Install Software Before starting, make sure the printer is not connected with step 3. Windows Vista®: If you see the Software Installation screen, continue with a USB cable. Windows XP: When you see the User Account Control screen, click Continue.
Network Installation Guide
Page 9
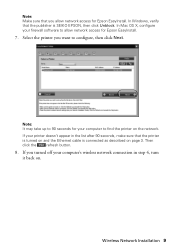
... 4, turn it back on and the Ethernet cable is SEIKO EPSON, then click Unblock. Select the printer you want to find the printer on page 3. Note: It may take up to 90 seconds for Epson EasyInstall. Note: Make sure that you allow network access for Epson EasyInstall. 7. In Mac OS X, configure your firewall software to... 9 If your computer's wireless network connection in the list after 90 seconds, make sure that the publisher is connected as described on the network. In Windows, verify that the printer is turned on .
... 4, turn it back on and the Ethernet cable is SEIKO EPSON, then click Unblock. Select the printer you want to find the printer on page 3. Note: It may take up to 90 seconds for Epson EasyInstall. Note: Make sure that you allow network access for Epson EasyInstall. 7. In Mac OS X, configure your firewall software to... 9 If your computer's wireless network connection in the list after 90 seconds, make sure that the publisher is connected as described on the network. In Windows, verify that the printer is turned on .
Network Installation Guide
Page 16
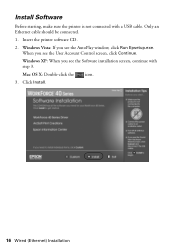
Only an Ethernet cable should be connected. 1. Insert the printer software CD. 2. Mac OS X: Double-click the icon. 3. Click Install. 16 Wired (Ethernet) Installation Windows XP: When you see the User Account Control screen, click Continue. When you see the AutoPlay window, click Run Epsetup.exe. Install Software Before starting, make sure the printer is not connected with step 3. Windows Vista: If you see the Software installation screen, continue with a USB cable.
Only an Ethernet cable should be connected. 1. Insert the printer software CD. 2. Mac OS X: Double-click the icon. 3. Click Install. 16 Wired (Ethernet) Installation Windows XP: When you see the User Account Control screen, click Continue. When you see the AutoPlay window, click Run Epsetup.exe. Install Software Before starting, make sure the printer is not connected with step 3. Windows Vista: If you see the Software installation screen, continue with a USB cable.
Network Installation Guide
Page 19
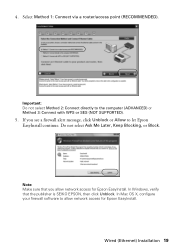
... Method 1: Connect via a router/access point (RECOMMENDED). Do not select Ask Me Later, Keep Blocking, or Block. In Windows, verify that you see a firewall alert message, click Unblock or Allow to let Epson EasyInstall continue. In Mac OS X, configure your firewall software to the computer (ADVANCED) or Method 3: Connect with WPS or...
... Method 1: Connect via a router/access point (RECOMMENDED). Do not select Ask Me Later, Keep Blocking, or Block. In Windows, verify that you see a firewall alert message, click Unblock or Allow to let Epson EasyInstall continue. In Mac OS X, configure your firewall software to the computer (ADVANCED) or Method 3: Connect with WPS or...
Network Installation Guide
Page 23
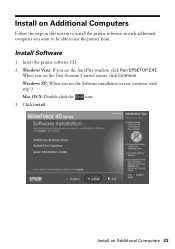
Mac OS X: Double-click the icon. 3. Install on each additional computer you see the User Account Control screen, click Continue. Windows Vista: If you see the AutoPlay window, click Run EPSETUP.EXE. Windows XP: When you see the Software installation screen, continue with step 3. Insert the printer software CD. 2. Install on Additional Computers Follow the steps in this section to use the printer from. Click Install. Install Software 1. When you want to be able to install the printer software on Additional Computers 23
Mac OS X: Double-click the icon. 3. Install on each additional computer you see the User Account Control screen, click Continue. Windows Vista: If you see the AutoPlay window, click Run EPSETUP.EXE. Windows XP: When you see the Software installation screen, continue with step 3. Insert the printer software CD. 2. Install on Additional Computers Follow the steps in this section to use the printer from. Click Install. Install Software 1. When you want to be able to install the printer software on Additional Computers 23
Network Installation Guide
Page 25
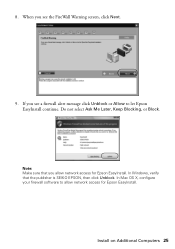
Do not select Ask Me Later, Keep Blocking, or Block. Note: Make sure that the publisher is SEIKO EPSON, then click Unblock. Install on Additional Computers 25 In Mac OS X, configure your firewall software to let Epson EasyInstall continue. 8. When you see the FireWall Warning screen, click Next. 9. In Windows, verify that you allow network access for Epson EasyInstall. If you see a firewall alert message click Unblock or Allow to allow network access for Epson EasyInstall.
Do not select Ask Me Later, Keep Blocking, or Block. Note: Make sure that the publisher is SEIKO EPSON, then click Unblock. Install on Additional Computers 25 In Mac OS X, configure your firewall software to let Epson EasyInstall continue. 8. When you see the FireWall Warning screen, click Next. 9. In Windows, verify that you allow network access for Epson EasyInstall. If you see a firewall alert message click Unblock or Allow to allow network access for Epson EasyInstall.

Network Installation Guide
Page 27
... a test page. After making a successful network connection, you 're ready to make the printer your operating system: ■ "Windows" below ■ "Mac OS X" on page 28 Windows 1. See your Quick Guide or on-screen Epson Information Center for the printer in the Printer Name text box (optional) ■ Select Set as default to print. Finish the...
... a test page. After making a successful network connection, you 're ready to make the printer your operating system: ■ "Windows" below ■ "Mac OS X" on page 28 Windows 1. See your Quick Guide or on-screen Epson Information Center for the printer in the Printer Name text box (optional) ■ Select Set as default to print. Finish the...
Network Installation Guide
Page 31
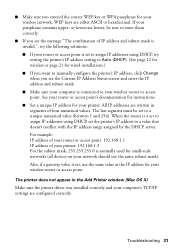
... If your passphrase contains upper- WEP keys are configured correctly. or lowercase letters, be set to assign IP addresses using DHCP, try setting the printer's IP address setting to Auto (DHCP). (See page 12 for wireless or page 21 for wired installations.) ■ If you want to ... value (between 1 and 254). All IP addresses are written in the Add Printer window (Mac OS X) Make sure the printer driver was installed correctly and your printer. When the router is a set to manually configure the printer's IP address, click Change when you see the message "The combination of IP...
... If your passphrase contains upper- WEP keys are configured correctly. or lowercase letters, be set to assign IP addresses using DHCP, try setting the printer's IP address setting to Auto (DHCP). (See page 12 for wireless or page 21 for wired installations.) ■ If you want to ... value (between 1 and 254). All IP addresses are written in the Add Printer window (Mac OS X) Make sure the printer driver was installed correctly and your printer. When the router is a set to manually configure the printer's IP address, click Change when you see the message "The combination of IP...
Product Brochure
Page 2
...-26446 8/08 and Canada WorkForce 40 color printer, instructional manual, CD-ROM with drivers and bonus software, power cord, Ethernet cable (CAT-5), 4 DURABrite Ultra Ink cartridges (one 97 Extra High-capacity Black ink cartridge and three 69 standardcapacity color ink cartridges: Cyan, Magenta, Yellow... Epson America, Inc. The use genuine Epson ink cartridges. Epson and MicroPiezo are registered trademarks, Epson Exceed Your Vision is a registered logomark and Epson Vivid Color and Exceed Your Vision are trademarks of other product and brand names are subject to ink jet printers priced...
...-26446 8/08 and Canada WorkForce 40 color printer, instructional manual, CD-ROM with drivers and bonus software, power cord, Ethernet cable (CAT-5), 4 DURABrite Ultra Ink cartridges (one 97 Extra High-capacity Black ink cartridge and three 69 standardcapacity color ink cartridges: Cyan, Magenta, Yellow... Epson America, Inc. The use genuine Epson ink cartridges. Epson and MicroPiezo are registered trademarks, Epson Exceed Your Vision is a registered logomark and Epson Vivid Color and Exceed Your Vision are trademarks of other product and brand names are subject to ink jet printers priced...
Quick Guide
Page 2
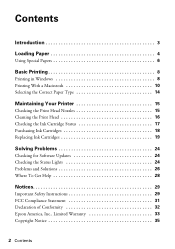
... in Windows 8 Printing With a Macintosh 10 Selecting the Correct Paper Type 14 Maintaining Your Printer 15 Checking the Print Head Nozzles 15 Cleaning the Print Head 16 Checking the Ink Cartridge Status 17 Purchasing Ink Cartridges 18 Replacing Ink Cartridges ...19 Solving Problems 24 Checking for Software Updates 24 Checking the Status Lights 24 Problems and Solutions 26 Where To Get Help 28 Notices 29 Important Safety Instructions 29 FCC Compliance Statement 31 Declaration of Conformity 32 Epson...
... in Windows 8 Printing With a Macintosh 10 Selecting the Correct Paper Type 14 Maintaining Your Printer 15 Checking the Print Head Nozzles 15 Cleaning the Print Head 16 Checking the Ink Cartridge Status 17 Purchasing Ink Cartridges 18 Replacing Ink Cartridges ...19 Solving Problems 24 Checking for Software Updates 24 Checking the Status Lights 24 Problems and Solutions 26 Where To Get Help 28 Notices 29 Important Safety Instructions 29 FCC Compliance Statement 31 Declaration of Conformity 32 Epson...

Quick Guide
Page 8
... you see a window like this one: Select your printer Click here to open your printer software 3. Printing in an application. 2. You see a Setup, Printer, or Options button, click it. Make sure EPSON WorkForce 40 Series is selected, then click the Preferences or Properties button. (If you 've installed your printer software and connected the printer to your WorkForce 40 Series software...
... you see a window like this one: Select your printer Click here to open your printer software 3. Printing in an application. 2. You see a Setup, Printer, or Options button, click it. Make sure EPSON WorkForce 40 Series is selected, then click the Preferences or Properties button. (If you 've installed your printer software and connected the printer to your WorkForce 40 Series software...

Quick Guide
Page 9
To reduce or remove red-eye effects in Windows 9 If you are using (see page 14 for borderless photos Select your document Orientation Tip: For quick access to the most common settings, click the .... For more information about print settings, click Help or see your own presets by clicking the Save Settings button on -screen Epson Information Center. 9. You can create your on-screen Epson Information Center. 5. Click OK to reduce or enlarge your paper Size Click here for details). 4. To improve the color, contrast, and...
To reduce or remove red-eye effects in Windows 9 If you are using (see page 14 for borderless photos Select your document Orientation Tip: For quick access to the most common settings, click the .... For more information about print settings, click Help or see your own presets by clicking the Save Settings button on -screen Epson Information Center. 9. You can create your on-screen Epson Information Center. 5. Click OK to reduce or enlarge your paper Size Click here for details). 4. To improve the color, contrast, and...
Quick Guide
Page 10
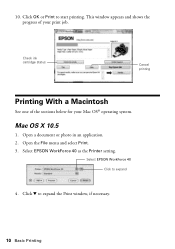
Open the File menu and select Print. 3. This window appears and shows the progress of the sections below for your print job. Select EPSON WorkForce 40 Click to expand the Print window, if necessary. 10 Basic Printing Click d to expand 4. Click OK or Print to start printing. Open a document or photo in an application. 2. Select EPSON WorkForce 40 as the Printer setting. 10. Mac OS X 10.5 1. Check ink cartridge status Cancel printing Printing With a Macintosh See one of your Mac OS® operating system.
Open the File menu and select Print. 3. This window appears and shows the progress of the sections below for your print job. Select EPSON WorkForce 40 Click to expand the Print window, if necessary. 10 Basic Printing Click d to expand 4. Click OK or Print to start printing. Open a document or photo in an application. 2. Select EPSON WorkForce 40 as the Printer setting. 10. Mac OS X 10.5 1. Check ink cartridge status Cancel printing Printing With a Macintosh See one of your Mac OS® operating system.
Quick Guide
Page 12
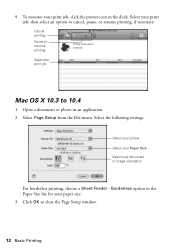
Select Page Setup from the File menu. Borderless option in the Paper Size list for your print job, click the printer icon in an application. 2. Click OK to 10.4 1. To monitor your paper size. 3. Cancel printing Pause or resume printing Select the print job Mac OS X ...10.3 to close the Page Setup window. 12 Basic Printing Open a document or photo in the dock. Select the following settings: Select your printer Select your Paper Size Select your print job, then select an option to cancel, pause, or resume...
Select Page Setup from the File menu. Borderless option in the Paper Size list for your print job, click the printer icon in an application. 2. Click OK to 10.4 1. To monitor your paper size. 3. Cancel printing Pause or resume printing Select the print job Mac OS X ...10.3 to close the Page Setup window. 12 Basic Printing Open a document or photo in the dock. Select the following settings: Select your printer Select your Paper Size Select your print job, then select an option to cancel, pause, or resume...
Quick Guide
Page 13
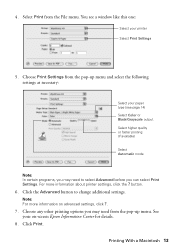
See your printer Select Print Settings 5. Choose Print Settings from the File menu. You see page 14) Select Color or Black/Grayscale output Select higher quality or faster ... following settings as necessary: Select your paper type (see a window like this one: Select your on advanced settings, click ?. 7. Click Print. Select Print from the pop-up menu. button. 6. Note: For more information about printer settings, click the ? 4. For more information on -screen Epson Information Center for details. 8. Choose any other printing options...
See your printer Select Print Settings 5. Choose Print Settings from the File menu. You see page 14) Select Color or Black/Grayscale output Select higher quality or faster ... following settings as necessary: Select your paper type (see a window like this one: Select your on advanced settings, click ?. 7. Click Print. Select Print from the pop-up menu. button. 6. Note: For more information about printer settings, click the ? 4. For more information on -screen Epson Information Center for details. 8. Choose any other printing options...
Quick Guide
Page 17
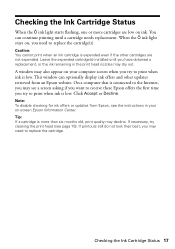
... asking if you want to receive these Epson offers the first time you try to replace the cartridge. A window may also appear on -screen Epson Information Center. Checking the Ink Cartridge Status 17 When the ink light stays on ink. Note: To disable checking for ink offers or updates from an Epson website. Tip: If a cartridge is expended...
... asking if you want to receive these Epson offers the first time you try to replace the cartridge. A window may also appear on -screen Epson Information Center. Checking the Ink Cartridge Status 17 When the ink light stays on ink. Note: To disable checking for ink offers or updates from an Epson website. Tip: If a cartridge is expended...
Quick Guide
Page 24
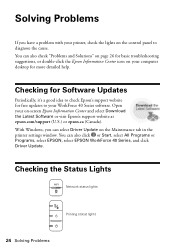
... click or Start, select All Programs or Programs, select EPSON, select EPSON WorkForce 40 Series, and click Driver Update. With Windows, you have a problem with your printer, check the lights on -screen Epson Information Center and select Download the Latest Software or visit Epson's support website at epson.com/support (U.S.) or epson.ca (Canada). Checking for Software Updates Periodically, it...
... click or Start, select All Programs or Programs, select EPSON, select EPSON WorkForce 40 Series, and click Driver Update. With Windows, you have a problem with your printer, check the lights on -screen Epson Information Center and select Download the Latest Software or visit Epson's support website at epson.com/support (U.S.) or epson.ca (Canada). Checking for Software Updates Periodically, it...
Start Here
Page 5
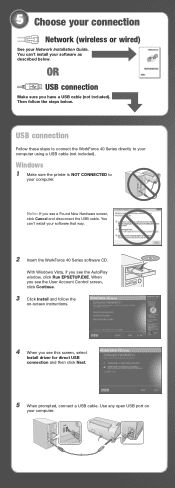
USB connection Follow these steps to connect the WorkForce 40 Series directly to your computer using a USB cable (not included). Windows 1 Make sure the printer is NOT CONNECTED to your computer. When you see this screen, select Install driver for direct USB connection and ...Install and follow the steps below . With Windows Vista, if you have a USB cable (not included). You can 't install your Network Installation Guide. 5 Choose your connection Network (wireless or wired) See your software that way. 2 Insert the WorkForce 40 Series software CD. OR USB connection Make sure...
USB connection Follow these steps to connect the WorkForce 40 Series directly to your computer using a USB cable (not included). Windows 1 Make sure the printer is NOT CONNECTED to your computer. When you see this screen, select Install driver for direct USB connection and ...Install and follow the steps below . With Windows Vista, if you have a USB cable (not included). You can 't install your Network Installation Guide. 5 Choose your connection Network (wireless or wired) See your software that way. 2 Insert the WorkForce 40 Series software CD. OR USB connection Make sure...

