
Network Installation Guide
Page 2
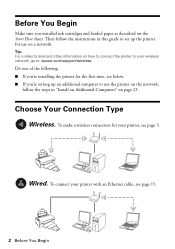
..." on the Start Here sheet. Choose Your Connection Type Wireless. Tip: For a video tutorial and other information on how to connect the printer to your wireless network, go to use on a network. Wired. Then follow the steps in this guide to set up an additional computer to... : epson.com/support/wireless Do one of the following: ■ If you're installing the printer for the first time, see page 3. To connect your printer, see below. ■ If you installed ink cartridges and loaded paper as described on page 23.
..." on the Start Here sheet. Choose Your Connection Type Wireless. Tip: For a video tutorial and other information on how to connect the printer to your wireless network, go to use on a network. Wired. Then follow the steps in this guide to set up an additional computer to... : epson.com/support/wireless Do one of the following: ■ If you're installing the printer for the first time, see page 3. To connect your printer, see below. ■ If you installed ink cartridges and loaded paper as described on page 23.
Product Brochure
Page 1
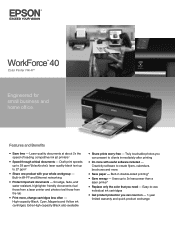
WorkForce™ 40 Color Printer | Wi-Fi® Engineered for small business ... rival those from a laser printer and photos rival those from the lab • Print more • Save paper - High-capacity Black, Cyan, Magenta and Yellow ink cartridges; Creativity software to -use, individual ink cartridges • Get product protection ...create flyers, calendars, brochures and more , change cartridges less often - Features and Benefits • Save time - Laser quality documents at about 2x the speed of leading competitive ink jet printers1 • Speed through critical documents - Extra...
WorkForce™ 40 Color Printer | Wi-Fi® Engineered for small business ... rival those from a laser printer and photos rival those from the lab • Print more • Save paper - High-capacity Black, Cyan, Magenta and Yellow ink cartridges; Creativity software to -use, individual ink cartridges • Get product protection ...create flyers, calendars, brochures and more , change cartridges less often - Features and Benefits • Save time - Laser quality documents at about 2x the speed of leading competitive ink jet printers1 • Speed through critical documents - Extra...
Product Brochure
Page 2
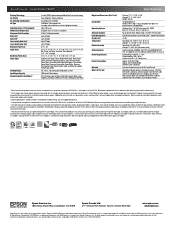
...U.S. For print quality, a small amount of Seiko Epson Corporation. The printer ships with full cartridges and part of April 2008. Epson disclaims any and all prints under glass. CPD-26446 8/08 and Canada WorkForce 40 color printer, instructional manual, CD-ROM with 802.11n) Wired ...° to 140 °F (-20 ° to ink jet printers priced at $199 or less available as of the ink from the first cartridges is a trademark of Epson America, Inc. Cartridge yields vary considerably based on accelerated testing of prints. Epson America, Inc. 3840 Kilroy Airport Way, Long Beach, CA...
...U.S. For print quality, a small amount of Seiko Epson Corporation. The printer ships with full cartridges and part of April 2008. Epson disclaims any and all prints under glass. CPD-26446 8/08 and Canada WorkForce 40 color printer, instructional manual, CD-ROM with 802.11n) Wired ...° to 140 °F (-20 ° to ink jet printers priced at $199 or less available as of the ink from the first cartridges is a trademark of Epson America, Inc. Cartridge yields vary considerably based on accelerated testing of prints. Epson America, Inc. 3840 Kilroy Airport Way, Long Beach, CA...
Quick Guide
Page 2
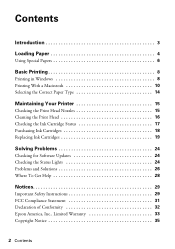
...Selecting the Correct Paper Type 14 Maintaining Your Printer 15 Checking the Print Head Nozzles 15 Cleaning the Print Head 16 Checking the Ink Cartridge Status 17 Purchasing Ink Cartridges 18 Replacing Ink Cartridges 19 Solving Problems 24 Checking for Software ...Updates 24 Checking the Status Lights 24 Problems and Solutions 26 Where To Get Help 28 Notices 29 Important Safety Instructions 29 FCC Compliance Statement 31 Declaration of Conformity 32 Epson...
...Selecting the Correct Paper Type 14 Maintaining Your Printer 15 Checking the Print Head Nozzles 15 Cleaning the Print Head 16 Checking the Ink Cartridge Status 17 Purchasing Ink Cartridges 18 Replacing Ink Cartridges 19 Solving Problems 24 Checking for Software ...Updates 24 Checking the Status Lights 24 Problems and Solutions 26 Where To Get Help 28 Notices 29 Important Safety Instructions 29 FCC Compliance Statement 31 Declaration of Conformity 32 Epson...
Quick Guide
Page 10
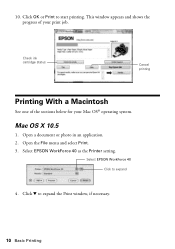
Click OK or Print to expand the Print window, if necessary. 10 Basic Printing Open a document or photo in an application. 2. Click d to start printing. Select EPSON WorkForce 40 Click to expand 4. Check ink cartridge status Cancel printing Printing With a Macintosh See one of your Mac OS® operating system. Mac OS X 10.5 1. Open the File menu and select Print. 3. This window appears and shows the progress of the sections below for your print job. Select EPSON WorkForce 40 as the Printer setting. 10.
Click OK or Print to expand the Print window, if necessary. 10 Basic Printing Open a document or photo in an application. 2. Click d to start printing. Select EPSON WorkForce 40 Click to expand 4. Check ink cartridge status Cancel printing Printing With a Macintosh See one of your Mac OS® operating system. Mac OS X 10.5 1. Open the File menu and select Print. 3. This window appears and shows the progress of the sections below for your print job. Select EPSON WorkForce 40 as the Printer setting. 10.

Quick Guide
Page 15
Caution: To keep your printer looking like new, don't place anything on -screen Epson Information Center. Checking the Print Head Nozzles If your on top of the ink cartridges. Follow the steps below to flash, then release the buttons. Hold down the button as a writing surface. To align the ... microfiber-type cloth. Load letter-size paper in this chapter for checking and cleaning the print head nozzles and replacing ink cartridges. Maintaining Your Printer 15 Turn off the printer. 3. If you press the P power button to clean the cover, use it as you need to turn the...
Caution: To keep your printer looking like new, don't place anything on -screen Epson Information Center. Checking the Print Head Nozzles If your on top of the ink cartridges. Follow the steps below to flash, then release the buttons. Hold down the button as a writing surface. To align the ... microfiber-type cloth. Load letter-size paper in this chapter for checking and cleaning the print head nozzles and replacing ink cartridges. Maintaining Your Printer 15 Turn off the printer. 3. If you press the P power button to clean the cover, use it as you need to turn the...

Quick Guide
Page 16
...the print head if an ink cartridge is low. Note: If you may need cleaning 5. If that doesn't help, contact Epson as described in the lines. Make sure the printer is off the printer during head cleaning or you don't see any dried ink soften. Hold down the ink button for at least ...six hours to clean it when a cartridge is expended, and you may not be...
...the print head if an ink cartridge is low. Note: If you may need cleaning 5. If that doesn't help, contact Epson as described in the lines. Make sure the printer is off the printer during head cleaning or you don't see any dried ink soften. Hold down the ink button for at least ...six hours to clean it when a cartridge is expended, and you may not be...
Quick Guide
Page 17
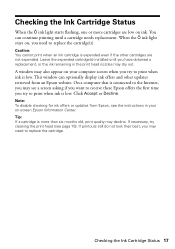
... to the Internet, you may see page 16). Caution: You cannot print when an ink cartridge is connected to print when ink is low. Note: To disable checking for ink offers or updates from an Epson website. If printouts still do not look their best, you need to receive these... until you try to replace the cartridge(s). Checking the Ink Cartridge Status 17 On a computer that is expended even if the other updates retrieved from Epson, see the instructions in the print head nozzles may dry out. Checking the Ink Cartridge Status When the ink light starts flashing, one or more...
... to the Internet, you may see page 16). Caution: You cannot print when an ink cartridge is connected to print when ink is low. Note: To disable checking for ink offers or updates from an Epson website. If printouts still do not look their best, you need to receive these... until you try to replace the cartridge(s). Checking the Ink Cartridge Status 17 On a computer that is expended even if the other updates retrieved from Epson, see the instructions in the print head nozzles may dry out. Checking the Ink Cartridge Status When the ink light starts flashing, one or more...
Quick Guide
Page 18
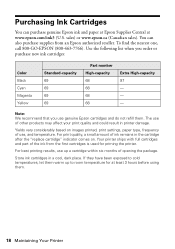
... type, frequency of use of the ink from an Epson authorized reseller. Your printer ships with full cartridges and part of other products may affect your print quality and could result in a cool, dark place. If they have been exposed to room temperature for priming the printer. Purchasing Ink Cartridges You can also purchase supplies from the...
... type, frequency of use of the ink from an Epson authorized reseller. Your printer ships with full cartridges and part of other products may affect your print quality and could result in a cool, dark place. If they have been exposed to room temperature for priming the printer. Purchasing Ink Cartridges You can also purchase supplies from the...
Quick Guide
Page 19
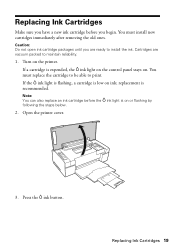
... the ink button. Replacing Ink Cartridges Make sure you have a new ink cartridge before the ink light is on or flashing by following the steps below. 2. Cartridges are ready to install the ink. Turn on ink; replacement is expended, the ink light on the control panel stays on. Replacing Ink Cartridges 19 If the ink light is flashing, a cartridge is low on the printer. You...
... the ink button. Replacing Ink Cartridges Make sure you have a new ink cartridge before the ink light is on or flashing by following the steps below. 2. Cartridges are ready to install the ink. Turn on ink; replacement is expended, the ink light on the control panel stays on. Replacing Ink Cartridges 19 If the ink light is flashing, a cartridge is low on the printer. You...

Quick Guide
Page 21
Do not take the used cartridge apart or try to remove it. Replacing Ink Cartridges 21 If ink gets into your hands, wash them immediately with soap and water. Warning: If ink gets on the cartridge and lift it straight up to refill it carefully. Dispose of children. 4. Open the cartridge cover. 5. Squeeze the tab on your eyes, flush them thoroughly with water. Keep ink cartridges out of the reach of it .
Do not take the used cartridge apart or try to remove it. Replacing Ink Cartridges 21 If ink gets into your hands, wash them immediately with soap and water. Warning: If ink gets on the cartridge and lift it straight up to refill it carefully. Dispose of children. 4. Open the cartridge cover. 5. Squeeze the tab on your eyes, flush them thoroughly with water. Keep ink cartridges out of the reach of it .

Quick Guide
Page 22
ink may leak. 9. This can damage the ink cartridge. 8. Caution: Do not remove any other labels or seals, or ink may leak.) 7. Remove the cartridge from the bottom. Remove the yellow tape from the package. Caution: Do not touch the green chip on the front of the cartridge. Before opening the new cartridge package, shake it clicks into the holder and push it down until it four or five times. (Do not shake a cartridge after opening the package; Insert the new ink cartridge into place. 22 Maintaining Your Printer 6.
ink may leak. 9. This can damage the ink cartridge. 8. Caution: Do not remove any other labels or seals, or ink may leak.) 7. Remove the cartridge from the bottom. Remove the yellow tape from the package. Caution: Do not touch the green chip on the front of the cartridge. Before opening the new cartridge package, shake it clicks into the holder and push it down until it four or five times. (Do not shake a cartridge after opening the package; Insert the new ink cartridge into place. 22 Maintaining Your Printer 6.
Quick Guide
Page 23
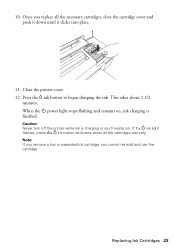
... use the cartridge. Replacing Ink Cartridges 23 This takes about 2 1/2 minutes. Caution: Never turn off the printer while ink is finished. If the ink light flashes, press the ink button and press down until it clicks into place. 11. Note: If you remove a low or expended ink cartridge, you 'll waste ink. Close the printer cover. 12. Press the ink button to...
... use the cartridge. Replacing Ink Cartridges 23 This takes about 2 1/2 minutes. Caution: Never turn off the printer while ink is finished. If the ink light flashes, press the ink button and press down until it clicks into place. 11. Note: If you remove a low or expended ink cartridge, you 'll waste ink. Close the printer cover. 12. Press the ink button to...
Quick Guide
Page 25
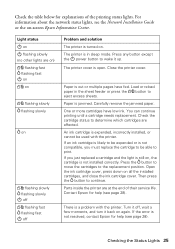
... service life. Press any button except the power button to determine which cartridges are affected. One or more cartridges have fed. You can continue printing until a cartridge needs replacement. Open the ink cartridge cover, press down on -screen Epson Information Center. Parts inside the printer are on) flashing fast flashing fast on on flashing slowly flashing slowly...
... service life. Press any button except the power button to determine which cartridges are affected. One or more cartridges have fed. You can continue printing until a cartridge needs replacement. Open the ink cartridge cover, press down on -screen Epson Information Center. Parts inside the printer are on) flashing fast flashing fast on on flashing slowly flashing slowly...
Quick Guide
Page 27
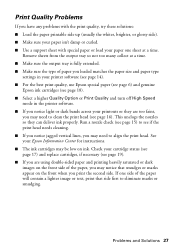
...the type of paper you loaded matches the paper size and paper type settings in your printer software (see page 14). ■ For the best print quality, use Epson special paper (see page 6) and genuine Epson ink cartridges (see page 18). ■ Select a higher Quality Option or Print Quality and turn... off High Speed mode in the printer software. ■ If you notice light or dark bands across your...
...the type of paper you loaded matches the paper size and paper type settings in your printer software (see page 14). ■ For the best print quality, use Epson special paper (see page 6) and genuine Epson ink cartridges (see page 18). ■ Select a higher Quality Option or Print Quality and turn... off High Speed mode in the printer software. ■ If you notice light or dark bands across your...
Quick Guide
Page 30
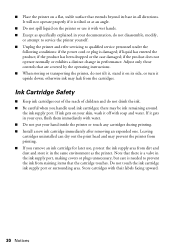
... with water. ■ Do not put your hand inside the printer or touch any cartridges during printing. ■ Install a new ink cartridge immediately after removing an expended one. If it upside down; Store cartridges with soap and water. if the product does not operate normally ... as specifically explained in the same environment as the printer. Ink Cartridge Safety ■ Keep ink cartridges out of the reach of children and do not disassemble, modify, or attempt to service the printer yourself. ■ Unplug the printer and refer servicing to qualified service personnel under the ...
... with water. ■ Do not put your hand inside the printer or touch any cartridges during printing. ■ Install a new ink cartridge immediately after removing an expended one. If it upside down; Store cartridges with soap and water. if the product does not operate normally ... as specifically explained in the same environment as the printer. Ink Cartridge Safety ■ Keep ink cartridges out of the reach of children and do not disassemble, modify, or attempt to service the printer yourself. ■ Unplug the printer and refer servicing to qualified service personnel under the ...
Quick Guide
Page 33
... secure the cost of the replacement printer in workmanship and materials for continuous production or similar high duty purposes is needed, Epson will be another model of like kind and quality. This warranty does not cover ribbons, ink cartridges or third party parts, components,... or peripheral devices added to the Epson product after its authorized service center, where the printer will provide telephone diagnostic service to the Epson product caused by parts or supplies not manufactured...
... secure the cost of the replacement printer in workmanship and materials for continuous production or similar high duty purposes is needed, Epson will be another model of like kind and quality. This warranty does not cover ribbons, ink cartridges or third party parts, components,... or peripheral devices added to the Epson product after its authorized service center, where the printer will provide telephone diagnostic service to the Epson product caused by parts or supplies not manufactured...

Start Here
Page 1
Caution: Do not connect to install the ink. Start Here Please read these instructions before using the printer. 1 Unpack Ethernet cable Caution: Do not open ink cartridge packages until you are vacuum packed to maintain reliability. If anything is missing, contact Epson as described on the back of this sheet. 2 Turn on the printer 1 Connect the power cable. Cartridges are ready to your computer yet. 2 Press the power button. Remove all protective materials.
Caution: Do not connect to install the ink. Start Here Please read these instructions before using the printer. 1 Unpack Ethernet cable Caution: Do not open ink cartridge packages until you are vacuum packed to maintain reliability. If anything is missing, contact Epson as described on the back of this sheet. 2 Turn on the printer 1 Connect the power cable. Cartridges are ready to your computer yet. 2 Press the power button. Remove all protective materials.
Start Here
Page 2
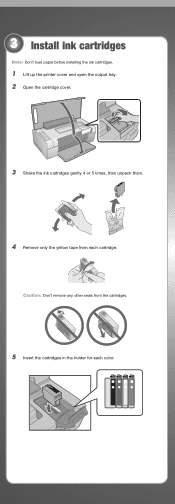
3 Install ink cartridges Note: Don't load paper before installing the ink cartridges. 1 Lift up the printer cover and open the output tray. 2 Open the cartridge cover. 3 Shake the ink cartridges gently 4 or 5 times, then unpack them. 4 Remove only the yellow tape from the cartridges. 5 Insert the cartridges in the holder for each cartridge. Caution: Don't remove any other seals from each color.
3 Install ink cartridges Note: Don't load paper before installing the ink cartridges. 1 Lift up the printer cover and open the output tray. 2 Open the cartridge cover. 3 Shake the ink cartridges gently 4 or 5 times, then unpack them. 4 Remove only the yellow tape from the cartridges. 5 Insert the cartridges in the holder for each cartridge. Caution: Don't remove any other seals from each color.
Start Here
Page 3
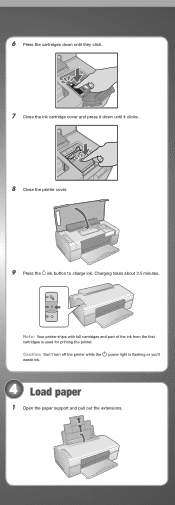
6 Press the cartridges down until they click. 7 Close the ink cartridge cover and press it down until it clicks. 8 Close the printer cover. 9 Press the ink button to charge ink. Caution: Don't turn off the printer while the power light is used for priming the printer. Charging takes about 2.5 minutes. Note: Your printer ships with full cartridges and part of the ink from the first cartridges is flashing or you'll waste ink. 4 Load paper 1 Open the paper support and pull out the extensions.
6 Press the cartridges down until they click. 7 Close the ink cartridge cover and press it down until it clicks. 8 Close the printer cover. 9 Press the ink button to charge ink. Caution: Don't turn off the printer while the power light is used for priming the printer. Charging takes about 2.5 minutes. Note: Your printer ships with full cartridges and part of the ink from the first cartridges is flashing or you'll waste ink. 4 Load paper 1 Open the paper support and pull out the extensions.


