
Important Setup Information
Page 1
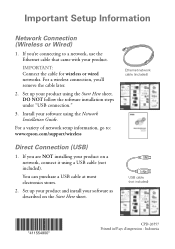
... in/Pays d'impression : Indonesia IMPORTANT: Connect the cable for wireless or wired networks. For a wireless connection, you 're connecting to : www.epson.com/support/wireless Direct Connection (USB) 1. If you are NOT installing your product using a USB cable (not included...). Set up your product and install your software using the Network Installation Guide. Set up your product on the Start Here sheet. Install your software as described on a network, connect it ...
... in/Pays d'impression : Indonesia IMPORTANT: Connect the cable for wireless or wired networks. For a wireless connection, you 're connecting to : www.epson.com/support/wireless Direct Connection (USB) 1. If you are NOT installing your product using a USB cable (not included...). Set up your product and install your software using the Network Installation Guide. Set up your product on the Start Here sheet. Install your software as described on a network, connect it ...
Network Installation Guide
Page 2
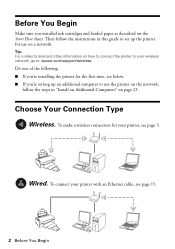
...tutorial and other information on how to connect the printer to your wireless network, go to: epson.com/support/wireless Do one of the following: ■ If you're installing the printer for the first time, see below. ■ If you installed ink cartridges and loaded paper as described on the ...in "Install on Additional Computers" on page 23. Then follow the steps in this guide to set up the printer for your printer with an Ethernet cable, see page 3. Choose Your Connection Type Wireless. To connect your printer, see page 15. 2 Before You Begin Before You Begin Make sure you 're...
...tutorial and other information on how to connect the printer to your wireless network, go to: epson.com/support/wireless Do one of the following: ■ If you're installing the printer for the first time, see below. ■ If you installed ink cartridges and loaded paper as described on the ...in "Install on Additional Computers" on page 23. Then follow the steps in this guide to set up the printer for your printer with an Ethernet cable, see page 3. Choose Your Connection Type Wireless. To connect your printer, see page 15. 2 Before You Begin Before You Begin Make sure you 're...
Network Installation Guide
Page 3
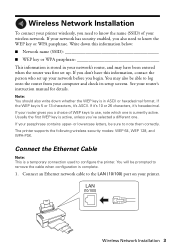
...is active, unless you've selected a different one is currently active. If you don't have been entered when the router was first set up . Wireless Network Installation 3 The printer supports the following wireless security modes: WEP 64, WEP 128, and WPA-PSK. If your router gives you a choice of your ... Cable Note: This is a temporary connection used to know the name (SSID) of WEP keys to the LAN (10/100) port on your printer. If the WEP key is stored in ASCII or hexadecimal format. If your network has security enabled, you also need to remove the cable when...
...is active, unless you've selected a different one is currently active. If you don't have been entered when the router was first set up . Wireless Network Installation 3 The printer supports the following wireless security modes: WEP 64, WEP 128, and WPA-PSK. If your router gives you a choice of your ... Cable Note: This is a temporary connection used to know the name (SSID) of WEP keys to the LAN (10/100) port on your printer. If the WEP key is stored in ASCII or hexadecimal format. If your network has security enabled, you also need to remove the cable when...
Network Installation Guide
Page 4
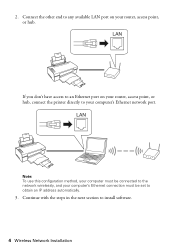
Connect the other end to any available LAN port on your router, access point, or hub, connect the printer directly to obtain an IP address automatically. 3. Continue with the steps in the next section to the network wirelessly, and your router, access point, or hub. If you don't have access to an Ethernet port on your computer's Ethernet connection must be set to your computer's Ethernet network port. Note: To use this configuration method, your computer must be connected to install software. 4 Wireless Network Installation 2.
Connect the other end to any available LAN port on your router, access point, or hub, connect the printer directly to obtain an IP address automatically. 3. Continue with the steps in the next section to the network wirelessly, and your router, access point, or hub. If you don't have access to an Ethernet port on your computer's Ethernet connection must be set to your computer's Ethernet network port. Note: To use this configuration method, your computer must be connected to install software. 4 Wireless Network Installation 2.
Network Installation Guide
Page 6
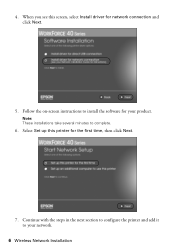
When you see this printer for the first time, then click Next. 7. Continue with the steps in the next section to configure the printer and add it to install the software for network connection and click Next. 5. Follow the on-screen instructions to your product. Note: These installations take several minutes to complete. 6. Select Set up this screen, select Install driver for your network. 6 Wireless Network Installation 4.
When you see this printer for the first time, then click Next. 7. Continue with the steps in the next section to configure the printer and add it to install the software for network connection and click Next. 5. Follow the on-screen instructions to your product. Note: These installations take several minutes to complete. 6. Select Set up this screen, select Install driver for your network. 6 Wireless Network Installation 4.
Network Installation Guide
Page 7
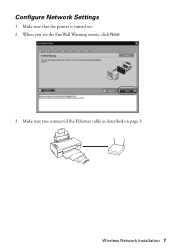
Wireless Network Installation 7 Make sure that the printer is turned on page 3. When you connected the Ethernet cable as described on . 2. Make sure you see the FireWall Warning screen, click Next. 3. Configure Network Settings 1.
Wireless Network Installation 7 Make sure that the printer is turned on page 3. When you connected the Ethernet cable as described on . 2. Make sure you see the FireWall Warning screen, click Next. 3. Configure Network Settings 1.
Network Installation Guide
Page 11
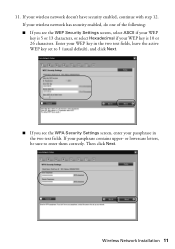
or lowercase letters, be sure to 1 (usual default), and click Next. ■ If you see the WPA Security Settings screen, enter your WEP key in the two text fields. If your wireless network doesn't have security enabled, continue with step 12. Wireless Network Installation ...11 If your passphrase contains upper- If your wireless network has security enabled, do one of the following: ■ If you see the WEP Security Settings screen, select ASCII if your WEP key is 5 or 13 characters, or select Hexadecimal if your WEP key is 10 or 26 characters. Then click...
or lowercase letters, be sure to 1 (usual default), and click Next. ■ If you see the WPA Security Settings screen, enter your WEP key in the two text fields. If your wireless network doesn't have security enabled, continue with step 12. Wireless Network Installation ...11 If your passphrase contains upper- If your wireless network has security enabled, do one of the following: ■ If you see the WEP Security Settings screen, select ASCII if your WEP key is 5 or 13 characters, or select Hexadecimal if your WEP key is 10 or 26 characters. Then click...
Network Installation Guide
Page 12
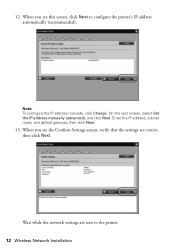
On the next screen, select Set the IP address manually (advanced), and click Next. Wait while the network settings are correct, then click Next. When you see this screen, click Next to the printer. 12 Wireless Network Installation Enter the IP address, subnet mask, and default gateway, then click Next. 13. 12. Note: To configure the IP address manually, click Change. When you see the Confirm Settings screen, verify that the settings are sent to configure the printer's IP address automatically (recommended).
On the next screen, select Set the IP address manually (advanced), and click Next. Wait while the network settings are correct, then click Next. When you see this screen, click Next to the printer. 12 Wireless Network Installation Enter the IP address, subnet mask, and default gateway, then click Next. 13. 12. Note: To configure the IP address manually, click Change. When you see the Confirm Settings screen, verify that the settings are sent to configure the printer's IP address automatically (recommended).
Network Installation Guide
Page 14
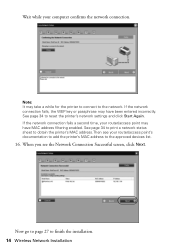
...router/access point may have been entered incorrectly. If the network connection fails, the WEP key or passphrase may take a while for the printer to connect to the approved devices list. 16. Note: It may have MAC address filtering enabled. Now go to page 27 to reset the... printer's network settings and click Start Again. If the network connection fails a second time, your computer confirms the network connection. See page 34 to finish the ...
...router/access point may have been entered incorrectly. If the network connection fails, the WEP key or passphrase may take a while for the printer to connect to the approved devices list. 16. Note: It may have MAC address filtering enabled. Now go to page 27 to reset the... printer's network settings and click Start Again. If the network connection fails a second time, your computer confirms the network connection. See page 34 to finish the ...

Network Installation Guide
Page 17
4. Select Set up this screen, select Install driver for network connection and click Next. 5. Continue with the steps in the next section to configure the printer and add it to your product. Note: These installations take several minutes to install the software for the first time, then click Next. 7. Follow the instructions on the screen to complete. 6. Wired (Ethernet) Installation 17 When you see this printer for your network.
4. Select Set up this screen, select Install driver for network connection and click Next. 5. Continue with the steps in the next section to configure the printer and add it to your product. Note: These installations take several minutes to install the software for the first time, then click Next. 7. Follow the instructions on the screen to complete. 6. Wired (Ethernet) Installation 17 When you see this printer for your network.

Network Installation Guide
Page 18
Make sure that the printer is turned on page 15. 18 Wired (Ethernet) Installation Make sure you see the FireWall Warning screen, click Next. 3. When you connected the Ethernet cable as described on . 2. Configure Network Settings 1.
Make sure that the printer is turned on page 15. 18 Wired (Ethernet) Installation Make sure you see the FireWall Warning screen, click Next. 3. When you connected the Ethernet cable as described on . 2. Configure Network Settings 1.

Network Installation Guide
Page 21
8. Wired (Ethernet) Installation 21 When you see the Confirm Settings screen, verify that the settings are correct, then click Next. Enter the IP address, subnet mask, and default gateway, then click Next. 9. On the next screen, select Set the IP address manually (advanced), and click Next. Note: To configure the IP address manually, click Change. When you see this screen, click Next to your network. Wait while the printer connects to configure the IP address automatically (recommended).
8. Wired (Ethernet) Installation 21 When you see the Confirm Settings screen, verify that the settings are correct, then click Next. Enter the IP address, subnet mask, and default gateway, then click Next. 9. On the next screen, select Set the IP address manually (advanced), and click Next. Note: To configure the IP address manually, click Change. When you see this screen, click Next to your network. Wait while the printer connects to configure the IP address automatically (recommended).
Network Installation Guide
Page 24
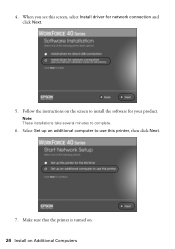
4. Note: These installations take several minutes to install the software for network connection and click Next. 5. Make sure that the printer is turned on. 24 Install on the screen to complete. 6. Follow the instructions on Additional Computers When you see this printer, then click Next. 7. Select Set up an additional computer to use this screen, select Install driver for your product.
4. Note: These installations take several minutes to install the software for network connection and click Next. 5. Make sure that the printer is turned on. 24 Install on the screen to complete. 6. Follow the instructions on Additional Computers When you see this printer, then click Next. 7. Select Set up an additional computer to use this screen, select Install driver for your product.

Network Installation Guide
Page 27
If desired, you can do the following: ■ Enter a new name for details. See your default printer (optional) 3. Follow the on -screen instructions to finish installing software and print a test page. Click Next and follow the on -screen instructions. Finish..., you 're ready to print. Finish the Installation Follow the steps for your operating system: ■ "Windows" below ■ "Mac OS X" on -screen Epson Information Center for the printer in the Printer Name text box (optional) ■ Select Set as default to make the printer your Quick Guide or on page 28 Windows 1.
If desired, you can do the following: ■ Enter a new name for details. See your default printer (optional) 3. Follow the on -screen instructions to finish installing software and print a test page. Click Next and follow the on -screen instructions. Finish..., you 're ready to print. Finish the Installation Follow the steps for your operating system: ■ "Windows" below ■ "Mac OS X" on -screen Epson Information Center for the printer in the Printer Name text box (optional) ■ Select Set as default to make the printer your Quick Guide or on page 28 Windows 1.
Network Installation Guide
Page 30
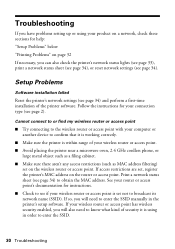
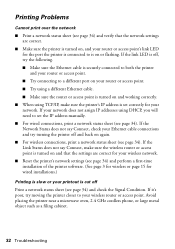
...to know what kind of security it is working correctly. ■ Make sure the printer is set , register the printer's MAC address on the wireless router or access point. If access restrictions are set not to enter the SSID. 30 Troubleshooting Print a network status sheet (see if ... page 32 If necessary, you can also check the printer's network status lights (see page 33), print a network status sheet (see page 34), or reset network settings (see page 2). Setup Problems Software installation failed Reset the printer's network settings (see page 34) and perform a first-time installation...
...to know what kind of security it is working correctly. ■ Make sure the printer is set , register the printer's MAC address on the wireless router or access point. If access restrictions are set not to enter the SSID. 30 Troubleshooting Print a network status sheet (see if ... page 32 If necessary, you can also check the printer's network status lights (see page 33), print a network status sheet (see page 34), or reset network settings (see page 2). Setup Problems Software installation failed Reset the printer's network settings (see page 34) and perform a first-time installation...
Network Installation Guide
Page 31
... connected to assign IP addresses using DHCP, try the following solutions: ■ If your computer's TCP/IP settings are either ASCII or hexadecimal. Also, if a gateway value is a set , use the same subnet mask). The printer does not appear in segments of four numerical values. When the router is... example: IP address of your router or access point: 192.168.1.1 IP address of IP address and subnet mask is invalid.", try setting the printer's IP address setting to Auto (DHCP). (See page 12 for wireless or page 21 for wired installations.) ■ If you want to manually configure ...
... connected to assign IP addresses using DHCP, try the following solutions: ■ If your computer's TCP/IP settings are either ASCII or hexadecimal. Also, if a gateway value is a set , use the same subnet mask). The printer does not appear in segments of four numerical values. When the router is... example: IP address of your router or access point: 192.168.1.1 IP address of IP address and subnet mask is invalid.", try setting the printer's IP address setting to Auto (DHCP). (See page 12 for wireless or page 21 for wired installations.) ■ If you want to manually configure ...
Network Installation Guide
Page 32
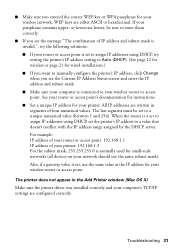
... Troubleshooting Printing Problems Cannot print over the network ■ Print a network status sheet (see page 34) and verify that the settings are correct. ■ Make sure the printer is turned on again. ■ For wireless connections, print a network status sheet (see page 34). If the Link Status does.... ■ When using TCP/IP, make sure the wireless router or access point is turned on and that the network settings are correct for your wireless network. ■ Reset the printer's network settings (see page 34) and check the Signal Condition. If it's poor, try moving the...
... Troubleshooting Printing Problems Cannot print over the network ■ Print a network status sheet (see page 34) and verify that the settings are correct. ■ Make sure the printer is turned on again. ■ For wireless connections, print a network status sheet (see page 34). If the Link Status does.... ■ When using TCP/IP, make sure the wireless router or access point is turned on and that the network settings are correct for your wireless network. ■ Reset the printer's network settings (see page 34) and check the Signal Condition. If it's poor, try moving the...
Network Installation Guide
Page 33
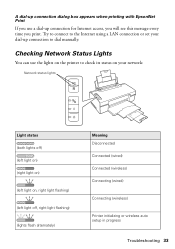
Try to connect to the Internet using a LAN connection or set your network: Network status lights Light status (both lights off) (left light on) (right light on) (left light on your dial-up connection for Internet ... see this message every time you print. A dial-up connection dialog box appears when printing with EpsonNet Print If you use the lights on the printer to check its status on , right light flashing) (left light off, right light flashing) (lights flash alternately) Meaning Disconnected Connected (wired) Connected (wireless) Connecting (wired...
Try to connect to the Internet using a LAN connection or set your network: Network status lights Light status (both lights off) (left light on) (right light on) (left light on your dial-up connection for Internet ... see this message every time you print. A dial-up connection dialog box appears when printing with EpsonNet Print If you use the lights on the printer to check its status on , right light flashing) (left light off, right light flashing) (lights flash alternately) Meaning Disconnected Connected (wired) Connected (wireless) Connecting (wired...
Network Installation Guide
Page 34
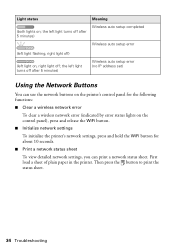
... off ; Light status Meaning (both lights on the control panel), press and release the WiFi button. ■ Initialize network settings To initialize the printer's network settings, press and hold the WiFi button for about 10 seconds. ■ Print a network status sheet To view detailed network... settings, you can use the network buttons on the printer's control panel for the following functions: ■ Clear a wireless network error To clear a wireless network error (indicated ...
... off ; Light status Meaning (both lights on the control panel), press and release the WiFi button. ■ Initialize network settings To initialize the printer's network settings, press and hold the WiFi button for about 10 seconds. ■ Print a network status sheet To view detailed network... settings, you can use the network buttons on the printer's control panel for the following functions: ■ Clear a wireless network error To clear a wireless network error (indicated ...
Product Brochure
Page 2
... print stability will vary based on images printed, print settings, paper type, frequency of their respective companies. For maximum print life, display all rights in printer damage. WorkForce 40 Color Printer | Wi-Fi® Printing Technology Ink Palette Ink Cartridge Configuration Ink Type Fade Resistance / Print Longevity† Minimum Ink Droplet Size Maximum Print Resolution Black text2 Color text2...
... print stability will vary based on images printed, print settings, paper type, frequency of their respective companies. For maximum print life, display all rights in printer damage. WorkForce 40 Color Printer | Wi-Fi® Printing Technology Ink Palette Ink Cartridge Configuration Ink Type Fade Resistance / Print Longevity† Minimum Ink Droplet Size Maximum Print Resolution Black text2 Color text2...


