
Important Setup Information
Page 1
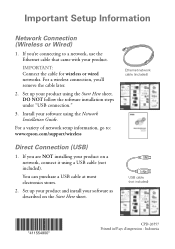
... network, connect it using a USB cable (not included). Set up your product. Ethernet network cable (included) USB cable (not included) CPD-26557 Printed in/Pays d'impression : Indonesia You can purchase a USB cable at most electronics stores. 2. IMPORTANT: Connect the cable for wireless or wired networks.... under "USB connection." 3. Set up your product and install your software using the Start Here sheet. If you're connecting to : www.epson.com/support/wireless Direct Connection (USB) 1. For a variety of network setup information, go to a network, use the Ethernet cable that came...
... network, connect it using a USB cable (not included). Set up your product. Ethernet network cable (included) USB cable (not included) CPD-26557 Printed in/Pays d'impression : Indonesia You can purchase a USB cable at most electronics stores. 2. IMPORTANT: Connect the cable for wireless or wired networks.... under "USB connection." 3. Set up your product and install your software using the Start Here sheet. If you're connecting to : www.epson.com/support/wireless Direct Connection (USB) 1. For a variety of network setup information, go to a network, use the Ethernet cable that came...
Network Installation Guide
Page 14
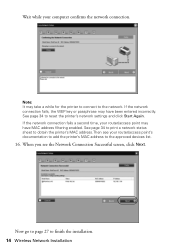
... connect to the approved devices list. 16. See page 34 to print a network status sheet to obtain the printer's MAC address.Then see the Network Connection Successful screen, click Next. When you see your router/access point's documentation to add the printer's MAC address to the network. Wait while your router/access point... have been entered incorrectly. If the network connection fails a second time, your computer confirms the network connection. Now go to page 27 to reset the printer's network settings and click Start Again.
... connect to the approved devices list. 16. See page 34 to print a network status sheet to obtain the printer's MAC address.Then see the Network Connection Successful screen, click Next. When you see your router/access point's documentation to add the printer's MAC address to the network. Wait while your router/access point... have been entered incorrectly. If the network connection fails a second time, your computer confirms the network connection. Now go to page 27 to reset the printer's network settings and click Start Again.

Network Installation Guide
Page 27
... network connection, you can do the following: ■ Enter a new name for details. When installation is complete, you're ready to finish installing software and print a test page. Finish the Installation 27 See your operating system: ■ "Windows" below ■ "Mac OS X" on page 28 Windows 1. Finish the Installation... Follow the steps for your Quick Guide or on-screen Epson Information Center for the printer in the Printer Name text box (optional) ■ Select Set as default to make the...
... network connection, you can do the following: ■ Enter a new name for details. When installation is complete, you're ready to finish installing software and print a test page. Finish the Installation 27 See your operating system: ■ "Windows" below ■ "Mac OS X" on page 28 Windows 1. Finish the Installation... Follow the steps for your Quick Guide or on-screen Epson Information Center for the printer in the Printer Name text box (optional) ■ Select Set as default to make the...

Network Installation Guide
Page 29
See your Quick Guide or on -screen instructions to print. When installation is complete, you're ready to finish installing software and print a test page. Finish the Installation 29 Follow the on -screen Epson Information Center for details. 4. Click Next. 5.
See your Quick Guide or on -screen instructions to print. When installation is complete, you're ready to finish installing software and print a test page. Finish the Installation 29 Follow the on -screen Epson Information Center for details. 4. Click Next. 5.
Network Installation Guide
Page 30
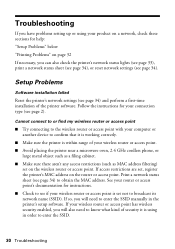
...access point with your computer or another device to confirm that it is set , register the printer's MAC address on a network, check these sections for instructions. ■ Check to see page 34). Print a network status sheet (see page 34) and perform a first-time installation of your ...access point. See your router or access point's documentation for help: "Setup Problems" below "Printing Problems" on page 32 If necessary, you can also check the printer's network status lights (see page 33), print a network status sheet (see page 34), or reset network settings (see if your wireless...
...access point with your computer or another device to confirm that it is set , register the printer's MAC address on a network, check these sections for instructions. ■ Check to see page 34). Print a network status sheet (see page 34) and perform a first-time installation of your ...access point. See your router or access point's documentation for help: "Setup Problems" below "Printing Problems" on page 32 If necessary, you can also check the printer's network status lights (see page 33), print a network status sheet (see page 34), or reset network settings (see if your wireless...
Network Installation Guide
Page 32
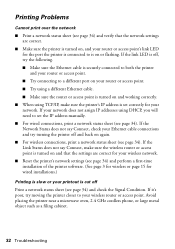
...working correctly. ■ When using DHCP, you will need to set correctly for the port the printer is connected to is on or flashing. If the link LED is off, try turning the printer off Print a network status sheet (see page 34) and check the Signal Condition. If the Network Status ...does not say Connect, make sure the printer's IP address is cut off and back on again. ■ For wireless connections, print a network status sheet (see page 34). If your network does not assign IP addresses using TCP/IP, ...
...working correctly. ■ When using DHCP, you will need to set correctly for the port the printer is connected to is on or flashing. If the link LED is off, try turning the printer off Print a network status sheet (see page 34) and check the Signal Condition. If the Network Status ...does not say Connect, make sure the printer's IP address is cut off and back on again. ■ For wireless connections, print a network status sheet (see page 34). If your network does not assign IP addresses using TCP/IP, ...
Network Installation Guide
Page 33
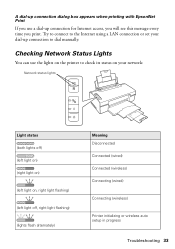
Checking Network Status Lights You can use a dial-up connection for Internet access, you will see this message every time you print. A dial-up connection dialog box appears when printing with EpsonNet Print If you use the lights on , right light flashing) (left light off ) (left light on) (right light on)... (left light on the printer to dial manually. Try to connect to the Internet using a LAN connection or set your dial-...
Checking Network Status Lights You can use a dial-up connection for Internet access, you will see this message every time you print. A dial-up connection dialog box appears when printing with EpsonNet Print If you use the lights on , right light flashing) (left light off ) (left light on) (right light on)... (left light on the printer to dial manually. Try to connect to the Internet using a LAN connection or set your dial-...
Network Installation Guide
Page 34
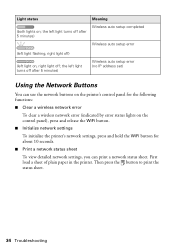
Then press the button to print the status sheet. 34 Troubleshooting Light status Meaning (both lights on the control panel), press and release the WiFi button. ■ Initialize network settings To initialize the printer's network settings, press and hold the WiFi button for the following functions: ...You can use the network buttons on the printer's control panel for about 10 seconds. ■ Print a network status sheet To view detailed network settings, you can print a network status sheet. First load a sheet of plain paper in the printer. the left light turns off after 5 minutes...
Then press the button to print the status sheet. 34 Troubleshooting Light status Meaning (both lights on the control panel), press and release the WiFi button. ■ Initialize network settings To initialize the printer's network settings, press and hold the WiFi button for the following functions: ...You can use the network buttons on the printer's control panel for about 10 seconds. ■ Print a network status sheet To view detailed network settings, you can print a network status sheet. First load a sheet of plain paper in the printer. the left light turns off after 5 minutes...

Network Installation Guide
Page 36
CPD-25742R1 Printed in XXXXXX
CPD-25742R1 Printed in XXXXXX
Product Brochure
Page 1
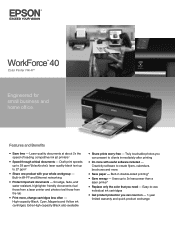
...color that you can count on - 1-year limited warranty and quick product exchange WorkForce™ 40 Color Printer | Wi-Fi® Engineered for small business and home office. Draft print speeds up to create flyers, calendars, brochures and more , change cartridges less ...often - Truly touchable photos you need - High-capacity Black, Cyan, Magenta and Yellow ink cartridges; Features and Benefits • Save time - Laser quality documents at about 2x the speed of leading competitive ink jet...
...color that you can count on - 1-year limited warranty and quick product exchange WorkForce™ 40 Color Printer | Wi-Fi® Engineered for small business and home office. Draft print speeds up to create flyers, calendars, brochures and more , change cartridges less ...often - Truly touchable photos you need - High-capacity Black, Cyan, Magenta and Yellow ink cartridges; Features and Benefits • Save time - Laser quality documents at about 2x the speed of leading competitive ink jet...
Product Brochure
Page 2
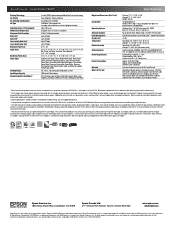
... Ink cartridges (one 97 Extra High-capacity Black ink cartridge and three 69 standardcapacity color ink cartridges: Cyan, Magenta, Yellow) 1 Black text printing about two times faster compared to ink jet printers priced at $199 or less available as of ink ...images printed, print settings, paper type, frequency of Seiko Epson Corporation. Epson disclaims any and all prints under glass. WorkForce 40 Color Printer | Wi-Fi® Printing Technology Ink Palette Ink Cartridge Configuration Ink Type Fade Resistance / Print Longevity† Minimum Ink Droplet Size Maximum Print Resolution...
... Ink cartridges (one 97 Extra High-capacity Black ink cartridge and three 69 standardcapacity color ink cartridges: Cyan, Magenta, Yellow) 1 Black text printing about two times faster compared to ink jet printers priced at $199 or less available as of ink ...images printed, print settings, paper type, frequency of Seiko Epson Corporation. Epson disclaims any and all prints under glass. WorkForce 40 Color Printer | Wi-Fi® Printing Technology Ink Palette Ink Cartridge Configuration Ink Type Fade Resistance / Print Longevity† Minimum Ink Droplet Size Maximum Print Resolution...
Quick Guide
Page 2
Contents Introduction 3 Loading Paper 4 Using Special Papers 6 Basic Printing 8 Printing in Windows 8 Printing With a Macintosh 10 Selecting the Correct Paper Type 14 Maintaining Your Printer 15 Checking the Print Head Nozzles 15 Cleaning the Print Head 16 Checking the Ink Cartridge Status 17 Purchasing Ink Cartridges 18 Replacing Ink Cartridges 19 Solving Problems 24 Checking for Software Updates 24 Checking...
Contents Introduction 3 Loading Paper 4 Using Special Papers 6 Basic Printing 8 Printing in Windows 8 Printing With a Macintosh 10 Selecting the Correct Paper Type 14 Maintaining Your Printer 15 Checking the Print Head Nozzles 15 Cleaning the Print Head 16 Checking the Ink Cartridge Status 17 Purchasing Ink Cartridges 18 Replacing Ink Cartridges 19 Solving Problems 24 Checking for Software Updates 24 Checking...
Quick Guide
Page 3
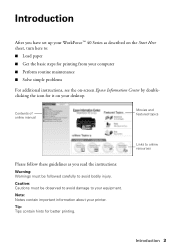
...to avoid bodily injury. Tip: Tips contain hints for it on -screen Epson Information Center by doubleclicking the icon for better printing. Note: Notes contain important information about your printer. Contents of online manual Movies and featured topics Please follow these guidelines as... Get the basic steps for printing from your computer ■ Perform routine maintenance ■ Solve simple problems For additional instructions, see the on your desktop. Links to online resources Introduction 3 Introduction After you have set up your WorkForce™ 40 Series as you read the ...
...to avoid bodily injury. Tip: Tips contain hints for it on -screen Epson Information Center by doubleclicking the icon for better printing. Note: Notes contain important information about your printer. Contents of online manual Movies and featured topics Please follow these guidelines as... Get the basic steps for printing from your computer ■ Perform routine maintenance ■ Solve simple problems For additional instructions, see the on your desktop. Links to online resources Introduction 3 Introduction After you have set up your WorkForce™ 40 Series as you read the ...
Quick Guide
Page 4
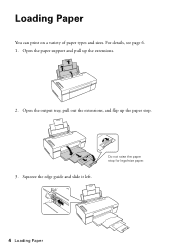
Open the output tray, pull out the extensions, and flip up the extensions. 2. Squeeze the edge guide and slide it left. Loading Paper You can print on a variety of paper types and sizes. Open the paper support and pull up the paper stop for legal-size paper. 4 Loading Paper Do not raise the paper stop . 3. For details, see page 6. 1.
Open the output tray, pull out the extensions, and flip up the extensions. 2. Squeeze the edge guide and slide it left. Loading Paper You can print on a variety of paper types and sizes. Open the paper support and pull up the paper stop for legal-size paper. 4 Loading Paper Do not raise the paper stop . 3. For details, see page 6. 1.
Quick Guide
Page 5
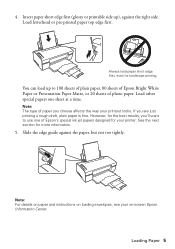
... sheet at a time. Note: The type of Epson's special ink jet papers designed for the best results, you are just printing a rough draft, plain paper is fine. If you 'll want to 100 sheets of plain paper, 80 sheets of Epson Bright White Paper or Presentation Paper Matte, or 20... ), against the paper, but not too tightly. However, for your printer. Slide the edge guide against the right side. See the next section for landscape printing. Note: For details on paper and instructions on -screen Epson Information Center. Load other special papers one of paper you choose affects...
... sheet at a time. Note: The type of Epson's special ink jet papers designed for the best results, you are just printing a rough draft, plain paper is fine. If you 'll want to 100 sheets of plain paper, 80 sheets of Epson Bright White Paper or Presentation Paper Matte, or 20... ), against the paper, but not too tightly. However, for your printer. Slide the edge guide against the right side. See the next section for landscape printing. Note: For details on paper and instructions on -screen Epson Information Center. Load other special papers one of paper you choose affects...

Quick Guide
Page 8
...® or Macintosh® computer. Make sure EPSON WorkForce 40 Series is selected, then click the Preferences or Properties button. (If you 've installed your printer software and connected the printer to open your computer as described on the next screen.) 8 Basic Printing Open the File menu and select Print. Tip: It's a good idea to check for...
...® or Macintosh® computer. Make sure EPSON WorkForce 40 Series is selected, then click the Preferences or Properties button. (If you 've installed your printer software and connected the printer to open your computer as described on the next screen.) 8 Basic Printing Open the File menu and select Print. Tip: It's a good idea to check for...

Quick Guide
Page 9
... your paper Type Select your paper Size Click here for borderless photos Select your on -screen Epson Information Center. 9. You can create your on -screen Epson Information Center. 5. Note: For more printing options, click the Advanced tab. Printing in photos, select Fix Red-Eye. 7. Click OK to reduce or enlarge your settings. 4. To reduce...
... your paper Type Select your paper Size Click here for borderless photos Select your on -screen Epson Information Center. 9. You can create your on -screen Epson Information Center. 5. Note: For more printing options, click the Advanced tab. Printing in photos, select Fix Red-Eye. 7. Click OK to reduce or enlarge your settings. 4. To reduce...
Quick Guide
Page 10
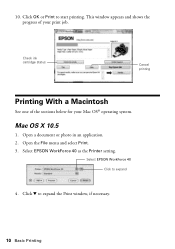
Click OK or Print to expand the Print window, if necessary. 10 Basic Printing Mac OS X 10.5 1. Open the File menu and select Print. 3. Check ink cartridge status Cancel printing Printing With a Macintosh See one of your Mac OS® operating system. Click d to start printing. Select EPSON WorkForce 40 as the Printer setting. Select EPSON WorkForce 40 Click to expand 4. This window appears and shows the progress of the sections below for your print job. Open a document or photo in an application. 2. 10.
Click OK or Print to expand the Print window, if necessary. 10 Basic Printing Mac OS X 10.5 1. Open the File menu and select Print. 3. Check ink cartridge status Cancel printing Printing With a Macintosh See one of your Mac OS® operating system. Click d to start printing. Select EPSON WorkForce 40 as the Printer setting. Select EPSON WorkForce 40 Click to expand 4. This window appears and shows the progress of the sections below for your print job. Open a document or photo in an application. 2. 10.
Quick Guide
Page 11
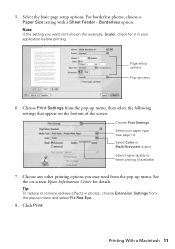
Note: If the setting you may need from the pop-up menu, then select the following settings that appear on -screen Epson Information Center for details. Page setup options Pop-up menu and select Fix Red-Eye. 8. Select the basic page setup options. See the on the... bottom of the screen: Choose Print Settings Select your application before printing. Choose any other printing options you want isn't shown (for example, Scale), check for it in photos, choose Extension Settings from the pop-up menu...
Note: If the setting you may need from the pop-up menu, then select the following settings that appear on -screen Epson Information Center for details. Page setup options Pop-up menu and select Fix Red-Eye. 8. Select the basic page setup options. See the on the... bottom of the screen: Choose Print Settings Select your application before printing. Choose any other printing options you want isn't shown (for example, Scale), check for it in photos, choose Extension Settings from the pop-up menu...
Quick Guide
Page 12
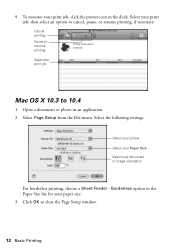
... an option to cancel, pause, or resume printing, if necessary. Click OK to 10.4 1. Cancel printing Pause or resume printing Select the print job Mac OS X 10.3 to close the Page Setup window. 12 Basic Printing Borderless option in the Paper Size list for your print job, click the printer icon in an application. 2. 9. Select Page Setup...
... an option to cancel, pause, or resume printing, if necessary. Click OK to 10.4 1. Cancel printing Pause or resume printing Select the print job Mac OS X 10.3 to close the Page Setup window. 12 Basic Printing Borderless option in the Paper Size list for your print job, click the printer icon in an application. 2. 9. Select Page Setup...


