Photo Printing Guide
Page 3
... Preparing the Printer...4 Installing the Print Head 5 Installing an Ink Tank ...7 Printer Parts and Their Functions 8 Printer ...8 Menu Screen...11 Preparation When Using the Printer 16 Turning On/Off the Printer 16 Using a Memory Card 17 Loading Paper...20 Changing the Print Settings 24 Printing from the Memory Card 28 Printing Photograph...28 Other Useful Functions 32 Changing the Other Settings 43 Printing Photographs Directly from a Digital Camera 45 Printing Photographs Directly from a PictBridge Compliant Device 45 Printing Photographs Directly from a Canon Bubble Jet Direct...
... Preparing the Printer...4 Installing the Print Head 5 Installing an Ink Tank ...7 Printer Parts and Their Functions 8 Printer ...8 Menu Screen...11 Preparation When Using the Printer 16 Turning On/Off the Printer 16 Using a Memory Card 17 Loading Paper...20 Changing the Print Settings 24 Printing from the Memory Card 28 Printing Photograph...28 Other Useful Functions 32 Changing the Other Settings 43 Printing Photographs Directly from a Digital Camera 45 Printing Photographs Directly from a PictBridge Compliant Device 45 Printing Photographs Directly from a Canon Bubble Jet Direct...
Photo Printing Guide
Page 4
.............77 Paper Does Not Feed Properly/Paper Jam 77 Printing is Blurred/Colors are Wrong/White Streaks appear 78 Printed Surface is Scratched or Ink Blots 79 Cannot Print Properly from the Digital Camera 81 Cannot Install the Printer Driver 83 Cannot Print Properly through Wireless Communication 84 Appendix ...85 For the Optional Bluetooth Unit Users 85 Specifications ...87 Safety Precautions ...90 Regulatory Information 92 Introduction This Photo Printing Guide uses the...
.............77 Paper Does Not Feed Properly/Paper Jam 77 Printing is Blurred/Colors are Wrong/White Streaks appear 78 Printed Surface is Scratched or Ink Blots 79 Cannot Print Properly from the Digital Camera 81 Cannot Install the Printer Driver 83 Cannot Print Properly through Wireless Communication 84 Appendix ...85 For the Optional Bluetooth Unit Users 85 Specifications ...87 Safety Precautions ...90 Regulatory Information 92 Introduction This Photo Printing Guide uses the...
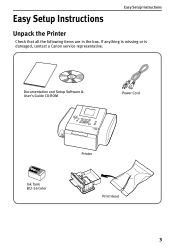
Photo Printing Guide
Page 5
Easy Setup Instructions Easy Setup Instructions Unpack the Printer Check that all the following items are in the box. Documentation and Setup Software & User's Guide CD-ROM Power Cord Ink Tank BCI-16 Color Printer Print Head 3 If anything is missing or is damaged, contact a Canon service representative.
Easy Setup Instructions Easy Setup Instructions Unpack the Printer Check that all the following items are in the box. Documentation and Setup Software & User's Guide CD-ROM Power Cord Ink Tank BCI-16 Color Printer Print Head 3 If anything is missing or is damaged, contact a Canon service representative.

Photo Printing Guide
Page 10
... Functions Printer Parts and Their Functions This section describes the components of the countries. Auto Sheet Feeder Load paper here. Card Slot Set the memory card from a mobile phone or a PDA via infrared communication. For details, contact a Canon service representative. 8 LCD Monitor Displays menus, setting items, and photos for printing. Printer „ Front View Cover Open to a digital camera, digital video camcorder or the optional Bluetooth unit*. For instructions, see "Using a Memory Card...
... Functions Printer Parts and Their Functions This section describes the components of the countries. Auto Sheet Feeder Load paper here. Card Slot Set the memory card from a mobile phone or a PDA via infrared communication. For details, contact a Canon service representative. 8 LCD Monitor Displays menus, setting items, and photos for printing. Printer „ Front View Cover Open to a digital camera, digital video camcorder or the optional Bluetooth unit*. For instructions, see "Using a Memory Card...

Photo Printing Guide
Page 12
... paper type used to connect the supplied power cord. „ Inside the Printer Print Head Holder Install the Print Head here. Print Head Lock Lever Locks the Print Head into the Print Head Holder. Cover Open Switch Slide to the right to a computer through a USB interface. Move to the right when printing. Once the Print Head is stained. USB Port Connects the printer to open the Cover. 10 Paper Thickness Lever Move to the left if ink smudges or the printed surface is installed, do not touch this lever. Printer Parts and...
... paper type used to connect the supplied power cord. „ Inside the Printer Print Head Holder Install the Print Head here. Print Head Lock Lever Locks the Print Head into the Print Head Holder. Cover Open Switch Slide to the right to a computer through a USB interface. Move to the right when printing. Once the Print Head is stained. USB Port Connects the printer to open the Cover. 10 Paper Thickness Lever Move to the left if ink smudges or the printed surface is installed, do not touch this lever. Printer Parts and...

Photo Printing Guide
Page 20
...; Photos stored in a memory card not supported by the digital camera, refer to your digital camera user's manual. • Use the digital camera to format a memory card. For types of memory cards supported by the digital camera may result in loading or be damaged. Preparation When Using the Printer Important • This printer supports images taken with a camera compatible with computer-specific formats. • Images edited on the computer may fail in...
...; Photos stored in a memory card not supported by the digital camera, refer to your digital camera user's manual. • Use the digital camera to format a memory card. For types of memory cards supported by the digital camera may result in loading or be damaged. Preparation When Using the Printer Important • This printer supports images taken with a camera compatible with computer-specific formats. • Images edited on the computer may fail in...

Photo Printing Guide
Page 60
Installing the Printer Driver To prepare your printer for printing. The driver cannot be correctly installed. • The screens below refer to use the User's Guide. Next, remove and replace the USB cable connected to your personal computer, in a process called a "Printer Driver" to quit the screen and turn off the printer. Please purchase one separately. • This section explains how to install the printer driver, and how to Windows XP installation. Refer to the User's Guide for instructions on how...
Installing the Printer Driver To prepare your printer for printing. The driver cannot be correctly installed. • The screens below refer to use the User's Guide. Next, remove and replace the USB cable connected to your personal computer, in a process called a "Printer Driver" to quit the screen and turn off the printer. Please purchase one separately. • This section explains how to install the printer driver, and how to Windows XP installation. Refer to the User's Guide for instructions on how...

Photo Printing Guide
Page 62
Follow the on-screen instructions. 8 Connect your USB cable when the Printer Connection screen appears. (1) Connect one end of the printer driver, On-screen Manuals, and applications will begin . The "Installation Results" window appears. 60 As the installation proceeds, the "Print Head Alignment Recommended" screen appears. When Restart is displayed, ensure the Restart the system now (recommended) check box is selected, then click Restart. Printing with the Computer 7 Read the License Agreement, then click...
Follow the on-screen instructions. 8 Connect your USB cable when the Printer Connection screen appears. (1) Connect one end of the printer driver, On-screen Manuals, and applications will begin . The "Installation Results" window appears. 60 As the installation proceeds, the "Print Head Alignment Recommended" screen appears. When Restart is displayed, ensure the Restart the system now (recommended) check box is selected, then click Restart. Printing with the Computer 7 Read the License Agreement, then click...

Photo Printing Guide
Page 63
... installing the driver, disable all anti-virus programs and automatically loading programs. 1 Connect the end of the USB cable to the computer, the other to register your system, you can restart the system instead of just exiting the program. Printing with the Computer 9 Confirm the installation results and click Next. Note For U.S. customer only Follow the on-screen instructions to the printer. 2 Turn on the Mac. 3 Turn...
... installing the driver, disable all anti-virus programs and automatically loading programs. 1 Connect the end of the USB cable to the computer, the other to register your system, you can restart the system instead of just exiting the program. Printing with the Computer 9 Confirm the installation results and click Next. Note For U.S. customer only Follow the on-screen instructions to the printer. 2 Turn on the Mac. 3 Turn...
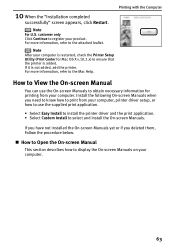
Photo Printing Guide
Page 65
... register your computer is restarted, check the Printer Setup Utility (Print Center for Mac OS X v.10.2.x) to obtain necessary information for printing from your computer. 63 How to View the On-screen Manual You can use the supplied print application. • Select Easy Install to install the printer driver and the print application. • Select Custom Install to print from your computer. 10 When the "Installation completed successfully" screen appears, click Restart.
... register your computer is restarted, check the Printer Setup Utility (Print Center for Mac OS X v.10.2.x) to obtain necessary information for printing from your computer. 63 How to View the On-screen Manual You can use the supplied print application. • Select Easy Install to install the printer driver and the print application. • Select Custom Install to print from your computer. 10 When the "Installation completed successfully" screen appears, click Restart.
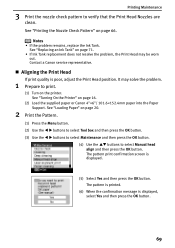
Photo Printing Guide
Page 71
... the OK button. (4) Use the ST buttons to print. (1) Turn on page 66. The pattern print confirmation screen is displayed, select Yes and then press the OK button. 69 See "Replacing an Ink Tank" on page 16. (2) Load the supplied paper or Canon 4"×6"/ 101.6×152.4mm paper into the Paper Support. See "Turning On the Printer" on page 71. • If Ink Tank replacement does not resolve the problem, the Print Head may solve the problem. 1 Prepare to select Manual head align and...
... the OK button. (4) Use the ST buttons to print. (1) Turn on page 66. The pattern print confirmation screen is displayed, select Yes and then press the OK button. 69 See "Replacing an Ink Tank" on page 16. (2) Load the supplied paper or Canon 4"×6"/ 101.6×152.4mm paper into the Paper Support. See "Turning On the Printer" on page 71. • If Ink Tank replacement does not resolve the problem, the Print Head may solve the problem. 1 Prepare to select Manual head align and...
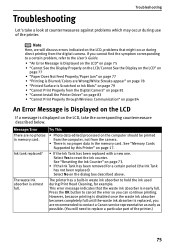
Photo Printing Guide
Page 77
Ink tank replaced? • If the Ink Tank has been replaced with a new one. Press the OK button to reset the ink counter. Message/Error Try This There are no proper data in the memory card. However, because printing is disabled once the waste ink absorber becomes completely full until the waste ink absorber is replaced, you are Wrong/White Streaks appear" on page 78 • "Printed Surface is Scratched or Ink Blots" on page 79 • "Cannot...
Ink tank replaced? • If the Ink Tank has been replaced with a new one. Press the OK button to reset the ink counter. Message/Error Try This There are no proper data in the memory card. However, because printing is disabled once the waste ink absorber becomes completely full until the waste ink absorber is replaced, you are Wrong/White Streaks appear" on page 78 • "Printed Surface is Scratched or Ink Blots" on page 79 • "Cannot...
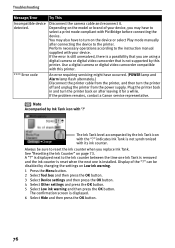
Photo Printing Guide
Page 78
... OK button. 5 Select Low ink warning and then press the OK button. If the problem remains, contact a Canon service representative. The Ink Tank level accompanied by changing the settings on the model or brand of the "?" indicates Ink Tank is not supported by Ink Tank icon with PictBridge before connecting the device. Always be disabled by the Ink Tank icon with your device, you replace Ink Tank. A "?" Display of your device. You may have to the instruction manual supplied...
... OK button. 5 Select Low ink warning and then press the OK button. If the problem remains, contact a Canon service representative. The Ink Tank level accompanied by changing the settings on the model or brand of the "?" indicates Ink Tank is not supported by Ink Tank icon with PictBridge before connecting the device. Always be disabled by the Ink Tank icon with your device, you replace Ink Tank. A "?" Display of your device. You may have to the instruction manual supplied...
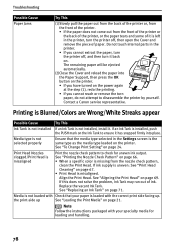
Photo Printing Guide
Page 80
... the printer by yourself. Contact a Canon service representative. the print-side up . See "To Change Print Setting" on page 71. Media type is left in the printer, turn it back on. Printing is Blurred/Colors are Wrong/White Streaks appear Possible Cause Try This Ink Tank is not installed If an Ink Tank is misaligned. See "Replacing an Ink Tank" on page 24. If ink supply is uneven: See "Print Head Cleaning" on page 67. • Print Head is not installed, install it. Troubleshooting Possible Cause Paper Jams Try...
... the printer by yourself. Contact a Canon service representative. the print-side up . See "To Change Print Setting" on page 71. Media type is left in the printer, turn it back on. Printing is Blurred/Colors are Wrong/White Streaks appear Possible Cause Try This Ink Tank is not installed If an Ink Tank is misaligned. See "Replacing an Ink Tank" on page 24. If ink supply is uneven: See "Print Head Cleaning" on page 67. • Print Head is not installed, install it. Troubleshooting Possible Cause Paper Jams Try...

Photo Printing Guide
Page 81
... back side Follow the steps described below to turned off the protrusions using Borderless Printing. inside of the printed surface Try This Clean the Paper Feed Roller. Select Bottom plate cleaning from the Settings screen. See "Paper Thickness Lever" on page 77. Troubleshooting Note When the color is different from what is displayed on the LCD or when it is not printed with step 1. If the protrusions inside the printer are ink...
... back side Follow the steps described below to turned off the protrusions using Borderless Printing. inside of the printed surface Try This Clean the Paper Feed Roller. Select Bottom plate cleaning from the Settings screen. See "Paper Thickness Lever" on page 77. Troubleshooting Note When the color is different from what is displayed on the LCD or when it is not printed with step 1. If the protrusions inside the printer are ink...
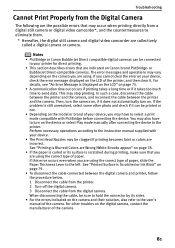
Photo Printing Guide
Page 83
... its sides. • For the errors indicated on page 79. • To disconnect the cable connected between the printer and the camera. For other photo and check if it does not automatically turn the camera on, if it can be clogged if printing becomes faint or colors are using the correct type of paper, slide the Paper Thickness Lever to the printer. If this error occurs even when you are Wrong/White Streaks...
... its sides. • For the errors indicated on page 79. • To disconnect the cable connected between the printer and the camera. For other photo and check if it does not automatically turn the camera on, if it can be clogged if printing becomes faint or colors are using the correct type of paper, slide the Paper Thickness Lever to the printer. If this error occurs even when you are Wrong/White Streaks...
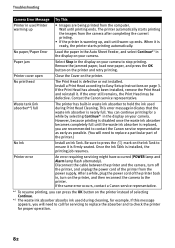
Photo Printing Guide
Page 84
... the printer back in, turn off the printer, and unplug the power cord of selecting Continue. *2 The waste ink absorber absorbs ink used during cleaning, for proper operation. 82 Troubleshooting Camera Error Message Try This Printer in use/Printer warming up ends. Wait until the waste ink absorber is nearly full. Remove the jammed paper, load new paper, and press the OK button on the printer, and then reconnect the camera to stop printing. Install a Print Head according to Easy Setup Instructions...
... the printer back in, turn off the printer, and unplug the power cord of selecting Continue. *2 The waste ink absorber absorbs ink used during cleaning, for proper operation. 82 Troubleshooting Camera Error Message Try This Printer in use/Printer warming up ends. Wait until the waste ink absorber is nearly full. Remove the jammed paper, load new paper, and press the OK button on the printer, and then reconnect the camera to stop printing. Install a Print Head according to Easy Setup Instructions...

Photo Printing Guide
Page 85
... displayed screen. 4. If this problem persists, contact a Canon service representative. Carefully follow the installation not followed correctly procedure properly. Installation does not start automatically when the If printer driver installation did not start installation. Double-click the CD-ROM icon on the Installation Failure screen. 3. If the installer was forced to terminate due to proceed beyond the Printer Port Screen Try This Reinstall the printer driver. 1. Click Exit on page 58. See "Installing the Printer Driver" on the SELPHY DS810 screen...
... displayed screen. 4. If this problem persists, contact a Canon service representative. Carefully follow the installation not followed correctly procedure properly. Installation does not start automatically when the If printer driver installation did not start installation. Double-click the CD-ROM icon on the Installation Failure screen. 3. If the installer was forced to terminate due to proceed beyond the Printer Port Screen Try This Reinstall the printer driver. 1. Click Exit on page 58. See "Installing the Printer Driver" on the SELPHY DS810 screen...
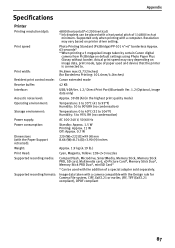
Photo Printing Guide
Page 89
....) Print Head: Cyan, Magenta, Yellow: 128×2×3 nozzles Supported recording media: CompactFlash, Microdrive, SmartMedia, Memory Stick, Memory Stick PRO, SD card, Multimedia card, xD-Picture Card*, Memory Stick Duo*, Memory Stick PRO Duo*, miniSD Card* * Can be placed with the addition of a special adapter sold separately. Actual print speed may vary based on default settings using Photo Paper Plus Glossy without border. Appendix Specifications Printer Printing resolution (dpi): 4800 (horizontal)*×1200 (vertical) * Ink droplets...
....) Print Head: Cyan, Magenta, Yellow: 128×2×3 nozzles Supported recording media: CompactFlash, Microdrive, SmartMedia, Memory Stick, Memory Stick PRO, SD card, Multimedia card, xD-Picture Card*, Memory Stick Duo*, Memory Stick PRO Duo*, miniSD Card* * Can be placed with the addition of a special adapter sold separately. Actual print speed may vary based on default settings using Photo Paper Plus Glossy without border. Appendix Specifications Printer Printing resolution (dpi): 4800 (horizontal)*×1200 (vertical) * Ink droplets...
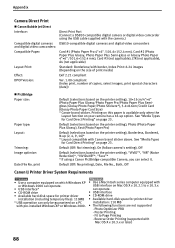
Photo Printing Guide
Page 90
...; PictBridge Paper size: Paper type: Layout: Trimming: Image optimize: Date/File No. Reverse Order Printing (supported with border, Index Print: 6-24 images (Depending on the printer setting), "VIVID"*, "NR" (Noise Reduction)*, "VIVID+NR"*, "Face"* * If using the USB cable supplied with the camera.) Compatible digital cameras DS810-compatible digital cameras and digital video camcorders and digital video camcorders: Compatible Paper: Card #1 (Photo Paper Pro 4"×6" /101.6×152.4 mm), Card #2 (Photo Paper Plus Glossy, Photo Paper Plus...
...; PictBridge Paper size: Paper type: Layout: Trimming: Image optimize: Date/File No. Reverse Order Printing (supported with border, Index Print: 6-24 images (Depending on the printer setting), "VIVID"*, "NR" (Noise Reduction)*, "VIVID+NR"*, "Face"* * If using the USB cable supplied with the camera.) Compatible digital cameras DS810-compatible digital cameras and digital video camcorders and digital video camcorders: Compatible Paper: Card #1 (Photo Paper Pro 4"×6" /101.6×152.4 mm), Card #2 (Photo Paper Plus Glossy, Photo Paper Plus...


