Photo Printing Guide
Page 3
...Printer 16 Using a Memory Card 17 Loading Paper...20 Changing the Print Settings 24 Printing from the Memory Card 28 Printing Photograph...28 Other Useful Functions 32 Changing the Other Settings 43 Printing Photographs Directly from a Digital Camera 45 Printing Photographs Directly from a PictBridge Compliant Device 45 Printing Photographs Directly from a Canon...Communication 55 Printing with the Computer 58 Installing the Printer Driver 58 How to View the On-screen Manual 63 Printing Maintenance 65 When Printing Becomes Faint or Colors are Incorrect 65 Replacing an Ink Tank 71 1
...Printer 16 Using a Memory Card 17 Loading Paper...20 Changing the Print Settings 24 Printing from the Memory Card 28 Printing Photograph...28 Other Useful Functions 32 Changing the Other Settings 43 Printing Photographs Directly from a Digital Camera 45 Printing Photographs Directly from a PictBridge Compliant Device 45 Printing Photographs Directly from a Canon...Communication 55 Printing with the Computer 58 Installing the Printer Driver 58 How to View the On-screen Manual 63 Printing Maintenance 65 When Printing Becomes Faint or Colors are Incorrect 65 Replacing an Ink Tank 71 1
Photo Printing Guide
Page 4
... the LCD 75 Cannot See the Display Properly on the LCD/Cannot See the Display on the LCD..........77 Paper Does Not Feed Properly/Paper Jam 77 Printing is Blurred/Colors are Wrong/White Streaks appear 78 Printed Surface is Scratched or Ink Blots 79 Cannot Print Properly from the... Digital Camera 81 Cannot Install the Printer Driver 83 Cannot Print Properly through Wireless Communication 84 Appendix ...85 For the Optional...
... the LCD 75 Cannot See the Display Properly on the LCD/Cannot See the Display on the LCD..........77 Paper Does Not Feed Properly/Paper Jam 77 Printing is Blurred/Colors are Wrong/White Streaks appear 78 Printed Surface is Scratched or Ink Blots 79 Cannot Print Properly from the... Digital Camera 81 Cannot Install the Printer Driver 83 Cannot Print Properly through Wireless Communication 84 Appendix ...85 For the Optional...

Photo Printing Guide
Page 10
...Open Switch Slide to the right to a digital camera, digital video camcorder or the optional Bluetooth unit*. For details, contact a Canon service representative. 8 Card Slot Set the memory card from a mobile phone or a PDA via infrared communication. Indicator Lamp This lamp... a digital camera here. Printer Parts and Their Functions Printer Parts and Their Functions This section describes the components of the countries. Paper Output Tray The printed paper will turn on page 17. Printer „ Front View Cover Open to support paper. For instructions, see "...
...Open Switch Slide to the right to a digital camera, digital video camcorder or the optional Bluetooth unit*. For details, contact a Canon service representative. 8 Card Slot Set the memory card from a mobile phone or a PDA via infrared communication. Indicator Lamp This lamp... a digital camera here. Printer Parts and Their Functions Printer Parts and Their Functions This section describes the components of the countries. Paper Output Tray The printed paper will turn on page 17. Printer „ Front View Cover Open to support paper. For instructions, see "...

Photo Printing Guide
Page 12
...printed surface is installed, do not touch this lever. Printer Parts and Their Functions „ Rear View Power Cord Connection Connector used " on page 79. Move to the right when printing. Once the Print Head is stained. See "Inappropriate paper type used to connect the supplied power cord. „... Inside the Printer Print Head Holder Install the Print Head here. Print Head Lock Lever Locks the Print Head into the Print ...
...printed surface is installed, do not touch this lever. Printer Parts and Their Functions „ Rear View Power Cord Connection Connector used " on page 79. Move to the right when printing. Once the Print Head is stained. See "Inappropriate paper type used to connect the supplied power cord. „... Inside the Printer Print Head Holder Install the Print Head here. Print Head Lock Lever Locks the Print Head into the Print ...

Photo Printing Guide
Page 15
...41. DPOF print Prints according to the DPOF settings, if available. Printer Parts and Their Functions „ Print Menus in the specified layout. See "Print all photos" on page 41. You can select your favorite color tone from a Photo-Sticker Print" on a sheet of Media-Layout...page 37. See "Printing with the following print menus. See "Printing Multiple Photos on One Sheet of paper. Print all photos Prints all photos. Color balance Prints 9 color samples of all photos. Layout print Prints the specified photo in Print Studio Print studio provides you with Adjusted...
...41. DPOF print Prints according to the DPOF settings, if available. Printer Parts and Their Functions „ Print Menus in the specified layout. See "Print all photos" on page 41. You can select your favorite color tone from a Photo-Sticker Print" on a sheet of Media-Layout...page 37. See "Printing with the following print menus. See "Printing Multiple Photos on One Sheet of paper. Print all photos Prints all photos. Color balance Prints 9 color samples of all photos. Layout print Prints the specified photo in Print Studio Print studio provides you with Adjusted...

Photo Printing Guide
Page 16
...settings Sets the page size and layout to ensure that ink is dirty" on page 77. Maintenance Displays the maintenance items below for printer configuration. Nozzle check Prints a check pattern to use Deep cleaning. See "Printed on page 79. on page 70. Head alignment print... setting of the Print Head position" on page 80. See "Paper Feed Roller is output correctly. Device settings Displays the setting items below . Print settings • Ink drying wait time See "Sets time to configure the printer settings. See "Printing the Nozzle Check Pattern" on the printing ...
...settings Sets the page size and layout to ensure that ink is dirty" on page 77. Maintenance Displays the maintenance items below for printer configuration. Nozzle check Prints a check pattern to use Deep cleaning. See "Printed on page 79. on page 70. Head alignment print... setting of the Print Head position" on page 80. See "Paper Feed Roller is output correctly. Device settings Displays the setting items below . Print settings • Ink drying wait time See "Sets time to configure the printer settings. See "Printing the Nozzle Check Pattern" on the printing ...

Photo Printing Guide
Page 22
...Removing a Memory Card Note If you use the printer connected to your fingers to jam or malfunction. Indicator lamp Loading Paper „ Print Media to the User's Guide. 1 Ensure that is too thick* (more than 105 gsm or 28 lb) * non-Canon brand paper • Picture postcards • Postcards with an ...refer to Avoid Do not use a cut paper or memo pad. • Folded, curled or wrinkled paper • Damp paper • Paper that is too thin (less than 64 gsm or 17 lb) • Paper that the Indicator lamp is flashing can also cause the printer to remove the memory card. Hold the...
...Removing a Memory Card Note If you use the printer connected to your fingers to jam or malfunction. Indicator lamp Loading Paper „ Print Media to the User's Guide. 1 Ensure that is too thick* (more than 105 gsm or 28 lb) * non-Canon brand paper • Picture postcards • Postcards with an ...refer to Avoid Do not use a cut paper or memo pad. • Folded, curled or wrinkled paper • Damp paper • Paper that is too thin (less than 64 gsm or 17 lb) • Paper that the Indicator lamp is flashing can also cause the printer to remove the memory card. Hold the...
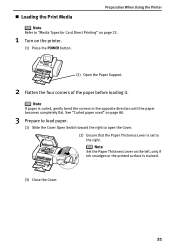
Photo Printing Guide
Page 23
... right to open the Cover. (2) Ensure that the Paper Thickness Lever is curled, gently bend the corners in the opposite direction until the paper becomes completely flat. „ Loading the Print Media Preparation When Using the Printer Note Refer to the right. Note If paper is set to "Media Types for Card Direct Printing...
... right to open the Cover. (2) Ensure that the Paper Thickness Lever is curled, gently bend the corners in the opposite direction until the paper becomes completely flat. „ Loading the Print Media Preparation When Using the Printer Note Refer to the right. Note If paper is set to "Media Types for Card Direct Printing...
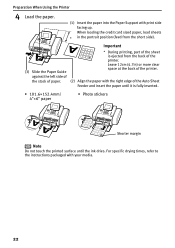
Photo Printing Guide
Page 24
...facing up. Preparation When Using the Printer 4 Load the paper. (1) Insert the paper into the Paper Support with your media. 22 When loading the credit card sized paper, load sheets * in the portrait position (feed from the back of the printer. Important (3) Slide the Paper Guide against the left side of ... side). Leave 12cm (4.7in) or more clear space at the back of the printer. (2) Align the paper with the right edge of the sheet is fully inserted. • 101.6×152.4mm/ 4"×6" paper • Photo stickers Shorter margin Note Do not touch the printed surface until the...
...facing up. Preparation When Using the Printer 4 Load the paper. (1) Insert the paper into the Paper Support with your media. 22 When loading the credit card sized paper, load sheets * in the portrait position (feed from the back of the printer. Important (3) Slide the Paper Guide against the left side of ... side). Leave 12cm (4.7in) or more clear space at the back of the printer. (2) Align the paper with the right edge of the sheet is fully inserted. • 101.6×152.4mm/ 4"×6" paper • Photo stickers Shorter margin Note Do not touch the printed surface until the...
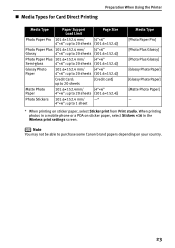
Photo Printing Guide
Page 25
... the Printer Media Type Paper Support Load Limit Page Size Photo Paper Pro 101.6×152.4 mm/ [4"×6" 4"×6": up to 20 sheets (101.6×152.4)] Photo Paper Plus 101.6×152.4 mm/ [4"×6" Glossy 4"×6": up to 20 sheets (101.6×152.4)] Photo Paper Plus ...215;6": up to purchase some Canon brand papers depending on your country. 23 Note You may not be able to 1 sheet Media Type [Photo Paper Pro] [Photo Plus Glossy] [Photo Plus Glossy] [Glossy Photo Paper] [Glossy Photo Paper] [Matte Photo Paper] - * When printing on sticker paper, select Stickers ×16 in...
... the Printer Media Type Paper Support Load Limit Page Size Photo Paper Pro 101.6×152.4 mm/ [4"×6" 4"×6": up to 20 sheets (101.6×152.4)] Photo Paper Plus 101.6×152.4 mm/ [4"×6" Glossy 4"×6": up to 20 sheets (101.6×152.4)] Photo Paper Plus ...215;6": up to purchase some Canon brand papers depending on your country. 23 Note You may not be able to 1 sheet Media Type [Photo Paper Pro] [Photo Plus Glossy] [Photo Plus Glossy] [Glossy Photo Paper] [Glossy Photo Paper] [Matte Photo Paper] - * When printing on sticker paper, select Stickers ×16 in...

Photo Printing Guide
Page 28
... pro ON/Photo optimizer pro OFF If you select Photo optimizer pro ON, Photo optimizer pro function automatically corrects the image brightness and color. • Noise reduction ON/Noise reduction OFF If you select Noise reduction ON, digital camera noise (which may be seen in dark.... Print date & file no. .Prints shooting dates and file numbers (DCF numbers) on the whole paper without a border. • Date/file no. Borderless Prints on photos. Preparation When Using the Printer • Border Bordered Prints with a border. Print date only.........Prints the date the photo was taken....
... pro ON/Photo optimizer pro OFF If you select Photo optimizer pro ON, Photo optimizer pro function automatically corrects the image brightness and color. • Noise reduction ON/Noise reduction OFF If you select Noise reduction ON, digital camera noise (which may be seen in dark.... Print date & file no. .Prints shooting dates and file numbers (DCF numbers) on the whole paper without a border. • Date/file no. Borderless Prints on photos. Preparation When Using the Printer • Border Bordered Prints with a border. Print date only.........Prints the date the photo was taken....

Photo Printing Guide
Page 30
...the photos stored in a memory card while displaying on page 19. You can be viewed when a memory card with stored photos is turned on the printer. Note If you took and stored in the memory card on page 20. (3) Insert the memory card into the Card Slot. See "Turning On ... into the Card Slot. To prepare the printer for each photo listed. Printing from the Memory Card Printing from the Memory Card Printing Photograph You can print the photos you leave the printer more than five minutes without using any button on page 16. (2) Load the paper. See "Inserting a Memory Card" on...
...the photos stored in a memory card while displaying on page 19. You can be viewed when a memory card with stored photos is turned on the printer. Note If you took and stored in the memory card on page 20. (3) Insert the memory card into the Card Slot. See "Turning On ... into the Card Slot. To prepare the printer for each photo listed. Printing from the Memory Card Printing from the Memory Card Printing Photograph You can print the photos you leave the printer more than five minutes without using any button on page 16. (2) Load the paper. See "Inserting a Memory Card" on...

Photo Printing Guide
Page 32
See "To Change Print Setting" on page 24. 5 Start printing. (1) Ensure that the paper is loaded in the memory card are displayed. 30 The number of copies (2) Confirm the Page size, Media type and Print quality. To change any ... Memory Card 4 Confirm the settings. (1) Press the ST buttons to specify the number of copies to print for Each Photograph- See "Preparation When Using the Printer" on the operation panel.
See "To Change Print Setting" on page 24. 5 Start printing. (1) Ensure that the paper is loaded in the memory card are displayed. 30 The number of copies (2) Confirm the Page size, Media type and Print quality. To change any ... Memory Card 4 Confirm the settings. (1) Press the ST buttons to specify the number of copies to print for Each Photograph- See "Preparation When Using the Printer" on the operation panel.
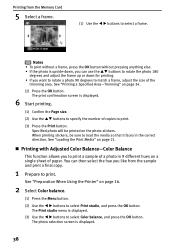
Photo Printing Guide
Page 40
...and adjust the frame up or down , you can then select the hue you to print a sample of paper. The print confirmation screen is displayed. (3) Use the W X buttons to select Color balance, and press the OK button. Specified photo will be sure to load the media so that it ... the trimming area. See "Printing a Specified Area-Trimming" on page 16. 2 Select Color balance. (1) Press the Menu button. (2) Use the W X buttons to select Print studio, and press the OK button. See "Preparation When Using the Printer" on page 34. (2) Press the OK button. See "Loading the Print Media" on...
...and adjust the frame up or down , you can then select the hue you to print a sample of paper. The print confirmation screen is displayed. (3) Use the W X buttons to select Color balance, and press the OK button. Specified photo will be sure to load the media so that it ... the trimming area. See "Printing a Specified Area-Trimming" on page 16. 2 Select Color balance. (1) Press the Menu button. (2) Use the W X buttons to select Print studio, and press the OK button. See "Preparation When Using the Printer" on page 34. (2) Press the OK button. See "Loading the Print Media" on...

Photo Printing Guide
Page 42
...number of copies you want to print. (3) Press the Print button. Sample photo Bright/Soft Brightness/Contrast Dark/Sharp Yellow Color tone Red 6 Start printing. (1) Confirm your favorite color tone. 40 The photo will be printed in your print settings. The print confirmation screen is displayed. See "To ...Change Print Setting" on the paper you use, you like . (2) Press the OK button. Wait until the colors of the sample photo settle, then select the number of the hue that you may need to wait for...
...number of copies you want to print. (3) Press the Print button. Sample photo Bright/Soft Brightness/Contrast Dark/Sharp Yellow Color tone Red 6 Start printing. (1) Confirm your favorite color tone. 40 The photo will be printed in your print settings. The print confirmation screen is displayed. See "To ...Change Print Setting" on the paper you use, you like . (2) Press the OK button. Wait until the colors of the sample photo settle, then select the number of the hue that you may need to wait for...
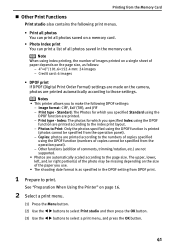
Photo Printing Guide
Page 43
... comments, trimming/rotation, etc.) are not supported. • Photos are automatically scaled according to the page size. Notes • This printer allows you use. • The shooting date format is printed (photos cannot be specified from the operation panel). - Standard: The Photos... the index print layout. - Print type - Index: The photos for which you specified Standard using the DPOF function (numbers of the paper you to print. Copies: photos are printed automatically according to Print: Only the photos specified using index printing, the number of images printed...
... comments, trimming/rotation, etc.) are not supported. • Photos are automatically scaled according to the page size. Notes • This printer allows you use. • The shooting date format is printed (photos cannot be specified from the operation panel). - Standard: The Photos... the index print layout. - Print type - Index: The photos for which you specified Standard using the DPOF function (numbers of the paper you to print. Copies: photos are printed automatically according to Print: Only the photos specified using index printing, the number of images printed...

Photo Printing Guide
Page 48
... to the instruction manual supplied with the device. A Canon Bubble Jet Direct compatible digital camera. When the connection between the device and printer has been established, the POWER lamp on the printer flashes twice. * The power-on sequence may also have to the printer. If the icon does not appear, see "Cannot ...manually after connecting the device to select a mode of the device. Printing Photographs Directly from a Digital Camera 3 Load the 101.6×152.4mm/4"×6" paper into the Paper Support in the portrait position (feed from the Digital Camera" on page 81. 46
... to the instruction manual supplied with the device. A Canon Bubble Jet Direct compatible digital camera. When the connection between the device and printer has been established, the POWER lamp on the printer flashes twice. * The power-on sequence may also have to the printer. If the icon does not appear, see "Cannot ...manually after connecting the device to select a mode of the device. Printing Photographs Directly from a Digital Camera 3 Load the 101.6×152.4mm/4"×6" paper into the Paper Support in the portrait position (feed from the Digital Camera" on page 81. 46

Photo Printing Guide
Page 49
.... PictBridge compliant device setting items Paper size: Default Paper type: Default Layout: Default Image Optimize: Default Printer setting on the Settings screen You can change the paper size or paper type, operate the device to your device depending on Canon PictBridge compliant devices are displayed on... for Camera FIle system and PNG files. *Exif 2.21 compliant „ About "Paper size" and "Paper type" When you have selected Default (selections based on the printer setting), the printer operates based on some devices. Names of the device. Printing Photographs Directly from...
.... PictBridge compliant device setting items Paper size: Default Paper type: Default Layout: Default Image Optimize: Default Printer setting on the Settings screen You can change the paper size or paper type, operate the device to your device depending on Canon PictBridge compliant devices are displayed on... for Camera FIle system and PNG files. *Exif 2.21 compliant „ About "Paper size" and "Paper type" When you have selected Default (selections based on the printer setting), the printer operates based on some devices. Names of the device. Printing Photographs Directly from...
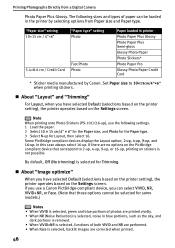
Photo Printing Guide
Page 50
...corrected when printed. 48 Printing Photographs Directly from Paper size and Paper type. "Paper size" setting 10×15 cm / 4"×6" "Paper type" setting Photo Fast Photo 5.4×8.6 cm / Credit Card Photo Paper loaded in the printer by Canon. Set Paper size to 2-up, 4-up, 9-up, or...when you have selected Default (selections based on the printer setting), the printer operates based on the Settings screen. Note When printing onto Photo Stickers (PS-101) (16-up for the Paper type. 3 Select N-up ), use a Canon PictBridge-compliant device, you can be selected for Trimming...
...corrected when printed. 48 Printing Photographs Directly from Paper size and Paper type. "Paper size" setting 10×15 cm / 4"×6" "Paper type" setting Photo Fast Photo 5.4×8.6 cm / Credit Card Photo Paper loaded in the printer by Canon. Set Paper size to 2-up, 4-up, 9-up, or...when you have selected Default (selections based on the printer setting), the printer operates based on the Settings screen. Note When printing onto Photo Stickers (PS-101) (16-up for the Paper type. 3 Select N-up ), use a Canon PictBridge-compliant device, you can be selected for Trimming...
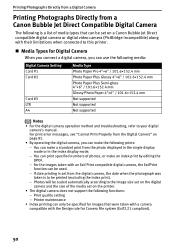
Photo Printing Guide
Page 52
...Card #1 Card #2 Card #3 LTR A4 Media Type Photo Paper Pro 4"×6" / 101.6×152.4 mm Photo Paper Plus Glossy 4"×6" / 101.6×152.4 mm Photo Paper Plus Semi-gloss 4"×6" / 101.6×152.4 mm Glossy Photo Paper 4"×6" / 101.6×152.4 mm Not supported Not ...print error messages, see "Cannot Print Properly from the Digital Camera" on a Canon Bubble Jet Direct compatible digital camera or digital video camera (PictBridge incompatible) along with their limitations when connected to this printer. „ Media Types for Camera File system (Exif2.21 compliant). 50
...Card #1 Card #2 Card #3 LTR A4 Media Type Photo Paper Pro 4"×6" / 101.6×152.4 mm Photo Paper Plus Glossy 4"×6" / 101.6×152.4 mm Photo Paper Plus Semi-gloss 4"×6" / 101.6×152.4 mm Glossy Photo Paper 4"×6" / 101.6×152.4 mm Not supported Not ...print error messages, see "Cannot Print Properly from the Digital Camera" on a Canon Bubble Jet Direct compatible digital camera or digital video camera (PictBridge incompatible) along with their limitations when connected to this printer. „ Media Types for Camera File system (Exif2.21 compliant). 50


