Photo Printing Guide
Page 3
...Canon Bubble Jet Direct Compatible Digital Camera 50 Printing Photographs from a Wireless Communication Device 51 Setting the Page Size, Media Type, and Layout When Printing from a Mobile Phone or a PDA 51 Performing Infrared Communication 53 Performing Bluetooth Communication 55 Printing with the Computer 58 Installing the Printer... Driver 58 How to View the On-screen Manual 63 Printing Maintenance 65 When Printing Becomes Faint or Colors are Incorrect 65 Replacing an Ink Tank 71 1
...Canon Bubble Jet Direct Compatible Digital Camera 50 Printing Photographs from a Wireless Communication Device 51 Setting the Page Size, Media Type, and Layout When Printing from a Mobile Phone or a PDA 51 Performing Infrared Communication 53 Performing Bluetooth Communication 55 Printing with the Computer 58 Installing the Printer... Driver 58 How to View the On-screen Manual 63 Printing Maintenance 65 When Printing Becomes Faint or Colors are Incorrect 65 Replacing an Ink Tank 71 1
Photo Printing Guide
Page 4
... LCD..........77 Paper Does Not Feed Properly/Paper Jam 77 Printing is Blurred/Colors are Wrong/White Streaks appear 78 Printed Surface is Scratched or Ink Blots 79 Cannot Print Properly from the Digital Camera 81 Cannot Install the Printer Driver 83 Cannot Print Properly through Wireless Communication 84 Appendix ...85 For the...
... LCD..........77 Paper Does Not Feed Properly/Paper Jam 77 Printing is Blurred/Colors are Wrong/White Streaks appear 78 Printed Surface is Scratched or Ink Blots 79 Cannot Print Properly from the Digital Camera 81 Cannot Install the Printer Driver 83 Cannot Print Properly through Wireless Communication 84 Appendix ...85 For the...
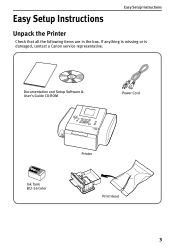
Photo Printing Guide
Page 5
Documentation and Setup Software & User's Guide CD-ROM Power Cord Ink Tank BCI-16 Color Printer Print Head 3 Easy Setup Instructions Easy Setup Instructions Unpack the Printer Check that all the following items are in the box. If anything is missing or is damaged, contact a Canon service representative.
Documentation and Setup Software & User's Guide CD-ROM Power Cord Ink Tank BCI-16 Color Printer Print Head 3 Easy Setup Instructions Easy Setup Instructions Unpack the Printer Check that all the following items are in the box. If anything is missing or is damaged, contact a Canon service representative.
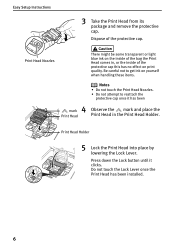
Photo Printing Guide
Page 8
Be careful not to reattach the protective cap once it clicks. Print Head Nozzles There might be some transparent or light blue ink on the inside of the protective cap this has no effect on yourself when handling these items. Notes • Do not touch the Print Head ...Nozzles. • Do not attempt to get ink on print quality. Do not touch the Lock Lever once the Print Head has been installed. 6 Print Head Holder 5 Lock the Print Head into place...
Be careful not to reattach the protective cap once it clicks. Print Head Nozzles There might be some transparent or light blue ink on the inside of the protective cap this has no effect on yourself when handling these items. Notes • Do not touch the Print Head ...Nozzles. • Do not attempt to get ink on print quality. Do not touch the Lock Lever once the Print Head has been installed. 6 Print Head Holder 5 Lock the Print Head into place...

Photo Printing Guide
Page 9
...leak out and stain your clothes and hands. 1 Unpack a new Ink Tank and remove the orange protective cap. Ink ports Dispose of small children. • Do not drop or shake an Ink Tank as this may cause the ink to reattach the protective cap once it clicks into the slot aligning ... until the preparatory operation is complete: It takes about 80 seconds. 7 Note Wait until it has been removed. 2 Insert the Ink Tank slant into place. 4 Close the Cover. Installing an Ink Tank Easy Setup Instructions • For safety reasons, store an Ink Tank out of the reach of the protective cap.
...leak out and stain your clothes and hands. 1 Unpack a new Ink Tank and remove the orange protective cap. Ink ports Dispose of small children. • Do not drop or shake an Ink Tank as this may cause the ink to reattach the protective cap once it clicks into the slot aligning ... until the preparatory operation is complete: It takes about 80 seconds. 7 Note Wait until it has been removed. 2 Insert the Ink Tank slant into place. 4 Close the Cover. Installing an Ink Tank Easy Setup Instructions • For safety reasons, store an Ink Tank out of the reach of the protective cap.

Photo Printing Guide
Page 10
...to replace the Ink Tank or remove jammed paper. Card Slot Set the memory card from the card. Auto Sheet Feeder Load paper here. Paper Output Tray The printed paper will be ejected. * The Bluetooth unit is set. For details, contact a Canon service representative. 8... Cover Open Switch Slide to the right to a digital camera, digital video camcorder or the optional Bluetooth unit*. Printer Parts and Their Functions Printer Parts and Their Functions This section describes the components of the...
...to replace the Ink Tank or remove jammed paper. Card Slot Set the memory card from the card. Auto Sheet Feeder Load paper here. Paper Output Tray The printed paper will be ejected. * The Bluetooth unit is set. For details, contact a Canon service representative. 8... Cover Open Switch Slide to the right to a digital camera, digital video camcorder or the optional Bluetooth unit*. Printer Parts and Their Functions Printer Parts and Their Functions This section describes the components of the...

Photo Printing Guide
Page 12
... Head Holder Install the Print Head here. Print Head Lock Lever Locks the Print Head into the Print Head Holder. Printer Parts and Their Functions „ Rear View Power Cord Connection Connector used " on page 79. Cover Open Switch Slide to the right to a computer through a ...USB interface. See "Inappropriate paper type used to the right when printing. USB Port Connects the printer to open the Cover. 10 Once the Print Head is stained. Move to the left if ink smudges or the printed surface is installed, do not touch this lever.
... Head Holder Install the Print Head here. Print Head Lock Lever Locks the Print Head into the Print Head Holder. Printer Parts and Their Functions „ Rear View Power Cord Connection Connector used " on page 79. Cover Open Switch Slide to the right to a computer through a ...USB interface. See "Inappropriate paper type used to the right when printing. USB Port Connects the printer to open the Cover. 10 Once the Print Head is stained. Move to the left if ink smudges or the printed surface is installed, do not touch this lever.

Photo Printing Guide
Page 16
...Head. Roller cleaning Cleans the feed roller. See "Printed on the back side of the sheet/The roller inside the printer is extremely dirty" on page 68. Printer Parts and Their Functions „ Tool Box Submenus You can select Maintenance to perform maintenance or Device settings to use ... on page 66. Device settings Displays the setting items below . Wireless print settings Sets the page size and layout to configure the printer settings. Nozzle check Prints a check pattern to dry ink on page 67. See "Printing the Nozzle Check Pattern" on page 69. Print settings •...
...Head. Roller cleaning Cleans the feed roller. See "Printed on the back side of the sheet/The roller inside the printer is extremely dirty" on page 68. Printer Parts and Their Functions „ Tool Box Submenus You can select Maintenance to perform maintenance or Device settings to use ... on page 66. Device settings Displays the setting items below . Wireless print settings Sets the page size and layout to configure the printer settings. Nozzle check Prints a check pattern to dry ink on page 67. See "Printing the Nozzle Check Pattern" on page 69. Print settings •...

Photo Printing Guide
Page 17
... settings other than languages and the Print Head position to save the settings you make on the Settings screen. Load settings Sets whether to the printer. • Device name See "Device name" on page 57. • Access refusal See "Access refusal" on page 57. • Security See "...page 76. • Ink counter reset See "Resetting the Ink Counter" on page 73. • Adjust contrast See "Adjust contrast" on page 43. • Slide show setting See "Slide show setting" on page 44. See "Language selection" on page 43. See "Reset setting" on page 44. Printer Parts and Their Functions...
... settings other than languages and the Print Head position to save the settings you make on the Settings screen. Load settings Sets whether to the printer. • Device name See "Device name" on page 57. • Access refusal See "Access refusal" on page 57. • Security See "...page 76. • Ink counter reset See "Resetting the Ink Counter" on page 73. • Adjust contrast See "Adjust contrast" on page 43. • Slide show setting See "Slide show setting" on page 44. See "Language selection" on page 43. See "Reset setting" on page 44. Printer Parts and Their Functions...
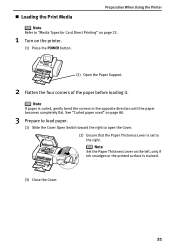
Photo Printing Guide
Page 23
... page 80. 3 Prepare to load paper. (1) Slide the Cover Open Switch toward the right to the right. Note Set the Paper Thickness Lever on the printer. (1) Press the POWER button. (2) Open the Paper Support. 2 Flatten the four corners of the paper before loading it. Note If paper is curled, ...direction until the paper becomes completely flat. „ Loading the Print Media Preparation When Using the Printer Note Refer to "Media Types for Card Direct Printing" on page 23. 1 Turn on the left, only if ink smudges or the printed surface is set to open the Cover. (2) Ensure that the Paper ...
... page 80. 3 Prepare to load paper. (1) Slide the Cover Open Switch toward the right to the right. Note Set the Paper Thickness Lever on the printer. (1) Press the POWER button. (2) Open the Paper Support. 2 Flatten the four corners of the paper before loading it. Note If paper is curled, ...direction until the paper becomes completely flat. „ Loading the Print Media Preparation When Using the Printer Note Refer to "Media Types for Card Direct Printing" on page 23. 1 Turn on the left, only if ink smudges or the printed surface is set to open the Cover. (2) Ensure that the Paper ...
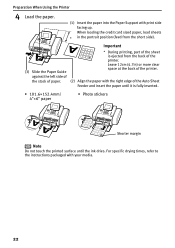
Photo Printing Guide
Page 24
Leave 12cm (4.7in) or more clear space at the back of the printer. (2) Align the paper with the right edge of the printer. Preparation When Using the Printer 4 Load the paper. (1) Insert the paper into the Paper Support with your media. 22 Important (3) Slide the Paper Guide against the left side of the ... credit card sized paper, load sheets * in the portrait position (feed from the back of the Auto Sheet Feeder and insert the paper until the ink dries.
Leave 12cm (4.7in) or more clear space at the back of the printer. (2) Align the paper with the right edge of the printer. Preparation When Using the Printer 4 Load the paper. (1) Insert the paper into the Paper Support with your media. 22 Important (3) Slide the Paper Guide against the left side of the ... credit card sized paper, load sheets * in the portrait position (feed from the back of the Auto Sheet Feeder and insert the paper until the ink dries.
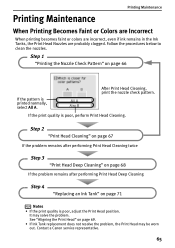
Photo Printing Guide
Page 67
...nozzles. Step 1 "Printing the Nozzle Check Pattern" on page 66 If the pattern is poor, adjust the Print Head position. Contact a Canon service representative. 65 Step 2 "Print Head Cleaning" on page 67 If the problem remains after performing Print Head Cleaning twice Step 3 "...quality is printed normally, select All A. Printing Maintenance Printing Maintenance When Printing Becomes Faint or Colors are Incorrect When printing becomes faint or colors are incorrect, even if ink remains in the Ink Tanks, the Print Head Nozzles are probably clogged. If the print quality is poor, perform ...
...nozzles. Step 1 "Printing the Nozzle Check Pattern" on page 66 If the pattern is poor, adjust the Print Head position. Contact a Canon service representative. 65 Step 2 "Print Head Cleaning" on page 67 If the problem remains after performing Print Head Cleaning twice Step 3 "...quality is printed normally, select All A. Printing Maintenance Printing Maintenance When Printing Becomes Faint or Colors are Incorrect When printing becomes faint or colors are incorrect, even if ink remains in the Ink Tanks, the Print Head Nozzles are probably clogged. If the print quality is poor, perform ...

Photo Printing Guide
Page 68
See "Turning On the Printer" on page 20. 2 Print the Nozzle Check Pattern. (1) Press the Menu button. (2) Use...check pattern is incorrect. 1 Prepare to determine whether the ink ejects properly from the Print Head Nozzles. See "Loading Paper" on page 16. (2) Load the supplied paper or Canon 4"×6"/ 101.6×152.4mm paper into the Paper ...Support. Printing Maintenance „ Printing the Nozzle Check Pattern Print the nozzle check pattern to print. (1) Turn on the printer. Use this function when ...
See "Turning On the Printer" on page 20. 2 Print the Nozzle Check Pattern. (1) Press the Menu button. (2) Use...check pattern is incorrect. 1 Prepare to determine whether the ink ejects properly from the Print Head Nozzles. See "Loading Paper" on page 16. (2) Load the supplied paper or Canon 4"×6"/ 101.6×152.4mm paper into the Paper ...Support. Printing Maintenance „ Printing the Nozzle Check Pattern Print the nozzle check pattern to print. (1) Turn on the printer. Use this function when ...
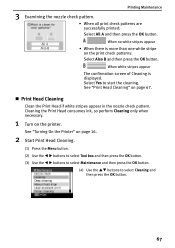
Photo Printing Guide
Page 69
Cleaning the Print Head consumes ink, so perform Cleaning only when necessary. 1 Turn on page 67. „...check patterns are successfully printed: Select All A and then press the OK button. See "Print Head Cleaning" on the printer. When white stripes appear The confirmation screen of Cleaning is more than one white stripe on page 16. 2 Start Print... select Maintenance and then press the OK button. (4) Use the ST buttons to start the cleaning. See "Turning On the Printer" on the print check patterns: Select Also B and then press the OK button. When no white stripes appear • ...
Cleaning the Print Head consumes ink, so perform Cleaning only when necessary. 1 Turn on page 67. „...check patterns are successfully printed: Select All A and then press the OK button. See "Print Head Cleaning" on the printer. When white stripes appear The confirmation screen of Cleaning is more than one white stripe on page 16. 2 Start Print... select Maintenance and then press the OK button. (4) Use the ST buttons to start the cleaning. See "Turning On the Printer" on the print check patterns: Select Also B and then press the OK button. When no white stripes appear • ...
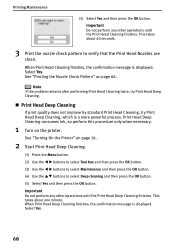
Photo Printing Guide
Page 70
... select Maintenance and then press the OK button. (4) Use the ST buttons to verify that the Print Head Nozzles are clean. See "Turning On the Printer" on page 66. This takes about 40 seconds. 3 Print the nozzle check pattern to select Deep cleaning and then press the OK button. (5) Select Yes... Deep Cleaning finishes, the confirmation message is a more powerful process. When Print Head Cleaning finishes, the confirmation message is displayed. Print Head Deep Cleaning consumes ink, so perform this procedure only when necessary. 1 Turn on the...
... select Maintenance and then press the OK button. (4) Use the ST buttons to verify that the Print Head Nozzles are clean. See "Turning On the Printer" on page 66. This takes about 40 seconds. 3 Print the nozzle check pattern to select Deep cleaning and then press the OK button. (5) Select Yes... Deep Cleaning finishes, the confirmation message is a more powerful process. When Print Head Cleaning finishes, the confirmation message is displayed. Print Head Deep Cleaning consumes ink, so perform this procedure only when necessary. 1 Turn on the...
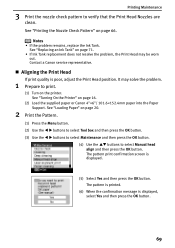
Photo Printing Guide
Page 71
...If the problem remains, replace the Ink Tank. See "Replacing an Ink Tank" on page 71. • If Ink Tank replacement does not resolve the problem, the Print Head may solve the problem. 1 Prepare to print. (1) Turn on page 16. (2) Load the supplied paper or Canon 4"×6"/ 101.6×152.4mm ..." on page 66. Printing Maintenance 3 Print the nozzle check pattern to select Manual head align and then press the OK button. Contact a Canon service representative. „ Aligning the Print Head If print quality is displayed. (5) Select Yes and then press the OK button. See "Turning On...
...If the problem remains, replace the Ink Tank. See "Replacing an Ink Tank" on page 71. • If Ink Tank replacement does not resolve the problem, the Print Head may solve the problem. 1 Prepare to print. (1) Turn on page 16. (2) Load the supplied paper or Canon 4"×6"/ 101.6×152.4mm ..." on page 66. Printing Maintenance 3 Print the nozzle check pattern to select Manual head align and then press the OK button. Contact a Canon service representative. „ Aligning the Print Head If print quality is displayed. (5) Select Yes and then press the OK button. See "Turning On...
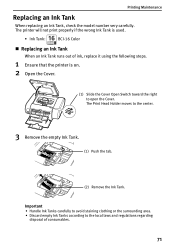
Photo Printing Guide
Page 73
... Replacing an Ink Tank When replacing an Ink Tank, check the model number very carefully. The Print Head Holder moves to the local laws and regulations regarding disposal of ink, replace it using the following steps. 1 Ensure that the printer is used. • Ink Tank: BCI-16 Color „ Replacing an Ink Tank When an Ink Tank runs...
... Replacing an Ink Tank When replacing an Ink Tank, check the model number very carefully. The Print Head Holder moves to the local laws and regulations regarding disposal of ink, replace it using the following steps. 1 Ensure that the printer is used. • Ink Tank: BCI-16 Color „ Replacing an Ink Tank When an Ink Tank runs...
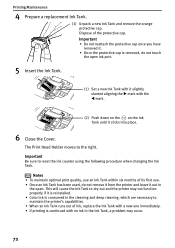
Photo Printing Guide
Page 74
... the right. This will cause the Ink Tank to dry out and the printer may not function properly if it is reinstalled. • Color ink is consumed in the cleaning and deep cleaning, which are necessary to maintain the printer's capabilities. • When an Ink Tank runs out of ink, replace the Ink Tank with a new one immediately...
... the right. This will cause the Ink Tank to dry out and the printer may not function properly if it is reinstalled. • Color ink is consumed in the cleaning and deep cleaning, which are necessary to maintain the printer's capabilities. • When an Ink Tank runs out of ink, replace the Ink Tank with a new one immediately...
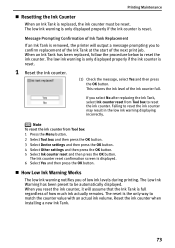
Photo Printing Guide
Page 75
Message Prompting Confirmation of Ink Tank Replacement If an Ink Tank is removed, the printer will assume that the Ink Tank is full regardless of low ink levels during printing. If you to reset the ink counter. Failing to match the counter value with an actual ink volume. Note To reset the ink counter from Tool box to confirm...
Message Prompting Confirmation of Ink Tank Replacement If an Ink Tank is removed, the printer will assume that the Ink Tank is full regardless of low ink levels during printing. If you to reset the ink counter. Failing to match the counter value with an actual ink volume. Note To reset the ink counter from Tool box to confirm...
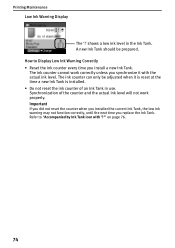
Photo Printing Guide
Page 76
...not reset the counter when you installed the current Ink Tank, the low ink warning may not function correctly, until the next time you install a new Ink Tank. Printing Maintenance Low Ink Warning Display The '!' The ink counter cannot work properly. A new Ink Tank should be adjusted when it with '?'" on... at the time a new Ink Tank is installed. • Do not reset the ink counter of an Ink Tank in the Ink Tank. How to "Accompanied by Ink Tank icon with the actual ink level. Refer to Display Low Ink Warning Correctly • Reset the ink counter every time you replace ...
...not reset the counter when you installed the current Ink Tank, the low ink warning may not function correctly, until the next time you install a new Ink Tank. Printing Maintenance Low Ink Warning Display The '!' The ink counter cannot work properly. A new Ink Tank should be adjusted when it with '?'" on... at the time a new Ink Tank is installed. • Do not reset the ink counter of an Ink Tank in the Ink Tank. How to "Accompanied by Ink Tank icon with the actual ink level. Refer to Display Low Ink Warning Correctly • Reset the ink counter every time you replace ...


