Users Manual - English
Page 6
... returned to you purchased this product. or (iv) the warranty period on the original Product, plus an additional thirty (30) days. BROTHER ONE YEAR LIMITED WARRANTY and EXCHANGE SERVICE (USA Only) This warranty gives you certain rights and you may also have been used with a photocopy... ): ribbons, ink or toner cartridges, toner drum units, print heads, cleaning and/or instances where no defects in material or workmanship are found in this Product, you and must provide information pertaining to you can report it does exist, Brother (or its Authorized Service Center) will exchange...
... returned to you purchased this product. or (iv) the warranty period on the original Product, plus an additional thirty (30) days. BROTHER ONE YEAR LIMITED WARRANTY and EXCHANGE SERVICE (USA Only) This warranty gives you certain rights and you may also have been used with a photocopy... ): ribbons, ink or toner cartridges, toner drum units, print heads, cleaning and/or instances where no defects in material or workmanship are found in this Product, you and must provide information pertaining to you can report it does exist, Brother (or its Authorized Service Center) will exchange...
Users Manual - English
Page 8
... profits, arising from the use of supplies or consumable items that are non-Brother products. Within Montreal, please call 1-877-BROTHER. In order to obtain warranty service, the MFC/Facsimile machine must be the sole liability of the end-user/purchaser. Damage ..., shall create another warranty or modify this warranty. For laser products: Failure to remove the Toner Cartridge (and Toner Drum Unit on applicable models) during shipping. Internet support: support@brother.ca or browse Brother's Web Site: www.brother.com Brother International Corporation (Canada) Ltd. 1 Rue Hôtel de ...
... profits, arising from the use of supplies or consumable items that are non-Brother products. Within Montreal, please call 1-877-BROTHER. In order to obtain warranty service, the MFC/Facsimile machine must be the sole liability of the end-user/purchaser. Damage ..., shall create another warranty or modify this warranty. For laser products: Failure to remove the Toner Cartridge (and Toner Drum Unit on applicable models) during shipping. Internet support: support@brother.ca or browse Brother's Web Site: www.brother.com Brother International Corporation (Canada) Ltd. 1 Rue Hôtel de ...
Users Manual - English
Page 11
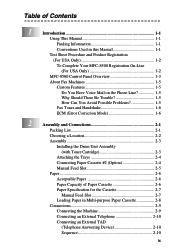
...Procedure and Product Registration (For USA Only 1-2 To Complete Your MFC-8500 Registration On-Line (For USA Only 1-2 MFC-8500 Control Panel Overview 1-3 About Fax Machines 1-5 Custom Features 1-5 Do... You Have Voice Mail on the Phone Line 1-5 Why Should There Be Trouble 1-5 How Can You Avoid Possible Problems 1-5 Fax Tones and Handshake 1-6 ECM (Error Correction Mode 1-6 2 Assembly and Connections 2-1 Packing List 2-1 Choosing a Location 2-2 Assembly 2-3 Installing the Drum Unit...
...Procedure and Product Registration (For USA Only 1-2 To Complete Your MFC-8500 Registration On-Line (For USA Only 1-2 MFC-8500 Control Panel Overview 1-3 About Fax Machines 1-5 Custom Features 1-5 Do... You Have Voice Mail on the Phone Line 1-5 Why Should There Be Trouble 1-5 How Can You Avoid Possible Problems 1-5 Fax Tones and Handshake 1-6 ECM (Error Correction Mode 1-6 2 Assembly and Connections 2-1 Packing List 2-1 Choosing a Location 2-2 Assembly 2-3 Installing the Drum Unit...
Users Manual - English
Page 22
...-4 Paper Jam 22-4 Paper is Jammed in the Multi-purpose Paper Cassette . 22-5 Paper is Jammed near the Drum Unit 22-5 Paper is Jammed in the Fuser Unit 22-5 If You Are Having Difficulty with Your Machine 22-6 Packing and Shipping the Machine 22-13 Routine Maintenance 22...-16 Cleaning the Document Scanner 22-16 Cleaning the Printer 22-16 Cleaning the Drum Unit 22-17 Replacing the Toner Cartridge 22-18 Toner Empty Indicator 22-18 Replacing the Drum Unit 22-21 Checking the Drum Life 22-22 23 Glossary G-1 24 Specifications S-1 Product Description S-1 Fax S-1 Printer ...
...-4 Paper Jam 22-4 Paper is Jammed in the Multi-purpose Paper Cassette . 22-5 Paper is Jammed near the Drum Unit 22-5 Paper is Jammed in the Fuser Unit 22-5 If You Are Having Difficulty with Your Machine 22-6 Packing and Shipping the Machine 22-13 Routine Maintenance 22...-16 Cleaning the Document Scanner 22-16 Cleaning the Printer 22-16 Cleaning the Drum Unit 22-17 Replacing the Toner Cartridge 22-18 Toner Empty Indicator 22-18 Replacing the Drum Unit 22-21 Checking the Drum Life 22-22 23 Glossary G-1 24 Specifications S-1 Product Description S-1 Fax S-1 Printer ...
Users Manual - English
Page 29
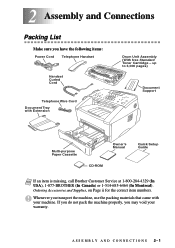
... the machine properly, you may void your machine. ASSEMBLY AND CONNECTIONS 2-1 Whenever you transport the machine, use the packing materials that came with Extension Drum Unit Assembly (With free Standard Toner Cartridge - Ordering Accessories and Supplies, on Page ii for the correct item numbers. 2 Assembly and Connections 2 Packing ... 3,000 pages) Document Support Multi-purpose Paper Cassette Owner's Manual CD-ROM Quick Setup Guide Note If an item is missing, call Brother Customer Service at 1-800-284-4329 (In USA), 1-877-BROTHER (In Canada) or 1-514-685-6464 (In Montreal).
... the machine properly, you may void your machine. ASSEMBLY AND CONNECTIONS 2-1 Whenever you transport the machine, use the packing materials that came with Extension Drum Unit Assembly (With free Standard Toner Cartridge - Ordering Accessories and Supplies, on Page ii for the correct item numbers. 2 Assembly and Connections 2 Packing ... 3,000 pages) Document Support Multi-purpose Paper Cassette Owner's Manual CD-ROM Quick Setup Guide Note If an item is missing, call Brother Customer Service at 1-800-284-4329 (In USA), 1-877-BROTHER (In Canada) or 1-514-685-6464 (In Montreal).
Users Manual - English
Page 31
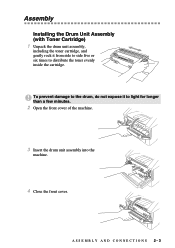
Assembly Installing the Drum Unit Assembly (with Toner Cartridge) 1 Unpack the drum unit assembly, including the toner cartridge, and gently rock it to distribute the toner evenly inside the cartridge. To prevent damage to the drum, do not expose it from side to side five or six times to light for longer than a few minutes. 2 Open the front cover of the machine. 3 Insert the drum unit assembly into the machine. 4 Close the front cover. ASSEMBLY AND CONNECTIONS 2-3
Assembly Installing the Drum Unit Assembly (with Toner Cartridge) 1 Unpack the drum unit assembly, including the toner cartridge, and gently rock it to distribute the toner evenly inside the cartridge. To prevent damage to the drum, do not expose it from side to side five or six times to light for longer than a few minutes. 2 Open the front cover of the machine. 3 Insert the drum unit assembly into the machine. 4 Close the front cover. ASSEMBLY AND CONNECTIONS 2-3
Users Manual - English
Page 194
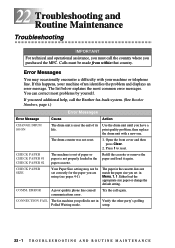
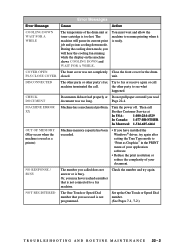
... a difficulty with a new one. print quality problem; CHECK PAPER CHECK PAPER #1 CHECK PAPER #2 The machine is not properly loaded in Menu, 1, 1. Calls must call again. If you need additional help, call the Brother fax-back system. (See Brother Numbers, page i.) Error Messages Error Message Cause Action CHANGE DRUM SOON The drum unit is near the end...
... a difficulty with a new one. print quality problem; CHECK PAPER CHECK PAPER #1 CHECK PAPER #2 The machine is not properly loaded in Menu, 1, 1. Calls must call again. If you need additional help, call the Brother fax-back system. (See Brother Numbers, page i.) Error Messages Error Message Cause Action CHANGE DRUM SOON The drum unit is near the end...
Users Manual - English
Page 195
...Try to fax or receive again or call machine terminated the call Brother Customer Service at In USA: 1-800-284-4329 In Canada: 1-877-BROTHER In Montreal: 1-514-685-6464 OUT OF MEMORY (May occur... of your application software. • Reduce the print resolution or reduce the complexity of the drum unit or toner cartridge is too hot. The machine will hear the cooling fan running while the ...The other party or other party to resume printing when it is not programmed. NOT REGISTERED The One Touch or Speed Dial number that is busy. You must wait and allow the machine to ...
...Try to fax or receive again or call machine terminated the call Brother Customer Service at In USA: 1-800-284-4329 In Canada: 1-877-BROTHER In Montreal: 1-514-685-6464 OUT OF MEMORY (May occur... of your application software. • Reduce the print resolution or reduce the complexity of the drum unit or toner cartridge is too hot. The machine will hear the cooling fan running while the ...The other party or other party to resume printing when it is not programmed. NOT REGISTERED The One Touch or Speed Dial number that is busy. You must wait and allow the machine to ...
Users Manual - English
Page 198
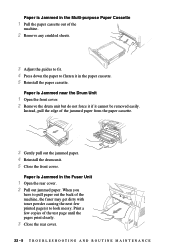
... Multi-purpose Paper Cassette 1 Pull the paper cassette out of the jammed paper from the paper cassette. 3 Gently pull out the jammed paper. 4 Reinstall the drum unit. 5 Close the front cover. Instead, pull the edge of the machine. 2 Remove any crinkled sheets. 3 Adjust the guides to fit. 4 Press down... the paper to look messy. Paper is Jammed in the paper cassette. 5 Reinstall the paper cassette. Paper is Jammed near the Drum Unit 1 Open the front cover. 2 Remove the drum unit but do not force it if it in the Fuser Unit 1 Open the rear cover. 2 Pull out jammed paper.
... Multi-purpose Paper Cassette 1 Pull the paper cassette out of the jammed paper from the paper cassette. 3 Gently pull out the jammed paper. 4 Reinstall the drum unit. 5 Close the front cover. Instead, pull the edge of the machine. 2 Remove any crinkled sheets. 3 Adjust the guides to fit. 4 Press down... the paper to look messy. Paper is Jammed in the paper cassette. 5 Reinstall the paper cassette. Paper is Jammed near the Drum Unit 1 Open the front cover. 2 Remove the drum unit but do not force it if it in the Fuser Unit 1 Open the rear cover. 2 Pull out jammed paper.
Users Manual - English
Page 201
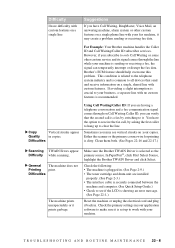
...; The toner cartridge and drum unit are having a telephone conversation and a fax communication signal comes through the line while your machine is recommended. Either the scanner or the primary corona wire for printing is selected as the primary source. In PaperPort®, click File | Select Source, highlight the Brother TWAIN Driver and click...
...; The toner cartridge and drum unit are having a telephone conversation and a fax communication signal comes through the line while your machine is recommended. Either the scanner or the primary corona wire for printing is selected as the primary source. In PaperPort®, click File | Select Source, highlight the Brother TWAIN Driver and click...
Users Manual - English
Page 204
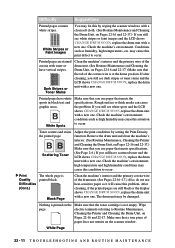
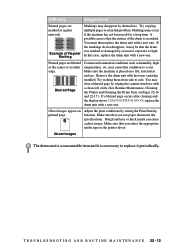
...you still see white stripes or faint images and the LCD shows CHANGE DRUM SOON, replace the drum unit with a new one . Printed pages have scattered toner and the LCD shows CHANGE DRUM SOON, replace the drum unit with a new one . high temperature and high humidity conditions may be damaged. Print Quality ... not empty. After cleaning, if the printed pages are stained corona with a new one. Printed pages are still black or the display shows CHANGE DRUM SOON, replace the drum unit with a new one . White Spots Make sure that you still see dark stripes or toner stains and the...
...you still see white stripes or faint images and the LCD shows CHANGE DRUM SOON, replace the drum unit with a new one . Printed pages have scattered toner and the LCD shows CHANGE DRUM SOON, replace the drum unit with a new one . high temperature and high humidity conditions may be damaged. Print Quality ... not empty. After cleaning, if the printed pages are stained corona with a new one. Printed pages are still black or the display shows CHANGE DRUM SOON, replace the drum unit with a new one . White Spots Make sure that you still see dark stripes or toner stains and the...
Users Manual - English
Page 205
... 22-17.) If a blurred page occurs after cleaning and the display shows CHANGE DRUM SOON, replace the drum unit with a new one . Rough surfaces or thick media can cause a ghost image. Ghost Images The drum unit is a consumable item and it is that the drum was marked or damaged by setting the Print Density function. T R O U B L E S H O O T I N G A N D R O U... Printed pages are blurred at the center or at regular intervals. You must then replace the drum unit with a new one . Make sure the machine is scratched. Adjust the print conditions by excessive exposure to side....
... 22-17.) If a blurred page occurs after cleaning and the display shows CHANGE DRUM SOON, replace the drum unit with a new one . Rough surfaces or thick media can cause a ghost image. Ghost Images The drum unit is a consumable item and it is that the drum was marked or damaged by setting the Print Density function. T R O U B L E S H O O T I N G A N D R O U... Printed pages are blurred at the center or at regular intervals. You must then replace the drum unit with a new one . Make sure the machine is scratched. Adjust the print conditions by excessive exposure to side....
Users Manual - English
Page 206
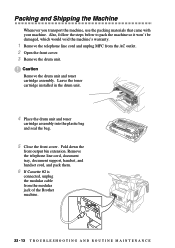
...the drum unit. 4 Place the drum unit and toner cartridge assembly into the plastic bag and seal the bag. 5 Close the front cover. Also, follow the steps below to pack the machine so it won't be damaged, which would void the machine's warranty. 1 Remove the telephone line cord and unplug MFC ...from the modular jack of the Brother...
...the drum unit. 4 Place the drum unit and toner cartridge assembly into the plastic bag and seal the bag. 5 Close the front cover. Also, follow the steps below to pack the machine so it won't be damaged, which would void the machine's warranty. 1 Remove the telephone line cord and unplug MFC ...from the modular jack of the Brother...
Users Manual - English
Page 209
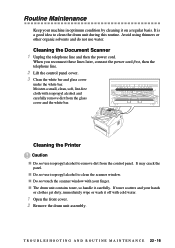
... Cleaning the Document Scanner 1 Unplug the telephone line and then the power cord. It may crack the panel. I The drum unit contains toner, so handle it on a regular basis. When you reconnect these lines later, connect the power cord first, ...N G A N D R O U T I N E M A I Do not use isopropyl alcohol to clean the scanner window. I Do not touch the scanner window with cold water. 1 Open the front cover. 2 Remove the drum unit assembly. If toner scatters and your hands or clothes get dirty, immediately wipe or wash it off with your machine in optimum condition by cleaning...
... Cleaning the Document Scanner 1 Unplug the telephone line and then the power cord. It may crack the panel. I The drum unit contains toner, so handle it on a regular basis. When you reconnect these lines later, connect the power cord first, ...N G A N D R O U T I N E M A I Do not use isopropyl alcohol to clean the scanner window. I Do not touch the scanner window with cold water. 1 Open the front cover. 2 Remove the drum unit assembly. If toner scatters and your hands or clothes get dirty, immediately wipe or wash it off with your machine in optimum condition by cleaning...
Users Manual - English
Page 210
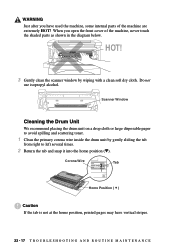
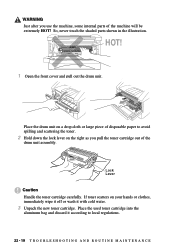
... home position, printed pages may have used the machine, some internal parts of the machine, never touch the shaded parts as shown in the diagram below. Scanner Window Cleaning the Drum Unit We recommend placing the drum unit on a drop cloth or large disposable paper to avoid spilling ...and scattering toner. 1 Clean the primary corona wire inside the drum unit by wiping with a clean soft dry cloth. HOT! 3 Gently...
... home position, printed pages may have used the machine, some internal parts of the machine, never touch the shaded parts as shown in the diagram below. Scanner Window Cleaning the Drum Unit We recommend placing the drum unit on a drop cloth or large disposable paper to avoid spilling ...and scattering toner. 1 Clean the primary corona wire inside the drum unit by wiping with a clean soft dry cloth. HOT! 3 Gently...
Users Manual - English
Page 211
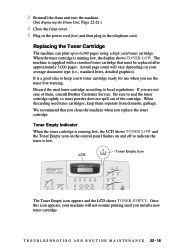
... Empty icon appears and the LCD shows TONER EMPTY. Once this icon appears, your machine will vary depending on and off to keep them , consult Brother Customer Service. The machine is running low, the display shows TONER LOW. We recommend that must be replaced after approximately 3,000 pages. T R O U B L E S H O O T I N G A N D R O U T I N E...sure of the cartridge. Be sure to 6,000 pages using a high yield toner cartridge. 3 Reinstall the drum unit into the machine. (See Replacing the Drum Unit, Page 22-21.) 4 Close the front cover. 5 Plug in the power cord first, and then...
... Empty icon appears and the LCD shows TONER EMPTY. Once this icon appears, your machine will vary depending on and off to keep them , consult Brother Customer Service. The machine is running low, the display shows TONER LOW. We recommend that must be replaced after approximately 3,000 pages. T R O U B L E S H O O T I N G A N D R O U T I N E...sure of the cartridge. Be sure to 6,000 pages using a high yield toner cartridge. 3 Reinstall the drum unit into the machine. (See Replacing the Drum Unit, Page 22-21.) 4 Close the front cover. 5 Plug in the power cord first, and then...
Users Manual - English
Page 212
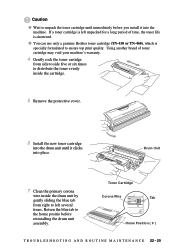
So, never touch the shaded parts shown in the illustration. HOT! 1 Open the front cover and pull out the drum unit. If toner scatters on your hands or clothes, immediately wipe it off or wash it according to avoid spilling and scattering the toner. 2 Hold down ... into the aluminum bag and discard it with cold water. 3 Unpack the new toner cartridge. Lock Lever Caution Handle the toner cartridge carefully. Place the drum unit on the right as you use the machine, some internal parts of the drum unit assembly.
So, never touch the shaded parts shown in the illustration. HOT! 1 Open the front cover and pull out the drum unit. If toner scatters on your hands or clothes, immediately wipe it off or wash it according to avoid spilling and scattering the toner. 2 Hold down ... into the aluminum bag and discard it with cold water. 3 Unpack the new toner cartridge. Lock Lever Caution Handle the toner cartridge carefully. Place the drum unit on the right as you use the machine, some internal parts of the drum unit assembly.
Users Manual - English
Page 213
... cartridge. 5 Remove the protective cover. 6 Install the new toner cartridge into the drum unit until immediately before reinstalling the drum unit assembly. Return the blue tab to unpack the toner cartridge until it into place. ...Caution I N T E N A N C E 22 - 20 Toner Cartridge Corona Wire Tab Home Position ( ) T R O U B L E S H O O T I N G A N D R O U T I N E M A I Wait to the home positio before you install it clicks into the machine. I You can use only a genuine Brother...
... cartridge. 5 Remove the protective cover. 6 Install the new toner cartridge into the drum unit until immediately before reinstalling the drum unit assembly. Return the blue tab to unpack the toner cartridge until it into place. ...Caution I N T E N A N C E 22 - 20 Toner Cartridge Corona Wire Tab Home Position ( ) T R O U B L E S H O O T I N G A N D R O U T I N E M A I Wait to the home positio before you install it clicks into the machine. I You can use only a genuine Brother...
Users Manual - English
Page 214
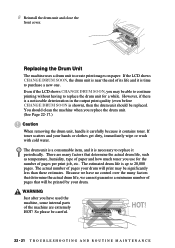
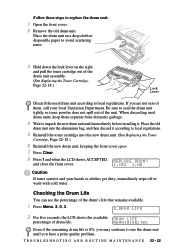
...able to continue printing without having to replace it is time to purchase a new one. If toner scatters and your drum will be significantly less than these estimates. Replacing the Drum Unit The machine uses a drum unit to 20,000 pages. Because we have no control over the many factors that ...and how much toner you have used the machine, some internal parts of its life and it contains toner. 8 Reinstall the drum unit and close the front cover. If the LCD shows CHANGE DRUM SOON, the drum unit is shown), then the drum unit should clean the machine when you may be printed by ...
...able to continue printing without having to replace it is time to purchase a new one. If toner scatters and your drum will be significantly less than these estimates. Replacing the Drum Unit The machine uses a drum unit to 20,000 pages. Because we have no control over the many factors that ...and how much toner you have used the machine, some internal parts of its life and it contains toner. 8 Reinstall the drum unit and close the front cover. If the LCD shows CHANGE DRUM SOON, the drum unit is shown), then the drum unit should clean the machine when you may be printed by ...
Users Manual - English
Page 215
... have a print quality problem. Be sure to replace the drum unit: 1 Open the front cover. 2 Remove the old drum unit. When discarding used drum unit according to local regulations. 5 Reinstall the toner cartridge into the new drum unit. (See Replacing the Toner Cartridge, Page 22-18.) 6 Reinstall the new drum unit, keeping the front cover open. 7 Press Clear. 8 Press 1 and...
... have a print quality problem. Be sure to replace the drum unit: 1 Open the front cover. 2 Remove the old drum unit. When discarding used drum unit according to local regulations. 5 Reinstall the toner cartridge into the new drum unit. (See Replacing the Toner Cartridge, Page 22-18.) 6 Reinstall the new drum unit, keeping the front cover open. 7 Press Clear. 8 Press 1 and...


