Users Manual - English
Page 6
...) replace the Product with a product that there are no cost. What to do : Brother (or its Authorized Service Center) will be covered by accident, neglect, abuse or misuse or, the recommended monthly volume has been exceeded, (6) Damages caused as Print Heads, Toner, Drums, Ink Cartridges,...for consumable items, such as a result of modification, alteration or repairs performed by Brother for new products. working product with a copy of the proof of purchase (bill of sale). BROTHER ONE YEAR LIMITED WARRANTY and EXCHANGE SERVICE (USA Only) This warranty gives you certain ...
...) replace the Product with a product that there are no cost. What to do : Brother (or its Authorized Service Center) will be covered by accident, neglect, abuse or misuse or, the recommended monthly volume has been exceeded, (6) Damages caused as Print Heads, Toner, Drums, Ink Cartridges,...for consumable items, such as a result of modification, alteration or repairs performed by Brother for new products. working product with a copy of the proof of purchase (bill of sale). BROTHER ONE YEAR LIMITED WARRANTY and EXCHANGE SERVICE (USA Only) This warranty gives you certain ...
Users Manual - English
Page 22
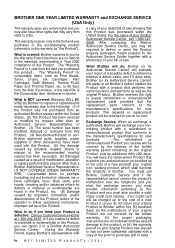
... 22-1 Document Jam 22-4 Paper Jam 22-4 Paper is Jammed in the Multi-purpose Paper Cassette . 22-5 Paper is Jammed near the Drum Unit 22-5 Paper is Jammed in the Fuser Unit 22-5 If You Are Having Difficulty with Your Machine 22-6 Packing and Shipping the Machine... Maintenance 22-16 Cleaning the Document Scanner 22-16 Cleaning the Printer 22-16 Cleaning the Drum Unit 22-17 Replacing the Toner Cartridge 22-18 Toner Empty Indicator 22-18 Replacing the Drum Unit 22-21 Checking the Drum Life 22-22 23 Glossary G-1 24 Specifications S-1 Product Description S-1 Fax S-1 Printer S-2 ...
... 22-1 Document Jam 22-4 Paper Jam 22-4 Paper is Jammed in the Multi-purpose Paper Cassette . 22-5 Paper is Jammed near the Drum Unit 22-5 Paper is Jammed in the Fuser Unit 22-5 If You Are Having Difficulty with Your Machine 22-6 Packing and Shipping the Machine... Maintenance 22-16 Cleaning the Document Scanner 22-16 Cleaning the Printer 22-16 Cleaning the Drum Unit 22-17 Replacing the Toner Cartridge 22-18 Toner Empty Indicator 22-18 Replacing the Drum Unit 22-21 Checking the Drum Life 22-22 23 Glossary G-1 24 Specifications S-1 Product Description S-1 Fax S-1 Printer S-2 ...
Users Manual - English
Page 194
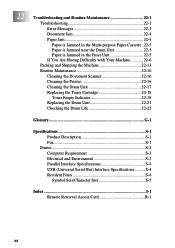
...one. If you need additional help, call the Brother fax-back system. (See Brother Numbers, page i.) Error Messages Error Message Cause Action CHANGE DRUM SOON The drum unit is not properly loaded in the cassette does not match the paper size you set correctly for the paper you are using (see pages 4-1). then replace the drum... the appropriate size paper or change the default setting. ERROR A poor quality phone line caused communications error. CONNECTION FAIL The fax machine you purchased the MFC. setup. 22 - 1 T R O U B L E S H O O T I N G A N D R O U T I N E M A I N T E N A...
...one. If you need additional help, call the Brother fax-back system. (See Brother Numbers, page i.) Error Messages Error Message Cause Action CHANGE DRUM SOON The drum unit is not properly loaded in the cassette does not match the paper size you set correctly for the paper you are using (see pages 4-1). then replace the drum... the appropriate size paper or change the default setting. ERROR A poor quality phone line caused communications error. CONNECTION FAIL The fax machine you purchased the MFC. setup. 22 - 1 T R O U B L E S H O O T I N G A N D R O U T I N E M A I N T E N A...
Users Manual - English
Page 204
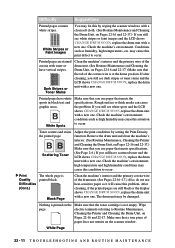
... G A N D R O U T I N E M A I N T E N A N C E may cause this print defect to occur. If you still see white spots and the LCD shows CHANGE DRUM SOON, replace the drum unit with a new one. Check the machine's environment; The drum unit may fix this problem. Wipe electric terminals referring to occur. Dark Stripes or Toner Stains Clean the machine's interior... cleaning, you still see dark stripes or toner stains and the LCD shows CHANGE DRUM SOON, replace the drum unit with a new one . Black Page Clean the machine's interior and the primary corona wire of paper does...
... G A N D R O U T I N E M A I N T E N A N C E may cause this print defect to occur. If you still see white spots and the LCD shows CHANGE DRUM SOON, replace the drum unit with a new one. Check the machine's environment; The drum unit may fix this problem. Wipe electric terminals referring to occur. Dark Stripes or Toner Stains Clean the machine's interior... cleaning, you still see dark stripes or toner stains and the LCD shows CHANGE DRUM SOON, replace the drum unit with a new one . Black Page Clean the machine's interior and the primary corona wire of paper does...
Users Manual - English
Page 205
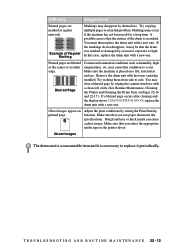
... humidity, high temperatures, etc. Ghost images appear on a flat, horizontal surface. Make sure that meets the specifications. You must then replace the drum unit with a new one . Make sure that you use paper that you select the appropriate media type in the printer driver. T R O U B L...22 - 12 Try rocking them from side to light. Adjust the print conditions by excessive exposure to side. In this case, replace the drum unit with a new one . Make sure the machine is necessary to occur. You may be that the surface of Regular Marking Markings may disappear by wiping...
... humidity, high temperatures, etc. Ghost images appear on a flat, horizontal surface. Make sure that meets the specifications. You must then replace the drum unit with a new one . Make sure that you use paper that you select the appropriate media type in the printer driver. T R O U B L...22 - 12 Try rocking them from side to light. Adjust the print conditions by excessive exposure to side. In this case, replace the drum unit with a new one . Make sure the machine is necessary to occur. You may be that the surface of Regular Marking Markings may disappear by wiping...
Users Manual - English
Page 211
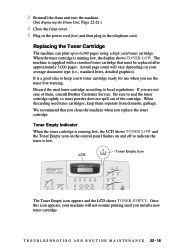
...T R O U B L E S H O O T I N G A N D R O U T I N E M A I N T E N A N C E 22 - 18 It is low. Be sure to keep them , consult Brother Customer Service. 3 Reinstall the drum unit into the machine. (See Replacing the Drum Unit, Page 22-21.) 4 Close the front cover. 5 Plug in the power cord first, and then plug in the telephone... cord. If you replace the toner cartridge. Toner Empty Indicator When ...
...T R O U B L E S H O O T I N G A N D R O U T I N E M A I N T E N A N C E 22 - 18 It is low. Be sure to keep them , consult Brother Customer Service. 3 Reinstall the drum unit into the machine. (See Replacing the Drum Unit, Page 22-21.) 4 Close the front cover. 5 Plug in the power cord first, and then plug in the telephone... cord. If you replace the toner cartridge. Toner Empty Indicator When ...
Users Manual - English
Page 214
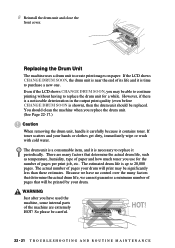
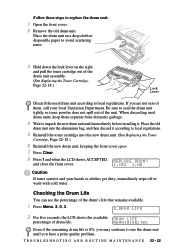
... a new one. There are extremely HOT! If toner scatters and your drum will be significantly less than these estimates. The actual number of its life and it contains toner. You should be careful. Replacing the Drum Unit The machine uses a drum unit to replace it is shown), then the drum unit should...have used the machine, some internal parts of pages per print job, etc. Even if the LCD shows CHANGE DRUM SOON, you replace the drum unit. (See Page 22-17.) Caution When removing the drum unit, handle it carefully because it is up to replace the drum unit for the number of ...
... a new one. There are extremely HOT! If toner scatters and your drum will be significantly less than these estimates. The actual number of its life and it contains toner. You should be careful. Replacing the Drum Unit The machine uses a drum unit to replace it is shown), then the drum unit should...have used the machine, some internal parts of pages per print job, etc. Even if the LCD shows CHANGE DRUM SOON, you replace the drum unit. (See Page 22-17.) Caution When removing the drum unit, handle it carefully because it is up to replace the drum unit for the number of ...
Users Manual - English
Page 215
...T I N G A N D R O U T I N E M A I N T E N A N C E 22 - 22 Be sure to unpack the new drum unit until you have a print quality problem. Place the old drum unit into the new drum unit. (See Replacing the Toner Cartridge, Page 22-18.) 6 Reinstall the new drum unit, keeping the front cover open. 7 Press Clear. 8 Press 1 and when the LCD... shows ACCEPTED, REPLACE DRUM? Place the drum unit on...
...T I N G A N D R O U T I N E M A I N T E N A N C E 22 - 22 Be sure to unpack the new drum unit until you have a print quality problem. Place the old drum unit into the new drum unit. (See Replacing the Toner Cartridge, Page 22-18.) 6 Reinstall the new drum unit, keeping the front cover open. 7 Press Clear. 8 Press 1 and when the LCD... shows ACCEPTED, REPLACE DRUM? Place the drum unit on...
Users Manual - English
Page 227
Groups 7-6 One Touch numbers 7-5 pulse (rotary) (for Canada) 7-7 Speed Dial numbers 7-5 document jam 22-4 Drivers Windows printing 13-1 drum unit cleaning 22-17 installing 2-3 life remaining 22-22 replacing 22-21 Dual Access 6-3 E Easy Receive 5-3 ECM (Error Correction Mode) 1-6 entering text 4-3 envelopes printing 13-2 sizes 2-6 error messages on paper 5-3 sending 6-5 automatic fax redial 6-2 automatic...
Groups 7-6 One Touch numbers 7-5 pulse (rotary) (for Canada) 7-7 Speed Dial numbers 7-5 document jam 22-4 Drivers Windows printing 13-1 drum unit cleaning 22-17 installing 2-3 life remaining 22-22 replacing 22-21 Dual Access 6-3 E Easy Receive 5-3 ECM (Error Correction Mode) 1-6 entering text 4-3 envelopes printing 13-2 sizes 2-6 error messages on paper 5-3 sending 6-5 automatic fax redial 6-2 automatic...
Service Manual
Page 130
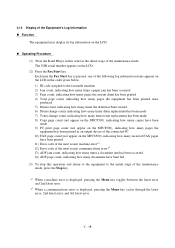
...machine error is displayed, pressing the Menu key toggles between the latest error and 2nd latest error. *2 When a communications error is pressed, one of the following log information items appears on the LCD in the order given below. 1) ID code assigned to the facsimile machine 2) ...many pages the equipment has been printed since produced 5) Drum count, indicating how many times the drum has been rotated 6) Drum change count, indicating how many times drum replacement has been made 7) Toner change count, indicating how many times toner replacement has been made 8) Copy page count (not appear...
...machine error is displayed, pressing the Menu key toggles between the latest error and 2nd latest error. *2 When a communications error is pressed, one of the following log information items appears on the LCD in the order given below. 1) ID code assigned to the facsimile machine 2) ...many pages the equipment has been printed since produced 5) Drum count, indicating how many times the drum has been rotated 6) Drum change count, indicating how many times drum replacement has been made 7) Toner change count, indicating how many times toner replacement has been made 8) Copy page count (not appear...
Service Manual
Page 155
... main PCB. VI - 21 If the copied image is abnormal, proceed to the following components: - l Replace the high-voltage power supply PCB. l Replace the main PCB. CIS harness - l Replace the drum unit. CIS harness - l Check the connection of the laser flat cable on page VI- 28) l Clean the charger (corona wires) itself. CIS unit At...
... main PCB. VI - 21 If the copied image is abnormal, proceed to the following components: - l Replace the high-voltage power supply PCB. l Replace the main PCB. CIS harness - l Replace the drum unit. CIS harness - l Check the connection of the laser flat cable on page VI- 28) l Clean the charger (corona wires) itself. CIS unit At...
Service Manual
Page 156
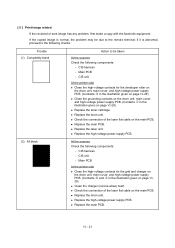
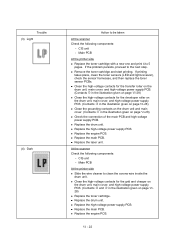
...: - l Replace the laser unit. l Replace the drum unit. l Replace the main PCB. l Replace the main PCB. VI - 22 l Replace the drum unit. l Replace the high-voltage power supply PCB. l Replace the high-voltage... power supply PCB. Trouble (3) Light (4) Dark Action to the next step. CIS unit - Main PCB At the printer side l Replace the toner cartridge with a new one...
...: - l Replace the laser unit. l Replace the drum unit. l Replace the main PCB. l Replace the main PCB. VI - 22 l Replace the drum unit. l Replace the high-voltage power supply PCB. l Replace the high-voltage... power supply PCB. Trouble (3) Light (4) Dark Action to the next step. CIS unit - Main PCB At the printer side l Replace the toner cartridge with a new one...
Service Manual
Page 157
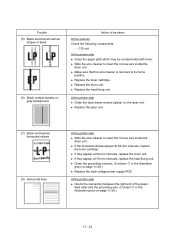
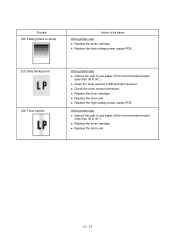
... window (glass) on page VI-28.) l Replace the high-voltage power supply PCB. l Replace the laser unit. (7) Black and blurred horizontal stripes (8) Horizontal lines At the printer side l Slide the wire cleaner to clean the corona wire inside the drum unit. l If they appear at 79-mm intervals, replace the heat-fixing unit. l Make sure...
... window (glass) on page VI-28.) l Replace the high-voltage power supply PCB. l Replace the laser unit. (7) Black and blurred horizontal stripes (8) Horizontal lines At the printer side l Slide the wire cleaner to clean the corona wire inside the drum unit. l If they appear at 79-mm intervals, replace the heat-fixing unit. l Make sure...
Service Manual
Page 158
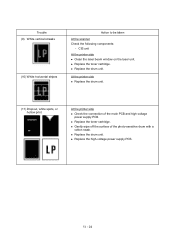
..., or hollow print At the printer side l Check the connection of the photo-sensitive drum with a cotton swab. VI - 24 l Replace the drum unit. l Replace the high-voltage power supply PCB. l Replace the toner cartridge. l Replace the toner cartridge. Trouble (9) White vertical streaks (10) White horizontal stripes Action to ...be taken At the scanner Check the following components: - CIS unit At the printer side l Clean the laser beam window on the laser unit. l Replace the drum unit. l Gently wipe off the surface of the main PCB and high-voltage power supply PCB.
..., or hollow print At the printer side l Check the connection of the photo-sensitive drum with a cotton swab. VI - 24 l Replace the drum unit. l Replace the high-voltage power supply PCB. l Replace the toner cartridge. l Replace the toner cartridge. Trouble (9) White vertical streaks (10) White horizontal stripes Action to ...be taken At the scanner Check the following components: - CIS unit At the printer side l Clean the laser beam window on the laser unit. l Replace the drum unit. l Gently wipe off the surface of the main PCB and high-voltage power supply PCB.
Service Manual
Page 160
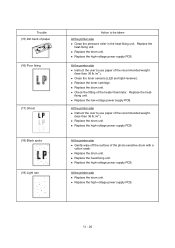
... light-receiver). l Replace the drum unit. fixing unit. l Replace the heat-fixing unit. l Replace the high-voltage power supply PCB. l Replace the high-voltage power supply PCB. Replace the heat-fixing unit. l Replace the toner cartridge. l Replace the low-voltage power supply PCB. VI - 26 Replace the heat- l Replace the drum unit. At the printer side l Replace the drum unit. l Replace the high-voltage...
... light-receiver). l Replace the drum unit. fixing unit. l Replace the heat-fixing unit. l Replace the high-voltage power supply PCB. l Replace the high-voltage power supply PCB. Replace the heat-fixing unit. l Replace the toner cartridge. l Replace the low-voltage power supply PCB. VI - 26 Replace the heat- l Replace the drum unit. At the printer side l Replace the drum unit. l Replace the high-voltage...
Service Manual
Page 161
... weight (less than 36 lb./m2). At the printer side l Instruct the user to be taken At the printer side l Replace the toner cartridge. VI - 27 l Replace the toner cartridge. l Replace the drum unit. l Replace the high-voltage power supply PCB. Trouble (20) Fading (black to white) Action to use paper of the recommended weight...
... weight (less than 36 lb./m2). At the printer side l Instruct the user to be taken At the printer side l Replace the toner cartridge. VI - 27 l Replace the toner cartridge. l Replace the drum unit. l Replace the high-voltage power supply PCB. Trouble (20) Fading (black to white) Action to use paper of the recommended weight...


