User Manual
Page 4
English TABLE OF CONTENTS EXTERNAL DEVICE CONNECTIONS 21 POWER CONNECTION 23 CONNECTING AC POWER 23 INITIAL SETUP 23 BASIC OPERATIONS 24 TURNING THE POWER ON AND OFF 24 ADJUSTING THE VOLUME 24 CHANGING CHANNELS 25 SELECTING THE INPUT SOURCE 25 ADJUSTING THE DISPLAY FORMAT 26 ADJUSTING THE LED BACKLIGHT 26 SETUP MENUS 27 SETUP MENU OPERATION 27 PICTURE 28 AUDIO 32 VIEW MODE 36 VIEW MODE (VGA 36 TV PROGRAM 38 SETTINGS 42 WALL MOUNT OPTION 54 WALL MOUNT INSTALLATION REMINDERS 54 TROUBLESHOOTING 55 SPECIFICATIONS 58 ii
English TABLE OF CONTENTS EXTERNAL DEVICE CONNECTIONS 21 POWER CONNECTION 23 CONNECTING AC POWER 23 INITIAL SETUP 23 BASIC OPERATIONS 24 TURNING THE POWER ON AND OFF 24 ADJUSTING THE VOLUME 24 CHANGING CHANNELS 25 SELECTING THE INPUT SOURCE 25 ADJUSTING THE DISPLAY FORMAT 26 ADJUSTING THE LED BACKLIGHT 26 SETUP MENUS 27 SETUP MENU OPERATION 27 PICTURE 28 AUDIO 32 VIEW MODE 36 VIEW MODE (VGA 36 TV PROGRAM 38 SETTINGS 42 WALL MOUNT OPTION 54 WALL MOUNT INSTALLATION REMINDERS 54 TROUBLESHOOTING 55 SPECIFICATIONS 58 ii
User Manual
Page 8
...reception, which the receiver is connected. • If the interference persists even after performing the above measures, consult the Westinghouse Service Center or an experienced radio/TV technician for a Class B digital device, pursuant to correct the interference by the manufacturer will not occur in a ... be determined by turning the equipment off and on, the user is encouraged to try to part 15 of the following measures: • Reorient or relocate the receiving antenna. • Increase the distance between the LED TV and the receiver. • Connect the LED TV to an outlet ...
...reception, which the receiver is connected. • If the interference persists even after performing the above measures, consult the Westinghouse Service Center or an experienced radio/TV technician for a Class B digital device, pursuant to correct the interference by the manufacturer will not occur in a ... be determined by turning the equipment off and on, the user is encouraged to try to part 15 of the following measures: • Reorient or relocate the receiving antenna. • Increase the distance between the LED TV and the receiver. • Connect the LED TV to an outlet ...
User Manual
Page 11
Contacting the Westinghouse Customer Service at [email protected]. 7 flower vase). • Do not place heavy objects on the LED TV, audio/video cables, or power cord. • If the LED TV emits smoke, abnormal noise, or a strange odor, immediately turn it (e.g. The LED TV interior contains high-voltage parts. English IMPORTANT INFORMATION WARNINGS AND PRECAUTIONS • Do not...
Contacting the Westinghouse Customer Service at [email protected]. 7 flower vase). • Do not place heavy objects on the LED TV, audio/video cables, or power cord. • If the LED TV emits smoke, abnormal noise, or a strange odor, immediately turn it (e.g. The LED TV interior contains high-voltage parts. English IMPORTANT INFORMATION WARNINGS AND PRECAUTIONS • Do not...
User Manual
Page 12
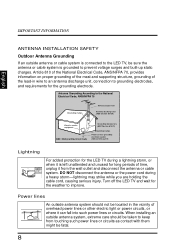
...or the power cord during a lightning storm, or when it is grounded to prevent voltage surges and built-up static charges. Turn off the LED TV and wait for the grounding electrode. Article 810 of the National Electrical Code, ANS/NFPA 70, provides information on proper grounding ...NEC Section 810-21) Grounding clamps Power service grounding electrode system (NEC Art 250 part H) Lightning Z Z Z For added protection for the LED TV during a heavy storm-lightning may strike while you are holding the cable cord, causing serious injury. When installing an outside antenna system, extreme ...
...or the power cord during a lightning storm, or when it is grounded to prevent voltage surges and built-up static charges. Turn off the LED TV and wait for the grounding electrode. Article 810 of the National Electrical Code, ANS/NFPA 70, provides information on proper grounding ...NEC Section 810-21) Grounding clamps Power service grounding electrode system (NEC Art 250 part H) Lightning Z Z Z For added protection for the LED TV during a heavy storm-lightning may strike while you are holding the cable cord, causing serious injury. When installing an outside antenna system, extreme ...
User Manual
Page 13
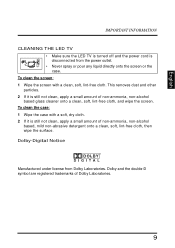
.... This removes dust and other particles. 2 If it is still not clean, apply a small amount of Dolby Laboratories. 9 English IMPORTANT INFORMATION CLEANING THE LED TV • Make sure the LED TV is turned off and the power cord is disconnected from Dolby Laboratories. To clean the screen: 1 Wipe the screen with a soft, dry cloth. 2 If...
.... This removes dust and other particles. 2 If it is still not clean, apply a small amount of Dolby Laboratories. 9 English IMPORTANT INFORMATION CLEANING THE LED TV • Make sure the LED TV is turned off and the power cord is disconnected from Dolby Laboratories. To clean the screen: 1 Wipe the screen with a soft, dry cloth. 2 If...
User Manual
Page 17
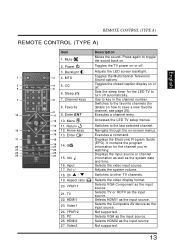
...15 12. G 22 YPbPr2 HDMI2 Video2 PC 23 24 25 26 27 15. Video2 Description Mutes the sound. Adjusts the LED screen backlight. Sets the sleep timer for the LED TV to key in the channel number. Enter ENT 12 10. Input 17. HDMI1 23. HDMI2 27. Accesses the... LED TV setup menus. Selects the Composite AV device as the input source. Backlight 1 2 4. CC C.C. Mute 2. Sleep zZz 7 B 8 7. Aspect ratio 20. Video1 24. PC 26. Toggles the TV power on how to the favorite channels (for the channel you're watching. Use to turn off . Navigate...
...15 12. G 22 YPbPr2 HDMI2 Video2 PC 23 24 25 26 27 15. Video2 Description Mutes the sound. Adjusts the LED screen backlight. Sets the sleep timer for the LED TV to key in the channel number. Enter ENT 12 10. Input 17. HDMI1 23. HDMI2 27. Accesses the... LED TV setup menus. Selects the Composite AV device as the input source. Backlight 1 2 4. CC C.C. Mute 2. Sleep zZz 7 B 8 7. Aspect ratio 20. Video1 24. PC 26. Toggles the TV power on how to the favorite channels (for the channel you're watching. Use to turn off . Navigate...
User Manual
Page 18
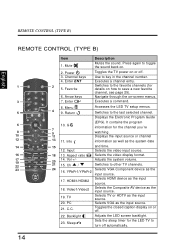
... 14. HDMI1/HDMI2 source. 18. C.C. Sets the sleep timer for the LED TV to toggle the sound back on -screen menus. Press again to turn off . Switches to save a new favorite channel, see page 25). Accesses the LED TV setup menus. YPbPr1/YPbPr2 input source. Channel keys 4. G 8 10 12... Input 7 9 11 13 11. TV Selects TV or HDTV as the 16. Use to the...
... 14. HDMI1/HDMI2 source. 18. C.C. Sets the sleep timer for the LED TV to toggle the sound back on -screen menus. Press again to turn off . Switches to save a new favorite channel, see page 25). Accesses the LED TV setup menus. YPbPr1/YPbPr2 input source. Channel keys 4. G 8 10 12... Input 7 9 11 13 11. TV Selects TV or HDTV as the 16. Use to the...

User Manual
Page 23
... option, you intend to the desk. 5 Lay the LED TV on a clear, flat, and stable surface. English LED TV BASE REMOVING THE LED TV BASE If you must first remove the LED TV base. 1 Turn off the LED TV and all connected devices. 2 Disconnect the power cord from the LED TV. 3 Disconnect all signal cables from LED TV. DC IN AUDIO IN VGA R L Y R L TUNER DC...
... option, you intend to the desk. 5 Lay the LED TV on a clear, flat, and stable surface. English LED TV BASE REMOVING THE LED TV BASE If you must first remove the LED TV base. 1 Turn off the LED TV and all connected devices. 2 Disconnect the power cord from the LED TV. 3 Disconnect all signal cables from LED TV. DC IN AUDIO IN VGA R L Y R L TUNER DC...
User Manual
Page 25
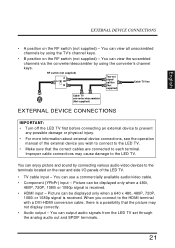
... that the picture may cause damage to each terminal. You can output audio signals from the LED TV set signal splitter (Not supplied) Cable TV line Cable TV converter/descrambler (Not supplied) EXTERNAL DEVICE CONNECTIONS IMPORTANT: • Turn off the LED TV first before connecting an external device to prevent any possible damage or physical injury. •...
... that the picture may cause damage to each terminal. You can output audio signals from the LED TV set signal splitter (Not supplied) Cable TV line Cable TV converter/descrambler (Not supplied) EXTERNAL DEVICE CONNECTIONS IMPORTANT: • Turn off the LED TV first before connecting an external device to prevent any possible damage or physical injury. •...
User Manual
Page 27
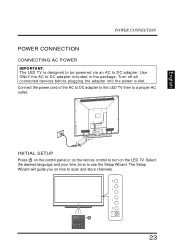
... scan and store channels. 23 DC IN AUDIO IN VGA Y LR TUNER L R INITIAL SETUP Press on the control panel or on the LED TV. Use ONLY the AC to turn on the remote control to DC adapter included in the package. Connect the power cord of the AC to DC adapter to the... LED TV then to DC adapter. English POWER CONNECTION POWER CONNECTION CONNECTING AC POWER IMPORTANT: The LED TV is designed to be powered via an AC to...
... scan and store channels. 23 DC IN AUDIO IN VGA Y LR TUNER L R INITIAL SETUP Press on the control panel or on the LED TV. Use ONLY the AC to turn on the remote control to DC adapter included in the package. Connect the power cord of the AC to DC adapter to the... LED TV then to DC adapter. English POWER CONNECTION POWER CONNECTION CONNECTING AC POWER IMPORTANT: The LED TV is designed to be powered via an AC to...
User Manual
Page 28
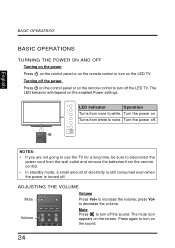
... none to white. Press again to turn on . NOTES: • If you are not going to use the TV for a long time, be sure to increase the volume; Turning off the power Press on the control panel or on the LED TV. LED indicator Operation Turns from the remote control. •... In standby mode, a small amount of electricity is still consumed even when the power is turned off. English BASIC OPERATIONS BASIC OPERATIONS TURNING THE POWER ON AND OFF Turning on the power Press on the...
... none to white. Press again to turn on . NOTES: • If you are not going to use the TV for a long time, be sure to increase the volume; Turning off the power Press on the control panel or on the LED TV. LED indicator Operation Turns from the remote control. •... In standby mode, a small amount of electricity is still consumed even when the power is turned off. English BASIC OPERATIONS BASIC OPERATIONS TURNING THE POWER ON AND OFF Turning on the power Press on the...


