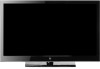
User Manual
Page 3
... COMPLIANCE STATEMENT 4 IMPORTANT SAFETY INSTRUCTIONS 5 Circuit Overload 6 Power Cord Protection 6 Ventilation 6 WARNINGS AND PRECAUTIONS 7 ANTENNA INSTALLATION SAFETY 8 Lightning 8 Power lines 8 CLEANING THE LED TV 9 Dolby-Digital Notice 9 PACKAGE CONTENTS 10 CONTROL PANEL 11 TERMINALS 12 REMOTE CONTROL (TYPE A 13 REMOTE CONTROL (TYPE B 14 REMOTE CONTROL OPERATION 16 INSTALLING THE REMOTE CONTROL...
... COMPLIANCE STATEMENT 4 IMPORTANT SAFETY INSTRUCTIONS 5 Circuit Overload 6 Power Cord Protection 6 Ventilation 6 WARNINGS AND PRECAUTIONS 7 ANTENNA INSTALLATION SAFETY 8 Lightning 8 Power lines 8 CLEANING THE LED TV 9 Dolby-Digital Notice 9 PACKAGE CONTENTS 10 CONTROL PANEL 11 TERMINALS 12 REMOTE CONTROL (TYPE A 13 REMOTE CONTROL (TYPE B 14 REMOTE CONTROL OPERATION 16 INSTALLING THE REMOTE CONTROL...
User Manual
Page 8
... BNC (5) cable. If a BNC cable is connected. • If the interference persists even after performing the above measures, consult the Westinghouse Service Center or an experienced radio/TV technician for a Class B digital device, pursuant to part 15 of the following measures: • Reorient or relocate the receiving antenna. • Increase the distance...
... BNC (5) cable. If a BNC cable is connected. • If the interference persists even after performing the above measures, consult the Westinghouse Service Center or an experienced radio/TV technician for a Class B digital device, pursuant to part 15 of the following measures: • Reorient or relocate the receiving antenna. • Increase the distance...
User Manual
Page 13
Dolby-Digital Notice Manufactured under license from the power outlet. • Never spray or pour any liquid directly onto the screen or the case. Dolby and the ...
Dolby-Digital Notice Manufactured under license from the power outlet. • Never spray or pour any liquid directly onto the screen or the case. Dolby and the ...
User Manual
Page 16
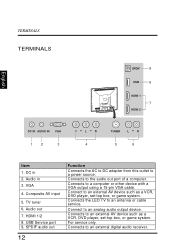
VGA 4. USB Service port 9. Connects the LED TV to an external digital audio receiver. 12 HDMI 1/2 8. Connects to an antenna or cable service. Audio in 2. TV tuner 6. Audio out 7. Connects to a power source. Connects to an external ...
VGA 4. USB Service port 9. Connects the LED TV to an external digital audio receiver. 12 HDMI 1/2 8. Connects to an antenna or cable service. Audio in 2. TV tuner 6. Audio out 7. Connects to a power source. Connects to an external ...
User Manual
Page 26
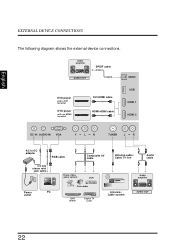
English EXTERNAL DEVICE CONNECTIONS The following diagram shows the external device connections. Audio amplifier SPDIF cable AUDIO OUT DVD player with a DVI terminal DVD player with an HDMI terminal DVI-HDMI cable HDMI-HDMI cable SPDIF USB HDMI 1 HDMI 2 DC IN AUDIO IN VGA Y L R TUNER L R AC to DC adapter RGB cable 3.5 mm stereo mini jack cable Home video game system Composite AV cable VCR Antenna cable / Cable TV line Audio cable Audio amplifier Power PC outlet Camcorder DVD player Digital TV tuner Antenna / Cable system AUDIO OUT 22
English EXTERNAL DEVICE CONNECTIONS The following diagram shows the external device connections. Audio amplifier SPDIF cable AUDIO OUT DVD player with a DVI terminal DVD player with an HDMI terminal DVI-HDMI cable HDMI-HDMI cable SPDIF USB HDMI 1 HDMI 2 DC IN AUDIO IN VGA Y L R TUNER L R AC to DC adapter RGB cable 3.5 mm stereo mini jack cable Home video game system Composite AV cable VCR Antenna cable / Cable TV line Audio cable Audio amplifier Power PC outlet Camcorder DVD player Digital TV tuner Antenna / Cable system AUDIO OUT 22
User Manual
Page 29
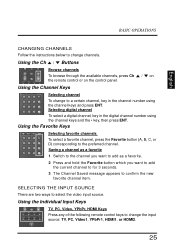
BASIC OPERATIONS English CHANGING CHANNELS Follow the instructions below to change to a certain channel, key in the digital channel number using the channel keys and press ENT. Using the Favorite Keys C.C. Saving a channel as a favorite 1 Switch to the channel you ...the Favorite button which you want to add the current channel to for 3 seconds. 3 The Channel Saved message appears to the preferred channel. Selecting digital channel To select a digital channel, key in the channel number using the channel keys and the • key, then press ENT. ZZZ MTS Favorite A B C ENT D...
BASIC OPERATIONS English CHANGING CHANNELS Follow the instructions below to change to a certain channel, key in the digital channel number using the channel keys and press ENT. Using the Favorite Keys C.C. Saving a channel as a favorite 1 Switch to the channel you ...the Favorite button which you want to add the current channel to for 3 seconds. 3 The Channel Saved message appears to the preferred channel. Selecting digital channel To select a digital channel, key in the channel number using the channel keys and the • key, then press ENT. ZZZ MTS Favorite A B C ENT D...
User Manual
Page 48
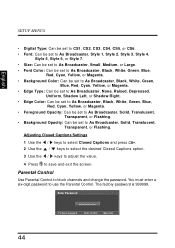
... to use the Parental Control. Enter Password 0~9: Key in password Enter: Confirm Menu: Exit 44 You must enter a six-digit password to block channels and change the password. English SETUP MENUS • Digital Type: Can be set to CS1, CS2, CS3, CS4, CS5, or CS6. • Font: Can be set to As...
... to use the Parental Control. Enter Password 0~9: Key in password Enter: Confirm Menu: Exit 44 You must enter a six-digit password to block channels and change the password. English SETUP MENUS • Digital Type: Can be set to CS1, CS2, CS3, CS4, CS5, or CS6. • Font: Can be set to As...


