User Manual
Page 3
... 1 AVISO RELATIVO A LA TRANSICIÓN A TELEVISIÓN DIGITAL 1 IMPORTANT INFORMATION 2 Warnings 2 NOTICES 3 FCC COMPLIANCE STATEMENT 4 IMPORTANT SAFETY INSTRUCTIONS 5 Circuit Overload 6 Power Cord Protection 6 Ventilation 6 WARNINGS AND PRECAUTIONS 7 ANTENNA INSTALLATION SAFETY 8 Lightning 8 Power lines 8 CLEANING THE LED TV 9 Dolby-Digital Notice 9 PACKAGE CONTENTS 10 CONTROL PANEL 11 TERMINALS 12 REMOTE CONTROL (TYPE A 13...
... 1 AVISO RELATIVO A LA TRANSICIÓN A TELEVISIÓN DIGITAL 1 IMPORTANT INFORMATION 2 Warnings 2 NOTICES 3 FCC COMPLIANCE STATEMENT 4 IMPORTANT SAFETY INSTRUCTIONS 5 Circuit Overload 6 Power Cord Protection 6 Ventilation 6 WARNINGS AND PRECAUTIONS 7 ANTENNA INSTALLATION SAFETY 8 Lightning 8 Power lines 8 CLEANING THE LED TV 9 Dolby-Digital Notice 9 PACKAGE CONTENTS 10 CONTROL PANEL 11 TERMINALS 12 REMOTE CONTROL (TYPE A 13...
User Manual
Page 4
English TABLE OF CONTENTS EXTERNAL DEVICE CONNECTIONS 21 POWER CONNECTION 23 CONNECTING AC POWER 23 INITIAL SETUP 23 BASIC OPERATIONS 24 TURNING THE POWER ON AND OFF 24 ADJUSTING THE VOLUME 24 CHANGING CHANNELS 25 SELECTING THE INPUT SOURCE 25 ADJUSTING THE DISPLAY FORMAT 26 ADJUSTING THE LED BACKLIGHT 26 SETUP MENUS 27 SETUP MENU OPERATION 27 PICTURE 28 AUDIO 32 VIEW MODE 36 VIEW MODE (VGA 36 TV PROGRAM 38 SETTINGS 42 WALL MOUNT OPTION 54 WALL MOUNT INSTALLATION REMINDERS 54 TROUBLESHOOTING 55 SPECIFICATIONS 58 ii
English TABLE OF CONTENTS EXTERNAL DEVICE CONNECTIONS 21 POWER CONNECTION 23 CONNECTING AC POWER 23 INITIAL SETUP 23 BASIC OPERATIONS 24 TURNING THE POWER ON AND OFF 24 ADJUSTING THE VOLUME 24 CHANGING CHANNELS 25 SELECTING THE INPUT SOURCE 25 ADJUSTING THE DISPLAY FORMAT 26 ADJUSTING THE LED BACKLIGHT 26 SETUP MENUS 27 SETUP MENU OPERATION 27 PICTURE 28 AUDIO 32 VIEW MODE 36 VIEW MODE (VGA 36 TV PROGRAM 38 SETTINGS 42 WALL MOUNT OPTION 54 WALL MOUNT INSTALLATION REMINDERS 54 TROUBLESHOOTING 55 SPECIFICATIONS 58 ii
User Manual
Page 6
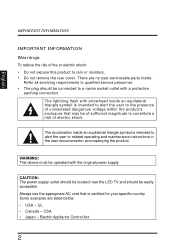
...with a protective earthing connection. This device must be easily accessible. UL • Canada - CSA • Japan - WARNING! CAUTION: The power supply outlet should be located near the LED TV and should be of sufficient magnitude to rain or moisture. • Do not remove the ... uninsulated dangerous voltage within the product's enclosure that is intended to alert the user to a mains socket outlet with the original power supply. The lightning flash with arrowhead inside an equilateral triangle symbol is certified for your specific country. Electric Appliance Control Act 2...
...with a protective earthing connection. This device must be easily accessible. UL • Canada - CSA • Japan - WARNING! CAUTION: The power supply outlet should be located near the LED TV and should be of sufficient magnitude to rain or moisture. • Do not remove the ... uninsulated dangerous voltage within the product's enclosure that is intended to alert the user to a mains socket outlet with the original power supply. The lightning flash with arrowhead inside an equilateral triangle symbol is certified for your specific country. Electric Appliance Control Act 2...
User Manual
Page 7
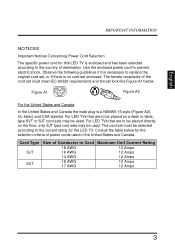
... that are to replace the original cord set, or if there is no cord set enclosed. English IMPORTANT INFORMATION NOTICES Important Notices Concerning Power Cord Selection The specific power cord for this LED TV is enclosed and has been selected according to be placed on the floor, only SJT type cord sets... the cord set must meet IEC-60320 requirements and should look like Figure A1 below for the LED TV. Cord Type SJT SVT Size of power cords used in Cord 18 AWG 16 AWG 14 AWG 18 AWG 17 AWG Maximum Unit Current Rating 10 Amps 12 Amps 12 Amps 10...
... that are to replace the original cord set, or if there is no cord set enclosed. English IMPORTANT INFORMATION NOTICES Important Notices Concerning Power Cord Selection The specific power cord for this LED TV is enclosed and has been selected according to be placed on the floor, only SJT type cord sets... the cord set must meet IEC-60320 requirements and should look like Figure A1 below for the LED TV. Cord Type SJT SVT Size of power cords used in Cord 18 AWG 16 AWG 14 AWG 18 AWG 17 AWG Maximum Unit Current Rating 10 Amps 12 Amps 12 Amps 10...
User Manual
Page 8
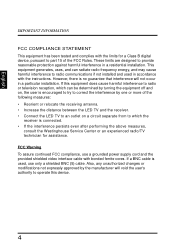
...15 of the FCC Rules. However, there is connected. • If the interference persists even after performing the above measures, consult the Westinghouse Service Center or an experienced radio/TV technician for a Class B digital device, pursuant to provide reasonable protection against harmful interference in a ... LED TV and the receiver. • Connect the LED TV to radio communications if not installed and used , use a grounded power supply cord and the provided shielded video interface cable with the instructions. This equipment generates, uses, and can be determined by turning the...
...15 of the FCC Rules. However, there is connected. • If the interference persists even after performing the above measures, consult the Westinghouse Service Center or an experienced radio/TV technician for a Class B digital device, pursuant to provide reasonable protection against harmful interference in a ... LED TV and the receiver. • Connect the LED TV to radio communications if not installed and used , use a grounded power supply cord and the provided shielded video interface cable with the instructions. This equipment generates, uses, and can be determined by turning the...
User Manual
Page 9
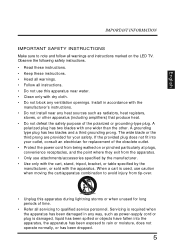
... amplifiers) that produce heat. • Do not defeat the safety purpose of the obsolete outlet. • Protect the power cord from tip-over. • Unplug this apparatus near any heat sources such as power-supply cord or plug is used, use this apparatus during lightning storms or when unused for replacement of...
... amplifiers) that produce heat. • Do not defeat the safety purpose of the obsolete outlet. • Protect the power cord from tip-over. • Unplug this apparatus near any heat sources such as power-supply cord or plug is used, use this apparatus during lightning storms or when unused for replacement of...
User Manual
Page 10
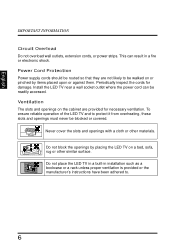
...To ensure reliable operation of the LED TV and to . 6 Do not place the LED TV in a built-in a fire or electronic shock. Power Cord Protection Power supply cords should be routed so that they are not likely to be readily accessed. Do not block the openings by items placed upon... or against them. Install the LED TV near a wall socket outlet where the power cord can result in installation such as a bookcase or a rack unless proper ventilation is provided or the manufacturer's instructions have been adhered to protect...
...To ensure reliable operation of the LED TV and to . 6 Do not place the LED TV in a built-in a fire or electronic shock. Power Cord Protection Power supply cords should be routed so that they are not likely to be readily accessed. Do not block the openings by items placed upon... or against them. Install the LED TV near a wall socket outlet where the power cord can result in installation such as a bookcase or a rack unless proper ventilation is provided or the manufacturer's instructions have been adhered to protect...
User Manual
Page 11
...• Do not place heavy objects on the LED TV, audio/video cables, or power cord. • If the LED TV emits smoke, abnormal noise, or a strange odor, immediately turn it (e.g. Contacting the Westinghouse Customer Service at [email protected]. 7 English IMPORTANT INFORMATION WARNINGS AND PRECAUTIONS • ...unit and remove the batteries from the remote control. • Avoid touching the display screen by : - Logging on it off and contact the Westinghouse Service Center by hand or any object. • Never remove the rear cover. E-mailing us at (800) 701-0680. - You may be...
...• Do not place heavy objects on the LED TV, audio/video cables, or power cord. • If the LED TV emits smoke, abnormal noise, or a strange odor, immediately turn it (e.g. Contacting the Westinghouse Customer Service at [email protected]. 7 English IMPORTANT INFORMATION WARNINGS AND PRECAUTIONS • ...unit and remove the batteries from the remote control. • Avoid touching the display screen by : - Logging on it off and contact the Westinghouse Service Center by hand or any object. • Never remove the rear cover. E-mailing us at (800) 701-0680. - You may be...
User Manual
Page 12
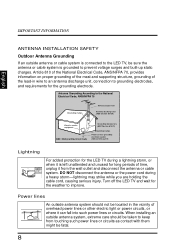
...in wire Antenna discharge unit (NEC Section 810-20) Electric service equipment NEC: National Electrical Code Grounding Conductors (NEC Section 810-21) Grounding clamps Power service grounding electrode system (NEC Art 250 part H) Lightning Z Z Z For added protection for the LED TV during a heavy storm-lightning ...installing an outside antenna system, extreme care should not be located in the vicinity of overhead power lines or other electric light or power circuits, or where it can fall into such power lines or circuits. Turn off the LED TV and wait for the grounding electrode. DO...
...in wire Antenna discharge unit (NEC Section 810-20) Electric service equipment NEC: National Electrical Code Grounding Conductors (NEC Section 810-21) Grounding clamps Power service grounding electrode system (NEC Art 250 part H) Lightning Z Z Z For added protection for the LED TV during a heavy storm-lightning ...installing an outside antenna system, extreme care should not be located in the vicinity of overhead power lines or other electric light or power circuits, or where it can fall into such power lines or circuits. Turn off the LED TV and wait for the grounding electrode. DO...
User Manual
Page 13
Dolby-Digital Notice Manufactured under license from the power outlet. • Never spray or pour any liquid directly onto the screen or the case. Dolby and the double-D symbol are registered trademarks of non-..., lint-free cloth, and wipe the screen. English IMPORTANT INFORMATION CLEANING THE LED TV • Make sure the LED TV is turned off and the power cord is disconnected from Dolby Laboratories. This removes dust and other particles. 2 If it is still not clean, apply a small amount of Dolby Laboratories. 9 To...
Dolby-Digital Notice Manufactured under license from the power outlet. • Never spray or pour any liquid directly onto the screen or the case. Dolby and the double-D symbol are registered trademarks of non-..., lint-free cloth, and wipe the screen. English IMPORTANT INFORMATION CLEANING THE LED TV • Make sure the LED TV is turned off and the power cord is disconnected from Dolby Laboratories. This removes dust and other particles. 2 If it is still not clean, apply a small amount of Dolby Laboratories. 9 To...
User Manual
Page 14
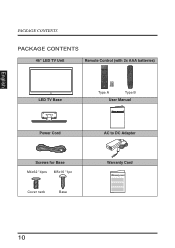
English PACKAGE CONTENTS PACKAGE CONTENTS 46" LED TV Unit LED TV Base Remote Control (with 2x AAA batteries) C.C. ZZZ MTS Favorite A B C ENT D Enter Input Vol Ch YPbPr1 HDMI1 Video1 TV YPbPr2 HDMI2 Video2 PC RMT-11 Type A Type B User Manual Power Cord Screws for Base M4x62 *4pcs M5x16 *1pc Cover neck Base AC to DC Adapter Warranty Card 10
English PACKAGE CONTENTS PACKAGE CONTENTS 46" LED TV Unit LED TV Base Remote Control (with 2x AAA batteries) C.C. ZZZ MTS Favorite A B C ENT D Enter Input Vol Ch YPbPr1 HDMI1 Video1 TV YPbPr2 HDMI2 Video2 PC RMT-11 Type A Type B User Manual Power Cord Screws for Base M4x62 *4pcs M5x16 *1pc Cover neck Base AC to DC Adapter Warranty Card 10
User Manual
Page 15
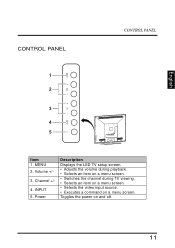
English CONTROL PANEL CONTROL PANEL MENU 1 2 3 4 5 INPUT CH VOL DC IN AUDIO IN VGA Y LR TUNER L R Item 1. MENU 2. Volume +/- 3. INPUT 5. Power Description Displays the LED TV setup screen. • Adjusts the volume during playback. • Selects an item on a menu screen. • Switches the channel during TV viewing. • Selects an item on a menu screen. • Selects the video input source. • Executes a command on and off. 11 Channel +/- 4. Toggles the power on a menu screen.
English CONTROL PANEL CONTROL PANEL MENU 1 2 3 4 5 INPUT CH VOL DC IN AUDIO IN VGA Y LR TUNER L R Item 1. MENU 2. Volume +/- 3. INPUT 5. Power Description Displays the LED TV setup screen. • Adjusts the volume during playback. • Selects an item on a menu screen. • Switches the channel during TV viewing. • Selects an item on a menu screen. • Selects the video input source. • Executes a command on and off. 11 Channel +/- 4. Toggles the power on a menu screen.
User Manual
Page 16
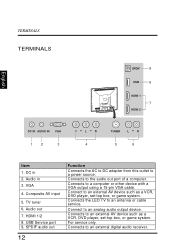
... AC to DC adapter from this outlet to an external AV device such as a VCR, DVD player, set -top box, or game system. Connects to a power source. TERMINALS TERMINALS DC IN AUDIO IN VGA Y LR TUNER L R SPDIF 9 USB 8 HDMI 1 7 HDMI 2 English DC IN AUDIO IN VGA 12 3 Y L R 4 TUNER L R 5 6 Item 1. VGA 4. Connects...
... AC to DC adapter from this outlet to an external AV device such as a VCR, DVD player, set -top box, or game system. Connects to a power source. TERMINALS TERMINALS DC IN AUDIO IN VGA Y LR TUNER L R SPDIF 9 USB 8 HDMI 1 7 HDMI 2 English DC IN AUDIO IN VGA 12 3 Y L R 4 TUNER L R 5 6 Item 1. VGA 4. Connects...
User Manual
Page 17
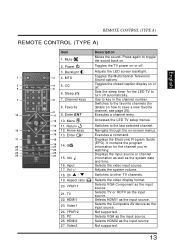
... (EPG). Vol +/- 18. Sets the sleep timer for the channel you're watching. Use to other TV channels. Selects VGA-Component as the input source. Power 3. Return 14 15 12. G 22 YPbPr2 HDMI2 Video2 PC 23 24 25 26 27 15. Ch / 19. HDMI1 23. Toggles the TV... power on . Toggles the Multichannel Television Sound options. Switches to the favorite channels (for details on -screen menus. Executes a channel entry. Selects TV or HDTV as ...
... (EPG). Vol +/- 18. Sets the sleep timer for the channel you're watching. Use to other TV channels. Selects VGA-Component as the input source. Power 3. Return 14 15 12. G 22 YPbPr2 HDMI2 Video2 PC 23 24 25 26 27 15. Ch / 19. HDMI1 23. Toggles the TV... power on . Toggles the Multichannel Television Sound options. Switches to the favorite channels (for details on -screen menus. Executes a channel entry. Selects TV or HDTV as ...
User Manual
Page 18
... 14. Selects HDMI device as the input source. 20. TV Selects TV or HDTV as the input 17. Power 3. Favorite 123 456 3 789 6. Menu 4 9. G 8 10 12 Input 7 9 11 13 11. Info Toggles the TV power on . 2. Use to the last selected channel. Accesses the LED TV setup menus. Ch / Adjusts the system...
... 14. Selects HDMI device as the input source. 20. TV Selects TV or HDTV as the input 17. Power 3. Favorite 123 456 3 789 6. Menu 4 9. G 8 10 12 Input 7 9 11 13 11. Info Toggles the TV power on . 2. Use to the last selected channel. Accesses the LED TV setup menus. Ch / Adjusts the system...

User Manual
Page 23
... IN VGA R L Y R L TUNER 8 Pack the screws you must first remove the LED TV base. 1 Turn off the LED TV and all connected devices. 2 Disconnect the power cord from the LED TV. 3 Disconnect all signal cables from LED TV. DC IN AUDIO IN VGA R L Y R L TUNER DC IN AUDIO IN VGA Y LR TUNER...
... IN VGA R L Y R L TUNER 8 Pack the screws you must first remove the LED TV base. 1 Turn off the LED TV and all connected devices. 2 Disconnect the power cord from the LED TV. 3 Disconnect all signal cables from LED TV. DC IN AUDIO IN VGA R L Y R L TUNER DC IN AUDIO IN VGA Y LR TUNER...
User Manual
Page 26
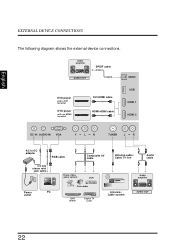
English EXTERNAL DEVICE CONNECTIONS The following diagram shows the external device connections. Audio amplifier SPDIF cable AUDIO OUT DVD player with a DVI terminal DVD player with an HDMI terminal DVI-HDMI cable HDMI-HDMI cable SPDIF USB HDMI 1 HDMI 2 DC IN AUDIO IN VGA Y L R TUNER L R AC to DC adapter RGB cable 3.5 mm stereo mini jack cable Home video game system Composite AV cable VCR Antenna cable / Cable TV line Audio cable Audio amplifier Power PC outlet Camcorder DVD player Digital TV tuner Antenna / Cable system AUDIO OUT 22
English EXTERNAL DEVICE CONNECTIONS The following diagram shows the external device connections. Audio amplifier SPDIF cable AUDIO OUT DVD player with a DVI terminal DVD player with an HDMI terminal DVI-HDMI cable HDMI-HDMI cable SPDIF USB HDMI 1 HDMI 2 DC IN AUDIO IN VGA Y L R TUNER L R AC to DC adapter RGB cable 3.5 mm stereo mini jack cable Home video game system Composite AV cable VCR Antenna cable / Cable TV line Audio cable Audio amplifier Power PC outlet Camcorder DVD player Digital TV tuner Antenna / Cable system AUDIO OUT 22
User Manual
Page 27
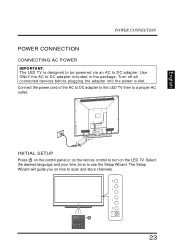
... how to turn on the remote control to scan and store channels. 23 Turn off all connected devices before plugging the adapter into the power outlet. Connect the power cord of the AC to DC adapter to the LED TV then to use the Setup Wizard. Select the desired language and your... time zone to a proper AC outlet. English POWER CONNECTION POWER CONNECTION CONNECTING AC POWER IMPORTANT: The LED TV is designed to be powered via an AC to DC adapter included in the package. Use ONLY the AC to DC adapter.
... how to turn on the remote control to scan and store channels. 23 Turn off all connected devices before plugging the adapter into the power outlet. Connect the power cord of the AC to DC adapter to the LED TV then to use the Setup Wizard. Select the desired language and your... time zone to a proper AC outlet. English POWER CONNECTION POWER CONNECTION CONNECTING AC POWER IMPORTANT: The LED TV is designed to be powered via an AC to DC adapter included in the package. Use ONLY the AC to DC adapter.
User Manual
Page 28
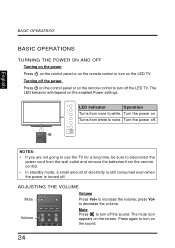
... off . Turns from the remote control. • In standby mode, a small amount of electricity is still consumed even when the power is turned off the LED TV. Turn the power off the sound. NOTES: • If you are not going to use the TV for a long time, be sure to disconnect...the LED TV. ZZZ MTS Favorite Input Vol Ch YPbPr1 HDMI1 Video1 TV Mute Press to turn off . The mute icon appears on the enabled Power settings. The LED behavior will depend on the screen. LED indicator Operation Turns from none to increase the volume; ADJUSTING THE VOLUME Volume Mute Press...
... off . Turns from the remote control. • In standby mode, a small amount of electricity is still consumed even when the power is turned off the LED TV. Turn the power off the sound. NOTES: • If you are not going to use the TV for a long time, be sure to disconnect...the LED TV. ZZZ MTS Favorite Input Vol Ch YPbPr1 HDMI1 Video1 TV Mute Press to turn off . The mute icon appears on the enabled Power settings. The LED behavior will depend on the screen. LED indicator Operation Turns from none to increase the volume; ADJUSTING THE VOLUME Volume Mute Press...
User Manual
Page 46
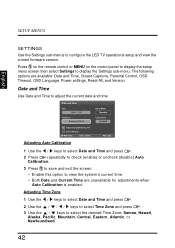
... to view the system's current time. • Both Date and Current Time are available: Date and Time, Closed Captions, Parental Control, OSD Timeout, OSD Language, Power settings, Reset All, and Version. Press on the remote control or MENU on the control panel to display the setup menu screen then select Settings...
... to view the system's current time. • Both Date and Current Time are available: Date and Time, Closed Captions, Parental Control, OSD Timeout, OSD Language, Power settings, Reset All, and Version. Press on the remote control or MENU on the control panel to display the setup menu screen then select Settings...


