User Manual
Page 3
... INSTRUCTIONS 5 Circuit Overload 6 Power Cord Protection 6 Ventilation 6 WARNINGS AND PRECAUTIONS 7 ANTENNA INSTALLATION SAFETY 8 Lightning 8 Power lines 8 CLEANING THE LED TV 9 Dolby-Digital Notice 9 PACKAGE CONTENTS 10 CONTROL PANEL 11 TERMINALS 12 REMOTE CONTROL (TYPE A 13 REMOTE CONTROL (TYPE B 14 REMOTE CONTROL OPERATION... 16 INSTALLING THE REMOTE CONTROL BATTERIES .. 16 REMOTE CONTROL TRANSMISSION RANGE .......... 16 LED TV BASE 17 INSTALLING THE LED TV BASE 17 REMOVING THE LED TV BASE 19 ANTENNA CONNECTION 20 OUTDOOR ANTENNA CONNECTION 20 CABLE...
... INSTRUCTIONS 5 Circuit Overload 6 Power Cord Protection 6 Ventilation 6 WARNINGS AND PRECAUTIONS 7 ANTENNA INSTALLATION SAFETY 8 Lightning 8 Power lines 8 CLEANING THE LED TV 9 Dolby-Digital Notice 9 PACKAGE CONTENTS 10 CONTROL PANEL 11 TERMINALS 12 REMOTE CONTROL (TYPE A 13 REMOTE CONTROL (TYPE B 14 REMOTE CONTROL OPERATION... 16 INSTALLING THE REMOTE CONTROL BATTERIES .. 16 REMOTE CONTROL TRANSMISSION RANGE .......... 16 LED TV BASE 17 INSTALLING THE LED TV BASE 17 REMOVING THE LED TV BASE 19 ANTENNA CONNECTION 20 OUTDOOR ANTENNA CONNECTION 20 CABLE...
User Manual
Page 4
English TABLE OF CONTENTS EXTERNAL DEVICE CONNECTIONS 21 POWER CONNECTION 23 CONNECTING AC POWER 23 INITIAL SETUP 23 BASIC OPERATIONS 24 TURNING THE POWER ON AND OFF 24 ADJUSTING THE VOLUME 24 CHANGING CHANNELS 25 SELECTING THE INPUT SOURCE 25 ADJUSTING THE DISPLAY FORMAT 26 ADJUSTING THE LED BACKLIGHT 26 SETUP MENUS 27 SETUP MENU OPERATION 27 PICTURE 28 AUDIO 32 VIEW MODE 36 VIEW MODE (VGA 36 TV PROGRAM 38 SETTINGS 42 WALL MOUNT OPTION 54 WALL MOUNT INSTALLATION REMINDERS 54 TROUBLESHOOTING 55 SPECIFICATIONS 58 ii
English TABLE OF CONTENTS EXTERNAL DEVICE CONNECTIONS 21 POWER CONNECTION 23 CONNECTING AC POWER 23 INITIAL SETUP 23 BASIC OPERATIONS 24 TURNING THE POWER ON AND OFF 24 ADJUSTING THE VOLUME 24 CHANGING CHANNELS 25 SELECTING THE INPUT SOURCE 25 ADJUSTING THE DISPLAY FORMAT 26 ADJUSTING THE LED BACKLIGHT 26 SETUP MENUS 27 SETUP MENU OPERATION 27 PICTURE 28 AUDIO 32 VIEW MODE 36 VIEW MODE (VGA 36 TV PROGRAM 38 SETTINGS 42 WALL MOUNT OPTION 54 WALL MOUNT INSTALLATION REMINDERS 54 TROUBLESHOOTING 55 SPECIFICATIONS 58 ii
User Manual
Page 6
... user to related operating and maintenance instructions in the user documentation accompanying the product. CAUTION: The power supply outlet should be located near the LED TV and should be operated with a protective earthing connection. Always use the appropriate AC cord that may be easily accessible. CSA • Japan - Electric Appliance Control...
... user to related operating and maintenance instructions in the user documentation accompanying the product. CAUTION: The power supply outlet should be located near the LED TV and should be operated with a protective earthing connection. Always use the appropriate AC cord that may be easily accessible. CSA • Japan - Electric Appliance Control...
User Manual
Page 7
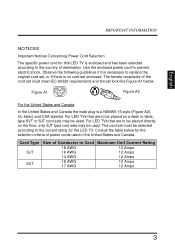
... are to be placed directly on a desk or table, type SVT or SJT cord sets may be used. For LED TVs that are to be placed on the floor, only SJT type cord sets may be selected according to the country of the cord set enclosed. ... cord set must meet IEC-60320 requirements and should look like Figure A1 below for the LED TV. English IMPORTANT INFORMATION NOTICES Important Notices Concerning Power Cord Selection The specific power cord for this LED TV is enclosed and has been selected according to the current rating for the selection criteria of...
... are to be placed directly on a desk or table, type SVT or SJT cord sets may be used. For LED TVs that are to be placed on the floor, only SJT type cord sets may be selected according to the country of the cord set enclosed. ... cord set must meet IEC-60320 requirements and should look like Figure A1 below for the LED TV. English IMPORTANT INFORMATION NOTICES Important Notices Concerning Power Cord Selection The specific power cord for this LED TV is enclosed and has been selected according to the current rating for the selection criteria of...
User Manual
Page 8
... an outlet on , the user is connected. • If the interference persists even after performing the above measures, consult the Westinghouse Service Center or an experienced radio/TV technician for a Class B digital device, pursuant to part 15 of the FCC Rules. If this device. 4 However, there is used in a particular installation. FCC...
... an outlet on , the user is connected. • If the interference persists even after performing the above measures, consult the Westinghouse Service Center or an experienced radio/TV technician for a Class B digital device, pursuant to part 15 of the FCC Rules. If this device. 4 However, there is used in a particular installation. FCC...
User Manual
Page 9
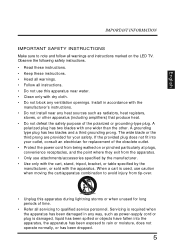
... apparatus. If the provided plug does not fit into the apparatus, the apparatus has been exposed to avoid injury from being walked on the LED TV. A grounding type plug has two blades and a third grounding prong. Observe the following safety instructions. • Read these instructions. • Keep these instructions. • Heed...
... apparatus. If the provided plug does not fit into the apparatus, the apparatus has been exposed to avoid injury from being walked on the LED TV. A grounding type plug has two blades and a third grounding prong. Observe the following safety instructions. • Read these instructions. • Keep these instructions. • Heed...
User Manual
Page 10
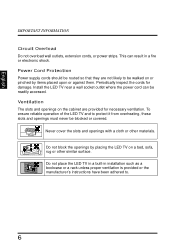
...the cabinet are not likely to . 6 Power Cord Protection Power supply cords should be routed so that they are provided for damage. Install the LED TV near a wall socket outlet where the power cord can result in installation such as a bookcase or a rack unless proper ventilation is provided or the ... have been adhered to be blocked or covered. Never cover the slots and openings with a cloth or other similar surface. Do not place the LED TV in a built-in a fire or electronic shock. Do not block the openings by items placed upon or against them. This can be readily accessed....
...the cabinet are not likely to . 6 Power Cord Protection Power supply cords should be routed so that they are provided for damage. Install the LED TV near a wall socket outlet where the power cord can result in installation such as a bookcase or a rack unless proper ventilation is provided or the ... have been adhered to be blocked or covered. Never cover the slots and openings with a cloth or other similar surface. Do not place the LED TV in a built-in a fire or electronic shock. Do not block the openings by items placed upon or against them. This can be readily accessed....
User Manual
Page 11
...and remove the batteries from the remote control. • Avoid touching the display screen by : - Logging on the LED TV, audio/video cables, or power cord. • If the LED TV emits smoke, abnormal noise, or a strange odor, immediately turn it (e.g. flower vase). • Do not place heavy ...objects on to splash on it off and contact the Westinghouse Service Center by hand or any object. • Never remove the...
...and remove the batteries from the remote control. • Avoid touching the display screen by : - Logging on the LED TV, audio/video cables, or power cord. • If the LED TV emits smoke, abnormal noise, or a strange odor, immediately turn it (e.g. flower vase). • Do not place heavy ...objects on to splash on it off and contact the Westinghouse Service Center by hand or any object. • Never remove the...
User Manual
Page 12
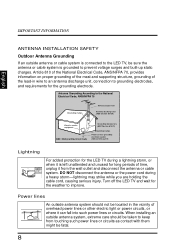
... charges. IMPORTANT INFORMATION English ANTENNA INSTALLATION SAFETY Outdoor Antenna Grounding If an outside antenna or cable system is connected to the LED TV, be sure the antenna or cable system is left unattended and unused for long periods of time, unplug it from touching such... Section 810-21) Grounding clamps Power service grounding electrode system (NEC Art 250 part H) Lightning Z Z Z For added protection for the LED TV during a heavy storm-lightning may strike while you are holding the cable cord, causing serious injury. Antenna Grounding According to the National Electrical Code,...
... charges. IMPORTANT INFORMATION English ANTENNA INSTALLATION SAFETY Outdoor Antenna Grounding If an outside antenna or cable system is connected to the LED TV, be sure the antenna or cable system is left unattended and unused for long periods of time, unplug it from touching such... Section 810-21) Grounding clamps Power service grounding electrode system (NEC Art 250 part H) Lightning Z Z Z For added protection for the LED TV during a heavy storm-lightning may strike while you are holding the cable cord, causing serious injury. Antenna Grounding According to the National Electrical Code,...
User Manual
Page 13
... dust and other particles. 2 If it is still not clean, apply a small amount of Dolby Laboratories. 9 English IMPORTANT INFORMATION CLEANING THE LED TV • Make sure the LED TV is turned off and the power cord is still not clean, apply a small amount of non-ammonia, non-alcohol based glass cleaner onto...
... dust and other particles. 2 If it is still not clean, apply a small amount of Dolby Laboratories. 9 English IMPORTANT INFORMATION CLEANING THE LED TV • Make sure the LED TV is turned off and the power cord is still not clean, apply a small amount of non-ammonia, non-alcohol based glass cleaner onto...
User Manual
Page 14
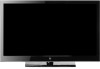
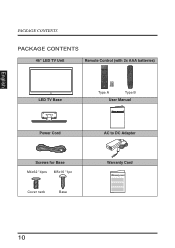
English PACKAGE CONTENTS PACKAGE CONTENTS 46" LED TV Unit LED TV Base Remote Control (with 2x AAA batteries) C.C. ZZZ MTS Favorite A B C ENT D Enter Input Vol Ch YPbPr1 HDMI1 Video1 TV YPbPr2 HDMI2 Video2 PC RMT-11 Type A Type B User Manual Power Cord Screws for Base M4x62 *4pcs M5x16 *1pc Cover neck Base AC to DC Adapter Warranty Card 10
English PACKAGE CONTENTS PACKAGE CONTENTS 46" LED TV Unit LED TV Base Remote Control (with 2x AAA batteries) C.C. ZZZ MTS Favorite A B C ENT D Enter Input Vol Ch YPbPr1 HDMI1 Video1 TV YPbPr2 HDMI2 Video2 PC RMT-11 Type A Type B User Manual Power Cord Screws for Base M4x62 *4pcs M5x16 *1pc Cover neck Base AC to DC Adapter Warranty Card 10
User Manual
Page 15
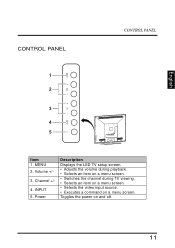
Channel +/- 4. Volume +/- 3. Toggles the power on a menu screen. INPUT 5. Power Description Displays the LED TV setup screen. • Adjusts the volume during playback. • Selects an item on a menu screen. • Switches the channel during TV viewing. • Selects an item on a menu screen. • Selects the video input source. • Executes a command on and off. 11 English CONTROL PANEL CONTROL PANEL MENU 1 2 3 4 5 INPUT CH VOL DC IN AUDIO IN VGA Y LR TUNER L R Item 1. MENU 2.
Channel +/- 4. Volume +/- 3. Toggles the power on a menu screen. INPUT 5. Power Description Displays the LED TV setup screen. • Adjusts the volume during playback. • Selects an item on a menu screen. • Switches the channel during TV viewing. • Selects an item on a menu screen. • Selects the video input source. • Executes a command on and off. 11 English CONTROL PANEL CONTROL PANEL MENU 1 2 3 4 5 INPUT CH VOL DC IN AUDIO IN VGA Y LR TUNER L R Item 1. MENU 2.
User Manual
Page 16
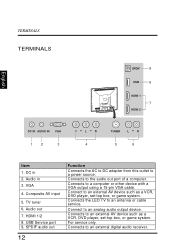
... from this outlet to an external AV device such as a VCR, DVD player, set -top box, or game system. For service only. Composite AV input 5. TV tuner 6. Connects to the audio out port of a computer. USB Service port 9. Connects to an external digital audio receiver. 12 Audio in 2. Connects the LED...
... from this outlet to an external AV device such as a VCR, DVD player, set -top box, or game system. For service only. Composite AV input 5. TV tuner 6. Connects to the audio out port of a computer. USB Service port 9. Connects to an external digital audio receiver. 12 Audio in 2. Connects the LED...
User Manual
Page 17
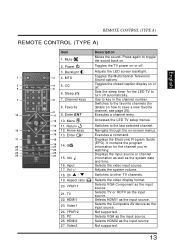
...supported. MTS 3 4 5. Sleep zZz 7 B 8 7. Info RMT-11 16. Accesses the LED TV setup menus. Executes a command. It contains the program information for the LED TV to other TV channels. Selects HDMI1 as the input source. Video1 24. Press again to save a new favorite channel, ... C.C. ZZZ MTS 5 Favorite 6 A 6. Menu Enter 13 11. Return 14 15 12. Enter Input 17 Vol Ch 18 20 YPbPr1 HDMI1 Video1 TV 19 21 14. YPbPr1 21. Video2 Description Mutes the sound. Sets the sleep timer for the channel you're watching. Executes a channel entry. Selects...
...supported. MTS 3 4 5. Sleep zZz 7 B 8 7. Info RMT-11 16. Accesses the LED TV setup menus. Executes a command. It contains the program information for the LED TV to other TV channels. Selects HDMI1 as the input source. Video1 24. Press again to save a new favorite channel, ... C.C. ZZZ MTS 5 Favorite 6 A 6. Menu Enter 13 11. Return 14 15 12. Enter Input 17 Vol Ch 18 20 YPbPr1 HDMI1 Video1 TV 19 21 14. YPbPr1 21. Video2 Description Mutes the sound. Sets the sleep timer for the channel you're watching. Executes a channel entry. Selects...
User Manual
Page 18
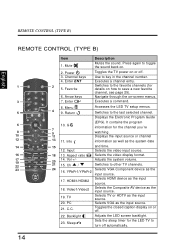
...keys 7. Switches to key in the channel number. Input and time. Switches to toggle the sound back on or off automatically. 14 TV Selects TV or HDTV as the input source. 19. Navigate through the on or off. Displays the Electronic Program Guide (EPG). YPbPr1/YPbPr2 input ...turn off . 22. Use to the last selected channel. Power 3. Aspect ratio Selects the video display format. 17 19 22 YPbPr2 HDMI2 Video2 TV C.C. Mute Mutes the sound. PC Selects VGA as the input 17. Menu 4 9. Executes a command. It contains the program information for the...
...keys 7. Switches to key in the channel number. Input and time. Switches to toggle the sound back on or off automatically. 14 TV Selects TV or HDTV as the input source. 19. Navigate through the on or off. Displays the Electronic Program Guide (EPG). YPbPr1/YPbPr2 input ...turn off . 22. Use to the last selected channel. Power 3. Aspect ratio Selects the video display format. 17 19 22 YPbPr2 HDMI2 Video2 TV C.C. Mute Mutes the sound. PC Selects VGA as the input 17. Menu 4 9. Executes a command. It contains the program information for the...
User Manual
Page 20
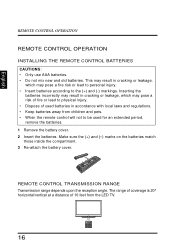
... batteries incorrectly may result in cracking or leakage, which may result in accordance with local laws and regulations. • Keep batteries away from the LED TV. 16
... batteries incorrectly may result in cracking or leakage, which may result in accordance with local laws and regulations. • Keep batteries away from the LED TV. 16
User Manual
Page 21
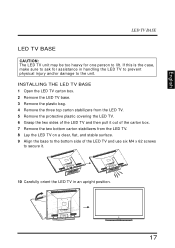
... the plastic bag. 4 Remove the three top carton stabilizers from the LED TV. 5 Remove the protective plastic covering the LED TV. 6 Grasp the two sides of the LED TV and then pull it . English LED TV BASE LED TV BASE CAUTION: The LED TV unit may be too heavy for assistance in an upright position. If... secure it out of the carton box. 7 Remove the two bottom carton stabilizers from the LED TV. 8 Lay the LED TV on a clear, flat, and stable surface. 9 Align the base to the bottom side of the LED TV and use six M4 x 62 screws to lift. DC IN AUDIO IN VGA R L Y R L TUNER DC...
... the plastic bag. 4 Remove the three top carton stabilizers from the LED TV. 5 Remove the protective plastic covering the LED TV. 6 Grasp the two sides of the LED TV and then pull it . English LED TV BASE LED TV BASE CAUTION: The LED TV unit may be too heavy for assistance in an upright position. If... secure it out of the carton box. 7 Remove the two bottom carton stabilizers from the LED TV. 8 Lay the LED TV on a clear, flat, and stable surface. 9 Align the base to the bottom side of the LED TV and use six M4 x 62 screws to lift. DC IN AUDIO IN VGA R L Y R L TUNER DC...
User Manual
Page 22
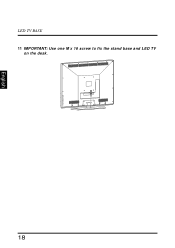
DC IN AUDIO IN VGA Y LR TUNER L English 18 LED TV BASE 11 IMPORTANT: Use one M x 16 screw to fix the stand base and LED TV on the desk.
DC IN AUDIO IN VGA Y LR TUNER L English 18 LED TV BASE 11 IMPORTANT: Use one M x 16 screw to fix the stand base and LED TV on the desk.

User Manual
Page 23
... IN AUDIO IN VGA R L Y R L TUNER DC IN AUDIO IN VGA Y LR TUNER L R 6 Remove the screws securing the base to the desk. 5 Lay the LED TV on a clear, flat, and stable surface. DC IN AUDIO IN VGA R L Y R L TUNER DC IN AUDIO IN VGA R L Y R L TUNER DC IN AUDIO IN VGA R L Y R L TUNER 8 Pack ...the screws you removed in step 4 and 6 together with the LED TV base for shipping or storage) or you want to change the installation to a wall mount option, you intend to repack the LED...
... IN AUDIO IN VGA R L Y R L TUNER DC IN AUDIO IN VGA Y LR TUNER L R 6 Remove the screws securing the base to the desk. 5 Lay the LED TV on a clear, flat, and stable surface. DC IN AUDIO IN VGA R L Y R L TUNER DC IN AUDIO IN VGA R L Y R L TUNER DC IN AUDIO IN VGA R L Y R L TUNER 8 Pack ...the screws you removed in step 4 and 6 together with the LED TV base for shipping or storage) or you want to change the installation to a wall mount option, you intend to repack the LED...
User Manual
Page 24
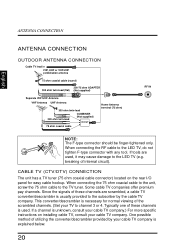
...to channel 3 or 4. Typically one of these channels are used . CABLE TV (CTV/DTV) CONNECTION The unit has a TV tuner (75 ohm coaxial cable connector) located on installing cable TV, consult your TV to the LED TV (e.g. When connecting the 75 ohm coaxial cable to the unit, screw the .... 20 breaking of the scrambled channels. (Set your cable TV company. Some cable TV companies offer premium pay channels. When connecting the RF cable to the TV tuner. ANTENNA CONNECTION English ANTENNA CONNECTION OUTDOOR ANTENNA CONNECTION Cable TV lead in VHF, UHF or VHF/UHF combination antenna 75...
...to channel 3 or 4. Typically one of these channels are used . CABLE TV (CTV/DTV) CONNECTION The unit has a TV tuner (75 ohm coaxial cable connector) located on installing cable TV, consult your TV to the LED TV (e.g. When connecting the 75 ohm coaxial cable to the unit, screw the .... 20 breaking of the scrambled channels. (Set your cable TV company. Some cable TV companies offer premium pay channels. When connecting the RF cable to the TV tuner. ANTENNA CONNECTION English ANTENNA CONNECTION OUTDOOR ANTENNA CONNECTION Cable TV lead in VHF, UHF or VHF/UHF combination antenna 75...


