User Manual
Page 3
... 8 Lightning 8 Power lines 8 CLEANING THE LED TV 9 Dolby-Digital Notice 9 PACKAGE CONTENTS 10 CONTROL PANEL 11 TERMINALS 12 REMOTE CONTROL (TYPE A 13 REMOTE CONTROL (TYPE B 14 REMOTE CONTROL OPERATION 16 INSTALLING THE REMOTE CONTROL BATTERIES .. 16 REMOTE CONTROL TRANSMISSION RANGE .......... 16 LED TV BASE 17 INSTALLING THE LED TV BASE 17 REMOVING THE LED TV...
... 8 Lightning 8 Power lines 8 CLEANING THE LED TV 9 Dolby-Digital Notice 9 PACKAGE CONTENTS 10 CONTROL PANEL 11 TERMINALS 12 REMOTE CONTROL (TYPE A 13 REMOTE CONTROL (TYPE B 14 REMOTE CONTROL OPERATION 16 INSTALLING THE REMOTE CONTROL BATTERIES .. 16 REMOTE CONTROL TRANSMISSION RANGE .......... 16 LED TV BASE 17 INSTALLING THE LED TV BASE 17 REMOVING THE LED TV...
User Manual
Page 11
... immediately turn it (e.g. The LED TV interior contains high-voltage parts. Logging on to www.wde.com. - Contacting the Westinghouse Customer Service at [email protected]. 7 E-mailing us at (800) 701-0680. - You may be seriously injured if ...airtight compartments, or in areas where it can cause liquid to splash on it off and contact the Westinghouse Service Center by hand or any object. • Never remove the rear cover. English IMPORTANT INFORMATION WARNINGS..., unplug the unit and remove the batteries from the remote control. • Avoid touching the display screen by : -
... immediately turn it (e.g. The LED TV interior contains high-voltage parts. Logging on to www.wde.com. - Contacting the Westinghouse Customer Service at [email protected]. 7 E-mailing us at (800) 701-0680. - You may be seriously injured if ...airtight compartments, or in areas where it can cause liquid to splash on it off and contact the Westinghouse Service Center by hand or any object. • Never remove the rear cover. English IMPORTANT INFORMATION WARNINGS..., unplug the unit and remove the batteries from the remote control. • Avoid touching the display screen by : -
User Manual
Page 14
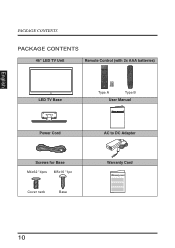
English PACKAGE CONTENTS PACKAGE CONTENTS 46" LED TV Unit LED TV Base Remote Control (with 2x AAA batteries) C.C. ZZZ MTS Favorite A B C ENT D Enter Input Vol Ch YPbPr1 HDMI1 Video1 TV YPbPr2 HDMI2 Video2 PC RMT-11 Type A Type B User Manual Power Cord Screws for Base M4x62 *4pcs M5x16 *1pc Cover neck Base AC to DC Adapter Warranty Card 10
English PACKAGE CONTENTS PACKAGE CONTENTS 46" LED TV Unit LED TV Base Remote Control (with 2x AAA batteries) C.C. ZZZ MTS Favorite A B C ENT D Enter Input Vol Ch YPbPr1 HDMI1 Video1 TV YPbPr2 HDMI2 Video2 PC RMT-11 Type A Type B User Manual Power Cord Screws for Base M4x62 *4pcs M5x16 *1pc Cover neck Base AC to DC Adapter Warranty Card 10
User Manual
Page 17
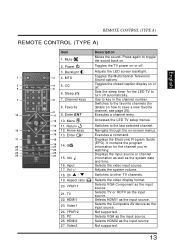
REMOTE CONTROL (TYPE A) English REMOTE CONTROL (TYPE A) Item 1. ZZZ MTS 5 Favorite 6 A 6. Enter ENT 12 10. G 22 YPbPr2 HDMI2 Video2 PC 23 24 25 26 27 15. Vol +/- 18. Adjusts the ...
REMOTE CONTROL (TYPE A) English REMOTE CONTROL (TYPE A) Item 1. ZZZ MTS 5 Favorite 6 A 6. Enter ENT 12 10. G 22 YPbPr2 HDMI2 Video2 PC 23 24 25 26 27 15. Vol +/- 18. Adjusts the ...
User Manual
Page 18
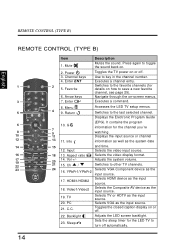
... Video1 18 13. Backlight 23. Switches to key in the channel number. HDMI1/HDMI2 source. 18. TV Selects TV or HDTV as the 16. REMOTE CONTROL (TYPE B) English REMOTE CONTROL (TYPE B) Item Description 1. Aspect ratio Selects the video display format. 17 19 22 YPbPr2 HDMI2 Video2 TV C.C. Press again to other TV...
... Video1 18 13. Backlight 23. Switches to key in the channel number. HDMI1/HDMI2 source. 18. TV Selects TV or HDTV as the 16. REMOTE CONTROL (TYPE B) English REMOTE CONTROL (TYPE B) Item Description 1. Aspect ratio Selects the video display format. 17 19 22 YPbPr2 HDMI2 Video2 TV C.C. Press again to other TV...
User Manual
Page 19
MTS REMOTE CONTROL (TYPE B) Description Toggles the Multichannel Television Sound options. English 15 Item 24.
MTS REMOTE CONTROL (TYPE B) Description Toggles the Multichannel Television Sound options. English 15 Item 24.
User Manual
Page 20
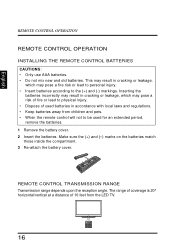
...horizontal/vertical at a distance of used for an extended period, remove the batteries. 1 Remove the battery cover. 2 Insert the batteries. REMOTE CONTROL TRANSMISSION RANGE Transmission range depends upon the reception angle. Make sure the (+) and (-) marks on the batteries match those inside the... compartment. 3 Re-attach the battery cover. English REMOTE CONTROL OPERATION REMOTE CONTROL OPERATION INSTALLING THE REMOTE CONTROL BATTERIES CAUTIONS: • Only use AAA batteries. • Do not mix new and old batteries. This ...
...horizontal/vertical at a distance of used for an extended period, remove the batteries. 1 Remove the battery cover. 2 Insert the batteries. REMOTE CONTROL TRANSMISSION RANGE Transmission range depends upon the reception angle. Make sure the (+) and (-) marks on the batteries match those inside the... compartment. 3 Re-attach the battery cover. English REMOTE CONTROL OPERATION REMOTE CONTROL OPERATION INSTALLING THE REMOTE CONTROL BATTERIES CAUTIONS: • Only use AAA batteries. • Do not mix new and old batteries. This ...
User Manual
Page 27
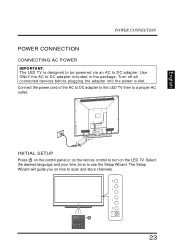
... before plugging the adapter into the power outlet. DC IN AUDIO IN VGA Y LR TUNER L R INITIAL SETUP Press on the control panel or on the remote control to turn on how to scan and store channels. 23 The Setup Wizard will guide you on the LED TV.
... before plugging the adapter into the power outlet. DC IN AUDIO IN VGA Y LR TUNER L R INITIAL SETUP Press on the control panel or on the remote control to turn on how to scan and store channels. 23 The Setup Wizard will guide you on the LED TV.
User Manual
Page 28
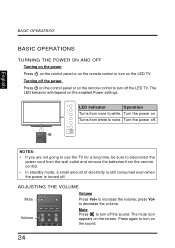
... going to use the TV for a long time, be sure to disconnect the power cord from the wall outlet and remove the batteries from the remote control. • In standby mode, a small amount of electricity is still consumed even when the power is turned off the LED TV. Press again to... LED TV. English BASIC OPERATIONS BASIC OPERATIONS TURNING THE POWER ON AND OFF Turning on the power Press on the control panel or on the remote control to turn on the sound. 24 Turning off the power Press on the control panel or on . Turn the power on the...
... going to use the TV for a long time, be sure to disconnect the power cord from the wall outlet and remove the batteries from the remote control. • In standby mode, a small amount of electricity is still consumed even when the power is turned off the LED TV. Press again to... LED TV. English BASIC OPERATIONS BASIC OPERATIONS TURNING THE POWER ON AND OFF Turning on the power Press on the control panel or on the remote control to turn on the sound. 24 Turning off the power Press on the control panel or on . Turn the power on the...
User Manual
Page 29
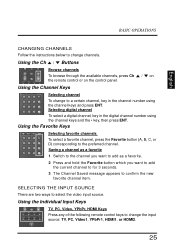
...Using the Individual Input Keys YPbPr1 HDMI1 Video1 TV YPbPr2 HDMI2 Video2 PC TV, PC, Video, YPbPr, HDMI Keys Press any of the following remote control keys to select the video input source. Using the Favorite Keys C.C. ZZZ MTS Favorite A B C ENT D Selecting favorite channels To select...the Ch / Buttons Input Vol Ch YPbPr1 HDMI1 Video1 TV Browse channels To browse through the available channels, press Ch / on the remote control or on the control panel. Selecting digital channel To select a digital channel, key in the channel number using the channel keys...
...Using the Individual Input Keys YPbPr1 HDMI1 Video1 TV YPbPr2 HDMI2 Video2 PC TV, PC, Video, YPbPr, HDMI Keys Press any of the following remote control keys to select the video input source. Using the Favorite Keys C.C. ZZZ MTS Favorite A B C ENT D Selecting favorite channels To select...the Ch / Buttons Input Vol Ch YPbPr1 HDMI1 Video1 TV Browse channels To browse through the available channels, press Ch / on the remote control or on the control panel. Selecting digital channel To select a digital channel, key in the channel number using the channel keys...
User Manual
Page 31
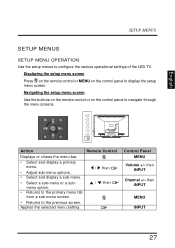
...screen. then INPUT Channel +/- then INPUT MENU INPUT 27 MENU VOL Enter CH SPDIF USB HDMI 1 HDMI 2 DC IN AUDIO IN VGA Y L R TUNER L R INPUT Action Remote Control Displays or closes the menu bar. • Select and display a primary menu. • Adjust sub-menu options. • Select and display a sub-menu. / then... MENUS SETUP MENUS SETUP MENU OPERATION Use the setup menus to the previous screen. Navigating the setup menu screen Use the buttons on the remote control or on the control panel to navigate through the menu screens. Applies the selected menu setting.
...screen. then INPUT Channel +/- then INPUT MENU INPUT 27 MENU VOL Enter CH SPDIF USB HDMI 1 HDMI 2 DC IN AUDIO IN VGA Y L R TUNER L R INPUT Action Remote Control Displays or closes the menu bar. • Select and display a primary menu. • Adjust sub-menu options. • Select and display a sub-menu. / then... MENUS SETUP MENUS SETUP MENU OPERATION Use the setup menus to the previous screen. Navigating the setup menu screen Use the buttons on the remote control or on the control panel to navigate through the menu screens. Applies the selected menu setting.
User Manual
Page 32
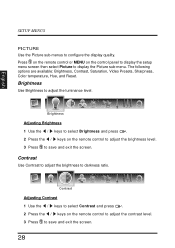
... Brightness 1 Use the / keys to select Brightness and press . 2 Press the / keys on the remote control to adjust the brightness level. 3 Press to save and exit the screen. Press on the remote control or MENU on the remote control to adjust the contrast level. 3 Press to save and exit the screen. 28 Contrast...
... Brightness 1 Use the / keys to select Brightness and press . 2 Press the / keys on the remote control to adjust the brightness level. 3 Press to save and exit the screen. Press on the remote control or MENU on the remote control to adjust the contrast level. 3 Press to save and exit the screen. 28 Contrast...

User Manual
Page 33
SETUP MENUS English Saturation Adjusting Saturation 1 Use the / keys to select Saturation and press . 2 Press the / keys on the remote control to adjust the saturation level. 3 Press to its original recording condition. • Game: Uses increased brightness and response time level for enjoying video games. &#...
SETUP MENUS English Saturation Adjusting Saturation 1 Use the / keys to select Saturation and press . 2 Press the / keys on the remote control to adjust the saturation level. 3 Press to its original recording condition. • Game: Uses increased brightness and response time level for enjoying video games. &#...
User Manual
Page 34
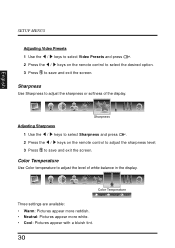
... Use Sharpness to adjust the level of the display. Sharpness Adjusting Sharpness 1 Use the / keys to select Sharpness and press . 2 Press the / keys on the remote control to select the desired option. 3 Press to save and exit the screen. English SETUP MENUS Adjusting Video Presets 1 Use the / keys to select Video...
... Use Sharpness to adjust the level of the display. Sharpness Adjusting Sharpness 1 Use the / keys to select Sharpness and press . 2 Press the / keys on the remote control to select the desired option. 3 Press to save and exit the screen. English SETUP MENUS Adjusting Video Presets 1 Use the / keys to select Video...
User Manual
Page 35
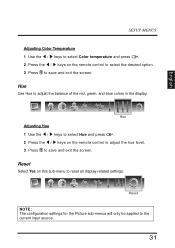
Reset Select Yes on the remote control to adjust the hue level. 3 Press to save and exit the screen. Reset NOTE: The configuration settings for the Picture sub-menus will only ... the current input source. 31 English SETUP MENUS Adjusting Color Temperature 1 Use the / keys to select Color temperature and press . 2 Press the / keys on the remote control to select the desired option. 3 Press to reset all display-related settings.
Reset Select Yes on the remote control to adjust the hue level. 3 Press to save and exit the screen. Reset NOTE: The configuration settings for the Picture sub-menus will only ... the current input source. 31 English SETUP MENUS Adjusting Color Temperature 1 Use the / keys to select Color temperature and press . 2 Press the / keys on the remote control to select the desired option. 3 Press to reset all display-related settings.
User Manual
Page 36
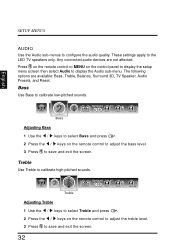
... sounds. Treble Use Treble to calibrate low-pitched sounds. Bass Adjusting Bass 1 Use the / keys to select Bass and press . 2 Press the / keys on the remote control to adjust the bass level. 3 Press to save and exit the screen. The following options are not affected. Treble Adjusting Treble 1 Use the / keys... SETUP MENUS AUDIO Use the Audio sub-menus to the LED TV speakers only. These settings apply to configure the audio quality. Press on the remote control or MENU on the remote control to adjust the treble level. 3 Press to save and exit the screen. 32
... sounds. Treble Use Treble to calibrate low-pitched sounds. Bass Adjusting Bass 1 Use the / keys to select Bass and press . 2 Press the / keys on the remote control to adjust the bass level. 3 Press to save and exit the screen. The following options are not affected. Treble Adjusting Treble 1 Use the / keys... SETUP MENUS AUDIO Use the Audio sub-menus to the LED TV speakers only. These settings apply to configure the audio quality. Press on the remote control or MENU on the remote control to adjust the treble level. 3 Press to save and exit the screen. 32

User Manual
Page 37
Surround 3D ON OFF Adjusting Surround 3D 1 Use the / keys to select Surround 3D and press . 2 Press the / keys on the remote control to adjust the balance level. 3 Press to save and exit the screen. English SETUP MENUS Balance Use Balance to toggle the Surround 3D on and off. Balance Adjusting Balance 1 Use the / keys to select Balance and press . 2 Press the / keys on the remote control to select ON or OFF. 3 Press to save and exit the screen. 33 Surround 3D Use this sub-menu to adjust the sound balance between the L/R speakers.
Surround 3D ON OFF Adjusting Surround 3D 1 Use the / keys to select Surround 3D and press . 2 Press the / keys on the remote control to adjust the balance level. 3 Press to save and exit the screen. English SETUP MENUS Balance Use Balance to toggle the Surround 3D on and off. Balance Adjusting Balance 1 Use the / keys to select Balance and press . 2 Press the / keys on the remote control to select ON or OFF. 3 Press to save and exit the screen. 33 Surround 3D Use this sub-menu to adjust the sound balance between the L/R speakers.

User Manual
Page 38
.... • Flat: Sets the equalizer to save and exit the screen. Audio Presets Use this sub-menu to toggle the LED TV speakers on the remote control to select ON or OFF. 3 Press to the Flat mode. • Custom: Uses the customized settings. 34
.... • Flat: Sets the equalizer to save and exit the screen. Audio Presets Use this sub-menu to toggle the LED TV speakers on the remote control to select ON or OFF. 3 Press to the Flat mode. • Custom: Uses the customized settings. 34
User Manual
Page 39
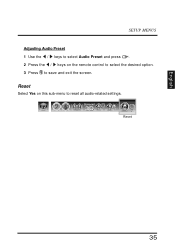
Reset 35 English SETUP MENUS Adjusting Audio Preset 1 Use the / keys to select Audio Preset and press . 2 Press the / keys on this sub-menu to save and exit the screen. Reset Select Yes on the remote control to select the desired option. 3 Press to reset all audio-related settings.
Reset 35 English SETUP MENUS Adjusting Audio Preset 1 Use the / keys to select Audio Preset and press . 2 Press the / keys on this sub-menu to save and exit the screen. Reset Select Yes on the remote control to select the desired option. 3 Press to reset all audio-related settings.
User Manual
Page 40
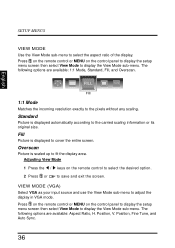
... the control panel to display the setup menu screen then select View Mode to display the View Mode sub-menu. Press on the remote control or MENU on the remote control to select the desired option. 2 Press or to display the View Mode sub-menu. Overscan Picture is displayed to adjust the... SETUP MENUS VIEW MODE Use the View Mode sub-menu to fit the display area. The following options are available: Aspect Ratio, H. Press on the remote control or MENU on the control panel to display the setup menu screen then select View Mode to save and exit the screen.
... the control panel to display the setup menu screen then select View Mode to display the View Mode sub-menu. Press on the remote control or MENU on the remote control to select the desired option. 2 Press or to display the View Mode sub-menu. Overscan Picture is displayed to adjust the... SETUP MENUS VIEW MODE Use the View Mode sub-menu to fit the display area. The following options are available: Aspect Ratio, H. Press on the remote control or MENU on the control panel to display the setup menu screen then select View Mode to save and exit the screen.


