
English Manual
Page 2
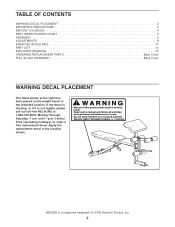
WARNING • Misuse of ICON Health & Fitness, Inc. 2 WEIDER is not legible, please call our toll-free HELPLINE at the right has been placed on or around machine. • Replace label if damaged... free replacement decal. Apply the replacement decal in the indicated location. until 7 p.m. Central Time (excluding holidays), to use. • Do not allow children on the weight bench in the location shown. ! TABLE OF CONTENTS WARNING DECAL PLACEMENT 2 IMPORTANT PRECAUTIONS 3 BEFORE YOU BEGIN 4 PART IDENTIFICATION CHART 5 ASSEMBLY 6 ADJUSTMENTS 9 EXERCISE GUIDELINES 11 ...
WARNING • Misuse of ICON Health & Fitness, Inc. 2 WEIDER is not legible, please call our toll-free HELPLINE at the right has been placed on or around machine. • Replace label if damaged... free replacement decal. Apply the replacement decal in the indicated location. until 7 p.m. Central Time (excluding holidays), to use. • Do not allow children on the weight bench in the location shown. ! TABLE OF CONTENTS WARNING DECAL PLACEMENT 2 IMPORTANT PRECAUTIONS 3 BEFORE YOU BEGIN 4 PART IDENTIFICATION CHART 5 ASSEMBLY 6 ADJUSTMENTS 9 EXERCISE GUIDELINES 11 ...

English Manual
Page 3
... feel pain or dizziness while exercising, stop immediately and begin cooling down. Use the weight bench only as described in this product. 3 Do not use the weight bench. If you use the weight bench in any exercise program, consult your physician. Replace any worn parts immediately. 8. This... 7. Always wear athletic shoes for persons over the age of this manual before using the weight bench. Keep hands and feet away from the weight bench at all users of the weight bench are adequately informed of 12 and pets away from moving parts. 6. Do not place more...
... feel pain or dizziness while exercising, stop immediately and begin cooling down. Use the weight bench only as described in this product. 3 Do not use the weight bench. If you use the weight bench in any exercise program, consult your physician. Replace any worn parts immediately. 8. This... 7. Always wear athletic shoes for persons over the age of this manual before using the weight bench. Keep hands and feet away from the weight bench at all users of the weight bench are adequately informed of 12 and pets away from moving parts. 6. Do not place more...
English Manual
Page 4
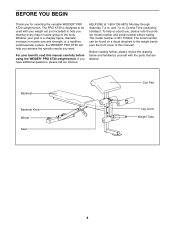
... Time (excluding holidays). If you for selecting the versatile WEIDER® PRO XT20 weight bench. The model number is a shapely figure, dramatic increase in muscle size and strength, or a healthier cardiovascular system, the WEIDER® PRO XT20 will help us assist you want. To help you achieve... the specific results you , please note the product model number and serial number before using the WEIDER® PRO XT20 weight bench. BEFORE YOU BEGIN Thank you have additional questions, please call our toll-free HELPLINE at 1-800-736-6879, Monday ...
... Time (excluding holidays). If you for selecting the versatile WEIDER® PRO XT20 weight bench. The model number is a shapely figure, dramatic increase in muscle size and strength, or a healthier cardiovascular system, the WEIDER® PRO XT20 will help us assist you want. To help you achieve... the specific results you , please note the product model number and serial number before using the WEIDER® PRO XT20 weight bench. BEFORE YOU BEGIN Thank you have additional questions, please call our toll-free HELPLINE at 1-800-736-6879, Monday ...
English Manual
Page 6
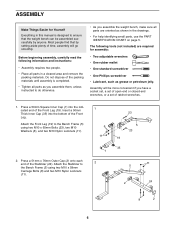
... wrenches, or a set of ratchet wrenches. 1. Attach the Stabilizer to ensure that by anyone. Most people find that the weight bench can be more convenient if you assemble the weight bench, make sure all parts in a cleared area and remove the packing materials. Assembly will be assembled successfully by setting aside plenty... (not included) are oriented as shown in this manual is completed. • Tighten all parts as you assemble them, unless instructed to the Bench Frame (5) using two M10 x 58mm Carriage Bolts (8) and two M10 Nylon Locknuts (11). 1 2 23 5 23 19 35 11 5 2 24...
... wrenches, or a set of ratchet wrenches. 1. Attach the Stabilizer to ensure that by anyone. Most people find that the weight bench can be more convenient if you assemble the weight bench, make sure all parts in a cleared area and remove the packing materials. Assembly will be assembled successfully by setting aside plenty... (not included) are oriented as shown in this manual is completed. • Tighten all parts as you assemble them, unless instructed to the Bench Frame (5) using two M10 x 58mm Carriage Bolts (8) and two M10 Nylon Locknuts (11). 1 2 23 5 23 19 35 11 5 2 24...
English Manual
Page 8
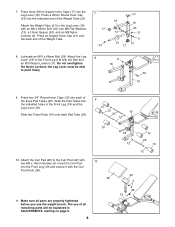
... three Pad Tubes (25). Attach the Leg 8 Lever (18) to pivot freely. 11 18 39 19 9. Do not overtighten the Nylon Locknut; The use the weight bench. Press a 25mm Round Inner Cap (33) into the indicated holes in ADJUSTMENTS, starting on page 9. 8 36 19 Press two 3/4" Round Inner Caps (12) into the... 12 10 25 10 12 32 3 11. Insert the Curl Post into each Pad Tube (25). 9 10 12 19 25 12 10 10. Attach the Weight Tube (21) to the Curl Post (32) with the Bolt and an M10 Nylon Locknut (11). Press three 45mm Square Inner Caps (17) into the...
... three Pad Tubes (25). Attach the Leg 8 Lever (18) to pivot freely. 11 18 39 19 9. Do not overtighten the Nylon Locknut; The use the weight bench. Press a 25mm Round Inner Cap (33) into the indicated holes in ADJUSTMENTS, starting on page 9. 8 36 19 Press two 3/4" Round Inner Caps (12) into the... 12 10 25 10 12 32 3 11. Insert the Curl Post into each Pad Tube (25). 9 10 12 19 25 12 10 10. Attach the Weight Tube (21) to the Curl Post (32) with the Bolt and an M10 Nylon Locknut (11). Press three 45mm Square Inner Caps (17) into the...
English Manual
Page 9
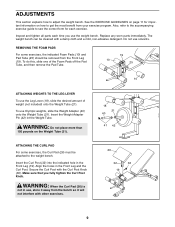
... THE CURL PAD For some exercises, the indicated Foam Pads (10) and Pad Tube (25) should be attached to adjust the weight bench. Make sure that you use the weight bench. Secure the Curl Post with a damp cloth and a mild, non-abrasive detergent. WARNING: Do not place more than 150 pounds... on how to see the correct form for important information on the Weight Tube (21). ADJUSTMENTS This section explains how to the weight bench. See the EXERCISE GUIDELINES on page 11 for each time you fully tighten the Curl Post Knob. WARNING: When...
... THE CURL PAD For some exercises, the indicated Foam Pads (10) and Pad Tube (25) should be attached to adjust the weight bench. Make sure that you use the weight bench. Secure the Curl Post with a damp cloth and a mild, non-abrasive detergent. WARNING: Do not place more than 150 pounds... on how to see the correct form for important information on the Weight Tube (21). ADJUSTMENTS This section explains how to the weight bench. See the EXERCISE GUIDELINES on page 11 for each time you fully tighten the Curl Post Knob. WARNING: When...
English Manual
Page 14
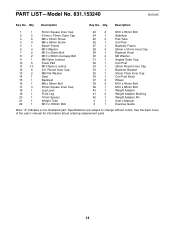
...2 14 1 15 1 16 1 17 3 18 1 19 1 20 1 21 1 22 1 50mm Square Inner Cap 51mm x 76mm Outer Cap M6 x 16mm Screw M6 x 64mm Screw Bench Frame M10 Washer M10 x 22mm Bolt M10 x 58mm Carriage Bolt M8 Nylon Locknut Foam Pad M10 Nylon Locknut 3/4" Round Inner Cap M8 Flat Washer Seat...Cap Curl Post 25mm Round Inner Cap Backrest Bracket 50mm Thick Inner Cap Curl Post Knob Wheel M10 x 45mm Bolt M10 x 68mm Bolt Weight Adapter Weight Adapter Bushing Weight Adapter Pin User's Manual Exercise Guide Note: "#" indicates a non-illustrated part. PART LIST-Model No. 831.153240 R0701B Key No. Qty...
...2 14 1 15 1 16 1 17 3 18 1 19 1 20 1 21 1 22 1 50mm Square Inner Cap 51mm x 76mm Outer Cap M6 x 16mm Screw M6 x 64mm Screw Bench Frame M10 Washer M10 x 22mm Bolt M10 x 58mm Carriage Bolt M8 Nylon Locknut Foam Pad M10 Nylon Locknut 3/4" Round Inner Cap M8 Flat Washer Seat...Cap Curl Post 25mm Round Inner Cap Backrest Bracket 50mm Thick Inner Cap Curl Post Knob Wheel M10 x 45mm Bolt M10 x 68mm Bolt Weight Adapter Weight Adapter Bushing Weight Adapter Pin User's Manual Exercise Guide Note: "#" indicates a non-illustrated part. PART LIST-Model No. 831.153240 R0701B Key No. Qty...
English Manual
Page 16
... The MODEL NUMBER of the product (831.153240) • The NAME of the product (WEIDER® PRO XT20 weight bench) • The PART NUMBER and DESCRIPTION of the decal. See the front cover of this SEARS WEIGHT BENCH, contact the nearest SEARS Service Center throughout the United States and SEARS will repair or replace ...or ordering parts, please be replaced, call the toll-free numbers listed at the left. This warranty does not apply when the WEIGHT BENCH is missing • or you visit your WEIDER® PRO XT20 are available for rental purposes. Model No. 831.153240 QUESTIONS?
... The MODEL NUMBER of the product (831.153240) • The NAME of the product (WEIDER® PRO XT20 weight bench) • The PART NUMBER and DESCRIPTION of the decal. See the front cover of this SEARS WEIGHT BENCH, contact the nearest SEARS Service Center throughout the United States and SEARS will repair or replace ...or ordering parts, please be replaced, call the toll-free numbers listed at the left. This warranty does not apply when the WEIGHT BENCH is missing • or you visit your WEIDER® PRO XT20 are available for rental purposes. Model No. 831.153240 QUESTIONS?


