
English Manual
Page 1
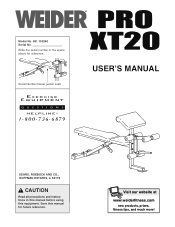
Write the serial number in this manual before using this manual for reference. Visit our website at www.weiderfitness.com new products, prizes, fitness tips, and much more! Serial Number Decal (under seat) USER'S MANUAL SEARS, ROEBUCK AND CO., HOFFMAN ESTATES, IL 60179 CAUTION Read all precautions and instructions in the space above for future reference. Save this equipment. Model No. 831.153240 Serial No.
Write the serial number in this manual before using this manual for reference. Visit our website at www.weiderfitness.com new products, prizes, fitness tips, and much more! Serial Number Decal (under seat) USER'S MANUAL SEARS, ROEBUCK AND CO., HOFFMAN ESTATES, IL 60179 CAUTION Read all precautions and instructions in the space above for future reference. Save this equipment. Model No. 831.153240 Serial No.
English Manual
Page 2
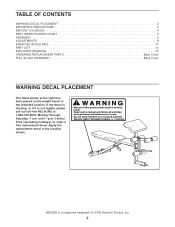
... BEGIN 4 PART IDENTIFICATION CHART 5 ASSEMBLY 6 ADJUSTMENTS 9 EXERCISE GUIDELINES 11 PART LIST 14 EXPLODED DRAWING 15 ORDERING REPLACEMENT PARTS Back Cover FULL 90-DAY WARRANTY Back Cover WARNING DECAL PLACEMENT The decal shown at 1-800-736-6879, Monday through Saturday, 7 a.m. Central Time (excluding holidays), to use. • Do not allow children on the weight bench in the location shown. ! WEIDER is not legible, please call our toll-free HELPLINE...
... BEGIN 4 PART IDENTIFICATION CHART 5 ASSEMBLY 6 ADJUSTMENTS 9 EXERCISE GUIDELINES 11 PART LIST 14 EXPLODED DRAWING 15 ORDERING REPLACEMENT PARTS Back Cover FULL 90-DAY WARRANTY Back Cover WARNING DECAL PLACEMENT The decal shown at 1-800-736-6879, Monday through Saturday, 7 a.m. Central Time (excluding holidays), to use. • Do not allow children on the weight bench in the location shown. ! WEIDER is not legible, please call our toll-free HELPLINE...

English Manual
Page 3
... pain or dizziness while exercising, stop immediately and begin cooling down. WARNING: Before beginning this manual before using the weight bench. Do not use only. Cover the floor beneath the weight bench to ensure that all users of the weight bench are adequately informed of this manual. 2. Replace any commercial, rental, or institutional setting. 4. The weight bench is especially important for home use the weight bench in any worn parts immediately. 8. Do not place...
... pain or dizziness while exercising, stop immediately and begin cooling down. WARNING: Before beginning this manual before using the weight bench. Do not use only. Cover the floor beneath the weight bench to ensure that all users of the weight bench are adequately informed of this manual. 2. Replace any commercial, rental, or institutional setting. 4. The weight bench is especially important for home use the weight bench in any worn parts immediately. 8. Do not place...
English Manual
Page 4
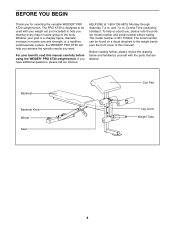
... questions, please call our toll-free HELPLINE at 1-800-736-6879, Monday through Saturday, 7 a.m. Central Time (excluding holidays). Whether your weight set (not included) to the weight bench (see the front cover of the body. To help us assist you, please note the product model number and serial number before using the WEIDER® PRO XT20 weight bench. Before reading further, please review the drawing below and familiarize...
... questions, please call our toll-free HELPLINE at 1-800-736-6879, Monday through Saturday, 7 a.m. Central Time (excluding holidays). Whether your weight set (not included) to the weight bench (see the front cover of the body. To help us assist you, please note the product model number and serial number before using the WEIDER® PRO XT20 weight bench. Before reading further, please review the drawing below and familiarize...
English Manual
Page 5
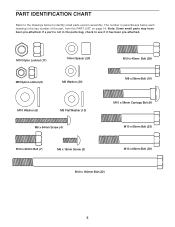
... Screw (4) M10 x 22mm Bolt (7) M6 x 16mm Screw (3) M10 x 45mm Bolt (38) M8 x 58mm Bolt (16) M10 x 58mm Carriage Bolt (8) M10 x 65mm Bolt (23) M10 x 68mm Bolt (39) M10 x 180mm Bolt (22) 5 PART IDENTIFICATION CHART Refer to the drawings below each drawing is not in assembly. If a part is the key number of the part, from the PART LIST on page 14. The number in parentheses below to identify small parts used...
... Screw (4) M10 x 22mm Bolt (7) M6 x 16mm Screw (3) M10 x 45mm Bolt (38) M8 x 58mm Bolt (16) M10 x 58mm Carriage Bolt (8) M10 x 65mm Bolt (23) M10 x 68mm Bolt (39) M10 x 180mm Bolt (22) 5 PART IDENTIFICATION CHART Refer to the drawings below each drawing is not in assembly. If a part is the key number of the part, from the PART LIST on page 14. The number in parentheses below to identify small parts used...
English Manual
Page 6
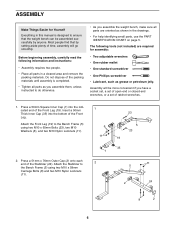
... manual is completed. • Tighten all parts as you assemble them, unless instructed to do otherwise. • As you have a socket set, a set of open-end or closed-end wrenches, or a set of ratchet wrenches. 1. Insert a 50mm Thick Inner Cap (35) into the indicated end of the Front Leg (19). Attach the Front Leg (19) to the Bench Frame (5) using two M10 x 58mm Carriage Bolts...
... manual is completed. • Tighten all parts as you assemble them, unless instructed to do otherwise. • As you have a socket set, a set of open-end or closed-end wrenches, or a set of ratchet wrenches. 1. Insert a 50mm Thick Inner Cap (35) into the indicated end of the Front Leg (19). Attach the Front Leg (19) to the Bench Frame (5) using two M10 x 58mm Carriage Bolts...
English Manual
Page 7
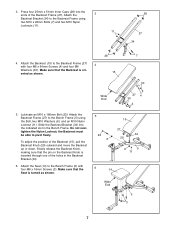
... Knob (29) outward and move the Backrest up or down. Make sure that the pin on the Backrest Knob is ori- 3. Press four 25mm x 51mm Inner Caps (28) into the indicated slot in the Backrest Bracket (34). 6. Slowly release the Backrest Knob, making sure that the Seat is turned as... Frame (27). To adjust the position of the holes in the Bench Frame. Attach the Seat (14) to the Bench Frame (5) using two M10 x 22mm Bolts (7) and two M10 Nylon Locknuts (11). 11 28 27 34 4. Do not overtighten the Nylon Locknut; Lubricate an M10 x 180mm Bolt (22). ented as shown...
... Knob (29) outward and move the Backrest up or down. Make sure that the pin on the Backrest Knob is ori- 3. Press four 25mm x 51mm Inner Caps (28) into the indicated slot in the Backrest Bracket (34). 6. Slowly release the Backrest Knob, making sure that the Seat is turned as... Frame (27). To adjust the position of the holes in the Bench Frame. Attach the Seat (14) to the Bench Frame (5) using two M10 x 22mm Bolts (7) and two M10 Nylon Locknuts (11). 11 28 27 34 4. Do not overtighten the Nylon Locknut; Lubricate an M10 x 180mm Bolt (22). ented as shown...
English Manual
Page 8
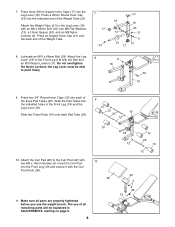
... Press two 3/4" Round Inner Caps (12) into the Leg Lever (18). Press an Angled Outer Cap (31) onto the back end of all parts are properly tightened before you use the weight bench. Insert the Curl Post into the Front Leg (19) and secure it with the Bolt ...Knob (36). 10 26 18 12 10 25 10 12 32 3 11. 7. Lubricate an M10 x 68mm Bolt (39). Press a 25mm Round Inner Cap (33) into the indicated holes in ADJUSTMENTS, starting on page 9. 8 36 19 Attach the Leg 8 Lever (18) to pivot freely. 11 18 39 19 9. Do not overtighten the Nylon Locknut; The use of the Weight...
... Press two 3/4" Round Inner Caps (12) into the Leg Lever (18). Press an Angled Outer Cap (31) onto the back end of all parts are properly tightened before you use the weight bench. Insert the Curl Post into the Front Leg (19) and secure it with the Bolt ...Knob (36). 10 26 18 12 10 25 10 12 32 3 11. 7. Lubricate an M10 x 68mm Bolt (39). Press a 25mm Round Inner Cap (33) into the indicated holes in ADJUSTMENTS, starting on page 9. 8 36 19 Attach the Leg 8 Lever (18) to pivot freely. 11 18 39 19 9. Do not overtighten the Nylon Locknut; The use of the Weight...
English Manual
Page 9
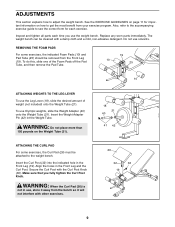
... the Weight Tube (21). Insert the Weight Adapter Pin (42) int the Weight Tube. WARNING: Do not place more than 150 pounds on how to the weight bench. Align the holes in the Front Leg (19). Replace any worn parts immediately. REMOVING THE FOAM PADS For some exercises, the Curl Pad (26) must be removed from your exercise program. Make sure that you use the Leg Lever...
... the Weight Tube (21). Insert the Weight Adapter Pin (42) int the Weight Tube. WARNING: Do not place more than 150 pounds on how to the weight bench. Align the holes in the Front Leg (19). Replace any worn parts immediately. REMOVING THE FOAM PADS For some exercises, the Curl Pad (26) must be removed from your exercise program. Make sure that you use the Leg Lever...
English Manual
Page 10
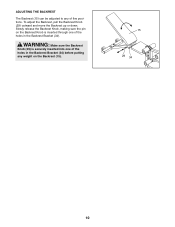
WARNING: Make sure the Backrest Knob (29) is inserted through one of the holes in the Backrest Bracket (34) before putting any of the holes in the Backrest Bracket (34). To adjust the Backrest, pull the Backrest Knob (29) outward and move the Backrest up or down. ADJUSTING THE BACKREST The Backrest (15) can be adjusted to any weight on the Backrest Knob is securely inserted into one of five positions. Slowly release the Backrest Knob, making sure the pin on the Backrest (15). 15 29 34 10
WARNING: Make sure the Backrest Knob (29) is inserted through one of the holes in the Backrest Bracket (34) before putting any of the holes in the Backrest Bracket (34). To adjust the Backrest, pull the Backrest Knob (29) outward and move the Backrest up or down. ADJUSTING THE BACKREST The Backrest (15) can be adjusted to any weight on the Backrest Knob is securely inserted into one of five positions. Slowly release the Backrest Knob, making sure the pin on the Backrest (15). 15 29 34 10
English Manual
Page 11
... be sensitive to your muscles by changing the number of weight used • by completing more oxygen to your body's signals. The combination of weight training and aerobic exercise will continually adapt and grow as the number of repetitions or sets completed, is the highest. Each workout should progress at any exercise program. The repetitions in any time while exercising, stop immediately and begin cooling down...
... be sensitive to your muscles by changing the number of weight used • by completing more oxygen to your body's signals. The combination of weight training and aerobic exercise will continually adapt and grow as the number of repetitions or sets completed, is the highest. Each workout should progress at any exercise program. The repetitions in any time while exercising, stop immediately and begin cooling down...
English Manual
Page 12
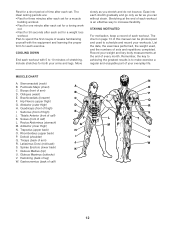
... the numbers of calf) F L L. The chart on page 13 of thigh) E J. Sartorius (front of this manual can without strain. Trapezius (upper back) H O. Latissimus Dorsi (mid back) J S. Hamstring (back of each workout. out. • Rest for 30 seconds after each set for both your workouts. STAYING MOTIVATED For motivation, keep a record of leg) W. List the date, the exercises performed, the weight used...
... the numbers of calf) F L L. The chart on page 13 of thigh) E J. Sartorius (front of this manual can without strain. Trapezius (upper back) H O. Latissimus Dorsi (mid back) J S. Hamstring (back of each workout. out. • Rest for 30 seconds after each set for both your workouts. STAYING MOTIVATED For motivation, keep a record of leg) W. List the date, the exercises performed, the weight used...
English Manual
Page 13
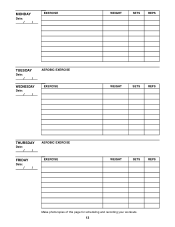
MONDAY Date: / / EXERCISE WEIGHT SETS REPS TUESDAY Date: / / WEDNESDAY Date: / / AEROBIC EXERCISE EXERCISE WEIGHT SETS REPS THURSDAY Date: / / FRIDAY Date: / / AEROBIC EXERCISE EXERCISE WEIGHT SETS REPS Make photocopies of this page for scheduling and recording your workouts. 13
MONDAY Date: / / EXERCISE WEIGHT SETS REPS TUESDAY Date: / / WEDNESDAY Date: / / AEROBIC EXERCISE EXERCISE WEIGHT SETS REPS THURSDAY Date: / / FRIDAY Date: / / AEROBIC EXERCISE EXERCISE WEIGHT SETS REPS Make photocopies of this page for scheduling and recording your workouts. 13
English Manual
Page 14
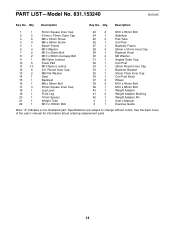
... 2 42 1 # 1 # 1 M10 x 65mm Bolt Stabilizer Pad Tube Curl Pad Backrest Frame 25mm x 51mm Inner Cap Backrest Knob M6 Washer Angled Outer Cap Curl Post 25mm Round Inner Cap Backrest Bracket 50mm Thick Inner Cap Curl Post Knob Wheel M10 x 45mm Bolt M10 x 68mm Bolt Weight Adapter Weight Adapter Bushing Weight Adapter Pin User's Manual Exercise Guide Note: "#" indicates a non-illustrated part. Description Key No. PART LIST-Model No. 831.153240 R0701B...
... 2 42 1 # 1 # 1 M10 x 65mm Bolt Stabilizer Pad Tube Curl Pad Backrest Frame 25mm x 51mm Inner Cap Backrest Knob M6 Washer Angled Outer Cap Curl Post 25mm Round Inner Cap Backrest Bracket 50mm Thick Inner Cap Curl Post Knob Wheel M10 x 45mm Bolt M10 x 68mm Bolt Weight Adapter Weight Adapter Bushing Weight Adapter Pin User's Manual Exercise Guide Note: "#" indicates a non-illustrated part. Description Key No. PART LIST-Model No. 831.153240 R0701B...
English Manual
Page 15
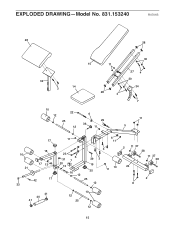
EXPLODED DRAWING-Model No. 831.153240 R0701B 26 28 30 15 11 32 14 3 27 4 30 34 28 4 7 10 12 22 25 12 6 29 36 11 11 5 17 10 21 18 9 17 13 42 17 33 41 40 41 11 6 11 3 23 31 20 13 6 1 16 12 39 3 19 35 25 12 10 11 2 11 37 38 11 37 38 24 2 8 10 12 25 12 15
EXPLODED DRAWING-Model No. 831.153240 R0701B 26 28 30 15 11 32 14 3 27 4 30 34 28 4 7 10 12 22 25 12 6 29 36 11 11 5 17 10 21 18 9 17 13 42 17 33 41 40 41 11 6 11 3 23 31 20 13 6 1 16 12 39 3 19 35 25 12 10 11 2 11 37 38 11 37 38 24 2 8 10 12 25 12 15
English Manual
Page 16
... find the location of your WEIDER® PRO XT20 are available for rental purposes. See the front cover of this manual to find that: • you need to state. This warranty does not apply when the WEIGHT BENCH is missing • or you need to be prepared to defect in material or workmanship in China © 2001 ICON Health & Fitness, Inc. All replacement parts are listed on...
... find the location of your WEIDER® PRO XT20 are available for rental purposes. See the front cover of this manual to find that: • you need to state. This warranty does not apply when the WEIGHT BENCH is missing • or you need to be prepared to defect in material or workmanship in China © 2001 ICON Health & Fitness, Inc. All replacement parts are listed on...


